
User Manual
Page 2
...Manual Revisions Revision 1.00 1.01 Date March 30, 2015 July 7, 2015 • First version • Minor changes Description Trademarks D-Link and the D-Link logo are trademarks of Google Inc. All other countries. Chrome™ browser, Google Play™ and Android™ are trademarks or ...organization of Apple Inc. App StoreSM is a service mark of such revisions or changes. Copyright © 2015 by D-Link Corporation, Inc. D-Link DCH-S160 User Manual i Internet Explorer®, Windows® and the Windows logo are trademarks of the Microsoft group of their respective companies...
...Manual Revisions Revision 1.00 1.01 Date March 30, 2015 July 7, 2015 • First version • Minor changes Description Trademarks D-Link and the D-Link logo are trademarks of Google Inc. All other countries. Chrome™ browser, Google Play™ and Android™ are trademarks or ...organization of Apple Inc. App StoreSM is a service mark of such revisions or changes. Copyright © 2015 by D-Link Corporation, Inc. D-Link DCH-S160 User Manual i Internet Explorer®, Windows® and the Windows logo are trademarks of the Microsoft group of their respective companies...
User Manual
Page 3
Table of Contents Table of Contents Preface i Manual Revisions i Trademarks i Product Overview 1 Package Contents 1 System Requirements 2 Introduction 3 Hardware Overview 4 Front/Bottom 4 Side 5 Wireless Installation Tips 6 Hardware Installation 7 Setting Up Your Device 8 mydlink™ Home 10 My Devices 10 Information 11 My Actions 12 My Places 15 Troubleshooting 17 Technical Specifications 18 Safety Instructions 19 Contacting Technical Support 24 Warranty 25 Registration 32 D-Link DCH-S160 User Manual ii
Table of Contents Table of Contents Preface i Manual Revisions i Trademarks i Product Overview 1 Package Contents 1 System Requirements 2 Introduction 3 Hardware Overview 4 Front/Bottom 4 Side 5 Wireless Installation Tips 6 Hardware Installation 7 Setting Up Your Device 8 mydlink™ Home 10 My Devices 10 Information 11 My Actions 12 My Places 15 Troubleshooting 17 Technical Specifications 18 Safety Instructions 19 Contacting Technical Support 24 Warranty 25 Registration 32 D-Link DCH-S160 User Manual ii
User Manual
Page 4
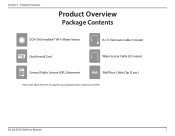
D-Link DCH-S160 User Manual 1 Product Overview Product Overview Package Contents DCH-S160 mydlink™ Wi-Fi Water Sensor RJ-11 Extension Cable (1 meter) Quick Install Card Quick Install Card Water Sensor Cable (0.5 meter) General Public License (GPL) Statement Wall/Floor Cable Clip (3 pcs.) If any of the above items are missing from your package, please contact your reseller. Section 1 -
D-Link DCH-S160 User Manual 1 Product Overview Product Overview Package Contents DCH-S160 mydlink™ Wi-Fi Water Sensor RJ-11 Extension Cable (1 meter) Quick Install Card Quick Install Card Water Sensor Cable (0.5 meter) General Public License (GPL) Statement Wall/Floor Cable Clip (3 pcs.) If any of the above items are missing from your package, please contact your reseller. Section 1 -
User Manual
Page 5
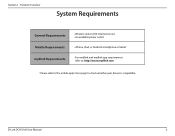
Section 1 - D-Link DCH-S160 User Manual 2 Product Overview System Requirements General Requirements Mobile Requirements mydlink Requirements • Wireless router with Internet service • An available power outlet • iPhone, iPad, or Android smartphone or tablet1 • For mydlink and mydlink app requirements refer to: http://www.mydlink.com 1Please refer to the mobile app's store page to check whether your device is compatible.
Section 1 - D-Link DCH-S160 User Manual 2 Product Overview System Requirements General Requirements Mobile Requirements mydlink Requirements • Wireless router with Internet service • An available power outlet • iPhone, iPad, or Android smartphone or tablet1 • For mydlink and mydlink app requirements refer to: http://www.mydlink.com 1Please refer to the mobile app's store page to check whether your device is compatible.
User Manual
Page 6
...™ Home app available for iPhone®, iPad®, and iPod touch® and Android™ devices. Compact, Convenient Design The DCH-S160's compact design is inconspicuous, so it will not detract from the look of the sensor by using any RJ-11 phone extension cable....to an existing network. Its intuitive user interface and simple instructions let you easily manage your home safe. D-Link DCH-S160 User Manual 3 You can quickly and easily connect the DCH-S160 to -use mydlink™ Home app, you detect water leaks before serious flooding occurs. If the water sensor...
...™ Home app available for iPhone®, iPad®, and iPod touch® and Android™ devices. Compact, Convenient Design The DCH-S160's compact design is inconspicuous, so it will not detract from the look of the sensor by using any RJ-11 phone extension cable....to an existing network. Its intuitive user interface and simple instructions let you easily manage your home safe. D-Link DCH-S160 User Manual 3 You can quickly and easily connect the DCH-S160 to -use mydlink™ Home app, you detect water leaks before serious flooding occurs. If the water sensor...
User Manual
Page 7
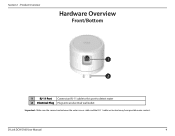
Product Overview Hardware Overview Front/Bottom 1 2 1 RJ-11 Port Connect an RJ-11 cable to this port to detect water 2 Electrical Plug Plugs into an electrical wall outlet Important: Make sure the connection between the water sensor cable and the RJ-11 cable are located away from possible water contact. D-Link DCH-S160 User Manual 4 Section 1 -
Product Overview Hardware Overview Front/Bottom 1 2 1 RJ-11 Port Connect an RJ-11 cable to this port to detect water 2 Electrical Plug Plugs into an electrical wall outlet Important: Make sure the connection between the water sensor cable and the RJ-11 cable are located away from possible water contact. D-Link DCH-S160 User Manual 4 Section 1 -

User Manual
Page 8
D-Link DCH-S160 User Manual 5 Product Overview Hardware Overview Side 1 2 3 Solid Green The device is connected to the network Blinking Green (slow) WPS is working Blinking Orange 1 Status ... to connect the water sensor to your wireless router using Wi-Fi Protected Setup. 3 Reset Button Press the reset button for 5 seconds to reset the DCH-S160 back to the factory default settings. Section 1 -
D-Link DCH-S160 User Manual 5 Product Overview Hardware Overview Side 1 2 3 Solid Green The device is connected to the network Blinking Green (slow) WPS is working Blinking Orange 1 Status ... to connect the water sensor to your wireless router using Wi-Fi Protected Setup. 3 Reset Button Press the reset button for 5 seconds to reset the DCH-S160 back to the factory default settings. Section 1 -
User Manual
Page 9
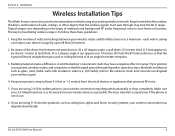
..., wireless routers, and computers so that is 0.5 meters thick (1.5 feet appears to a minimum - The key to follow these basic guidelines: 1. Keep your existing wireless network. D-Link DCH-S160 User Manual 6 each wall or ceiling can appear over 14 meters (45 feet) thick! If you are using your product away (at an angle) for...
..., wireless routers, and computers so that is 0.5 meters thick (1.5 feet appears to a minimum - The key to follow these basic guidelines: 1. Keep your existing wireless network. D-Link DCH-S160 User Manual 6 each wall or ceiling can appear over 14 meters (45 feet) thick! If you are using your product away (at an angle) for...
User Manual
Page 10
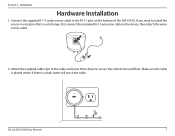
Attach the supplied cable clips to the cable and screw them down to secure the cable to install the sensor in a location that is a leak, water will touch the cable. Installation Hardware Installation 1. Make sure the cable is placed where if there is out of the DCH-S160. DCH-S160 D-Link DCH-S160 User Manual 7 Connect the supplied RJ-11 water sensor cable to the RJ-11 port on the bottom of range, first connect the included RJ-11 extension cable to the device, then attach the water sensor cable. 2. If you want to the wall/floor. Section 2 -
Attach the supplied cable clips to the cable and screw them down to secure the cable to install the sensor in a location that is a leak, water will touch the cable. Installation Hardware Installation 1. Make sure the cable is placed where if there is out of the DCH-S160. DCH-S160 D-Link DCH-S160 User Manual 7 Connect the supplied RJ-11 water sensor cable to the RJ-11 port on the bottom of range, first connect the included RJ-11 extension cable to the device, then attach the water sensor cable. 2. If you want to the wall/floor. Section 2 -
User Manual
Page 11
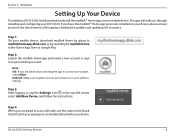
... Allow. Step 4: When you are asked to scan a QR code, use the code on your existing account. D-Link DCH-S160 User Manual 8 Installation Setting Up Your Device To install your DCH-S160, first download and install the mydlink™ Home app on the Quick Install Card in the iTunes App Store or.... This app will walk you have the mydlink™ Home app previously installed on your device, please ensure you through installing and configuring your DCH-S160. Note: iOS: If you are turned on the label attached to your mobile device. Step 3: After logging in, tap the Settings icon ...
... Allow. Step 4: When you are asked to scan a QR code, use the code on your existing account. D-Link DCH-S160 User Manual 8 Installation Setting Up Your Device To install your DCH-S160, first download and install the mydlink™ Home app on the Quick Install Card in the iTunes App Store or.... This app will walk you have the mydlink™ Home app previously installed on your device, please ensure you through installing and configuring your DCH-S160. Note: iOS: If you are turned on the label attached to your mobile device. Step 3: After logging in, tap the Settings icon ...
User Manual
Page 12
Please refer to page 12 for notifications to use! D-Link DCH-S160 User Manual 9 Congratulations, your DCH-S160 is now ready to work, you must set up a rule first using the mydlink Home app's My Actions page. Installation Step 5: In order for details on how to set up a rule. Section 2 -
Please refer to page 12 for notifications to use! D-Link DCH-S160 User Manual 9 Congratulations, your DCH-S160 is now ready to work, you must set up a rule first using the mydlink Home app's My Actions page. Installation Step 5: In order for details on how to set up a rule. Section 2 -

User Manual
Page 13
Under the My Devices page, tap the DCH-S160. Last Detection: Displays the last time the sensor detected water. Information: This page will show detailed information about the product and your network. Section 3 - To change the device name or associated icon, tap the name or the icon, and enter the new name or use the menu to select a new icon. Usage mydlink™ Home My Devices Launch the mydlink Home app. D-Link DCH-S160 User Manual 10
Under the My Devices page, tap the DCH-S160. Last Detection: Displays the last time the sensor detected water. Information: This page will show detailed information about the product and your network. Section 3 - To change the device name or associated icon, tap the name or the icon, and enter the new name or use the menu to select a new icon. Usage mydlink™ Home My Devices Launch the mydlink Home app. D-Link DCH-S160 User Manual 10

User Manual
Page 14
Firmware Displays the version of the device. IP Address: Displays the IP address of the firmware. Section 3 - Usage Information This page shows your Device: network. mydlink Displays the mydlink number of the device. D-Link DCH-S160 User Manual 11 Product Name: Displays the product model. Version: MAC Address: Displays the MAC address of the device. Number: Remove Tap Remove to remove the device from your product and related network details.
Firmware Displays the version of the device. IP Address: Displays the IP address of the firmware. Section 3 - Usage Information This page shows your Device: network. mydlink Displays the mydlink number of the device. D-Link DCH-S160 User Manual 11 Product Name: Displays the product model. Version: MAC Address: Displays the MAC address of the device. Number: Remove Tap Remove to remove the device from your product and related network details.
User Manual
Page 15
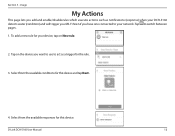
... rule for the rule. 3. D-Link DCH-S160 User Manual 12 Tap on New rule. 2. Usage My Actions This page lets you add and enable/disable rules which execute actions such as a trigger for your Wi-Fi Siren if you want to use to act as notifications (response) when your DCH-S160 detects water (condition) and...
... rule for the rule. 3. D-Link DCH-S160 User Manual 12 Tap on New rule. 2. Usage My Actions This page lets you add and enable/disable rules which execute actions such as a trigger for your Wi-Fi Siren if you want to use to act as notifications (response) when your DCH-S160 detects water (condition) and...
User Manual
Page 16
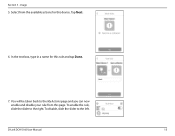
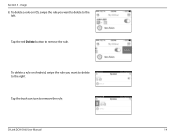
In the text box, type in a name for this device. To disable, slide the slider to the right. D-Link DCH-S160 User Manual 13 Tap Next. 6. Usage 5. Select from this rule and tap Done. 7. You will be taken back to the My Actions page and you can now enable and disable your rule from the available actions for this page. Section 3 - To enable the rule, slide the slider to the left.
In the text box, type in a name for this device. To disable, slide the slider to the right. D-Link DCH-S160 User Manual 13 Tap Next. 6. Usage 5. Select from this rule and tap Done. 7. You will be taken back to the My Actions page and you can now enable and disable your rule from the available actions for this page. Section 3 - To enable the rule, slide the slider to the left.
User Manual
Page 17
Tap the trash can icon to remove the rule. D-Link DCH-S160 User Manual 14 Tap the red Delete button to remove the rule. To delete a rule on Android, swipe the rule you want to delete to the left. Section 3 - To delete a rule on iOS, swipe the rule you want to delete to the right. Usage 8.
Tap the trash can icon to remove the rule. D-Link DCH-S160 User Manual 14 Tap the red Delete button to remove the rule. To delete a rule on Android, swipe the rule you want to delete to the left. Section 3 - To delete a rule on iOS, swipe the rule you want to delete to the right. Usage 8.
User Manual
Page 18
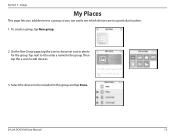
D-Link DCH-S160 User Manual 15 Select the devices to be included in a particular location. 1. On the New Group page, tap the icon to a group so you can easily see which devices are in this group and tap Done. Usage My Places This page lets you add devices to choose an icon or photo for the group. Tap next to it to add devices. 3. Then tap the + icon to enter a name for the group. To create a group, tap New group. 2. Section 3 -
D-Link DCH-S160 User Manual 15 Select the devices to be included in a particular location. 1. On the New Group page, tap the icon to a group so you can easily see which devices are in this group and tap Done. Usage My Places This page lets you add devices to choose an icon or photo for the group. Tap next to it to add devices. 3. Then tap the + icon to enter a name for the group. To create a group, tap New group. 2. Section 3 -
User Manual
Page 19
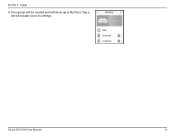
Your group will be created and will show up in My Places. D-Link DCH-S160 User Manual 16 Tap a device to take you to its settings. Section 3 - Usage 4.
Your group will be created and will show up in My Places. D-Link DCH-S160 User Manual 16 Tap a device to take you to its settings. Section 3 - Usage 4.
User Manual
Page 20
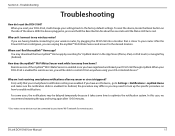
...). Remote access of the device. When your wireless router, try plugging the DCH-S160 into a location that your smartphone's notification settings are having trouble connecting to your DCH-S160 is triggered? After the Power LED turns solid green, you have registered and linked your settings back to optimize the notification system. Where can unplug the...
...). Remote access of the device. When your wireless router, try plugging the DCH-S160 into a location that your smartphone's notification settings are having trouble connecting to your DCH-S160 is triggered? After the Power LED turns solid green, you have registered and linked your settings back to optimize the notification system. Where can unplug the...

User Manual
Page 21
... Dimensions • 65 x 65 x 52.7 mm (2.56 x 2.56 x 2.07 inches) Weight • US plug: 100 grams (3.53 ounces) 1 Frequency range varies depending on local regulations D-Link DCH-S160 User Manual 18 Appendix A -
... Dimensions • 65 x 65 x 52.7 mm (2.56 x 2.56 x 2.07 inches) Weight • US plug: 100 grams (3.53 ounces) 1 Frequency range varies depending on local regulations D-Link DCH-S160 User Manual 18 Appendix A -


