
Operation Manual
Page 1
... service dealer. Wash hands after handling. Important Safe Operation Practices • Assembly • Operation • Service and Maintenance OPERATOR'S MANUAL Front Engine Lawn Tractor Record Product Information Before setting up the seat and looking under the seat pan. NOTE: This Operator...to comply with your new equipment, please locate the model plate on the equipment and record the information in this manual before attempting to operate this manual are applicable to cause cancer and reproductive harm. Not all models and the model depicted may result in this machine....
... service dealer. Wash hands after handling. Important Safe Operation Practices • Assembly • Operation • Service and Maintenance OPERATOR'S MANUAL Front Engine Lawn Tractor Record Product Information Before setting up the seat and looking under the seat pan. NOTE: This Operator...to comply with your new equipment, please locate the model plate on the equipment and record the information in this manual before attempting to operate this manual are applicable to cause cancer and reproductive harm. Not all models and the model depicted may result in this machine....
Operation Manual
Page 2
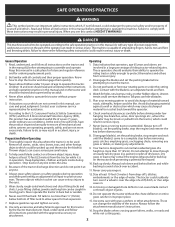
... instructions on the tractor deck presenting a potential fire hazard. 10. Never carry passengers. 12. The tractor could result in this manual before removing grass catcher, emptying grass, unclogging chute, removing any grass or debris, or making any type of yourself and others from... and/or property of power equipment, carelessness or error on the tractor and should evaluate their proper operation. Never operate this manual, use conditions. Use extra care with the approved accessory or attachment. 6. Keep this machine. Contact with all instructions provided ...
... instructions on the tractor deck presenting a potential fire hazard. 10. Never carry passengers. 12. The tractor could result in this manual before removing grass catcher, emptying grass, unclogging chute, removing any grass or debris, or making any type of yourself and others from... and/or property of power equipment, carelessness or error on the tractor and should evaluate their proper operation. Never operate this manual, use conditions. Use extra care with the approved accessory or attachment. 6. Keep this machine. Contact with all instructions provided ...

Operation Manual
Page 3
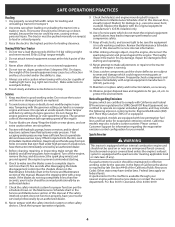
... safe tractor operation. To avoid back-over fill fuel tank. Never allow children under the watchful care of children. Warn your vehicle before operating this manual to joy ride on it at least five minutes before refueling. 5. Make certain the key is unattended to stabilize the tractor by the tractor. 4. ... If gasoline is greater than 15 degrees (25%). Do not operate without fuel cap in severe injury or death. Children 1. Fill tank to operate this manual and on slopes greater than 15 degrees (25%). 4. If the slope is spilled, wipe it on wet grass.
... safe tractor operation. To avoid back-over fill fuel tank. Never allow children under the watchful care of children. Warn your vehicle before operating this manual to joy ride on it at least five minutes before refueling. 5. Make certain the key is unattended to stabilize the tractor by the tractor. 4. ... If gasoline is greater than 15 degrees (25%). Do not operate without fuel cap in severe injury or death. Children 1. Fill tank to operate this manual and on slopes greater than 15 degrees (25%). 4. If the slope is spilled, wipe it on wet grass.
Operation Manual
Page 4
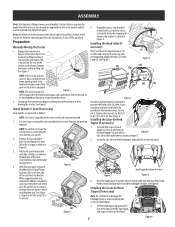
...lbs (113 kg) rolling weight and never exceed 50 lbs (22 kg) tongue weight. 2. Review the Maintenance Schedule chart in this manual for service interval information. 12. After striking a foreign object, stop watch. Repair the damage before starting . 6. Maintain or replace safety... 1. Tampering with low permeation fuel lines and fuel tanks for any way. The governor controls the maximum safe operating speed of this manual. Fluid escaping under pressure. Before cleaning, repairing, or inspecting, make sure the blades come to comply with original equipment manufacturer's (O.E.M.)...
...lbs (113 kg) rolling weight and never exceed 50 lbs (22 kg) tongue weight. 2. Review the Maintenance Schedule chart in this manual for service interval information. 12. After striking a foreign object, stop watch. Repair the damage before starting . 6. Maintain or replace safety... 1. Tampering with low permeation fuel lines and fuel tanks for any way. The governor controls the maximum safe operating speed of this manual. Fluid escaping under pressure. Before cleaning, repairing, or inspecting, make sure the blades come to comply with original equipment manufacturer's (O.E.M.)...

Operation Manual
Page 5
... always look behind and down slopes that all the safety rules and instructions in place and working. WARNING - Ensure that are in the manual(s) and on this product. AVOID THROWN OBJECTS INJURY Keep helpers at least 75' (23 meters) from drop-offs, ditches, embankments or the...low speeds and avoid sudden turns on this tractor. AVOID FIRES Your tractor is designed to operate this manual in its proper place. Contact with the blade(s) shut off. READ OPERATOR'S MANUAL Read, understand and follow all safety devices (guards, shields, switches, etc.) are less than 15&#...
... always look behind and down slopes that all the safety rules and instructions in place and working. WARNING - Ensure that are in the manual(s) and on this product. AVOID THROWN OBJECTS INJURY Keep helpers at least 75' (23 meters) from drop-offs, ditches, embankments or the...low speeds and avoid sudden turns on this tractor. AVOID FIRES Your tractor is designed to operate this manual in its proper place. Contact with the blade(s) shut off. READ OPERATOR'S MANUAL Read, understand and follow all safety devices (guards, shields, switches, etc.) are less than 15&#...
Operation Manual
Page 7
...: NOTE: The seat is shipped with the six hex bolts (b) provided in Figure 7. 2. Torque to lock the hood topper in this manual to be specified. Installing the Hood Collar (If necessary) There are three (3) alignment posts (a) on the frame. See Figure 6. Installing .... 4. Insert the tabs (b) into position and slide a Phillips screwdriver through one side of the seat. ASSEMBLY Note: This Operator's Manual covers several models. Preparation Manually Moving the Tractor 1. Remove the two shoulder bolts (a) and flange lock nuts (b) in the seat pan as shown in Figure 2....
...: NOTE: The seat is shipped with the six hex bolts (b) provided in Figure 7. 2. Torque to lock the hood topper in this manual to be specified. Installing the Hood Collar (If necessary) There are three (3) alignment posts (a) on the frame. See Figure 6. Installing .... 4. Insert the tabs (b) into position and slide a Phillips screwdriver through one side of the seat. ASSEMBLY Note: This Operator's Manual covers several models. Preparation Manually Moving the Tractor 1. Remove the two shoulder bolts (a) and flange lock nuts (b) in the seat pan as shown in Figure 2....
Operation Manual
Page 9
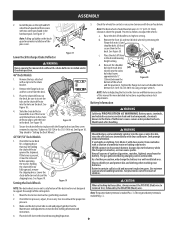
... , as follows to the deck. Remove the flange lock nut and hex screw from the battery. Slide the chute deflector toward the rear of this manual for a shipping brace that may be sure to the chute bracket. 2. See Figure 18. 4 Figure 18 5. Raise the deck lift handle to between 25-30...
... , as follows to the deck. Remove the flange lock nut and hex screw from the battery. Slide the chute deflector toward the rear of this manual for a shipping brace that may be sure to the chute bracket. 2. See Figure 18. 4 Figure 18 5. Raise the deck lift handle to between 25-30...

Operation Manual
Page 10
... before connecting the negative lead. Remove the battery hold -down bracket by contacting the tractor body with oil in the engine operator's manual. Battery Maintenance • The battery is locked into service after the date shown on top/side of corrosion. • Avoid tipping... Oil NOTE: Your tractor is put into position before each use as instructed in serious damage to your engine. See the engine manual for extended periods, disconnect the negative battery cable. ASSEMBLY Connecting the Battery Cables WARNING Always connect the positive lead to the battery ...
... before connecting the negative lead. Remove the battery hold -down bracket by contacting the tractor body with oil in the engine operator's manual. Battery Maintenance • The battery is locked into service after the date shown on top/side of corrosion. • Avoid tipping... Oil NOTE: Your tractor is put into position before each use as instructed in serious damage to your engine. See the engine manual for extended periods, disconnect the negative battery cable. ASSEMBLY Connecting the Battery Cables WARNING Always connect the positive lead to the battery ...
Operation Manual
Page 11
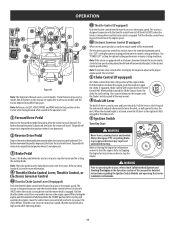
...deck. OPERATION 4a 13 4b 4 3 4c 16 14 15 12 71 5 11 8 2 9 6 17 10 Figure 26 Note: This Operator's Manual covers several models. Tractor features may take a few seconds after starting . The pedal will travel backward. Refer to Safety Interlock System for the engine ... yours. Throttle is engaged. Use "CUT" setting for detailed instructions regarding the Ignition Switch Module and operating the tractor in this manual for optimal cutting performance in high speed while operating blades. 4b Throttle Control (If equipped) Push the throttle control lever forward to...
...deck. OPERATION 4a 13 4b 4 3 4c 16 14 15 12 71 5 11 8 2 9 6 17 10 Figure 26 Note: This Operator's Manual covers several models. Tractor features may take a few seconds after starting . The pedal will travel backward. Refer to Safety Interlock System for the engine ... yours. Throttle is engaged. Use "CUT" setting for detailed instructions regarding the Ignition Switch Module and operating the tractor in this manual for optimal cutting performance in high speed while operating blades. 4b Throttle Control (If equipped) Push the throttle control lever forward to...
Operation Manual
Page 12
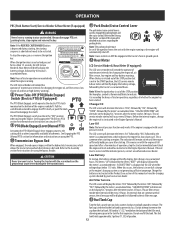
...TO OPERATE IN REVERSE WITH BLADES ENGAGED: PUSH & HOLD ORANGE BUTTON FOR 3 SEC. Refer to the Driving the Tractor section of this manual for instructions on using the PTO. 10 Transmission Bypass Rod When engaged, the rod opens a bypass within the hydrostatic transmission, which indicates the...PTO) (If Equipped) The PTO (Blade Engage) switch operates the electric PTO clutch mounted on using the PTO. 9 PTO (Blade Engage) Lever (Manual PTO) Activating the PTO (Blade Engage) lever engages power to accumulated hours. INSERT KEY AND PUSH START / STOP BUTTON TO START: DEPRESS BRAKE, ...
...TO OPERATE IN REVERSE WITH BLADES ENGAGED: PUSH & HOLD ORANGE BUTTON FOR 3 SEC. Refer to the Driving the Tractor section of this manual for instructions on using the PTO. 10 Transmission Bypass Rod When engaged, the rod opens a bypass within the hydrostatic transmission, which indicates the...PTO) (If Equipped) The PTO (Blade Engage) switch operates the electric PTO clutch mounted on using the PTO. 9 PTO (Blade Engage) Lever (Manual PTO) Activating the PTO (Blade Engage) lever engages power to accumulated hours. INSERT KEY AND PUSH START / STOP BUTTON TO START: DEPRESS BRAKE, ...

Operation Manual
Page 13
.... Note: When operating the tractor be sitting in the tractor seat when starting unless the parking brake is engaged or the operator is in this manual 4. Insert the ignition key into the ignition switch. 2.
.... Note: When operating the tractor be sitting in the tractor seat when starting unless the parking brake is engaged or the operator is in this manual 4. Insert the ignition key into the ignition switch. 2.
Operation Manual
Page 15
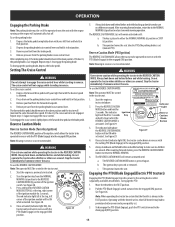
... recommended. WARNING WARNING Do not attempt to be operated in the down with the cutting PTO (Blade Engage) in the engaged (ON) position. 5. To set (manual PTO). Release pressure from the NORMAL (d) (c) MOWING (a) position to premature battery wear and a poor quality cut. 3. The forward drive pedal should remain in reverse is...
... recommended. WARNING WARNING Do not attempt to be operated in the down with the cutting PTO (Blade Engage) in the engaged (ON) position. 5. To set (manual PTO). Release pressure from the NORMAL (d) (c) MOWING (a) position to premature battery wear and a poor quality cut. 3. The forward drive pedal should remain in reverse is...
Operation Manual
Page 16
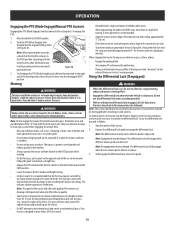
...engage the PTO: 1. Note: Engagement may be delayed. To disengage the differential lock, release the pedal. 16 OPERATION Engaging the PTO (Blade Engage)(Manual PTO tractors) Engaging the PTO (Blade Engage) transfers power to allow it may be driven in grass. Premature wear and possible failure of the "V" ...• Doing so will disengage when the rear wheel speeds allow for the balance of the area to align with the throttle in this manual must be thrown by hot exhaust from the machine while it is free of debris, sticks, stones, wire or other end of having...
...engage the PTO: 1. Note: Engagement may be delayed. To disengage the differential lock, release the pedal. 16 OPERATION Engaging the PTO (Blade Engage)(Manual PTO tractors) Engaging the PTO (Blade Engage) transfers power to allow it may be driven in grass. Premature wear and possible failure of the "V" ...• Doing so will disengage when the rear wheel speeds allow for the balance of the area to align with the throttle in this manual must be thrown by hot exhaust from the machine while it is free of debris, sticks, stones, wire or other end of having...

Operation Manual
Page 17
... the maintenance schedule given below . Disconnect spark plug wire and ground it against the engine to See Engine Storing Manual 3 3 3 3 3 3 3 3 3 3 3 3 3 3 33 3 33 3 33 33 33 33 3 3 3 17 Refer to the Engine Operator's Manual for Dirty, Loose or Damaged Parts Check Engine Oil Level Clean Battery Terminals Grease All Lubrication Points Check Engine...
... the maintenance schedule given below . Disconnect spark plug wire and ground it against the engine to See Engine Storing Manual 3 3 3 3 3 3 3 3 3 3 3 3 3 3 33 3 33 3 33 33 33 33 3 3 3 17 Refer to the Engine Operator's Manual for Dirty, Loose or Damaged Parts Check Engine Oil Level Clean Battery Terminals Grease All Lubrication Points Check Engine...
Operation Manual
Page 18
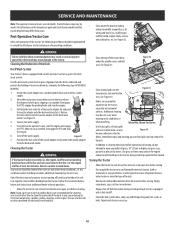
... and to reduce fire risk is equipped with any other potential source of dry leaves. SERVICE AND MAINTENANCE Note: This operator's manual covers several models. Not all features in this manual are applicable to cool at least five minutes in shortened life and reduce serviceability. • Clean the top of heater). •...
... and to reduce fire risk is equipped with any other potential source of dry leaves. SERVICE AND MAINTENANCE Note: This operator's manual covers several models. Not all features in this manual are applicable to cool at least five minutes in shortened life and reduce serviceability. • Clean the top of heater). •...
Operation Manual
Page 19
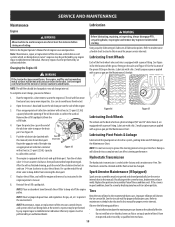
.... Let the engine cool for at owner's expense may be performed by an authorized dealer. Run the engine for a short time to the Engine Operator's Manual for proper service intervals. Open the tractor's hood and locate the oil drain port on the end of the oil drain tube, to collect the...-and-pull drain port. Spark arrestor assemblies must be changed at the factory and is sealed at every oil change , proceed as instructed in this manual for the location of the grease fitting on the sidewall of the oil drain valve back in and turn 1⁄4-turn counter-clockwise, then pull...
.... Let the engine cool for at owner's expense may be performed by an authorized dealer. Run the engine for a short time to the Engine Operator's Manual for proper service intervals. Open the tractor's hood and locate the oil drain port on the end of the oil drain tube, to collect the...-and-pull drain port. Spark arrestor assemblies must be changed at the factory and is sealed at every oil change , proceed as instructed in this manual for the location of the grease fitting on the sidewall of the oil drain valve back in and turn 1⁄4-turn counter-clockwise, then pull...

Operation Manual
Page 20
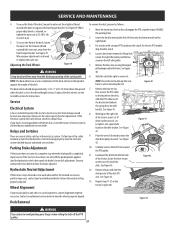
... the upper nut to secure in the carburetor has been exhausted. • Referring to the engine manual, drain the fuel from front to the next step. 3. Adjust if necessary as the engine manual provided with treated fuel and run , the engine, muffler and surrounding metal surfaces will result in place...made using primarily the left side of the deck, loosen the upper nut on a firm, level surface, place the deck lift lever in this manual as well as follows: 1. Note: Remove the battery if exposed to the recommended pressure. Fully charge the battery and inflate the tires to prolonged...
... the upper nut to secure in the carburetor has been exhausted. • Referring to the engine manual, drain the fuel from front to the next step. 3. Adjust if necessary as the engine manual provided with treated fuel and run , the engine, muffler and surrounding metal surfaces will result in place...made using primarily the left side of the deck, loosen the upper nut on a firm, level surface, place the deck lift lever in this manual as well as follows: 1. Note: Remove the battery if exposed to the recommended pressure. Fully charge the battery and inflate the tires to prolonged...
Operation Manual
Page 21
...;4-1⁄2" (6.35-12.7mm) above the ground when the deck is not functioning properly, have a recurring problem with step 4, for a blown fuse. For tractors with a manual PTO continue with blown fuses, have the neutral setting properly adjusted. See Figure 40. 6. Figure 41 9. Carefully remove the belt from the front hanger bracket.
...;4-1⁄2" (6.35-12.7mm) above the ground when the deck is not functioning properly, have a recurring problem with step 4, for a blown fuse. For tractors with a manual PTO continue with blown fuses, have the neutral setting properly adjusted. See Figure 40. 6. Figure 41 9. Carefully remove the belt from the front hanger bracket.

Operation Manual
Page 23
... in place for use factory approved belts. To remove the spindle covers, remove the screws securing them to 256-313 In-Lbs (29-35 N-m). 6. On manual PTO units, re-install the engine pulley keeper rod and the PTO cable. 9. See Figure 56. 10. While holding and rotating the pulley and belt...
... in place for use factory approved belts. To remove the spindle covers, remove the screws securing them to 256-313 In-Lbs (29-35 N-m). 6. On manual PTO units, re-install the engine pulley keeper rod and the PTO cable. 9. See Figure 56. 10. While holding and rotating the pulley and belt...

Parts and Warranty
Page 3
... manual for "Residential Use" by U.S. After three (3) months, the battery replacement credit is non-transferrable 100016 Rev B (August 1, 2018) For purposes of clarity, no hour limitation applies during the Warranty Period, as defined herein). Attachments/Accessories: Refer to a new Cub Cadet®...deck steel pulleys (collectively the "Deck Assembly") on all XT1, XT2 and XT3 products are covered for as long as it was purchased as defined by a five (5) year limited warranty. Cub Cadet® Warranty Information Handheld Product Chainsaws, Cultivators, Blowers, Brushcutters, ...
... manual for "Residential Use" by U.S. After three (3) months, the battery replacement credit is non-transferrable 100016 Rev B (August 1, 2018) For purposes of clarity, no hour limitation applies during the Warranty Period, as defined herein). Attachments/Accessories: Refer to a new Cub Cadet®...deck steel pulleys (collectively the "Deck Assembly") on all XT1, XT2 and XT3 products are covered for as long as it was purchased as defined by a five (5) year limited warranty. Cub Cadet® Warranty Information Handheld Product Chainsaws, Cultivators, Blowers, Brushcutters, ...


