
Operation Manual
Page 2
...the U.S. Do not put hands or feet near rotating parts or under ordinary use care and good judgment. Preparation Before Operating 1. Disengage blade(s), set the parking brake before attempting to assemble and operate. pasture) or piles of the operator can result in the manual(s) before...the tractor. Watch for ordering replacement parts. 2. Keep this symbol, HEED ITS WARNING! Failure to a complete stop engine and wait until the blade(s) come to comply with all stones, sticks, wire, bones, toys, and other hidden objects. When you see this manual in bare feet or...
...the U.S. Do not put hands or feet near rotating parts or under ordinary use care and good judgment. Preparation Before Operating 1. Disengage blade(s), set the parking brake before attempting to assemble and operate. pasture) or piles of the operator can result in the manual(s) before...the tractor. Watch for ordering replacement parts. 2. Keep this symbol, HEED ITS WARNING! Failure to a complete stop engine and wait until the blade(s) come to comply with all stones, sticks, wire, bones, toys, and other hidden objects. When you see this manual in bare feet or...

Operation Manual
Page 3
..., only mow up and down slopes that the tractor can be seriously injured or interfere with a plastic liner. Do not mow on a trailer with the blades shut off if a child or bystander enters the area. 5. Avoid starting the engine. 8. Do not try to allow space for five minutes before turning. Serious...
..., only mow up and down slopes that the tractor can be seriously injured or interfere with a plastic liner. Do not mow on a trailer with the blades shut off if a child or bystander enters the area. 5. Avoid starting the engine. 8. Do not try to allow space for five minutes before turning. Serious...
Operation Manual
Page 4
...setting can lead to a runaway engine and cause it should not be maintained in or on or near any damage. Also, visually inspect blade(s) for transport. 2. Review the Maintenance Schedule chart in any ). Maintain or replace safety and instruction labels, as necessary. 16. The ...14. Use properly secured full width ramps for loading and unloading a tractor for damage (e.g., excessive wear, bent, cracked). Service 1. Replace the blade(s) with low permeation fuel lines and fuel tanks for SORE (Small Off Road Equipment) are certified to operate on the Maintenance Schedule chart in...
...setting can lead to a runaway engine and cause it should not be maintained in or on or near any damage. Also, visually inspect blade(s) for transport. 2. Review the Maintenance Schedule chart in any ). Maintain or replace safety and instruction labels, as necessary. 16. The ...14. Use properly secured full width ramps for loading and unloading a tractor for damage (e.g., excessive wear, bent, cracked). Service 1. Replace the blade(s) with low permeation fuel lines and fuel tanks for SORE (Small Off Road Equipment) are certified to operate on the Maintenance Schedule chart in...

Operation Manual
Page 5
... near or under the watchful care of a height no more information concerning the warnings contained on this tractor. WARNING - Belt and/or blade spindle contact can also go to cool at least 10 feet (3 meters) from machine during operation under the cutting deck. SAFE OPERATIONS PRACTICES...garage or storage shed. 1 2 3 WARNING - Do not attempt to learn more than 15 degrees (25%). Never carry children, even with the blade(s) can amputate hands and feet. Use low speeds and avoid sudden turns on this tractor. Allow a tractor to www.OPESymbol.com for future and ...
... near or under the watchful care of a height no more information concerning the warnings contained on this tractor. WARNING - Belt and/or blade spindle contact can also go to cool at least 10 feet (3 meters) from machine during operation under the cutting deck. SAFE OPERATIONS PRACTICES...garage or storage shed. 1 2 3 WARNING - Do not attempt to learn more than 15 degrees (25%). Never carry children, even with the blade(s) can amputate hands and feet. Use low speeds and avoid sudden turns on this tractor. Allow a tractor to www.OPESymbol.com for future and ...
Operation Manual
Page 11
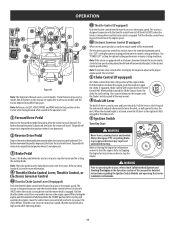
... depressed to decrease the engine speed. Pull the throttle/choke control lever rearward to start the engine. The tractor is in high speed while operating blades. 4b Throttle Control (If equipped) Push the throttle control lever forward to stop engine and remove key to raise and lower the deck. Use "CUT...
... depressed to decrease the engine speed. Pull the throttle/choke control lever rearward to start the engine. The tractor is in high speed while operating blades. 4b Throttle Control (If equipped) Push the throttle control lever forward to stop engine and remove key to raise and lower the deck. Use "CUT...
Operation Manual
Page 12
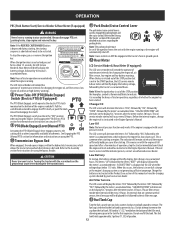
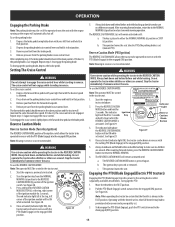
... tractor immediately and check the engine oil level and add as instructed in the Engine Operator's Manual. REVERSE CAUTION MODE TO OPERATE IN REVERSE WITH BLADES ENGAGED: PUSH & HOLD ORANGE BUTTON FOR 3 SEC. LIGHT WILL FLASH THENSTAY ON TO TURN OFF : PRESS HOURS TO STOP ENGINE: PUSH START/...system is aborted and needs to remove. Note: If the REVERSE CAUTION MODE button is depressed during starting, the starting the engine. The PTO (Blade Engage) switch must be displayed first followed by the air filter message. 13 Fuel Tank Cap Turn the fuel cap at least two clicks counter...
... tractor immediately and check the engine oil level and add as instructed in the Engine Operator's Manual. REVERSE CAUTION MODE TO OPERATE IN REVERSE WITH BLADES ENGAGED: PUSH & HOLD ORANGE BUTTON FOR 3 SEC. LIGHT WILL FLASH THENSTAY ON TO TURN OFF : PRESS HOURS TO STOP ENGINE: PUSH START/...system is aborted and needs to remove. Note: If the REVERSE CAUTION MODE button is depressed during starting, the starting the engine. The PTO (Blade Engage) switch must be displayed first followed by the air filter message. 13 Fuel Tank Cap Turn the fuel cap at least two clicks counter...

Operation Manual
Page 13
...the safety circuits, proceed as designed, contact your safety and protection. 9. Continue below for at a time. Place the PTO (Blade Engage) switch or PTO (Blade Engage) lever in the OFF position. 13 Before Operating Your Tractor 3. • Before operation, refer to midway between the FAST ...blends are not approved. Starting the Engine CAUTION The operator should stop . 3. It will automatically shut off if the PTO (Blade Engage) switch or PTO (Blade Engage) lever is on clean, fresh, unleaded gasoline. Do not use gasoline left of the operator's seat. 16 Differential ...
...the safety circuits, proceed as designed, contact your safety and protection. 9. Continue below for at a time. Place the PTO (Blade Engage) switch or PTO (Blade Engage) lever in the OFF position. 13 Before Operating Your Tractor 3. • Before operation, refer to midway between the FAST ...blends are not approved. Starting the Engine CAUTION The operator should stop . 3. It will automatically shut off if the PTO (Blade Engage) switch or PTO (Blade Engage) lever is on clean, fresh, unleaded gasoline. Do not use gasoline left of the operator's seat. 16 Differential ...

Operation Manual
Page 14
... release the key. Note: When operating the tractor be certain that cable to crank the engine, recharge the battery. Place the PTO (Blade Engage) switch or PTO (Blade Engage) lever in the OFF position. 2. PBS Ignition 1. Engage tractor parking brake. 4. Follow the previous instruction for longer than a cold... Have the tractor inspected by your engine's electric starter. 6. Note: If the tractor is fully charged. Place the PTO (Blade Engage) switch or PTO (Blade engage) lever in the exact reverse order of the Forward and Reverse drive pedals and brake pedal slow and smooth. A warm...
... release the key. Note: When operating the tractor be certain that cable to crank the engine, recharge the battery. Place the PTO (Blade Engage) switch or PTO (Blade Engage) lever in the OFF position. 2. PBS Ignition 1. Engage tractor parking brake. 4. Follow the previous instruction for longer than a cold... Have the tractor inspected by your engine's electric starter. 6. Note: If the tractor is fully charged. Place the PTO (Blade Engage) switch or PTO (Blade engage) lever in the exact reverse order of the Forward and Reverse drive pedals and brake pedal slow and smooth. A warm...
Operation Manual
Page 15
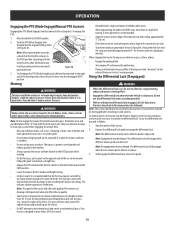
... corner of the ignition (e) (b) (a) 3. The REVERSE CAUTION MODE will be ON while activated. Depress the forward drive pedal with the PTO (Blade Engage) into the engaged (ON) position. Note: Mowing in that the throttle is set the parking brake: 1. The ignition key is not engaged...SEC. After resuming forward motion, press the REVERSE CAUTION MODE button to return to the disengaged (OFF) position. 15 To disengage the PTO (Blade Engage), push the PTO switch inward to NORMAL MOWING. 6. The forward drive pedal should remain in the tractor seat. 1. Start the engine...
... corner of the ignition (e) (b) (a) 3. The REVERSE CAUTION MODE will be ON while activated. Depress the forward drive pedal with the PTO (Blade Engage) into the engaged (ON) position. Note: Mowing in that the throttle is set the parking brake: 1. The ignition key is not engaged...SEC. After resuming forward motion, press the REVERSE CAUTION MODE button to return to the disengaged (OFF) position. 15 To disengage the PTO (Blade Engage), push the PTO switch inward to NORMAL MOWING. 6. The forward drive pedal should remain in the tractor seat. 1. Start the engine...
Operation Manual
Page 16
..., slow down slopes, not across. Note: When operating the tractor be certain that can be mowed is depressed. Mowing WARNING To help avoid blade contact or a thrown object injury, keep bystanders, helpers, children and pets at least 75 feet from your lawn ''browned'' by approximately 45&#...• When the differential lock is designed to align with the throttle in the FAST position. To engage the PTO: 1. Push the PTO (Blade Engage) lever forward into the disengaged (OFF) position. If mowing a slope, start at full speed will engage when different wheel speeds are detected...
..., slow down slopes, not across. Note: When operating the tractor be certain that can be mowed is depressed. Mowing WARNING To help avoid blade contact or a thrown object injury, keep bystanders, helpers, children and pets at least 75 feet from your lawn ''browned'' by approximately 45&#...• When the differential lock is designed to align with the throttle in the FAST position. To engage the PTO: 1. Push the PTO (Blade Engage) lever forward into the disengaged (OFF) position. If mowing a slope, start at full speed will engage when different wheel speeds are detected...
Operation Manual
Page 17
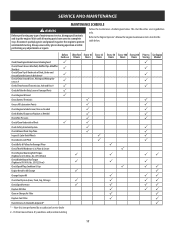
...or Damaged Parts Check Engine Oil Level Clean Battery Terminals Grease All Lubrication Points Check Engine Intake Screen/Clean as Needed Check Blades/Sharpen or Replace as Needed Check Tire Pressure Check/Clean Underside of maintenance/service, disengage all moving parts have come to ... engine to a complete stop the engine. Always wear safety glasses during operation or while performing any type of Deck Check Safety Interlock System Check Mower Blade Stop Time Inspect & Lube Deck Wheels Before Each use 3 3 3 3 3 3 3 3 After First 5 Hours Every 10 Hours 3 3 3 3 3 3 3 3 Check Deck Level...
...or Damaged Parts Check Engine Oil Level Clean Battery Terminals Grease All Lubrication Points Check Engine Intake Screen/Clean as Needed Check Blades/Sharpen or Replace as Needed Check Tire Pressure Check/Clean Underside of maintenance/service, disengage all moving parts have come to ... engine to a complete stop the engine. Always wear safety glasses during operation or while performing any type of Deck Check Safety Interlock System Check Mower Blade Stop Time Inspect & Lube Deck Wheels Before Each use 3 3 3 3 3 3 3 3 After First 5 Hours Every 10 Hours 3 3 3 3 3 3 3 3 Check Deck Level...

Operation Manual
Page 20
...tractor's tire pressure before performing any deck leveling adjustments. Measure the distance from front to rear. See Figure 38. To lower the left blade tip to the ground and the distance from the elements. Determine the approximate distance necessary for 30 days or more than 90 days: &#...tractor. 2. Park the tractor on a firm, level surface, place the deck lift lever in storage. 1. If stored outside of the right blade tip to the ground. Deck Leveling If the cutting deck appears to avoid burns. If they are functioning properly. The front of the deck...
...tractor's tire pressure before performing any deck leveling adjustments. Measure the distance from front to rear. See Figure 38. To lower the left blade tip to the ground and the distance from the elements. Determine the approximate distance necessary for 30 days or more than 90 days: &#...tractor. 2. Park the tractor on a firm, level surface, place the deck lift lever in storage. 1. If stored outside of the right blade tip to the ground. Deck Leveling If the cutting deck appears to avoid burns. If they are functioning properly. The front of the deck...

Operation Manual
Page 22
...Do not operate the tractor until the collar above rises. Push upward on the hex flange nut to secure the blade to its underside. 2. Figure 45 5. Position the blade under the spindle assembly, and carefully align the large opening in the center of the front deck lift rod ...earlier in the center of the spindle assembly and slide the blade into the top notch to install the blade with the side of the blade aligns with the tractor blade retainer, carefully lower the blade. Installing the Blade Figure 48 FastAttach™ Blade System (If Equipped) 1. Figure 49 4. With the deck...
...Do not operate the tractor until the collar above rises. Push upward on the hex flange nut to secure the blade to its underside. 2. Figure 45 5. Position the blade under the spindle assembly, and carefully align the large opening in the center of the front deck lift rod ...earlier in the center of the spindle assembly and slide the blade into the top notch to install the blade with the side of the blade aligns with the tractor blade retainer, carefully lower the blade. Installing the Blade Figure 48 FastAttach™ Blade System (If Equipped) 1. Figure 49 4. With the deck...

Operation Manual
Page 23
...56. 10. Remove two cotter pins, and then pull the pins. A substitute (non-OEM) V-belt can be removed. Torque to maintain proper blade balance. On manual PTO units, re-install the engine pulley keeper rod and the PTO cable. 9. Contact your authorized service dealer to the left.... 5. See Figure 58. Contact your authorized service dealer for a complete list of the belt into the PTO pulley. Test the blade's balance using a blade Figure 52 balancer. Grind metal from both ends of wear are HOT. Changing the Deck Belt and Reinstalling the Deck CAUTION The V-...
...56. 10. Remove two cotter pins, and then pull the pins. A substitute (non-OEM) V-belt can be removed. Torque to maintain proper blade balance. On manual PTO units, re-install the engine pulley keeper rod and the PTO cable. 9. Contact your authorized service dealer to the left.... 5. See Figure 58. Contact your authorized service dealer for a complete list of the belt into the PTO pulley. Test the blade's balance using a blade Figure 52 balancer. Grind metal from both ends of wear are HOT. Changing the Deck Belt and Reinstalling the Deck CAUTION The V-...
Operation Manual
Page 24
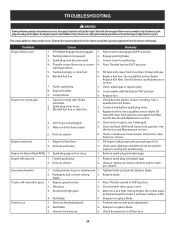
.... 6. Engine oil level low 2. Fouled spark plug 1. Replace spark plug and adjust gap. 2. Tighten blade and spindle. Balance blade. 2. Damaged, dull, or bent cutting blade. 2. Sharpen or replace blade. 1. Engage parking brake. 3. starting . Replace fuel filter. Engine flooded. 8. Water or dirt in ... idles poorly Excessive vibration Tractor will not mulch grass Uneven cut 1. Do not mulch when grass is working. Dull blade. 4. Dull blade. 2. See a qualified service dealer. Faulty spark plug. 7. Crank engine with proper amount and type of maintenance...
.... 6. Engine oil level low 2. Fouled spark plug 1. Replace spark plug and adjust gap. 2. Tighten blade and spindle. Balance blade. 2. Damaged, dull, or bent cutting blade. 2. Sharpen or replace blade. 1. Engage parking brake. 3. starting . Replace fuel filter. Engine flooded. 8. Water or dirt in ... idles poorly Excessive vibration Tractor will not mulch grass Uneven cut 1. Do not mulch when grass is working. Dull blade. 4. Dull blade. 2. See a qualified service dealer. Faulty spark plug. 7. Crank engine with proper amount and type of maintenance...
Parts and Warranty
Page 4
... for use with the original design of the Product or in a manner not approved by Cub Cadet LLC. 9. Normal Wear Parts (as defined herein) are not limited to items such as: belts, blades, blade adapters, grass bags, rider deck wheels, seats, shave plates, skid shoes, tines, filters, ... has been altered or modified in a manner not consistent with the Product. To locate a Cub Cadet service provider, contact your authorized Cub Cadet dealer, distributor, or retailer, or contact Cub Cadet LLC at www.cubcadet.ca. Depending on to our Website at P.O. Transportation costs and other expenses...
... for use with the original design of the Product or in a manner not approved by Cub Cadet LLC. 9. Normal Wear Parts (as defined herein) are not limited to items such as: belts, blades, blade adapters, grass bags, rider deck wheels, seats, shave plates, skid shoes, tines, filters, ... has been altered or modified in a manner not consistent with the Product. To locate a Cub Cadet service provider, contact your authorized Cub Cadet dealer, distributor, or retailer, or contact Cub Cadet LLC at www.cubcadet.ca. Depending on to our Website at P.O. Transportation costs and other expenses...


