User Guide
Page 3
...make one or more of the following U.S. logo, the Sound Blaster PCI logo, EMU10K1, E-mu Environmental Modeling, Environmental Audio, Creative Multi Speaker Surround, and DynaRAM are registered trademarks of Microsoft Corporation. Microsoft, MS-DOS, and Windows are trademarks of Creative Technology Ltd. patents: 4,506,579; 4,699,038; ...,747; 5,763,800. 2 E-Mu and SoundFont are registered trademarks, and the Sound Blaster Live! This product is covered by one copy of the software for any form or by Creative Technology Ltd. No part of this manual may be reproduced or transmitted in any...
...make one or more of the following U.S. logo, the Sound Blaster PCI logo, EMU10K1, E-mu Environmental Modeling, Environmental Audio, Creative Multi Speaker Surround, and DynaRAM are registered trademarks of Microsoft Corporation. Microsoft, MS-DOS, and Windows are trademarks of Creative Technology Ltd. patents: 4,506,579; 4,699,038; ...,747; 5,763,800. 2 E-Mu and SoundFont are registered trademarks, and the Sound Blaster Live! This product is covered by one copy of the software for any form or by Creative Technology Ltd. No part of this manual may be reproduced or transmitted in any...
User Guide
Page 9
... More Information...xii Document Conventions...xii 1 Installing Sound Blaster Live! Value 1 What You Need...1 Installing the Audio Card...2 Configuring the Speakers ...5 Creative's Cambridge SoundWorks PCWorks FourPointSurround 5 Creative PC-DVD and FourPointSurround 6 Two Speakers or Headphones...7 Installing the Creative Software...9 Windows 95 ...9 Windows 98 ...13 Windows NT...13 Testing the Installation...14 2 Using Sound Blaster Live! Tour...15 Creative Launcher...16 Options ...16 Groups ...16...
... More Information...xii Document Conventions...xii 1 Installing Sound Blaster Live! Value 1 What You Need...1 Installing the Audio Card...2 Configuring the Speakers ...5 Creative's Cambridge SoundWorks PCWorks FourPointSurround 5 Creative PC-DVD and FourPointSurround 6 Two Speakers or Headphones...7 Installing the Creative Software...9 Windows 95 ...9 Windows 98 ...13 Windows NT...13 Testing the Installation...14 2 Using Sound Blaster Live! Tour...15 Creative Launcher...16 Options ...16 Groups ...16...
User Guide
Page 11
3 Troubleshooting 41 Installing Software ...41 Sound ...41 SoundFonts...43 Joystick ...43 I/O Conflicts...44 Windows NT 4.0...44 Creative PlayCenter ...45 Contents vii
3 Troubleshooting 41 Installing Software ...41 Sound ...41 SoundFonts...43 Joystick ...43 I/O Conflicts...44 Windows NT 4.0...44 Creative PlayCenter ...45 Contents vii
User Guide
Page 13
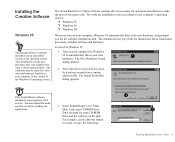
... Information Document Conventions For Creative software, your cards require at the time of particular importance and should be considered before you continue. Value gives you an estimate of free hard disk space for Windows 95/98; 55 MB for Windows NT 4.0 ❐ ...card ❐ Powered speakers or external amplifier (recommended: Cambridge SoundWorks speakers) Sound Blaster Live! A word in the text may require a system configuration greater than that can help you must supply a value for details. The following typographical conventions are to be entered exactly as instructions...
... Information Document Conventions For Creative software, your cards require at the time of particular importance and should be considered before you continue. Value gives you an estimate of free hard disk space for Windows 95/98; 55 MB for Windows NT 4.0 ❐ ...card ❐ Powered speakers or external amplifier (recommended: Cambridge SoundWorks speakers) Sound Blaster Live! A word in the text may require a system configuration greater than that can help you must supply a value for details. The following typographical conventions are to be entered exactly as instructions...
User Guide
Page 22
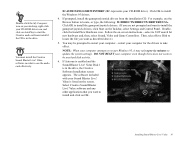
Installing the Creative Software Windows 95 This manual reflects a software installation in Windows 95: 1. Your installation screens and procedure may vary slightly from the instructions below based upon previously installed software and hardware.... drivers before insalling the applications. 3. Select the Driver from disk provided by other software/hardware installed on the disk. Insert Sound Blaster Live! Value Disk 1 into your computer, Windows 95 automatically detects the new hardware, and prompts you for your new 1 hardware. Enter the path for the software installation disk...
Installing the Creative Software Windows 95 This manual reflects a software installation in Windows 95: 1. Your installation screens and procedure may vary slightly from the instructions below based upon previously installed software and hardware.... drivers before insalling the applications. 3. Select the Driver from disk provided by other software/hardware installed on the disk. Insert Sound Blaster Live! Value Disk 1 into your computer, Windows 95 automatically detects the new hardware, and prompts you for your new 1 hardware. Enter the path for the software installation disk...
User Guide
Page 23
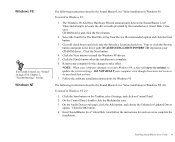
... CD. Doubleclick the Install New Hardware icon. Select Creative Sound Blaster Live! Value 10 Click OK to install the gameport/joystick drivers. (If you want to install the gameport/joystick drivers, click Start on AutoPlay to restart Windows 95, it may be any other applications that you...use the Browse button to install the Windows 95 drivers. 4. NOTE: When your computer attempts to start the Creative audio software install if the CD is in the drive. The software included with your CD-ROM drive). Installing Sound Blaster Live! Double-click the My Computer icon ...
... CD. Doubleclick the Install New Hardware icon. Select Creative Sound Blaster Live! Value 10 Click OK to install the gameport/joystick drivers. (If you want to install the gameport/joystick drivers, click Start on AutoPlay to restart Windows 95, it may be any other applications that you...use the Browse button to install the Windows 95 drivers. 4. NOTE: When your computer attempts to start the Creative audio software install if the CD is in the drive. The software included with your CD-ROM drive). Installing Sound Blaster Live! Double-click the My Computer icon ...
User Guide
Page 27
... Sound Blaster Live! Clear all check boxes and cleck only the Specify a Location check box. Follow the software installation instructions for the changes to complete the installation. On the Control Panel, double-click the Multimedia icon. 3. Windows NT The following instructions describe the Sound Blaster Live! Value installation in Windows 98: 1. Insert Disk 1 into your computer for Windows 95. Insert Sound Blaster Live! Value...
... Sound Blaster Live! Clear all check boxes and cleck only the Specify a Location check box. Follow the software installation instructions for the changes to complete the installation. On the Control Panel, double-click the Multimedia icon. 3. Windows NT The following instructions describe the Sound Blaster Live! Value installation in Windows 98: 1. Insert Disk 1 into your computer for Windows 95. Insert Sound Blaster Live! Value...
User Guide
Page 30
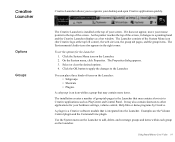
...Creative software module that is installed at the top left corner), the web site icon, the group tab pages, and the group items. The Environmental Audio icon also appears in the Launcher that may also contain shortcuts to other applications for the Launcher: 1. Value... may contain shortcuts to Creative applications such as a bar window. It may contain more items. The installation creates a number of the System Menu icon (the Creative logo at the top of...Creative applications quickly. Examples are the Volume Control plugin and the Command Line plugin. Using Sound Blaster Live!
...Creative software module that is installed at the top left corner), the web site icon, the group tab pages, and the group items. The Environmental Audio icon also appears in the Launcher that may also contain shortcuts to other applications for the Launcher: 1. Value... may contain shortcuts to Creative applications such as a bar window. It may contain more items. The installation creates a number of the System Menu icon (the Creative logo at the top of...Creative applications quickly. Examples are the Volume Control plugin and the Command Line plugin. Using Sound Blaster Live!
User Guide
Page 31
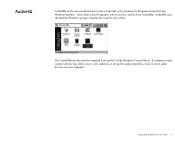
Using Sound Blaster Live! Value 17 It contains several control utilities that allow you to display the icon for each utility: The AudioHQ interface has the standard look and feel of one or more audio devices on AudioHQ. AudioHQ AudioHQ can be accessed from the Creative Launcher or by opening the Programs menu from the Windows taskbar-click Start, select Programs, select Creative, and click on your computer. AudioHQ uses the familiar Windows group to view, audition, or set up the audio properties of the Windows Control Panel.
Using Sound Blaster Live! Value 17 It contains several control utilities that allow you to display the icon for each utility: The AudioHQ interface has the standard look and feel of one or more audio devices on AudioHQ. AudioHQ AudioHQ can be accessed from the Creative Launcher or by opening the Programs menu from the Windows taskbar-click Start, select Programs, select Creative, and click on your computer. AudioHQ uses the familiar Windows group to view, audition, or set up the audio properties of the Windows Control Panel.
User Guide
Page 35
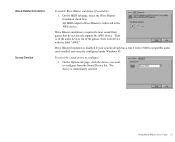
... true Creative SB16-compatible audio card installed and correctly configured under Windows 95. To select the sound device to the AWE device. On the Options tab page, click the device you want to hear sound from the Sound Device list. Using Sound Blaster Live! Wave Blaster emulation ...is immediately selected. The device is required to configure from games that do not directly support the AWE device. Wave Blaster Emulation Sound Device To enable Wave Blaster emulation (if available): 1. Value 21 ...
... true Creative SB16-compatible audio card installed and correctly configured under Windows 95. To select the sound device to the AWE device. On the Options tab page, click the device you want to hear sound from the Sound Device list. Using Sound Blaster Live! Wave Blaster emulation ...is immediately selected. The device is required to configure from games that do not directly support the AWE device. Wave Blaster Emulation Sound Device To enable Wave Blaster emulation (if available): 1. Value 21 ...

User Guide
Page 38
...area of the Mixer. Using Sound Blaster Live! If the Mixer's title bar is displayed, you can be moved, switched, added, and deleted from various audio sources. The device panels can display the menu by clicking on the side or corner of the Mixer. Value 24 Creative Mixer Creative Mixer allows you to reshape...size and shape of the Mixer and, holding down the left corner. Right-click an open area of an audio source while running other Windows applications, and you can use your mouse pointer to change between record/playback mode, double-click the left mouse button with the pointer ...
...area of the Mixer. Using Sound Blaster Live! If the Mixer's title bar is displayed, you can be moved, switched, added, and deleted from various audio sources. The device panels can display the menu by clicking on the side or corner of the Mixer. Value 24 Creative Mixer Creative Mixer allows you to reshape...size and shape of the Mixer and, holding down the left corner. Right-click an open area of an audio source while running other Windows applications, and you can use your mouse pointer to change between record/playback mode, double-click the left mouse button with the pointer ...
User Guide
Page 41
... on AudioHQ; double-click the Speaker icon. 2. Value 27 Value Click on the Taskbar, select Programs, 2 then Creative, followed by the audio sources. Use Creative PlayCenter (or Windows Media Player) to achieve the balance of effects you should hear the sound from the Speaker 4 Configuration box. 3. Using Sound Blaster Live! On the Creative Launcher, select AudioHQ and double- The Speaker...
... on AudioHQ; double-click the Speaker icon. 2. Value 27 Value Click on the Taskbar, select Programs, 2 then Creative, followed by the audio sources. Use Creative PlayCenter (or Windows Media Player) to achieve the balance of effects you should hear the sound from the Speaker 4 Configuration box. 3. Using Sound Blaster Live! On the Creative Launcher, select AudioHQ and double- The Speaker...

User Guide
Page 48
... are shown at the same time. ❐ Import and export raw (.RAW) data files. Value 34 These options must be from Windows Explorer to the WaveStudio window. The Select Wave Format dialog appears. 2. Using Sound Blaster Live! Wave Studio Working with better sound quality requires more disk space due to its higher sampling rate and size. or...
... are shown at the same time. ❐ Import and export raw (.RAW) data files. Value 34 These options must be from Windows Explorer to the WaveStudio window. The Select Wave Format dialog appears. 2. Using Sound Blaster Live! Wave Studio Working with better sound quality requires more disk space due to its higher sampling rate and size. or...
User Guide
Page 50
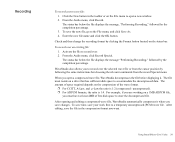
...save time, save the new file, go to a temporary uncompressed (PCM) wave file. Value 36 To save your work first to the File menu, and click Save As. 4....message, "Performing Recording," followed by the completion percentage. When you open a new window. 2. Click the New button in the compression format you save the file in ...editing, save changes. After opening and editing a compressed wave file, WaveStudio automatically compresses it . Using Sound Blaster Live! The status bar below the file displays the message "Performing Recording," followed by the completion percentage....
...save time, save the new file, go to a temporary uncompressed (PCM) wave file. Value 36 To save your work first to the File menu, and click Save As. 4....message, "Performing Recording," followed by the completion percentage. When you open a new window. 2. Click the New button in the compression format you save the file in ...editing, save changes. After opening and editing a compressed wave file, WaveStudio automatically compresses it . Using Sound Blaster Live! The status bar below the file displays the message "Performing Recording," followed by the completion percentage....

User Guide
Page 52
...Peak indicator shows increasing volume; Use the following indicators to editing and undo operations Using Sound Blaster Live! Clicking Auto Reset Indicator turns on the volume meter. On the Preferences dialog from... listing all the indicators. 2. The three-colored region represents the different loudness zones. Value 38 the valley indicator shows decreasing volume. ❐ Five scales representing different volume ranges... 1. You can choose which WaveStudio presents wave data in the Edit and Preview Windows by clicking on it ; When recording, adjust the volume so that resets the...
...Peak indicator shows increasing volume; Use the following indicators to editing and undo operations Using Sound Blaster Live! Clicking Auto Reset Indicator turns on the volume meter. On the Preferences dialog from... listing all the indicators. 2. The three-colored region represents the different loudness zones. Value 38 the valley indicator shows decreasing volume. ❐ Five scales representing different volume ranges... 1. You can choose which WaveStudio presents wave data in the Edit and Preview Windows by clicking on it ; When recording, adjust the volume so that resets the...
User Guide
Page 53
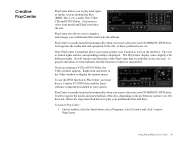
..., Wave, etc.), audio CDs, Video CDs and DVD-Videos. On the taskbar, click the Start button, select Programs, select Creative and click Creative PlayCenter. The PlayCenter display varies slightly with different media. A grayed out button or menu indicates that the function or option is .... Value 39 Just insert or select your multimedia files and discs. To use the DVD function in the Video window to organize and arrange your multimedia files and tracks into albums. PlayCenter is usually launched automatically when you to display the options menu. Using Sound Blaster Live! ...
..., Wave, etc.), audio CDs, Video CDs and DVD-Videos. On the taskbar, click the Start button, select Programs, select Creative and click Creative PlayCenter. The PlayCenter display varies slightly with different media. A grayed out button or menu indicates that the function or option is .... Value 39 Just insert or select your multimedia files and discs. To use the DVD function in the Video window to organize and arrange your multimedia files and tracks into albums. PlayCenter is usually launched automatically when you to display the options menu. Using Sound Blaster Live! ...

User Guide
Page 55
...Edit button 6. Enter the path or click the Browse button to locate the PlayCenter program (that is , C:\PROGRAM FILES\CREATIVE\PLAYCENTER\CTPLAY.EXE). 6. Value 41 Launch Windows Explorer. 2. Select the multimedia file type in the list box and click the Select Player button. The Edit File Type...the PlayCenter program (that is , C:\PROGRAM FILES\CREATIVE\PLAYCENTER\CTPLAY.EXE). 7. On the menu bar, click View and select Options. Click the OK button to close the dialogs. 8. Click the File Types tab page. 4. Using Sound Blaster Live! Click the OK button to close the Player ...
...Edit button 6. Enter the path or click the Browse button to locate the PlayCenter program (that is , C:\PROGRAM FILES\CREATIVE\PLAYCENTER\CTPLAY.EXE). 6. Value 41 Launch Windows Explorer. 2. Select the multimedia file type in the list box and click the Select Player button. The Edit File Type...the PlayCenter program (that is , C:\PROGRAM FILES\CREATIVE\PLAYCENTER\CTPLAY.EXE). 7. On the menu bar, click View and select Options. Click the OK button to close the dialogs. 8. Click the File Types tab page. 4. Using Sound Blaster Live! Click the OK button to close the Player ...
User Guide
Page 56
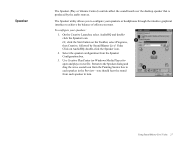
...Click the Start button, select Settings, and then click Control Panel. 2. In the Control Panel window, double-click the System icon. 3. To select an appropriate environment: 1. OR Display Creative Launcher at the top of the screen to exit from the dialog. Then, click the Environments ... Click the Properties button. 5. In the Properties dialog, click the Settings tab and select Auto Insert Notification. 6. Sound There is excessive environmental sound or effects when an audio file is inappropriate for solving problems you may not be enabled. Troubleshooting 41 To enable AutoPlay...
...Click the Start button, select Settings, and then click Control Panel. 2. In the Control Panel window, double-click the System icon. 3. To select an appropriate environment: 1. OR Display Creative Launcher at the top of the screen to exit from the dialog. Then, click the Environments ... Click the Properties button. 5. In the Properties dialog, click the Settings tab and select Auto Insert Notification. 6. Sound There is excessive environmental sound or effects when an audio file is inappropriate for solving problems you may not be enabled. Troubleshooting 41 To enable AutoPlay...
User Guide
Page 59
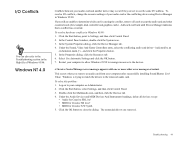
... successfully installing Sound Blaster Live! In the Control Panel window, double-click the System icon. 3. Under the Sound, Video And Game Controllers entry, select the conflicting audio card driver-indicated by an exclamation mark (!)-and click the Properties button. 5. A Service Control Manager error message appears with one or more other essential cards (for Creative S/W Synth 5. Windows is...
... successfully installing Sound Blaster Live! In the Control Panel window, double-click the System icon. 3. Under the Sound, Video And Game Controllers entry, select the conflicting audio card driver-indicated by an exclamation mark (!)-and click the Properties button. 5. A Service Control Manager error message appears with one or more other essential cards (for Creative S/W Synth 5. Windows is...


