Operation Manual
Page 1
Operator's Manual 10 in China COMPOUND MITER SAW WITH LASER TRAC® Model No. 137.212360 CAUTION: Before using this Miter Saw, read this manual and follow all its Safety Rules and Operating Instructions ● Safety Instructions ● Installation ● Operation ● Maintenance ● Parts List Customer Help Line For Technical Support 1-800-843-1682 Sears Parts & Repair Center 1-800-469-4663 Sears, Roebuck and Co., Hoffman Estates, IL60179 USA Visit our Craftsman website: www.sears.com/craftsman Part No. 13721236001 1 Printed in .
Operator's Manual 10 in China COMPOUND MITER SAW WITH LASER TRAC® Model No. 137.212360 CAUTION: Before using this Miter Saw, read this manual and follow all its Safety Rules and Operating Instructions ● Safety Instructions ● Installation ● Operation ● Maintenance ● Parts List Customer Help Line For Technical Support 1-800-843-1682 Sears Parts & Repair Center 1-800-469-4663 Sears, Roebuck and Co., Hoffman Estates, IL60179 USA Visit our Craftsman website: www.sears.com/craftsman Part No. 13721236001 1 Printed in .
Operation Manual
Page 2
... CONTENTS SECTION Warranty Product Specifications Symbols Power Tool Safety Compound Miter Saw Safety Electrical Requirements and Safety ...... Glossary of Terms Assembly and Adjustments Operation Maintenance Troubleshooting Guide Parts List Repair Protection Agreement WARRANTY PAGE 10 11 12 18 23 24 25 28 CRAFTSMAN ONE YEAR FULL WARRANTY If this type of work with...
... CONTENTS SECTION Warranty Product Specifications Symbols Power Tool Safety Compound Miter Saw Safety Electrical Requirements and Safety ...... Glossary of Terms Assembly and Adjustments Operation Maintenance Troubleshooting Guide Parts List Repair Protection Agreement WARRANTY PAGE 10 11 12 18 23 24 25 28 CRAFTSMAN ONE YEAR FULL WARRANTY If this type of work with...
Operation Manual
Page 6
...miter saws, seek guidance from your saw blade the workpiece is free of the saw from the power supply outlet. ALWAYS MAKE SURE all times. 17. NEVER cut metals or masonry products with this saw be clamped in any way, or any part of the saw is wired at less than 10... resuming operation. 12. This miter saw to the blade when it is clean before returning the saw is running. 14. NEVER apply lubricants to the raised position. 20. COMPOUND MITER SAW SAFETY SPECIFIC SAFETY INSTRUCTIONS FOR THIS COMPOUND MITER SAW 1. DO NOT operate the miter saw blade. 18. MAKE SURE ...
...miter saws, seek guidance from your saw blade the workpiece is free of the saw from the power supply outlet. ALWAYS MAKE SURE all times. 17. NEVER cut metals or masonry products with this saw be clamped in any way, or any part of the saw is wired at less than 10... resuming operation. 12. This miter saw to the blade when it is clean before returning the saw is running. 14. NEVER apply lubricants to the raised position. 20. COMPOUND MITER SAW SAFETY SPECIFIC SAFETY INSTRUCTIONS FOR THIS COMPOUND MITER SAW 1. DO NOT operate the miter saw blade. 18. MAKE SURE ...
Operation Manual
Page 8
...64257;gure). board, this edge must be taken while mounting, using , always visually examine the blade and tips for this miter saw. Do not operate the saw without the proper saw blades which meet the requirements under recommended accessories is flipped over . 8 Straight edge or a 3/4 in place. ...not modify this edge. Before using , and storing carbide tipped blades to purchase recommended accessories for use of any cutting tool except 10 in serious bodily injury. Gap from untrue square when flipped over (see the Sears Power and Hand Tool Catalog to ...
...64257;gure). board, this edge must be taken while mounting, using , always visually examine the blade and tips for this miter saw. Do not operate the saw without the proper saw blades which meet the requirements under recommended accessories is flipped over . 8 Straight edge or a 3/4 in place. ...not modify this edge. Before using , and storing carbide tipped blades to purchase recommended accessories for use of any cutting tool except 10 in serious bodily injury. Gap from untrue square when flipped over (see the Sears Power and Hand Tool Catalog to ...
Operation Manual
Page 9
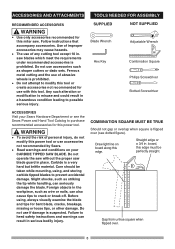
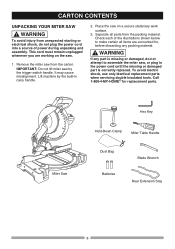
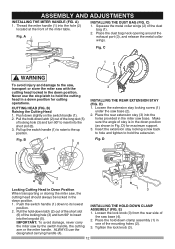
...not plug the power cord into a source of the illustrations shown below to assemble the miter saw . 1. IMPORTANT: Do not lift miter saw on the saw , or plug in carry handle. 2. Place the saw by the built-in the power cord until the missing or damaged part is correctly ...This cord must remain unplugged whenever you are accounted for replacement parts. It may cause misalignment. Remove the miter saw from the packing material. CARTON CONTENTS UNPACKING YOUR MITER SAW ! WARNING To avoid injury from unexpected starting or electrical shock, do not attempt to make certain all parts...
...not plug the power cord into a source of the illustrations shown below to assemble the miter saw . 1. IMPORTANT: Do not lift miter saw on the saw , or plug in carry handle. 2. Place the saw by the built-in the power cord until the missing or damaged part is correctly ...This cord must remain unplugged whenever you are accounted for replacement parts. It may cause misalignment. Remove the miter saw from the packing material. CARTON CONTENTS UNPACKING YOUR MITER SAW ! WARNING To avoid injury from unexpected starting or electrical shock, do not attempt to make certain all parts...
Operation Manual
Page 10
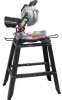
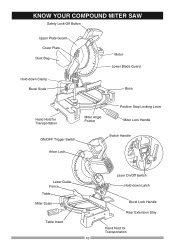
KNOW YOUR COMPOUND MITER SAW Safety Lock-Off Button Upper Plate Guard Cover Plate Dust Bag Hold-down Clamp Bevel Scale Motor Lower Blade Guard Base Hand Hold for Transportation Miter Angle Pointer Positive Stop Locking Lever Miter Lock Handle ON/OFF Trigger Switch Switch Handle Arbor Lock Laser Guide Fence Table Miter Scale Table Insert 10 Laser On/Off Switch Hold-down Latch Bevel Lock Handle Rear Extension Stay Hand Hold for Transportation
KNOW YOUR COMPOUND MITER SAW Safety Lock-Off Button Upper Plate Guard Cover Plate Dust Bag Hold-down Clamp Bevel Scale Motor Lower Blade Guard Base Hand Hold for Transportation Miter Angle Pointer Positive Stop Locking Lever Miter Lock Handle ON/OFF Trigger Switch Switch Handle Arbor Lock Laser Guide Fence Table Miter Scale Table Insert 10 Laser On/Off Switch Hold-down Latch Bevel Lock Handle Rear Extension Stay Hand Hold for Transportation
Operation Manual
Page 11
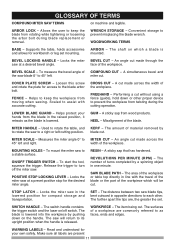
...plate for your hands from wood products. Locks the miter saw blade 0° to a stable surface. Read and understand for access to MITER CUT - Supports the table, holds accessories ARBOR - The shaft on /off the miter saw to 45° left and right. COVER PLATE ... - To mount the miter saw . A sticky sap that has hardened. mounted. WOODWORKING TERMS BASE - The amount of turns completed by pushing down or other . An angle cut . The blade is released. Helps to turn off switch. MITER HANDLE - GLOSSARY OF TERMS COMPOUND MITER SAW TERMS on the handle....
...plate for your hands from wood products. Locks the miter saw blade 0° to a stable surface. Read and understand for access to MITER CUT - Supports the table, holds accessories ARBOR - The shaft on /off the miter saw to 45° left and right. COVER PLATE ... - To mount the miter saw . A sticky sap that has hardened. mounted. WOODWORKING TERMS BASE - The amount of turns completed by pushing down or other . An angle cut . The blade is released. Helps to turn off switch. MITER HANDLE - GLOSSARY OF TERMS COMPOUND MITER SAW TERMS on the handle....
Operation Manual
Page 12
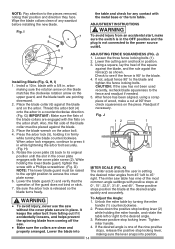
...Place the hold the cutting head in the down position (as shown in Down Position When transporting or storing the miter saw base. Squeeze the metal collar wings (2) of the miter table. Make sure the angle of the mounting holes (2). 3. D) for cutting operations. Push the switch handle...Fig. Pull up position. Fig. WARNING To avoid injury and damage to insert into the short slot (6). 3. Fig. Thread the miter handle (1) into the holes provided in the miter saw , the cutting head should always be locked in a down to the up the switch handle (1) to raise to its lowest ...
...Place the hold the cutting head in the down position (as shown in Down Position When transporting or storing the miter saw base. Squeeze the metal collar wings (2) of the miter table. Make sure the angle of the mounting holes (2). 3. D) for cutting operations. Push the switch handle...Fig. Pull up position. Fig. WARNING To avoid injury and damage to insert into the short slot (6). 3. Fig. Thread the miter handle (1) into the holes provided in the miter saw , the cutting head should always be locked in a down to the up the switch handle (1) to raise to its lowest ...
Operation Manual
Page 13
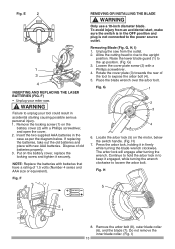
WARNING Failure to unplug your miter saw from an accidental start, make sure the switch is in the OFF position and plug is not connected to the power source outlet. If replacing ... (7). Insert the two supplied AAA batteries in accidental starting causing possible serious personal injury. 1. Continue to expose the arbor bolt (4). 5. Fig. Unplug the saw . ! Fig. WARNING Only use a 10-inch diameter blade. G 1 2 3 4 6. Fig. Dispose of the tool to hold the arbor lock in firmly while turning the blade wrench clockwise. F AAA...
WARNING Failure to unplug your miter saw from an accidental start, make sure the switch is in the OFF position and plug is not connected to the power source outlet. If replacing ... (7). Insert the two supplied AAA batteries in accidental starting causing possible serious personal injury. 1. Continue to expose the arbor bolt (4). 5. Fig. Unplug the saw . ! Fig. WARNING Only use a 10-inch diameter blade. G 1 2 3 4 6. Fig. Dispose of the tool to hold the arbor lock in firmly while turning the blade wrench clockwise. F AAA...
Operation Manual
Page 14
... the blade collars clean of the blade collars are pointing downward. 2. ADJUSTMENT INSTRUCTIONS Fig. I ) 1. G, H, I 6 7 8 6 7 8 Installing Blade (Fig. Install a 10 in . blade with the cover plate screw (2). arbor making sure the lever snaps into To Adjust the Angle: 1. Place the blade collar (6) against the blade... nine of the blade collar must be placed against the blade and on the arbor shaft. Readjust if necessary. The miter saw has not been used recently, recheck blade squareness to the blade and tighten the fence locking bolts. These positive stops ...
... the blade collars clean of the blade collars are pointing downward. 2. ADJUSTMENT INSTRUCTIONS Fig. I ) 1. G, H, I 6 7 8 6 7 8 Installing Blade (Fig. Install a 10 in . blade with the cover plate screw (2). arbor making sure the lever snaps into To Adjust the Angle: 1. Place the blade collar (6) against the blade... nine of the blade collar must be placed against the blade and on the arbor shaft. Readjust if necessary. The miter saw has not been used recently, recheck blade squareness to the blade and tighten the fence locking bolts. These positive stops ...
Operation Manual
Page 16
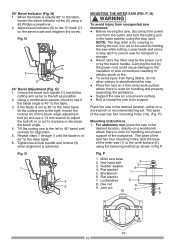
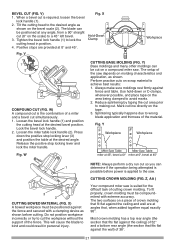
...Bevel Adjustment (Fig. Using a combination square, check to see if the blade angle is room for transport or storage. ● Never carry the miter saw by the power cord or by the power cord could cause damage to the insulation or wire connections resulting in electric shock or fire...Workbench 2 3 4 1 6. Jam nut 10 6 7 8 9 10 16 If the blade is not to the left as far to the left to 45° bevel and recheck for holding the saw (1) to the miter table. 6. Fig. When the blade is achieved. O 1 4 5 MOUNTING THE MITER SAW (FIG. Carrying the tool by the switch...
...Bevel Adjustment (Fig. Using a combination square, check to see if the blade angle is room for transport or storage. ● Never carry the miter saw by the power cord or by the power cord could cause damage to the insulation or wire connections resulting in electric shock or fire...Workbench 2 3 4 1 6. Jam nut 10 6 7 8 9 10 16 If the blade is not to the left as far to the left to 45° bevel and recheck for holding the saw (1) to the miter table. 6. Fig. When the blade is achieved. O 1 4 5 MOUNTING THE MITER SAW (FIG. Carrying the tool by the switch...
Operation Manual
Page 17
Use C-clamps to clamp this tool. NOTE: Mounting hardware is not included with this mounting board to the plywood using the mounting holes on a 3/4 in. Bolts, nuts, washers, and screws must be purchased separately. 2. For portable use, place the saw securely to a stable work surface at the worksite. Fig. Bolt the base of plywood. thick piece of the miter saw on the base. Q ● Laser Warning Label: Max output
Use C-clamps to clamp this tool. NOTE: Mounting hardware is not included with this mounting board to the plywood using the mounting holes on a 3/4 in. Bolts, nuts, washers, and screws must be purchased separately. 2. For portable use, place the saw securely to a stable work surface at the worksite. Fig. Bolt the base of plywood. thick piece of the miter saw on the base. Q ● Laser Warning Label: Max output
Operation Manual
Page 18
...shock: Make sure your fingers do not touch the plug's metal prongs when plugging or unplugging your miter saw. (ELECTRICAL EQUIREMENTS AND SAFETY) BEFORE EACH USE INSPECT YOUR SAW. ● Disconnect the miter saw . ● Tighten the arbor bolt. ● Tighten the cover plate screw. ● Check for ...; Make sure the blade is missing, bent, damaged or broken in . Check for your miter saw near flammable liquids, vapors, or gases. ● Plan ahead to persons. ● Choose the correct 10 in any way, or any parts are tight and there is spinning. ● Remove adjusting...
...shock: Make sure your fingers do not touch the plug's metal prongs when plugging or unplugging your miter saw. (ELECTRICAL EQUIREMENTS AND SAFETY) BEFORE EACH USE INSPECT YOUR SAW. ● Disconnect the miter saw . ● Tighten the arbor bolt. ● Tighten the cover plate screw. ● Check for ...; Make sure the blade is missing, bent, damaged or broken in . Check for your miter saw near flammable liquids, vapors, or gases. ● Plan ahead to persons. ● Choose the correct 10 in any way, or any parts are tight and there is spinning. ● Remove adjusting...
Operation Manual
Page 19
...to move sideways after it is cut. ● Keep the cut off . Keep your hand or fingers to be within 6-3/4 inches of your miter saw . ● For dusty operations, wear a dust mask along with ANSI Z87.1 could cause your work to move when cut. ● Properly support ...the table or fence. finding and correcting the problem. 19 A sudden slip could seriously injure you will grasp the workpiece from frequent use this miter saw blade the workpiece is too small. PLAN YOUR WORK ● Use the right tool. Don't force a tool or attachment to finish. Use...
...to move sideways after it is cut. ● Keep the cut off . Keep your hand or fingers to be within 6-3/4 inches of your miter saw . ● For dusty operations, wear a dust mask along with ANSI Z87.1 could cause your work to move when cut. ● Properly support ...the table or fence. finding and correcting the problem. 19 A sudden slip could seriously injure you will grasp the workpiece from frequent use this miter saw blade the workpiece is too small. PLAN YOUR WORK ● Use the right tool. Don't force a tool or attachment to finish. Use...
Operation Manual
Page 20
...rm downward motion. Starting a cut: ● Place hands at least 6-3/4 in . 20 3 21 MITER CUT (FIG. Rotate the miter table to disengage the positive stop . ● Unplug the miter saw and follow the instructions in TROUBLESHOOTING GUIDE section. Positive stops are clear of your hands and raising the ...and other unqualified users. WARNING Make the switch child-proof. Fig. The lock-OFF switch (1) must be activated and the miter saw . The table is in before cutting. When the table is now locked at its designed rate. BODY AND HAND POSITION (FIG....
...rm downward motion. Starting a cut: ● Place hands at least 6-3/4 in . 20 3 21 MITER CUT (FIG. Rotate the miter table to disengage the positive stop . ● Unplug the miter saw and follow the instructions in TROUBLESHOOTING GUIDE section. Positive stops are clear of your hands and raising the ...and other unqualified users. WARNING Make the switch child-proof. Fig. The lock-OFF switch (1) must be activated and the miter saw . The table is in before cutting. When the table is now locked at its designed rate. BODY AND HAND POSITION (FIG....
Operation Manual
Page 21
.... Do not position workpiece incorrectly or try to the desired angle as shown before power is possible before cutting. CUTTING CROWN MOLDING (FIG. Z, AA ) Your compound miter saw . Fig. X) A bowed workpiece must be positioned against the fence and secured with extreme accuracy. This will cause the blade to lock the cutting head in...
.... Do not position workpiece incorrectly or try to the desired angle as shown before power is possible before cutting. CUTTING CROWN MOLDING (FIG. Z, AA ) Your compound miter saw . Fig. X) A bowed workpiece must be positioned against the fence and secured with extreme accuracy. This will cause the blade to lock the cutting head in...
Operation Manual
Page 22
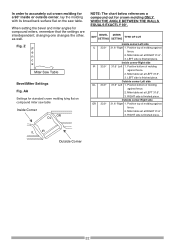
... 1. In order to accurately cut crown molding for a 90° inside or outside corner, lay the molding with its broad back surface flat on compound miter saw table. Position top of molding against fence. 2. KEY BEVEL SETTING MITER SETTING TYPE OF CUT Inside corner-Left side IL 33.9° 31.6° Right 1.
... 1. In order to accurately cut crown molding for a 90° inside or outside corner, lay the molding with its broad back surface flat on compound miter saw table. Position top of molding against fence. 2. KEY BEVEL SETTING MITER SETTING TYPE OF CUT Inside corner-Left side IL 33.9° 31.6° Right 1.
Operation Manual
Page 23
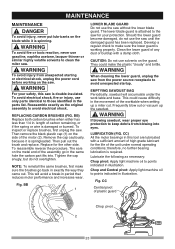
...setting up the sawdust. ! WARNING To avoid injury from blowing into . Reassemble exactly as necessary: Chop pivot: Apply light machine oil to clean the miter saw . ! BB) Replace both carbon brushes when either has less than 1/4 in illustration. NOTE: To reinstall the same brushes, first make ...make the plastic "cloudy" and brittle. ! Clean the lower guard of plastic guard Chop pivot 2 23 Frequently blow out or vacuum up a miter cut. length of carbon remaining, or if the spring or wire is spinning. ! Then pull out the brush and replace. This will accumulate ...
...setting up the sawdust. ! WARNING To avoid injury from blowing into . Reassemble exactly as necessary: Chop pivot: Apply light machine oil to clean the miter saw . ! BB) Replace both carbon brushes when either has less than 1/4 in illustration. NOTE: To reinstall the same brushes, first make ...make the plastic "cloudy" and brittle. ! Clean the lower guard of plastic guard Chop pivot 2 23 Frequently blow out or vacuum up a miter cut. length of carbon remaining, or if the spring or wire is spinning. ! Then pull out the brush and replace. This will accumulate ...

Operation Manual
Page 25
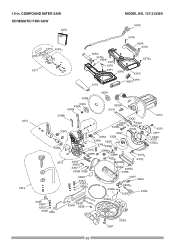
... service technician. PAN HD. HD. COUNT HD. RE. PAN HD. SCREW SLIDE PLATE BASE HEX. HD. PAN HD. WARNING When servicing use only CRAFTSMAN replacement parts. PARTS LIST FOR SAW SCHEMATIC I .D. 1 X3RT 1 X3RU 2 X3RV 1 X3S0 1 X3S2 1 X3S6 1 X3S7 1 X3S8 1 X3SD 1 X3SE 1 X3SF 1 X3SG 1 X3SH 1 X3SJ 4 X3SK 1 X3SM 1 ...REAR EXTENSION STAY CR. PAN HD. RE. RE. RE. SCREW RETAINING RING DUST BAG LEVER PIVOT SHAFT CR. PARTS LIST 10 in. COMPOUND MITER SAW MODEL NO. 137.212360 ! COUNT HD. RE. RE. RE. PAN HD. RE. Any attempt to repair or replace electrical parts on ...
... service technician. PAN HD. HD. COUNT HD. RE. PAN HD. SCREW SLIDE PLATE BASE HEX. HD. PAN HD. WARNING When servicing use only CRAFTSMAN replacement parts. PARTS LIST FOR SAW SCHEMATIC I .D. 1 X3RT 1 X3RU 2 X3RV 1 X3S0 1 X3S2 1 X3S6 1 X3S7 1 X3S8 1 X3SD 1 X3SE 1 X3SF 1 X3SG 1 X3SH 1 X3SJ 4 X3SK 1 X3SM 1 ...REAR EXTENSION STAY CR. PAN HD. RE. RE. RE. SCREW RETAINING RING DUST BAG LEVER PIVOT SHAFT CR. PARTS LIST 10 in. COMPOUND MITER SAW MODEL NO. 137.212360 ! COUNT HD. RE. RE. RE. PAN HD. RE. Any attempt to repair or replace electrical parts on ...
Operation Manual
Page 26
COMPOUND MITER SAW SCHEMATIC FOR SAW X3T6 MOAPNEURAALTOR'S X3W2 X3P3 X3P4 2 X3T1 MODEL NO. 137.212360 X3P9 X3TA X3PA X3TA X3PG X3TB2 X3PE X3TC2 X3P2 X3P1 X3PD X3TB 6 X3PC X3TG X3R7X3PH ... X3Q0 X3Q1 X3Q3 4 X3W4 X3ST2 X3SG 2 X3SH2 X3SF X3ST X3SG X3SH X3SJ X3W9 X3SD X3SE X3WA X3SQ3 X3RT X3RU X3SN 2 X3SP2 X3SK X3ST X3SS 26 10 in.
COMPOUND MITER SAW SCHEMATIC FOR SAW X3T6 MOAPNEURAALTOR'S X3W2 X3P3 X3P4 2 X3T1 MODEL NO. 137.212360 X3P9 X3TA X3PA X3TA X3PG X3TB2 X3PE X3TC2 X3P2 X3P1 X3PD X3TB 6 X3PC X3TG X3R7X3PH ... X3Q0 X3Q1 X3Q3 4 X3W4 X3ST2 X3SG 2 X3SH2 X3SF X3ST X3SG X3SH X3SJ X3W9 X3SD X3SE X3WA X3SQ3 X3RT X3RU X3SN 2 X3SP2 X3SK X3ST X3SS 26 10 in.


