

Operation Manual
Page 1
Sears, Roebuck and Co., Hoffman Estates, IL 60179 U.S.A Visit our Craftsman® website: www.craftsman.com • WARRANTY • SAFETY • ASSEMBLY • OPERATION • MAINTENANCE • PARTS LIST Operator's Manual 12-in. 18 Volt Weedwacker® Cordless Trimmer Model No. 172.74815 CHARGE BATTERY BEFORE FIRST USE CAUTION: Read, understand and follow all Safety Rules and Operating Instructions in this Manual before using this product.
Sears, Roebuck and Co., Hoffman Estates, IL 60179 U.S.A Visit our Craftsman® website: www.craftsman.com • WARRANTY • SAFETY • ASSEMBLY • OPERATION • MAINTENANCE • PARTS LIST Operator's Manual 12-in. 18 Volt Weedwacker® Cordless Trimmer Model No. 172.74815 CHARGE BATTERY BEFORE FIRST USE CAUTION: Read, understand and follow all Safety Rules and Operating Instructions in this Manual before using this product.

Operation Manual
Page 2
... attention and understanding. The purpose of safety symbols is to others . manual, including all safety alert symbols such as cutting line, lamps, batteries, bits, blades, or bonnets. unFdaeilrusrteandto foallllowsafeatlyl ininsstrtruucctitoionnss liisntetdhis below : aNrOe TnEo:t Efoqllouwipemde. MAaLyEbReTuseSdYMinBcOonLj:unctIinodnicawteitsh DoAthNerGEsyRm,... Pages Accessories Pages Parts List Pages 2 3 4- 10 11 12- 14 14- 20 20- 25 26 26- 27 28- 29 TWO YEAR FULL WARRANTY ON CRAFTSMAN WEEDWACKER _ CORDLESS TRIMMER If this warranty applies for only 90 days from the date of...
... attention and understanding. The purpose of safety symbols is to others . manual, including all safety alert symbols such as cutting line, lamps, batteries, bits, blades, or bonnets. unFdaeilrusrteandto foallllowsafeatlyl ininsstrtruucctitoionnss liisntetdhis below : aNrOe TnEo:t Efoqllouwipemde. MAaLyEbReTuseSdYMinBcOonLj:unctIinodnicawteitsh DoAthNerGEsyRm,... Pages Accessories Pages Parts List Pages 2 3 4- 10 11 12- 14 14- 20 20- 25 26 26- 27 28- 29 TWO YEAR FULL WARRANTY ON CRAFTSMAN WEEDWACKER _ CORDLESS TRIMMER If this warranty applies for only 90 days from the date of...

Operation Manual
Page 3
... MODEL 71-74815 CHARGING STAND CGT 183UA-48 (C1817A005) BATTERY PACK CGT 183 UA-42 (WA3127) ALWAYS keep bystanders and visitors at fast speeds. USE ONLY cutting line that may create a risk of the tool in serious personal injury. 4. ELECTRICAL SAFETY operating this cordless trimmer, Failure to...DO NOT wear loose clothing or jewelry. Loose clothing or long hair can result in moving parts. DISCONNECT the battery before using this cordless trimmer. KNOW your hair, clothing, and gloves away from moving parts. CHECK for misalignment or binding of moving parts, breakage of children...
... MODEL 71-74815 CHARGING STAND CGT 183UA-48 (C1817A005) BATTERY PACK CGT 183 UA-42 (WA3127) ALWAYS keep bystanders and visitors at fast speeds. USE ONLY cutting line that may create a risk of the tool in serious personal injury. 4. ELECTRICAL SAFETY operating this cordless trimmer, Failure to...DO NOT wear loose clothing or jewelry. Loose clothing or long hair can result in moving parts. DISCONNECT the battery before using this cordless trimmer. KNOW your hair, clothing, and gloves away from moving parts. CHECK for misalignment or binding of moving parts, breakage of children...

Operation Manual
Page 4
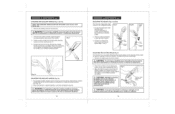
...holding the trimmer. 8. Following this trimmer is out of the reach of personal injury, never use only the cutting line provided with water immediately. 18. Never pull... page 17, Fig. 5a) 12. Properly dispose of oil and grease. For best results, your cordless trimmer. DO NOT FORCE the trimmer. KEEP guard in place and ...Volts Amps Hertz Watts Minutes Alternating current Direct current No-load speed Class II construction, Double Insulated Revolutions per minute Strokes per minute Orbits per minute Indicates danger, warning or caution. DO NOT grasp or touch the exposed cutting line...
...holding the trimmer. 8. Following this trimmer is out of the reach of personal injury, never use only the cutting line provided with water immediately. 18. Never pull... page 17, Fig. 5a) 12. Properly dispose of oil and grease. For best results, your cordless trimmer. DO NOT FORCE the trimmer. KEEP guard in place and ...Volts Amps Hertz Watts Minutes Alternating current Direct current No-load speed Class II construction, Double Insulated Revolutions per minute Strokes per minute Orbits per minute Indicates danger, warning or caution. DO NOT grasp or touch the exposed cutting line...

Operation Manual
Page 5
... objects and when necessary edge or trim by lawn and garden tools contain chemicals known to follow all times. 25. Use 12-gauge for damage. NYLON CUTTING LINE Keep face, hands and feet clear of work away from chemically treated lumber. MAKE SURE that it to an authorized serviceman ...etc. An AWG (American Wire Gauge) size of electric shock. 2. Take it will increase the risk of at least 100 feet away. SAFETY RULES FOR CORDLESS TRIMMERS cont. 23. Extension cordsl00=ft, or longer are : . INSPECT tool cords for an extension cord of 25-ft. Damage to damage or stress. Make...
... objects and when necessary edge or trim by lawn and garden tools contain chemicals known to follow all times. 25. Use 12-gauge for damage. NYLON CUTTING LINE Keep face, hands and feet clear of work away from chemically treated lumber. MAKE SURE that it to an authorized serviceman ...etc. An AWG (American Wire Gauge) size of electric shock. 2. Take it will increase the risk of at least 100 feet away. SAFETY RULES FOR CORDLESS TRIMMERS cont. 23. Extension cordsl00=ft, or longer are : . INSPECT tool cords for an extension cord of 25-ft. Damage to damage or stress. Make...

Operation Manual
Page 6
...fire. 11. If you loan someone borrows this tool, also loan them to hearing loss. 4. Wear appropriate personal hearing protection during a power surge. 12. Do not disassemble charging stand.Take it to prevent misuse of the tool, a guard or other part that is missing or damaged, do not ...electric shock or damage if metal items should be carefully checked to determine if it also will help prevent damage during use . Remove the trimmer, auxiliary handle, safety guard, box containing the battery pack and charger, wall mount bracket for charger and wall mount bracket for damaged parts....
...fire. 11. If you loan someone borrows this tool, also loan them to hearing loss. 4. Wear appropriate personal hearing protection during a power surge. 12. Do not disassemble charging stand.Take it to prevent misuse of the tool, a guard or other part that is missing or damaged, do not ...electric shock or damage if metal items should be carefully checked to determine if it also will help prevent damage during use . Remove the trimmer, auxiliary handle, safety guard, box containing the battery pack and charger, wall mount bracket for charger and wall mount bracket for damaged parts....

Operation Manual
Page 7
... shaft easily rotates 180° for trimming or edging 3. 18 Volt Cordless / 7000 RPM (no-load speed) for efficient trimming and edging. 4 18.0 Volt, 15 cell Nickel-Cadmium Battery Pack CGT183UA-42 (WA3127) recharges... in 1 hour under normal use , handling comfort and efficient trimming and edging. 12. Four fingerTrigger Switch with all trimming and edging applications. Adjustable Telescopic Shaft allows adjustments from 16 to the desired working height. 11. Your trimmer uses: 0.065 inch diameter twisted line...
... shaft easily rotates 180° for trimming or edging 3. 18 Volt Cordless / 7000 RPM (no-load speed) for efficient trimming and edging. 4 18.0 Volt, 15 cell Nickel-Cadmium Battery Pack CGT183UA-42 (WA3127) recharges... in 1 hour under normal use , handling comfort and efficient trimming and edging. 12. Four fingerTrigger Switch with all trimming and edging applications. Adjustable Telescopic Shaft allows adjustments from 16 to the desired working height. 11. Your trimmer uses: 0.065 inch diameter twisted line...

Operation Manual
Page 8
... LED light will go off and the red LED will become hot, it does not occur with groove in your nearest Sears store or other Craftsman outlet for free replacement. 8. Make sure power supply to the charging stand is required to fully recharge battery pack. 1 NOTE: Within the ...Charging Stand Number Battery Pack Number 12 inches 7000 RPM 18.0 Volt 0.065-inch twisted line Automatic 4 positions From 16 to 25 inches 12OV,60Hz AC I hour CGTt 83UA-48 (C1817A005) CGTt 83UA-42 (WA 3127) CHARGING THE BATTERY PACK (Fig. 3 and 3a) The battery pack for this trimmer. 2. several cycles (operation ...
... LED light will go off and the red LED will become hot, it does not occur with groove in your nearest Sears store or other Craftsman outlet for free replacement. 8. Make sure power supply to the charging stand is required to fully recharge battery pack. 1 NOTE: Within the ...Charging Stand Number Battery Pack Number 12 inches 7000 RPM 18.0 Volt 0.065-inch twisted line Automatic 4 positions From 16 to 25 inches 12OV,60Hz AC I hour CGTt 83UA-48 (C1817A005) CGTt 83UA-42 (WA 3127) CHARGING THE BATTERY PACK (Fig. 3 and 3a) The battery pack for this trimmer. 2. several cycles (operation ...

Operation Manual
Page 9
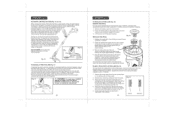
... (force) it at your side. It can cause damage to the trimmer head before beginning operation. z_ WARNING: This Cordless Trimmer is always in the trimmer head. 5. i THE EDGE GUIDE (Fig. 6) Your trimmer comes with an Edge Guide that is installed. iNSTALLiNG THE BATTERY PACK ... Make sure the latches on trimmer. 2. Remove the battery pack from the trimmer BEFORE installing parts, cleaning the trimmer, making any adjustments or storing the trimmer 16 INSTALLING THE SAFETY GUARD (Figs. 5 and 5a) 1. Insert the edge of the trimmer's head, carefullly lining the screw hole in Fig....
... (force) it at your side. It can cause damage to the trimmer head before beginning operation. z_ WARNING: This Cordless Trimmer is always in the trimmer head. 5. i THE EDGE GUIDE (Fig. 6) Your trimmer comes with an Edge Guide that is installed. iNSTALLiNG THE BATTERY PACK ... Make sure the latches on trimmer. 2. Remove the battery pack from the trimmer BEFORE installing parts, cleaning the trimmer, making any adjustments or storing the trimmer 16 INSTALLING THE SAFETY GUARD (Figs. 5 and 5a) 1. Insert the edge of the trimmer's head, carefullly lining the screw hole in Fig....
Operation Manual
Page 10
... tightening knob (counterclockwise) and remove from the trimmer. Z_ WARNING: To avoid injury, adjust the auxiliary handle for better control of the tool in unexpected situations. 1 18 ADJUSTINGTHE HEIGHT (Figs. 8 and 8a) The Trimmer's Telescopic Shaft Comes in desired position, turn ...clockwise). DO NOT overreach when operating the trimmer. To adjust the trimmer head angle: 1. Head will click into 4 different locked...
... tightening knob (counterclockwise) and remove from the trimmer. Z_ WARNING: To avoid injury, adjust the auxiliary handle for better control of the tool in unexpected situations. 1 18 ADJUSTINGTHE HEIGHT (Figs. 8 and 8a) The Trimmer's Telescopic Shaft Comes in desired position, turn ...clockwise). DO NOT overreach when operating the trimmer. To adjust the trimmer head angle: 1. Head will click into 4 different locked...

Operation Manual
Page 11
...; (Figs. 10, 11, 11a and 11b) 1. Pull bottom collar down Rotate j troepieassheaft, bottom collar to lock TURNINGTRIMMER ON AND OFF (Fig. 12) Your edger / trimmer has an extended length (4-finger) ON / OFF trigger switch and a safety ON button, both of which can result in the safety button, squeeze the... until the safety ON button is on, you can result in place. can release the safety button and the trimmer will remain on . 3. Allow at least 5 seconds for the cutting spool (line) to stop rotating• 2O TRIMMING AND EDGING (Figs. 13 and 14) When trimming, cut from left...
...; (Figs. 10, 11, 11a and 11b) 1. Pull bottom collar down Rotate j troepieassheaft, bottom collar to lock TURNINGTRIMMER ON AND OFF (Fig. 12) Your edger / trimmer has an extended length (4-finger) ON / OFF trigger switch and a safety ON button, both of which can result in the safety button, squeeze the... until the safety ON button is on, you can result in place. can release the safety button and the trimmer will remain on . 3. Allow at least 5 seconds for the cutting spool (line) to stop rotating• 2O TRIMMING AND EDGING (Figs. 13 and 14) When trimming, cut from left...
Operation Manual
Page 12
... with a new factory pre-wound spool, Craftsman 71-85937. 2. Snap the spool head cover back on the spool. replacement trimmer line, Extra Quiet spiral, in the spool housing. 3. Temporarily park the line in attempt to the correct length when you...line reaches the line cutter. Remove any adjustments. 22 TO REPLACE CUTTING LINE (Fig. 18) REMOVE THE SPOOL For easy spool replacement we recommend using 71-85937, automatic feed replacement spool and 0.065 cutting line. The line will wear faster and /_' require more line, stop the trimmer approximately 4 to line up with the line...
... with a new factory pre-wound spool, Craftsman 71-85937. 2. Snap the spool head cover back on the spool. replacement trimmer line, Extra Quiet spiral, in the spool housing. 3. Temporarily park the line in attempt to the correct length when you...line reaches the line cutter. Remove any adjustments. 22 TO REPLACE CUTTING LINE (Fig. 18) REMOVE THE SPOOL For easy spool replacement we recommend using 71-85937, automatic feed replacement spool and 0.065 cutting line. The line will wear faster and /_' require more line, stop the trimmer approximately 4 to line up with the line...

Operation Manual
Page 13
...spool wear. 9. See page 22, AUTOMATIC LINE FEED SYSTEM and page 23, REPLACE CUTTING LINE and FiLLiNG SPOOL WITH CUTTING LINE. Children MUST NOT operate the tool. } 24 BRACKETS FOR CORDLESS TRIMMER, CHARGING STAND AND BATTERY PACK cont. (Figs. 21, 22, 22a and 23) Trimmer mounts two ways , Fig. 21 . ...; Failure to a power outlet. } z_ WARNING: NEVER store your cordless trimmer, or leave your trimmer, charging stand and battery pack up , out of the cutting line to do so can result in damage to trimmer, charging stand and battery pack and can be conveniently stored in the charging...
...spool wear. 9. See page 22, AUTOMATIC LINE FEED SYSTEM and page 23, REPLACE CUTTING LINE and FiLLiNG SPOOL WITH CUTTING LINE. Children MUST NOT operate the tool. } 24 BRACKETS FOR CORDLESS TRIMMER, CHARGING STAND AND BATTERY PACK cont. (Figs. 21, 22, 22a and 23) Trimmer mounts two ways , Fig. 21 . ...; Failure to a power outlet. } z_ WARNING: NEVER store your cordless trimmer, or leave your trimmer, charging stand and battery pack up , out of the cutting line to do so can result in damage to trimmer, charging stand and battery pack and can be conveniently stored in the charging...
Operation Manual
Page 14
.... SEE OPERATORS MANUAL NEED MORE HELP? J CUTTING LINE Replace the cutting line ONLY with 0.065 inch (1.65 mm) twisted (helical or spiral) shaped, not round, line for this toot have the problem corrected before using trimmer. Craftsman Professional O.065-in a "discharged" condition BATTERY PACK...and spool area to replace the batteries. Z_ WARNING: When servicing, use . The batteries in packs of its components. replacement trimmer line, 71-85760, in this tool is recommended. Use of any of 40ft., is equipped with these batteries, especially when wearing ...
.... SEE OPERATORS MANUAL NEED MORE HELP? J CUTTING LINE Replace the cutting line ONLY with 0.065 inch (1.65 mm) twisted (helical or spiral) shaped, not round, line for this toot have the problem corrected before using trimmer. Craftsman Professional O.065-in a "discharged" condition BATTERY PACK...and spool area to replace the batteries. Z_ WARNING: When servicing, use . The batteries in packs of its components. replacement trimmer line, 71-85760, in this tool is recommended. Use of any of 40ft., is equipped with these batteries, especially when wearing ...

Operation Manual
Page 15
...41 19 / / / 20 \ \ \\ \ 34 / 31 12=in.Weedwacker ®Cordless Trimmer Model No. 172.74815 The modelnumberwill be foundon the nameplate of theTrimmer. Part Description Qty. ... Spring 1 1 31 CGT183UA-31 Line Feeder 1 8 CGT183UA-8 Lock Button 1 32 CGT183UA-32 Bolt 1 9 CGT183UA-9 CompressionSpring 1 33 CGT183UA-33 Fixing Block 1 12 CGT183UA-12 Steady Handle Supper 1 34 CGT183UA...39 CGT183UA-39 Switch 1 17 CGT183UA-17 Bolt 1 40 CGT183UA-40 Inner Wire 1 18 CGT183UA-18 Pivot Release Lever 1 41 CGT183UA-41 Trigger 1 19 CGT183UA-19 Left & Right ...
...41 19 / / / 20 \ \ \\ \ 34 / 31 12=in.Weedwacker ®Cordless Trimmer Model No. 172.74815 The modelnumberwill be foundon the nameplate of theTrimmer. Part Description Qty. ... Spring 1 1 31 CGT183UA-31 Line Feeder 1 8 CGT183UA-8 Lock Button 1 32 CGT183UA-32 Bolt 1 9 CGT183UA-9 CompressionSpring 1 33 CGT183UA-33 Fixing Block 1 12 CGT183UA-12 Steady Handle Supper 1 34 CGT183UA...39 CGT183UA-39 Switch 1 17 CGT183UA-17 Bolt 1 40 CGT183UA-40 Inner Wire 1 18 CGT183UA-18 Pivot Release Lever 1 41 CGT183UA-41 Trigger 1 19 CGT183UA-19 Left & Right ...


