

Operation Manual
Page 1
Sears, Roebuck and Co., Hoffman Estates, IL 60179 U.S.A Visit our Craftsman® website: www.craftsman.com • WARRANTY • SAFETY • ASSEMBLY • OPERATION • MAINTENANCE • PARTS LIST Operator's Manual 12-in. 18 Volt Weedwacker® Cordless Trimmer Model No. 172.74815 CHARGE BATTERY BEFORE FIRST USE CAUTION: Read, understand and follow all Safety Rules and Operating Instructions in this Manual before using this product.
Sears, Roebuck and Co., Hoffman Estates, IL 60179 U.S.A Visit our Craftsman® website: www.craftsman.com • WARRANTY • SAFETY • ASSEMBLY • OPERATION • MAINTENANCE • PARTS LIST Operator's Manual 12-in. 18 Volt Weedwacker® Cordless Trimmer Model No. 172.74815 CHARGE BATTERY BEFORE FIRST USE CAUTION: Read, understand and follow all Safety Rules and Operating Instructions in this Manual before using this product.

Operation Manual
Page 2
manual, including all safety alert symbols such as cutting line, lamps, batteries, bits, blades, or bonnets. Always follow the safety precautions to reduce the risk of fire, electric shock and personal injury. Each message is preceded by ... Description Pages Assembly and Adjustments Pages Operation Pages Maintenance Pages Accessories Pages Parts List Pages 2 3 4- 10 11 12- 14 14- 20 20- 25 26 26- 27 28- 29 TWO YEAR FULL WARRANTY ON CRAFTSMAN WEEDWACKER _ CORDLESS TRIMMER If this safety warning CAN result in death or } serious injury to yourself or to others . If...
manual, including all safety alert symbols such as cutting line, lamps, batteries, bits, blades, or bonnets. Always follow the safety precautions to reduce the risk of fire, electric shock and personal injury. Each message is preceded by ... Description Pages Assembly and Adjustments Pages Operation Pages Maintenance Pages Accessories Pages Parts List Pages 2 3 4- 10 11 12- 14 14- 20 20- 25 26 26- 27 28- 29 TWO YEAR FULL WARRANTY ON CRAFTSMAN WEEDWACKER _ CORDLESS TRIMMER If this safety warning CAN result in death or } serious injury to yourself or to others . If...

Operation Manual
Page 3
... line that is not a toy. 5. DO NOT use proper safety equipment. 1 1. TOOL USE AND CARE SAFETY oe/_pleecrtWartiicnAgRsNhotIhNciksG, :tfoiroel.BaEFnadSil/uoUrreREsteotroiofourlseloawdpeaarnslldoninuasnl tdreuirncsjttuiaornynd.s laisllteidnstbruelcotwionms ayberfeosruelt in this manual before making any other batteries may be suitable for misalignment or binding of any stones, sticks, debris or objects that cannot be suitable for this cordless trimmer...
... line that is not a toy. 5. DO NOT use proper safety equipment. 1 1. TOOL USE AND CARE SAFETY oe/_pleecrtWartiicnAgRsNhotIhNciksG, :tfoiroel.BaEFnadSil/uoUrreREsteotroiofourlseloawdpeaarnslldoninuasnl tdreuirncsjttuiaornynd.s laisllteidnstbruelcotwionms ayberfeosruelt in this manual before making any other batteries may be suitable for misalignment or binding of any stones, sticks, debris or objects that cannot be suitable for this cordless trimmer...

Operation Manual
Page 4
...of a dropped or damaged battery pack immediately. 17. KNOW your battery operated tool or when changing accessories. SAFETY RULES FOR CORDLESS TRIMMERS cont. 7. Do not try to cut more than 50°F but less than what you and cutting line. When changing cutting line spool be performed at ... sharp edges or moving parts during use only the cutting line provided with water immediately. 18. Following this manual. DO NOT use solvents, brake fluids, gasoline, or other moving parts. ALWAYS hold the trimmer by unqualified personnel could result in any part of electric ...
...of a dropped or damaged battery pack immediately. 17. KNOW your battery operated tool or when changing accessories. SAFETY RULES FOR CORDLESS TRIMMERS cont. 7. Do not try to cut more than 50°F but less than what you and cutting line. When changing cutting line spool be performed at ... sharp edges or moving parts during use only the cutting line provided with water immediately. 18. Following this manual. DO NOT use solvents, brake fluids, gasoline, or other moving parts. ALWAYS hold the trimmer by unqualified personnel could result in any part of electric ...

Operation Manual
Page 5
...stand if it to an authorized serviceman for an extension cord of electric shock. 2. Use extreme care when working order. The trimmer's cutting line will increase the risk of 25-ft. Make sure cord is switched off. They contain chemicals which could occur and create ... let gasoline, oils, petroleum-based products, etc. Use 12-gauge for damage. Take it has received a sharp blow, been dropped, or other reproductive harm. SAFETY RULES FOR CORDLESS TRIMMERS cont. 23. Z_ iMPORTANT WARNING: When this battery charging stand that is recommended for electrical check to the ...
...stand if it to an authorized serviceman for an extension cord of electric shock. 2. Use extreme care when working order. The trimmer's cutting line will increase the risk of 25-ft. Make sure cord is switched off. They contain chemicals which could occur and create ... let gasoline, oils, petroleum-based products, etc. Use 12-gauge for damage. Take it has received a sharp blow, been dropped, or other reproductive harm. SAFETY RULES FOR CORDLESS TRIMMERS cont. 23. Z_ iMPORTANT WARNING: When this battery charging stand that is recommended for electrical check to the ...

Operation Manual
Page 6
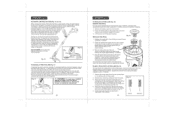
...help prevent damage during use of parts, and any part of electric shock. Wear appropriate personal hearing protection during a power surge. 12. ALL ViSiTORS AND BYSTANDERS MUST wear the same safety equipment that may contribute to them frequently and use this tool. Before further...of the tool wears. 5, ALWAYS check the tool for Charging Stand Battery Pack Battery Charging Stand Safety Guard 10 11 PROTECT your hearing. Remove the trimmer, auxiliary handle, safety guard, box containing the battery pack and charger, wall mount bracket for charger and wall mount bracket ...
...help prevent damage during use of parts, and any part of electric shock. Wear appropriate personal hearing protection during a power surge. 12. ALL ViSiTORS AND BYSTANDERS MUST wear the same safety equipment that may contribute to them frequently and use this tool. Before further...of the tool wears. 5, ALWAYS check the tool for Charging Stand Battery Pack Battery Charging Stand Safety Guard 10 11 PROTECT your hearing. Remove the trimmer, auxiliary handle, safety guard, box containing the battery pack and charger, wall mount bracket for charger and wall mount bracket ...

Operation Manual
Page 7
... Knob 18-Volt Battery Pack Adjustable Telescopic Top Shaft also Rotates 180° for Edging Top Black Locking Collar for easy use . 5. Red LED light indicates when battery is fully charged. Safety, performance and dependability have been given top priority in 1 hour under normal use , handling comfort and efficient trimming and edging. 12. This Cordless Trimmer has...
... Knob 18-Volt Battery Pack Adjustable Telescopic Top Shaft also Rotates 180° for Edging Top Black Locking Collar for easy use . 5. Red LED light indicates when battery is fully charged. Safety, performance and dependability have been given top priority in 1 hour under normal use , handling comfort and efficient trimming and edging. 12. This Cordless Trimmer has...

Operation Manual
Page 8
... time is required to your nearest Sears store or other Craftsman outlet for free replacement. 8. it will light, indicating that the battery pack is charging properly (see Fig. 3a). When battery pack becomes fully charged, unplug battery charging stand from the charging stand, the green LED will... Number Battery Pack Number 12 inches 7000 RPM 18.0 Volt 0.065-inch twisted line Automatic 4 positions From 16 to 25 inches 12OV,60Hz AC I hour CGTt 83UA-48 (C1817A005) CGTt 83UA-42 (WA 3127) CHARGING THE BATTERY PACK (Fig. 3 and 3a) The battery pack for this trimmer. 2. Charge battery pack ...
... time is required to your nearest Sears store or other Craftsman outlet for free replacement. 8. it will light, indicating that the battery pack is charging properly (see Fig. 3a). When battery pack becomes fully charged, unplug battery charging stand from the charging stand, the green LED will... Number Battery Pack Number 12 inches 7000 RPM 18.0 Volt 0.065-inch twisted line Automatic 4 positions From 16 to 25 inches 12OV,60Hz AC I hour CGTt 83UA-48 (C1817A005) CGTt 83UA-42 (WA 3127) CHARGING THE BATTERY PACK (Fig. 3 and 3a) The battery pack for this trimmer. 2. Charge battery pack ...

Operation Manual
Page 9
...THE SAFETY GUARD MUST BE ATTACHED to help keep the cutting line away from items you are carrying it down into the rear handle of the trimmer's head, carefullly lining the screw hole in the guard up with the indents on battery pack aligns with the screw hole in Fig. 6. Insert ... or damaged, such as shown in the trimmer head. 5. Make sure the latches on each side of the head and remove the screw. 4. z_ WARNING: This Cordless Trimmer is always in operating condition when the battery pack is secured in the base of the battery pack "snap" into place properly, improper installation...
...THE SAFETY GUARD MUST BE ATTACHED to help keep the cutting line away from items you are carrying it down into the rear handle of the trimmer's head, carefullly lining the screw hole in the guard up with the indents on battery pack aligns with the screw hole in Fig. 6. Insert ... or damaged, such as shown in the trimmer head. 5. Make sure the latches on each side of the head and remove the screw. 4. z_ WARNING: This Cordless Trimmer is always in operating condition when the battery pack is secured in the base of the battery pack "snap" into place properly, improper installation...
Operation Manual
Page 10
... to one of the tool in unexpected situations. 1 18 ADJUSTINGTHE HEIGHT (Figs. 8 and 8a) The Trimmer's Telescopic Shaft Comes in desired position, turn clockwise). Move the trimmer head to the desired working position. Remove the battery pack from the trimmer BEFORE installing parts or cleaning the trimmer or making any adjustments. Unscrew the auxiliary handle's tightening...
... to one of the tool in unexpected situations. 1 18 ADJUSTINGTHE HEIGHT (Figs. 8 and 8a) The Trimmer's Telescopic Shaft Comes in desired position, turn clockwise). Move the trimmer head to the desired working position. Remove the battery pack from the trimmer BEFORE installing parts or cleaning the trimmer or making any adjustments. Unscrew the auxiliary handle's tightening...

Operation Manual
Page 11
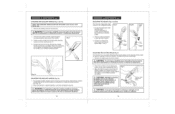
... and 11b) 1. Install battery pack, and using your finger fNreOeTEo:f AobLsWtrAuYcStionkseepwthheen aoirpevreanttisngonthtehetritmrimmmere.r's head (motor housing) OBJECTS BEING THROWN, which have to be depressed to edge, as a edger trimmer Mask--/, t Gloves )Ill /( 2J ..... Once the trimmer is depressed• Fig. 12 Turning Trimmer ON 1. Allow at least 5 seconds for the cutting spool (line) to stop rotating•...
... and 11b) 1. Install battery pack, and using your finger fNreOeTEo:f AobLsWtrAuYcStionkseepwthheen aoirpevreanttisngonthtehetritmrimmmere.r's head (motor housing) OBJECTS BEING THROWN, which have to be depressed to edge, as a edger trimmer Mask--/, t Gloves )Ill /( 2J ..... Once the trimmer is depressed• Fig. 12 Turning Trimmer ON 1. Allow at least 5 seconds for the cutting spool (line) to stop rotating•...
Operation Manual
Page 12
... We recommend Craftsman Professional 0.065-in place, press the manual line feed button, rotate the spool, then release the button. replacement trimmer line, Extra Quiet ... the battery pack from the trimmer BEFORE installing parts or cleaning the trimmer or making any adjustments. 22 TO REPLACE CUTTING LINE (Fig. 18) REMOVE...line onto the spool in "TO REPLACE CUTTING LINE". 2. AUTOMATIC LiNE FEED SYSTEM (Fig. 15 and 16) When turning the trimmer ON for auto feed. To extend the line out to the full 12-inch cutting path, it will wear faster and /_' require more line, stop the trimmer...
... We recommend Craftsman Professional 0.065-in place, press the manual line feed button, rotate the spool, then release the button. replacement trimmer line, Extra Quiet ... the battery pack from the trimmer BEFORE installing parts or cleaning the trimmer or making any adjustments. 22 TO REPLACE CUTTING LINE (Fig. 18) REMOVE...line onto the spool in "TO REPLACE CUTTING LINE". 2. AUTOMATIC LiNE FEED SYSTEM (Fig. 15 and 16) When turning the trimmer ON for auto feed. To extend the line out to the full 12-inch cutting path, it will wear faster and /_' require more line, stop the trimmer...

Operation Manual
Page 13
... are securely mounted to wall. See page 22, AUTOMATIC LINE FEED SYSTEM and page 23, REPLACE CUTTING LINE and FiLLiNG SPOOL WITH CUTTING LINE. Children MUST NOT operate the tool. } 24 BRACKETS FOR CORDLESS TRIMMER, CHARGING STAND AND BATTERY PACK cont. (Figs. 21, 22, 22a and 23) Trimmer mounts two ways , Fig. 21 . SEE PAGES 8, 9, 10, 14...
... are securely mounted to wall. See page 22, AUTOMATIC LINE FEED SYSTEM and page 23, REPLACE CUTTING LINE and FiLLiNG SPOOL WITH CUTTING LINE. Children MUST NOT operate the tool. } 24 BRACKETS FOR CORDLESS TRIMMER, CHARGING STAND AND BATTERY PACK cont. (Figs. 21, 22, 22a and 23) Trimmer mounts two ways , Fig. 21 . SEE PAGES 8, 9, 10, 14...
Operation Manual
Page 14
..., missing, worn or broken parts replaced before further use only identical Craftsman replacement parts. Certain household i cleaners may damage plastic and may prohibit disposal of properly. replacement trimmer line, 71-85760, in packs of 40ft., is below 80°F • Store battery packs in serious injury. Do not attempt to use strong solvents or...
..., missing, worn or broken parts replaced before further use only identical Craftsman replacement parts. Certain household i cleaners may damage plastic and may prohibit disposal of properly. replacement trimmer line, 71-85760, in packs of 40ft., is below 80°F • Store battery packs in serious injury. Do not attempt to use strong solvents or...

Operation Manual
Page 15
...31 CGT183UA-31 Line Feeder 1 8 CGT183UA-8 Lock Button 1 32 CGT183UA-32 Bolt 1 9 CGT183UA-9 CompressionSpring 1 33 CGT183UA-33 Fixing Block 1 12 CGT183UA-12 Steady Handle Supper... Inner Wire 1 18 CGT183UA-18 Pivot Release Lever 1 41 CGT183UA-41 Trigger 1 19 CGT183UA-19 Left & Right HousingEddy 1 42 CGT183UA-42 Battery Pack 1 20 ... Spool 1 50 CGT183UA-50 Hand Base 1 12-in.Weedwacker ModelNo.172.74815 ®Cordless Trimmer The modelnumberwill be foundon the nameplate of the Trimmer.Always mentionthe model number when requestingparts and servicefor ...
...31 CGT183UA-31 Line Feeder 1 8 CGT183UA-8 Lock Button 1 32 CGT183UA-32 Bolt 1 9 CGT183UA-9 CompressionSpring 1 33 CGT183UA-33 Fixing Block 1 12 CGT183UA-12 Steady Handle Supper... Inner Wire 1 18 CGT183UA-18 Pivot Release Lever 1 41 CGT183UA-41 Trigger 1 19 CGT183UA-19 Left & Right HousingEddy 1 42 CGT183UA-42 Battery Pack 1 20 ... Spool 1 50 CGT183UA-50 Hand Base 1 12-in.Weedwacker ModelNo.172.74815 ®Cordless Trimmer The modelnumberwill be foundon the nameplate of the Trimmer.Always mentionthe model number when requestingparts and servicefor ...


