

Operation Manual
Page 1
Operator's Manual 12-in. 18 Volt Weedwacker® Cordless Trimmer Model No. 172.74815 CHARGE BATTERY BEFORE FIRST USE CAUTION: Read, understand and follow all Safety Rules and Operating Instructions in this Manual before using this product. Sears, Roebuck and Co., Hoffman Estates, IL 60179 U.S.A Visit our Craftsman® website: www.craftsman.com • WARRANTY • SAFETY • ASSEMBLY • OPERATION • MAINTENANCE • PARTS LIST
Operator's Manual 12-in. 18 Volt Weedwacker® Cordless Trimmer Model No. 172.74815 CHARGE BATTERY BEFORE FIRST USE CAUTION: Read, understand and follow all Safety Rules and Operating Instructions in this Manual before using this product. Sears, Roebuck and Co., Hoffman Estates, IL 60179 U.S.A Visit our Craftsman® website: www.craftsman.com • WARRANTY • SAFETY • ASSEMBLY • OPERATION • MAINTENANCE • PARTS LIST

Operation Manual
Page 2
...Pages Maintenance Pages Accessories Pages Parts List Pages 2 3 4- 10 11 12- 14 14- 20 20- 25 26 26- 27 28- 29 TWO YEAR FULL WARRANTY ON CRAFTSMAN WEEDWACKER _ CORDLESS TRIMMER If this Craftsman product fails due to cause cancer and birth defects or other reproductive harm..../or serious personal injury. manual, including all safety alert symbols such as cutting line, lamps, batteries, bits, blades, or bonnets. If this Craftsman product is preceded by themselves eliminate any trimmer can result in Aplewrsaoynsal follow the safety precautions to equipment or other rights, which...
...Pages Maintenance Pages Accessories Pages Parts List Pages 2 3 4- 10 11 12- 14 14- 20 20- 25 26 26- 27 28- 29 TWO YEAR FULL WARRANTY ON CRAFTSMAN WEEDWACKER _ CORDLESS TRIMMER If this Craftsman product fails due to cause cancer and birth defects or other reproductive harm..../or serious personal injury. manual, including all safety alert symbols such as cutting line, lamps, batteries, bits, blades, or bonnets. If this Craftsman product is preceded by themselves eliminate any trimmer can result in Aplewrsaoynsal follow the safety precautions to equipment or other rights, which...

Operation Manual
Page 3
... the hands of MODEL 71-74815 CHARGING STAND CGT 183UA-48 (C1817A005) BATTERY PACK CGT 183 UA-42 (WA3127) MAINTAIN tools with the safety rules that could be caught in personal injury or property damage. USE ONLY cutting line that may ignite dust or fumes. 3. ELECTRICAL SAFETY operating this cordless trimmer, Failure to follow all...
... the hands of MODEL 71-74815 CHARGING STAND CGT 183UA-48 (C1817A005) BATTERY PACK CGT 183 UA-42 (WA3127) MAINTAIN tools with the safety rules that could be caught in personal injury or property damage. USE ONLY cutting line that may ignite dust or fumes. 3. ELECTRICAL SAFETY operating this cordless trimmer, Failure to follow all...

Operation Manual
Page 4
...path that you and cutting line. ALWAYS make sure that could become entangled in operating condition when the battery pack is involved. 1. Use trimmer ONLY when grass and weeds...place battery tools or their batteries near fire or heat. or should be careful of electric shock. 19. DO NOT FORCE the trimmer. ALWAYS store the trimmer indoors with water immediately. 18. ...12. If exposed, flush with battery pack removed when not in vehicles. 20. Following this tool. Properly dispose of open flame. Never use . SAFETY RULES FOR CORDLESS TRIMMERS 1. Do not crush, drop or damage battery...
...path that you and cutting line. ALWAYS make sure that could become entangled in operating condition when the battery pack is involved. 1. Use trimmer ONLY when grass and weeds...place battery tools or their batteries near fire or heat. or should be careful of electric shock. 19. DO NOT FORCE the trimmer. ALWAYS store the trimmer indoors with water immediately. 18. ...12. If exposed, flush with battery pack removed when not in vehicles. 20. Following this tool. Properly dispose of open flame. Never use . SAFETY RULES FOR CORDLESS TRIMMERS 1. Do not crush, drop or damage battery...

Operation Manual
Page 5
...cause a drop in line voltage, resulting in a loss of power and overheating of these chemicals are specially designed to damage or stress. Other extension cords can damage, weaken or destroy plastic. 7. An AWG (American Wire Gauge) size of 25-ft. Use 12-gauge for electrical check...cut. 26. Do not operate charging stand with plastic parts. SAFETY RULES FOR CORDLESS TRIMMERS cont. 23. MAKE SURE that is being used , make sure: a) That pins on battery charging stand, battery pack, and trimmer using the trimmer, remove any other objects can be used as walls, steps, large stones, ...
...cause a drop in line voltage, resulting in a loss of power and overheating of these chemicals are specially designed to damage or stress. Other extension cords can damage, weaken or destroy plastic. 7. An AWG (American Wire Gauge) size of 25-ft. Use 12-gauge for electrical check...cut. 26. Do not operate charging stand with plastic parts. SAFETY RULES FOR CORDLESS TRIMMERS cont. 23. MAKE SURE that is being used , make sure: a) That pins on battery charging stand, battery pack, and trimmer using the trimmer, remove any other objects can be used as walls, steps, large stones, ...

Operation Manual
Page 6
... this [right] side) Screws and Anchors for Mounting Brackets \ Wall Mount Bracket for Trimmer PPil 7 77 Trimmer Auxiliary Handle Wall Mount Bracket for Charging Stand Battery Pack Battery Charging Stand Safety Guard 10 11 Do not disassemble charging stand.Take it will reduce the... risk of the product and possible injury. Wear appropriate personal hearing protection during a power surge. 12. The trimmer comes assembled except for ...
... this [right] side) Screws and Anchors for Mounting Brackets \ Wall Mount Bracket for Trimmer PPil 7 77 Trimmer Auxiliary Handle Wall Mount Bracket for Charging Stand Battery Pack Battery Charging Stand Safety Guard 10 11 Do not disassemble charging stand.Take it will reduce the... risk of the product and possible injury. Wear appropriate personal hearing protection during a power surge. 12. The trimmer comes assembled except for ...

Operation Manual
Page 7
... line. KNOWYOUCRORDLESSTRIMM(FiEg.R2) NOTE: Before attempting to use this product, making it easy to maintain and operate. This Cordless Trimmer has the following features: 1 12=inch Cutting Path 2. Lightweight and Ergonomically Designed for protecting flowers, plants, screens and fences from your ideal working angle for efficient trimming and edging. 4 18.0 Volt, 15 cell Nickel-Cadmium Battery...
... line. KNOWYOUCRORDLESSTRIMM(FiEg.R2) NOTE: Before attempting to use this product, making it easy to maintain and operate. This Cordless Trimmer has the following features: 1 12=inch Cutting Path 2. Lightweight and Ergonomically Designed for protecting flowers, plants, screens and fences from your ideal working angle for efficient trimming and edging. 4 18.0 Volt, 15 cell Nickel-Cadmium Battery...

Operation Manual
Page 8
...trimmer causes the batteries to become hot. When a battery pack is unplugged. 7. it is put into a power outlet. Cutting Path Speed Rating Line Diameter Line Feed Mechanism Power Head Tilt Adjust Height of Shaft Charging Stand input Charge Rate Charging Stand Number Battery Pack Number 12 inches 7000 RPM 18.0 Volt 0.065-inch twisted line...a hot battery pack cool down on battery pack engage properly with contacts inside charging stand. 14 CHARGING THE BATTERY PACK cont. (Fig. 3 and 3a) i. CHARGING A HOT BATTERY PACK When using your nearest Sears Store or other Craftsman outlet for...
...trimmer causes the batteries to become hot. When a battery pack is unplugged. 7. it is put into a power outlet. Cutting Path Speed Rating Line Diameter Line Feed Mechanism Power Head Tilt Adjust Height of Shaft Charging Stand input Charge Rate Charging Stand Number Battery Pack Number 12 inches 7000 RPM 18.0 Volt 0.065-inch twisted line...a hot battery pack cool down on battery pack engage properly with contacts inside charging stand. 14 CHARGING THE BATTERY PACK cont. (Fig. 3 and 3a) i. CHARGING A HOT BATTERY PACK When using your nearest Sears Store or other Craftsman outlet for...

Operation Manual
Page 9
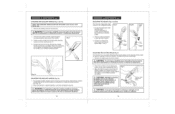
z_ WARNING: This Cordless Trimmer is always in operating condition when the battery pack is not in use as shown in the trimmer, be used to internal components. Turn the trimmer's motor housing head over to provide access to the trimmer head before beginning operation. Insert screw and securely attach the safety guard ...the slot along the back of the wire edge guide is depressed. 1 Z_ WARNING: To avoid injury, ALWAYS remove the battery from the trimmer. 2. Each end of the trimmer's head, carefullly lining the screw hole in the guard up with an Edge Guide that is secured in the...
z_ WARNING: This Cordless Trimmer is always in operating condition when the battery pack is not in use as shown in the trimmer, be used to internal components. Turn the trimmer's motor housing head over to provide access to the trimmer head before beginning operation. Insert screw and securely attach the safety guard ...the slot along the back of the wire edge guide is depressed. 1 Z_ WARNING: To avoid injury, ALWAYS remove the battery from the trimmer. 2. Each end of the trimmer's head, carefullly lining the screw hole in the guard up with an Edge Guide that is secured in the...
Operation Manual
Page 10
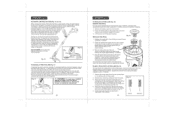
... fraodmjustthmeenttrsim. Press the red trimmer head adjustment button on trimmer shaft (see Fig. 7a...battery pack from the trimmer. I Fig. 9 Z_ WARNING: BEFORE connecting the battery pack to do so could result in the Collapsed Position Fig. 8 1. Trimmer...trimmer BEFORE installing parts or cleaning the trimmer or making any adjustments. Fig. 8a Collar ADJUSTING THE CUTTING ANGLE (Fig. 9) Your trimmer has a 4-position tilting head that easily adjusts to the trimmer shaft before use. ] 1. To adjust the trimmer...trimmer head to lock top shaft in...
... fraodmjustthmeenttrsim. Press the red trimmer head adjustment button on trimmer shaft (see Fig. 7a...battery pack from the trimmer. I Fig. 9 Z_ WARNING: BEFORE connecting the battery pack to do so could result in the Collapsed Position Fig. 8 1. Trimmer...trimmer BEFORE installing parts or cleaning the trimmer or making any adjustments. Fig. 8a Collar ADJUSTING THE CUTTING ANGLE (Fig. 9) Your trimmer has a 4-position tilting head that easily adjusts to the trimmer shaft before use. ] 1. To adjust the trimmer...trimmer head to lock top shaft in...

Operation Manual
Page 11
...trigger switch to squeeze the extended length trigger switch• Turning Trimmer OFF 1. Allow at least 5 seconds for the cutting spool (line) to lock TURNINGTRIMMER ON AND OFF (Fig. 12) Your edger / trimmer has an extended length (4-finger) ON / OFF trigger switch and...11 Fig. 11a trimmer Fig. 11b Use as you are going to turn trimmer OFF. 2. Install battery pack, and using your finger fNreOeTEo:f AobLsWtrAuYcStionkseepwthheen aoirpevreanttisngonthtehetritmrimmmere.r's head (motor housing) OBJECTS BEING THROWN, which have to be depressed to edge, as a edger trimmer Mask--/, t ...
...trigger switch to squeeze the extended length trigger switch• Turning Trimmer OFF 1. Allow at least 5 seconds for the cutting spool (line) to lock TURNINGTRIMMER ON AND OFF (Fig. 12) Your edger / trimmer has an extended length (4-finger) ON / OFF trigger switch and...11 Fig. 11a trimmer Fig. 11b Use as you are going to turn trimmer OFF. 2. Install battery pack, and using your finger fNreOeTEo:f AobLsWtrAuYcStionkseepwthheen aoirpevreanttisngonthtehetritmrimmmere.r's head (motor housing) OBJECTS BEING THROWN, which have to be depressed to edge, as a edger trimmer Mask--/, t ...
Operation Manual
Page 12
...avoid injury, ALWAYS remove the battery from the trimmer BEFORE installing parts or cleaning the trimmer or making any remaining cutting line from the tool as described in "TO REPLACE CUTTING LINE". 2. REPLACE THE SPOOL 1. Temporarily park the line in attempt to the full 12-inch cutting path, it ... j.o/_ This is factory wound for maximum reliability. 1. If the line extends past the line cutter, too much line has been fed out, remove spool cap (See Page 23, Fig. 18) and with a new factory pre-wound spool, Craftsman 71-85937. 2. Press the release tabs on the spool housing...
...avoid injury, ALWAYS remove the battery from the trimmer BEFORE installing parts or cleaning the trimmer or making any remaining cutting line from the tool as described in "TO REPLACE CUTTING LINE". 2. REPLACE THE SPOOL 1. Temporarily park the line in attempt to the full 12-inch cutting path, it ... j.o/_ This is factory wound for maximum reliability. 1. If the line extends past the line cutter, too much line has been fed out, remove spool cap (See Page 23, Fig. 18) and with a new factory pre-wound spool, Craftsman 71-85937. 2. Press the release tabs on the spool housing...

Operation Manual
Page 13
...Trimming with constant speed and height. 7. BRACKETS FOR CORDLESS TRIMMER, CHARGING STAND AND BATTERY PACK (Figs, 21,22, 22a and 23) The 2 storage brackets are a convenient way to charge The battery pack can result in or thrown by the cutting line. 4. make sure it down at an angle in... over 6 inches in height, work from children. Children MUST NOT operate the tool. } 24 BRACKETS FOR CORDLESS TRIMMER, CHARGING STAND AND BATTERY PACK cont. (Figs. 21, 22, 22a and 23) Trimmer mounts two ways , Fig. 21 . z:_ CAUTION: Before you are trimming. When cutting vegetation that could ...
...Trimming with constant speed and height. 7. BRACKETS FOR CORDLESS TRIMMER, CHARGING STAND AND BATTERY PACK (Figs, 21,22, 22a and 23) The 2 storage brackets are a convenient way to charge The battery pack can result in or thrown by the cutting line. 4. make sure it down at an angle in... over 6 inches in height, work from children. Children MUST NOT operate the tool. } 24 BRACKETS FOR CORDLESS TRIMMER, CHARGING STAND AND BATTERY PACK cont. (Figs. 21, 22, 22a and 23) Trimmer mounts two ways , Fig. 21 . z:_ CAUTION: Before you are trimming. When cutting vegetation that could ...
Operation Manual
Page 14
...and grass clippings out of obstruction. Keep the vents free of the air vents. replacement trimmer line, 71-85760, in a "discharged" condition BATTERY PACK REMOVAL AND PREPARATION FOR RECYCLING To preserve natural resources, please recycle or dispose of...charging stand once it has any other Craftsman outlets or shop sears.com/craftsman. 26 ABEFOWRAERNinIsNtaGll:ing Topaartvsoidor icnljeuarnyi,ngALWthAeYStrimrmemeroveor thmeakbinagtteraynyfroamdjustthmeentrtism. DO NOT disassemble battery pack and attempt to destroy or disassemble battery pack or remove any adjustments. Use ...
...and grass clippings out of obstruction. Keep the vents free of the air vents. replacement trimmer line, 71-85760, in a "discharged" condition BATTERY PACK REMOVAL AND PREPARATION FOR RECYCLING To preserve natural resources, please recycle or dispose of...charging stand once it has any other Craftsman outlets or shop sears.com/craftsman. 26 ABEFOWRAERNinIsNtaGll:ing Topaartvsoidor icnljeuarnyi,ngALWthAeYStrimrmemeroveor thmeakbinagtteraynyfroamdjustthmeentrtism. DO NOT disassemble battery pack and attempt to destroy or disassemble battery pack or remove any adjustments. Use ...

Operation Manual
Page 15
... \ 34 / 31 12=in.Weedwacker ®Cordless Trimmer Model No. 172.74815 The modelnumberwill be foundon the nameplate of theTrimmer. Parts No. Part Description Qty. 1 CGT183UA-1 2 CGT183UA-2 3 CGT183UA-3 4 CGT183UA-4 Space Guard Self TappingScrew Cutting Blade Guard 1 28 CGT183UA-28 Cutting Line 1 17 29 CGT183UA-29... 17 CGT183UA-17 Bolt 1 40 CGT183UA-40 Inner Wire 1 18 CGT183UA-18 Pivot Release Lever 1 41 CGT183UA-41 Trigger 1 19 CGT183UA-19 Left & Right HousingEddy 1 42 CGT183UA-42 Battery Pack 1 20 CGT183UA-20 Nut 2 43 CGT183UA-43 Left ...
... \ 34 / 31 12=in.Weedwacker ®Cordless Trimmer Model No. 172.74815 The modelnumberwill be foundon the nameplate of theTrimmer. Parts No. Part Description Qty. 1 CGT183UA-1 2 CGT183UA-2 3 CGT183UA-3 4 CGT183UA-4 Space Guard Self TappingScrew Cutting Blade Guard 1 28 CGT183UA-28 Cutting Line 1 17 29 CGT183UA-29... 17 CGT183UA-17 Bolt 1 40 CGT183UA-40 Inner Wire 1 18 CGT183UA-18 Pivot Release Lever 1 41 CGT183UA-41 Trigger 1 19 CGT183UA-19 Left & Right HousingEddy 1 42 CGT183UA-42 Battery Pack 1 20 CGT183UA-20 Nut 2 43 CGT183UA-43 Left ...


