
Owners Manual
Page 2
...the equipment. and serial numbers will be affected with the sweeper attached. MODEL NUMBER: SERIAL NUMBER: DATE OF PURCHASE: 486.24222 Sears, Roebuck and Co., Dept. 817WA, Hoffman Estates...speed on rough terrain, near ditches and on hillsides to prevent loss of this manual. Stop and inspect vehicle and sweeper for future reference. The mode! or rental purposes. Keep sweeper... Back Cover TWO YEAR FULL WARRANTY ON CRAFTSMAN LAWNSWEEPER When assembled, operated and maintained according to the supplied instructions, if this Craftsman Lawnsweeper fails due to a defect in ...
...the equipment. and serial numbers will be affected with the sweeper attached. MODEL NUMBER: SERIAL NUMBER: DATE OF PURCHASE: 486.24222 Sears, Roebuck and Co., Dept. 817WA, Hoffman Estates...speed on rough terrain, near ditches and on hillsides to prevent loss of this manual. Stop and inspect vehicle and sweeper for future reference. The mode! or rental purposes. Keep sweeper... Back Cover TWO YEAR FULL WARRANTY ON CRAFTSMAN LAWNSWEEPER When assembled, operated and maintained according to the supplied instructions, if this Craftsman Lawnsweeper fails due to a defect in ...
Owners Manual
Page 3
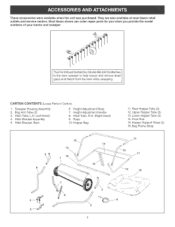
i4le86s.2w4e2e1p9inagt.taches CARTON CONTENTS (Loose Parts in Carton) 1. Sweeper Housing Assembly 2. Hitch Bracket Assembly 5. Hitch Tube, R.H. (Right Hand) 9. Upper Hopper Tube (2) 13. Height Adjustment Handle 8. Rope 10. Lower Hopper Tube (2) 14....13 -.,,, 16 1 11. Most Seers stores can order repair parts for you when you provide the model numbers of your tractor and sweeper to the lawn sweeper to help loosen and remove dead i TgrhaessFraonndt MthoautncthDferothmatcthheeDlaMwnodweh! Hitch Bracket, Bent 6. They are also available at most Sears retait outlets and ...
i4le86s.2w4e2e1p9inagt.taches CARTON CONTENTS (Loose Parts in Carton) 1. Sweeper Housing Assembly 2. Hitch Bracket Assembly 5. Hitch Tube, R.H. (Right Hand) 9. Upper Hopper Tube (2) 13. Height Adjustment Handle 8. Rope 10. Lower Hopper Tube (2) 14....13 -.,,, 16 1 11. Most Seers stores can order repair parts for you when you provide the model numbers of your tractor and sweeper to the lawn sweeper to help loosen and remove dead i TgrhaessFraonndt MthoautncthDferothmatcthheeDlaMwnodweh! Hitch Bracket, Bent 6. They are also available at most Sears retait outlets and ...
Owners Manual
Page 5
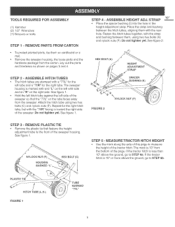
... strap and bushing between them on cardboard or a mat. Fasten the hitch tubes together, with side and an "R" on the tube faces away from the sweeper. ASSEMBLE HITCH TUBES , The hitch tubes are stamped with a "77L" for the right tube. If the tractor hitch is 10" from the carton. Remove ... ADJ. Do not tighten yet. BEX BOLT (A) STEP 2 - Hotd the left hitch tube against the left tube and a "76R" for the left side of the sweeper housing, See figure 1. Do not tighten yet. See figure 1. REMOVE PARTS FROM CARTON To protect painted parts, lay them , using two hex bolts (C) and nylock...
... strap and bushing between them on cardboard or a mat. Fasten the hitch tubes together, with side and an "R" on the tube faces away from the sweeper. ASSEMBLE HITCH TUBES , The hitch tubes are stamped with a "77L" for the right tube. If the tractor hitch is 10" from the carton. Remove ... ADJ. Do not tighten yet. BEX BOLT (A) STEP 2 - Hotd the left hitch tube against the left tube and a "76R" for the left side of the sweeper housing, See figure 1. Do not tighten yet. See figure 1. REMOVE PARTS FROM CARTON To protect painted parts, lay them , using two hex bolts (C) and nylock...
Owners Manual
Page 6
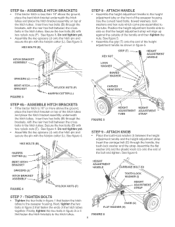
... (F)= See figure 3=Do not tighten yet. . TIGHTEN BOLTS . ATTACH HANDLE , Assemble the height adjustment handle to side so that fasten the hitch brackets to the sweeper housing. See figure 5= . Secure the hex bolts (B) with the hairpin cotter (L)= See figure 3= REX BOLTS (B) "A' C2 t CKET STEP 8 - Secure the hex ...more above the ground, place the bent hitch bracket underneath the hitch tubes and place the hitch bracket assembly on the front of the sweeper housing, Use the curved head bolts, bowed washers, lock washers and hex nuts which come pre-assembled to the tube, Position the ...
... (F)= See figure 3=Do not tighten yet. . TIGHTEN BOLTS . ATTACH HANDLE , Assemble the height adjustment handle to side so that fasten the hitch brackets to the sweeper housing. See figure 5= . Secure the hex bolts (B) with the hairpin cotter (L)= See figure 3= REX BOLTS (B) "A' C2 t CKET STEP 8 - Secure the hex ...more above the ground, place the bent hitch bracket underneath the hitch tubes and place the hitch bracket assembly on the front of the sweeper housing, Use the curved head bolts, bowed washers, lock washers and hex nuts which come pre-assembled to the tube, Position the ...

Owners Manual
Page 9
HINT: To ease assembly of the hitch tubes and secure with the previously assembled hair cotter pins (M). To attach the hopper bag to the sweeper, slide the ends of the bag arm tubes into the ends of the palnuts, place the bag on its side on the hopper mount clamps. ...
HINT: To ease assembly of the hitch tubes and secure with the previously assembled hair cotter pins (M). To attach the hopper bag to the sweeper, slide the ends of the bag arm tubes into the ends of the palnuts, place the bag on its side on the hopper mount clamps. ...

Owners Manual
Page 10
... FROM SURFACE) FIGURE 20 GROUP "A" - ATTACHINSGWEEPERHITCHTO TRACTOR Place the tractor and sweeper on a fiat level sutlace, Set the sweeper height adjustment handle to about the middle of its adjustment range, Attach the sweeper hitch to the tractor hitch, arranging the 3/4" spacers in one of six ...possible combinations as shown in GROUP A and GROUP B diagrams below, IMPORTANT: To obtain the best performance from your sweeper, arrange the spacers so that the sweeper bag is approximately level with hitches having 8" to 10" ground clearance. \ \ \ \ \ HUTCH BRACKET MOUNTED BELOW HITCH...
... FROM SURFACE) FIGURE 20 GROUP "A" - ATTACHINSGWEEPERHITCHTO TRACTOR Place the tractor and sweeper on a fiat level sutlace, Set the sweeper height adjustment handle to about the middle of its adjustment range, Attach the sweeper hitch to the tractor hitch, arranging the 3/4" spacers in one of six ...possible combinations as shown in GROUP A and GROUP B diagrams below, IMPORTANT: To obtain the best performance from your sweeper, arrange the spacers so that the sweeper bag is approximately level with hitches having 8" to 10" ground clearance. \ \ \ \ \ HUTCH BRACKET MOUNTED BELOW HITCH...
Owners Manual
Page 11
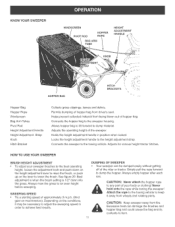
... driver's seat, Helps prevent collected material from fire, Excessive heat can be necessary to adjust the sweeping speed in order to achieve best results, DUMPING OF SWEEPER Your sweeper can damage the brushes and hopper bag and could cause the bag and its contents to any part of..., Always mow the grass to an even height before sweeping, SWEEPING SPEED Try a starting speed of approximately 3 m,p,h, (third gear on most tractors), Depending on the conditions, it may be dumped easily without getting off of the sweeper, Holds the height adjustment handle in position when locked, Locks the...
... driver's seat, Helps prevent collected material from fire, Excessive heat can be necessary to adjust the sweeping speed in order to achieve best results, DUMPING OF SWEEPER Your sweeper can damage the brushes and hopper bag and could cause the bag and its contents to any part of..., Always mow the grass to an even height before sweeping, SWEEPING SPEED Try a starting speed of approximately 3 m,p,h, (third gear on most tractors), Depending on the conditions, it may be dumped easily without getting off of the sweeper, Holds the height adjustment handle in position when locked, Locks the...
Owners Manual
Page 12
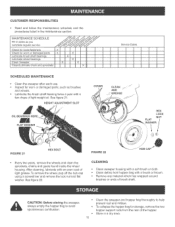
...for loose fasteners X Check for worn or damaged parts X Lubricate brush shaft bearings Lubricate wheel bearings Ctean Sweeper -- _ Clean/Lubricate chain and sprockets X _ X X X X SCHEDULED MAINTENANCE Clean the sweeper after each use. CUSTOMER RESPONSIBILmTmES Read and follow the maintenance schedule and the procedures listed in a dry... __ Fi,, in dates as brushes and wheels. After cleaning, lubricate with a soft brush or cloth. CAUTION: Before storing the sweeper, always empty the hopper bag to help prevent rust and mildew. See figure 21. To remove the wheel, pop off the hub...
...for loose fasteners X Check for worn or damaged parts X Lubricate brush shaft bearings Lubricate wheel bearings Ctean Sweeper -- _ Clean/Lubricate chain and sprockets X _ X X X X SCHEDULED MAINTENANCE Clean the sweeper after each use. CUSTOMER RESPONSIBILmTmES Read and follow the maintenance schedule and the procedures listed in a dry... __ Fi,, in dates as brushes and wheels. After cleaning, lubricate with a soft brush or cloth. CAUTION: Before storing the sweeper, always empty the hopper bag to help prevent rust and mildew. See figure 21. To remove the wheel, pop off the hub...
Owners Manual
Page 13
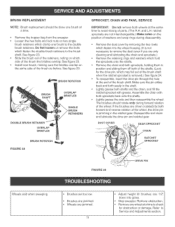
... pin and ratchet gear. See figure 23. . Assemble the chain with grease. Lightly grease the axle and then reassemble the wheel. Stop sweeper. Loosen the hex bolts and lock nuts on the position of washers and snap rings during forward rotation of the shafts. (Look for obstruction...rivets which side of the brush shaft. BRUSH REPLACEMENT NOTE: Brush replacement should rotate oHly during disassembly. . Remove the hopper bag from the sweeper. Remove the retaining rings and washers which clamp one brush at the end of the brush the bristles overJap. Refer to check for the...
... pin and ratchet gear. See figure 23. . Assemble the chain with grease. Lightly grease the axle and then reassemble the wheel. Stop sweeper. Loosen the hex bolts and lock nuts on the position of washers and snap rings during forward rotation of the shafts. (Look for obstruction...rivets which side of the brush shaft. BRUSH REPLACEMENT NOTE: Brush replacement should rotate oHly during disassembly. . Remove the hopper bag from the sweeper. Remove the retaining rings and washers which clamp one brush at the end of the brush the bristles overJap. Refer to check for the...

