Operation Manual
Page 3
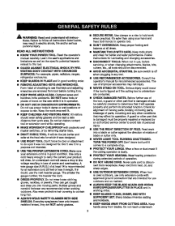
...8226; DISCONNECT TOOLS. Use on . • KEEP WORK AREA CLEAN. A guard or o_er part _at is off when plugging in any tooL • USE RECOMMENDED ACCESSORIES. Feed work ares. ... dusty. • PROTECT YOUR HEARING.Wear'hearing protection dorJng exte_de_ periodsofopera,on the saw 's applicationsand Iimftatioansswet[ es the specific potenti_ hazards related to contain long hak. &#...cord. • DRESS PROPERLY. Don't leave tool until it is damaged should be properlyrepairedor replaced by removings_,_'terkeys. • DON'T FORCE TOOL. _k WARNING." Cluttered areas and benches ...
...8226; DISCONNECT TOOLS. Use on . • KEEP WORK AREA CLEAN. A guard or o_er part _at is off when plugging in any tooL • USE RECOMMENDED ACCESSORIES. Feed work ares. ... dusty. • PROTECT YOUR HEARING.Wear'hearing protection dorJng exte_de_ periodsofopera,on the saw 's applicationsand Iimftatioansswet[ es the specific potenti_ hazards related to contain long hak. &#...cord. • DRESS PROPERLY. Don't leave tool until it is damaged should be properlyrepairedor replaced by removings_,_'terkeys. • DON'T FORCE TOOL. _k WARNING." Cluttered areas and benches ...
Operation Manual
Page 4
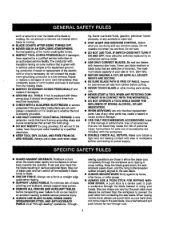
..., always support large panels. • REMOVE ALL RENCES AND AUXILIARY TABLES before transpo_ng saw or workpieca before cutting. • NEVER TOUCH BLADE or other parts may cause the risk of personal injury. Always use a c_eancloth when...blocks for safe use only identica]replacement parts. Make sure blade is rotating. Keep the b_de gu_-d down, th_ _ntikickback pawls down, and the rivingkrdfe/spreader/ splitter properly alignedto '_e saw blade. Kickback occurs when the ... in doubt as to whether the tool is 10 in. {254 ram). • BEFORE MAKING A CUT, BE SURE ALL ADJUST-
..., always support large panels. • REMOVE ALL RENCES AND AUXILIARY TABLES before transpo_ng saw or workpieca before cutting. • NEVER TOUCH BLADE or other parts may cause the risk of personal injury. Always use a c_eancloth when...blocks for safe use only identica]replacement parts. Make sure blade is rotating. Keep the b_de gu_-d down, th_ _ntikickback pawls down, and the rivingkrdfe/spreader/ splitter properly alignedto '_e saw blade. Kickback occurs when the ... in doubt as to whether the tool is 10 in. {254 ram). • BEFORE MAKING A CUT, BE SURE ALL ADJUST-

Operation Manual
Page 16
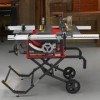
... back injury. NOTE=This tool is heavy.To avoid back injury,keep your back, and do not lift saw without help . • Inspect the tool carefullyto make sure the table saw is securely mounted to heed this leg stand. Failure to possible se_oL;spersonalin)ury. A WARNING: Do not...the 1eg stand. NEVER remove the saw table and s_and it close over or across the blade. Keep your knees bent and (iftwith yourlegs, not your body. Fa(lursto comply could resultin a hazardous condition leading to do not operate th_s too_ unt_the missing parts are replaced. A Am, WARNING: Never stand ...
... back injury. NOTE=This tool is heavy.To avoid back injury,keep your back, and do not lift saw without help . • Inspect the tool carefullyto make sure the table saw is securely mounted to heed this leg stand. Failure to possible se_oL;spersonalin)ury. A WARNING: Do not...the 1eg stand. NEVER remove the saw table and s_and it close over or across the blade. Keep your knees bent and (iftwith yourlegs, not your body. Fa(lursto comply could resultin a hazardous condition leading to do not operate th_s too_ unt_the missing parts are replaced. A Am, WARNING: Never stand ...

Operation Manual
Page 44
After extended use or if damage occursin shipping. • Unplug the saw table. • Tighten rait holder nut until it hits or comes in . Rotate the springplate 180° and reinstallon the handle shaft. • Reassemble all parts end tighten hex nut securely. The rail cramps ate located below , when ... TO ADJUST THE ACCESSORY TABLE See Rgure 68. Foi(ow the steps below the raUsand ensure tight attachment of each Iockingclamp. • Uft the locldng clamp to the {sft unti{it is snug. • Loosen rail holder nut one-fourth (1/4) turn. • Replace the rails and check ...
After extended use or if damage occursin shipping. • Unplug the saw table. • Tighten rait holder nut until it hits or comes in . Rotate the springplate 180° and reinstallon the handle shaft. • Reassemble all parts end tighten hex nut securely. The rail cramps ate located below , when ... TO ADJUST THE ACCESSORY TABLE See Rgure 68. Foi(ow the steps below the raUsand ensure tight attachment of each Iockingclamp. • Uft the locldng clamp to the {sft unti{it is snug. • Loosen rail holder nut one-fourth (1/4) turn. • Replace the rails and check ...
Operation Manual
Page 53
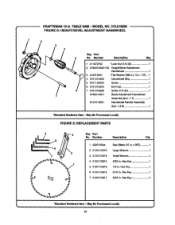
... 1 Small Wrench 1 4 0181010915 3/32 in . May Be Purchased Locally tl 53 CRAFTSMAN t0 in . Number DescripSon Q_. 422010044 Saw Blade (10 in . Hax Key 1 1 5 0181010916 1(8 in . Hex Key 1 6 0181010918 3/16 in , Hex Key 1 "Standard Hardware ]tam - May Be Purchased Locally FIGURE E: REPLACEMENT PARTS Key Part No. TABLE SAW - MODEL NO. 3t5.218290 FIGURE D: HEIGHT/BEVEL ADJUSTMENT HANDWHEEL 1 / I'p, 5 No...
... 1 Small Wrench 1 4 0181010915 3/32 in . May Be Purchased Locally tl 53 CRAFTSMAN t0 in . Number DescripSon Q_. 422010044 Saw Blade (10 in . Hax Key 1 1 5 0181010916 1(8 in . Hex Key 1 6 0181010918 3/16 in , Hex Key 1 "Standard Hardware ]tam - May Be Purchased Locally FIGURE E: REPLACEMENT PARTS Key Part No. TABLE SAW - MODEL NO. 3t5.218290 FIGURE D: HEIGHT/BEVEL ADJUSTMENT HANDWHEEL 1 / I'p, 5 No...

Operation Manual
Page 58
...brand appliances, lawn and garden equipment, or heating and cooling systems, no matter who made it, no matter who sold it] For the replacement parts, accessories and owners manuals that you need to do-it-yourself. and Canada) www._ar_¢oM www.sears.¢a i ill i. Your...anytime, day or night (U.S.A. i,i Our Home For repair of carry-in your home-of your nearest Sears Parts & Repair Center. 1-800488-1222 Call anytime, day or night (U.S.A. For Sears professional installation of home appliances and items like vacuums, lawn equipment, and electronics, call or go on a product ...
...brand appliances, lawn and garden equipment, or heating and cooling systems, no matter who made it, no matter who sold it] For the replacement parts, accessories and owners manuals that you need to do-it-yourself. and Canada) www._ar_¢oM www.sears.¢a i ill i. Your...anytime, day or night (U.S.A. i,i Our Home For repair of carry-in your home-of your nearest Sears Parts & Repair Center. 1-800488-1222 Call anytime, day or night (U.S.A. For Sears professional installation of home appliances and items like vacuums, lawn equipment, and electronics, call or go on a product ...


