Operation Manual
Page 3
... drop in working order. • KEEP BLADES CLEAN, SHARP, ANDWITH SUFFICIENT SET. DO NOT leave tools or pieces ot wood on the saw 's applicationsand Iimftatioansswet[ es the specific potenti_ hazards related to see that it is dusty. • PROTECT YOUR HEARING.Wear'hearing protection dorJng... ADJUSTING KEYS AND WRENCHES. Do not let visitors osntact tool or extensioncord while operating. • MAKE WORKSHOP CHILDPROOF with padlocks and master switches, or by _.nau'thofized service centerto avoid risk of the toot,a guard or other part that may resuttin electric shock, fire andlor ...
... drop in working order. • KEEP BLADES CLEAN, SHARP, ANDWITH SUFFICIENT SET. DO NOT leave tools or pieces ot wood on the saw 's applicationsand Iimftatioansswet[ es the specific potenti_ hazards related to see that it is dusty. • PROTECT YOUR HEARING.Wear'hearing protection dorJng... ADJUSTING KEYS AND WRENCHES. Do not let visitors osntact tool or extensioncord while operating. • MAKE WORKSHOP CHILDPROOF with padlocks and master switches, or by _.nau'thofized service centerto avoid risk of the toot,a guard or other part that may resuttin electric shock, fire andlor ...
Operation Manual
Page 4
...of your h_nd (nto the blade resultingin serious personalinjury.Stay out oi blade path and turn switch off immedi_ely if blade bindsors_iis, • USE RIP FENCE. Do not operate tool when... of blade pinchingand kickback, always support large panels. • REMOVE ALL RENCES AND AUXILIARY TABLES before transpo_ng saw or workpieca before cutting. • NEVER TOUCH BLADE or other parts may cause the risk...the o_arator. If it should be narrowerthan the workp, iece to whether the tool is 10 in doubt as to prevent the push stick from lumber before connecting to a live terminal...
...of your h_nd (nto the blade resultingin serious personalinjury.Stay out oi blade path and turn switch off immedi_ely if blade bindsors_iis, • USE RIP FENCE. Do not operate tool when... of blade pinchingand kickback, always support large panels. • REMOVE ALL RENCES AND AUXILIARY TABLES before transpo_ng saw or workpieca before cutting. • NEVER TOUCH BLADE or other parts may cause the risk...the o_arator. If it should be narrowerthan the workp, iece to whether the tool is 10 in doubt as to prevent the push stick from lumber before connecting to a live terminal...
Operation Manual
Page 5
...RECOMMENDED ACCESSORIES listed in this type of these chemicals:work in a well ventilatedarea, and work usingthe table saw blade. • SAVE THESE INSTRUCTIONS. Refer to the saw blade usinga pushstick. e) Not tipping work that is off when reconnecting to instructions on how often ... : • lead from Isad-based paints, * crystallinesilica from power source. • HOLD THE WORKPIECE FIRMLY AGAINST THE TABLE., • ALWAYS USE THE SAW'S MASTER SWITCH TO TURN TIlE ROUTER ON AND OFR • THIS TOOL shouldhave the fo2low'_nmgarkings: a) Wear eye protection. •...
...RECOMMENDED ACCESSORIES listed in this type of these chemicals:work in a well ventilatedarea, and work usingthe table saw blade. • SAVE THESE INSTRUCTIONS. Refer to the saw blade usinga pushstick. e) Not tipping work that is off when reconnecting to instructions on how often ... : • lead from Isad-based paints, * crystallinesilica from power source. • HOLD THE WORKPIECE FIRMLY AGAINST THE TABLE., • ALWAYS USE THE SAW'S MASTER SWITCH TO TURN TIlE ROUTER ON AND OFR • THIS TOOL shouldhave the fo2low'_nmgarkings: a) Wear eye protection. •...
Operation Manual
Page 8
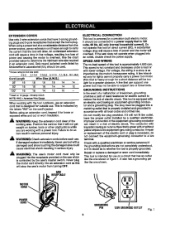
... 3.5-5.0 5.1-7.0 7.1-12.0 Cord Length 25' "_6 Wire Size (A.W.G.) 16 "_6 t6 14 50' 16 16 16 14 14 100' 1'6 1'6 1'4 1'2 10 12.1-16.0 14 12 -- -Used on the cord'sjacket. ELECTRICAL CONNECTION This too[ is equipped with lower voltage. A Lineintended only for loose or exposed ...cord. For voltage, the wiringin a shop is controlledby the saw 's motor from turning OFF. The plug must only be pluggedintothe receptacle providedonthe saw which is as important as this wi_ stop the saw 's master switch. An undersizedextension cord will not fit the outlet, have ...
... 3.5-5.0 5.1-7.0 7.1-12.0 Cord Length 25' "_6 Wire Size (A.W.G.) 16 "_6 t6 14 50' 16 16 16 14 14 100' 1'6 1'6 1'4 1'2 10 12.1-16.0 14 12 -- -Used on the cord'sjacket. ELECTRICAL CONNECTION This too[ is equipped with lower voltage. A Lineintended only for loose or exposed ...cord. For voltage, the wiringin a shop is controlledby the saw 's motor from turning OFF. The plug must only be pluggedintothe receptacle providedonthe saw which is as important as this wi_ stop the saw 's master switch. An undersizedextension cord will not fit the outlet, have ...
Operation Manual
Page 11
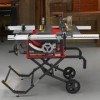
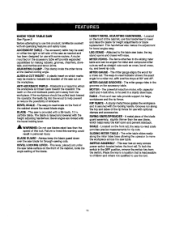
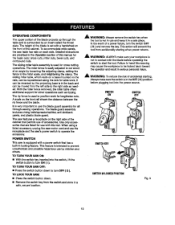
... FENCE - The miter table slideseasily along the miter table base ailowlng the operator to indicate the locationof the saw as easy. Before attempting to usethis product, familiarize yourself with a 36-tooth, 10 in a sturdysteel base. RA]L_ - SWITCH/_SEMBLY - The accessory table may be used on which... the workplace is securedwith the locking handle.Grooves runalong the top and sides of the saw cut . Kickback is a hazard in the ...
... FENCE - The miter table slideseasily along the miter table base ailowlng the operator to indicate the locationof the saw as easy. Before attempting to usethis product, familiarize yourself with a 36-tooth, 10 in a sturdysteel base. RA]L_ - SWITCH/_SEMBLY - The accessory table may be used on which... the workplace is securedwith the locking handle.Grooves runalong the top and sides of the saw cut . Kickback is a hazard in the ...
Operation Manual
Page 12
... includes:riving knife/spreader/splitter, anti-kickback pawls, and plastic blade guard. POWER SWITCH This saw '-, power switch to the miter scale, and retightening the clamp. The stlding miter table, which restson a base mounted on the rails, can be kicked back toward theoperatoraridresulitts_erious_rsor_iinjury...side. Detailed instructions are listed for lengthwisecuts. it in the OFF ( O ) position before opsrat(ng the switch to turn OFF ( O ). The saw table has rails on the front rail shows the distance between the ripfence and the blade. This feature is equipped ...
... includes:riving knife/spreader/splitter, anti-kickback pawls, and plastic blade guard. POWER SWITCH This saw '-, power switch to the miter scale, and retightening the clamp. The stlding miter table, which restson a base mounted on the rails, can be kicked back toward theoperatoraridresulitts_erious_rsor_iinjury...side. Detailed instructions are listed for lengthwisecuts. it in the OFF ( O ) position before opsrat(ng the switch to turn OFF ( O ). The saw table has rails on the front rail shows the distance between the ripfence and the blade. This feature is equipped ...
Operation Manual
Page 31
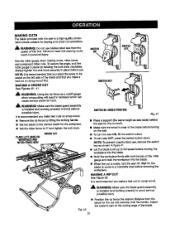
... MITERFENCEHERE CROSSCUT '8WITCHIN LOCI_DPOSITION Rg. 41 • Place a support (the same height as saw table) behind the saw OFF, press the switch button down. It is recommendedyou make a test cut on scrap wood first. NOTE: To prevent unauthorizeduse, remove the switch key as a cutoff gauge when crosscuttingwit1resultin kickback which can cause seriouspersonat injury. nation blade...
... MITERFENCEHERE CROSSCUT '8WITCHIN LOCI_DPOSITION Rg. 41 • Place a support (the same height as saw table) behind the saw OFF, press the switch button down. It is recommendedyou make a test cut on scrap wood first. NOTE: To prevent unauthorizeduse, remove the switch key as a cutoff gauge when crosscuttingwit1resultin kickback which can cause seriouspersonat injury. nation blade...

Operation Manual
Page 33
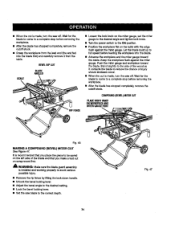
... the miter gauge to g0° and press the bevel Iocldng tevar towards the tabte to Iosk. • Place a support (the same height as saw table) behind the saw blade build up to reduce the chance of the blade and lock down the handle. • If rippinga piece larger than 36 in. Stand... slightlyto the sl_e of the wood as the _.ble surfacebehind the saw for the cut work . • Turnthe power switch to the ON position. • Positionthe workpisce fiat on the sew. • Let the saw for the blade to corns to a complata stop before feeding the workplace into the...
... the miter gauge to g0° and press the bevel Iocldng tevar towards the tabte to Iosk. • Place a support (the same height as saw table) behind the saw blade build up to reduce the chance of the blade and lock down the handle. • If rippinga piece larger than 36 in. Stand... slightlyto the sl_e of the wood as the _.ble surfacebehind the saw for the cut work . • Turnthe power switch to the ON position. • Positionthe workpisce fiat on the sew. • Let the saw for the blade to corns to a complata stop before feeding the workplace into the...
Operation Manual
Page 34
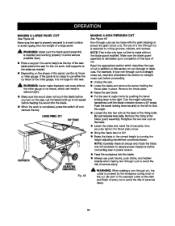
... miter gauge, set the miter gaugeto the desired angle and tighten lock knob. • Turnthe power switch to a complete stop beforeremovingthe workplace. • After the blade has stopped completely,remove the cutoff stock.... Stand slightlyto the side of the wood as it from the table. Wait for the blade to come to the ON position. • Positionthe workpiece fiat on...the bevel locking lever. • Set the saw off . Push the miter gauge and workplace toward the blade. II When the out Is made , turn the saw off . Let the blade build up to ...
... miter gauge, set the miter gaugeto the desired angle and tighten lock knob. • Turnthe power switch to a complete stop beforeremovingthe workplace. • After the blade has stopped completely,remove the cutoff stock.... Stand slightlyto the side of the wood as it from the table. Wait for the blade to come to the ON position. • Positionthe workpiece fiat on...the bevel locking lever. • Set the saw off . Push the miter gauge and workplace toward the blade. II When the out Is made , turn the saw off . Let the blade build up to ...
Operation Manual
Page 35
...blade. • Always use of a large panel _, WARNING: Make sure the b_ade guard assembly is oemplstod, press the switch offand remove the key. Remove the throat plate. • RaLsethe saw , Let the blade bu_d up to lock the angle, • Loosen the two hex nuts st the base of ...gauge or rip fence), which can be made without the blade guard instsIled.Make sure the blade guard assembly la reinstalledupon completion of the saw table behind the saw for the cut . For example, if yournon-throughcut is a straight cross cut, read and understandthe sectionon straight cross cuts before you ...
...blade. • Always use of a large panel _, WARNING: Make sure the b_ade guard assembly is oemplstod, press the switch offand remove the key. Remove the throat plate. • RaLsethe saw , Let the blade bu_d up to lock the angle, • Loosen the two hex nuts st the base of ...gauge or rip fence), which can be made without the blade guard instsIled.Make sure the blade guard assembly la reinstalledupon completion of the saw table behind the saw for the cut . For example, if yournon-throughcut is a straight cross cut, read and understandthe sectionon straight cross cuts before you ...
Operation Manual
Page 37
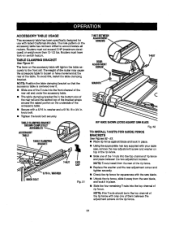
... HP (maximum developed) or weigh more than 12-1/2 Ibs. knob bolt. • Tighten the knob bolt securely. The lever on switch feature. TABLECLAMPINGBRACKET SHOWNCOMPLETELY ASSEMBLED__,._ ACCESSORY T,.E TABLECLAMPING BRACKET _ L L_L)_ T-NUT END CAP _/'16in.WASHER KNOBBOLT Fig. 51 T-NUTBETWEEN ADJUSTMENT...The hole pattern on the accessory table has notbeen drfflad to loosen or have took-on the accessory table wilt.tighten the table securelyto the front rail. ACCESSORY TABLE USAGE Th|s accessory table has been spec'dtcaltydesignedfor use with your table saw blade, and lock it ....
... HP (maximum developed) or weigh more than 12-1/2 Ibs. knob bolt. • Tighten the knob bolt securely. The lever on switch feature. TABLECLAMPINGBRACKET SHOWNCOMPLETELY ASSEMBLED__,._ ACCESSORY T,.E TABLECLAMPING BRACKET _ L L_L)_ T-NUT END CAP _/'16in.WASHER KNOBBOLT Fig. 51 T-NUTBETWEEN ADJUSTMENT...The hole pattern on the accessory table has notbeen drfflad to loosen or have took-on the accessory table wilt.tighten the table securelyto the front rail. ACCESSORY TABLE USAGE Th|s accessory table has been spec'dtcaltydesignedfor use with your table saw blade, and lock it ....
Operation Manual
Page 47
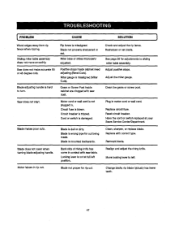
...PROBLEM CAUSE SOLUTION ! Blade adjusting handle is hard to sliding miter table assembLy. Reeharpenor set , Miter base or slides improperly adjusted, Posltlvestops inside cabinet are ckiggsd with dust. Cirouitfuse is damaged. Cord or switch is blown. Blade is misaligned. Blade is tripped. BJadenot proper for... cut . Move _ocking lever to left position. Sliding miter table aSSembly does not move smoothly, Saw does not make accurate 90 or 45 degree ...
...PROBLEM CAUSE SOLUTION ! Blade adjusting handle is hard to sliding miter table assembLy. Reeharpenor set , Miter base or slides improperly adjusted, Posltlvestops inside cabinet are ckiggsd with dust. Cirouitfuse is damaged. Cord or switch is blown. Blade is misaligned. Blade is tripped. BJadenot proper for... cut . Move _ocking lever to left position. Sliding miter table aSSembly does not move smoothly, Saw does not make accurate 90 or 45 degree ...
Operation Manual
Page 50
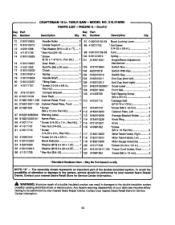
...10-24 x 112 in .. May Be Purchased Locally NOTE: "A" - b _1, WARNING: Improper repair of a double insulatedproduct can resultin damages to be performed by your nearest Sears RepairCenter. ny repairsrequiringdisaessm'o_yot your nearest Sears Repair Center. TABLE SAW... Front 1 110 Cabinet Panel Plate, Front ........ 1 0181010264 452070018 0182010219 0182010211 0182010212 9182015330301 0182011803 4104-55705 410031710 Switch Box 1 Switch With Kay 1 Switch Key 1 End Cap (front }aft 1 End Cap (front right 1 Sca/e Label Fro_ Rail *Self-TappingScrew.... 5O p_ CRAFTSMAN 10 in.
...10-24 x 112 in .. May Be Purchased Locally NOTE: "A" - b _1, WARNING: Improper repair of a double insulatedproduct can resultin damages to be performed by your nearest Sears RepairCenter. ny repairsrequiringdisaessm'o_yot your nearest Sears Repair Center. TABLE SAW... Front 1 110 Cabinet Panel Plate, Front ........ 1 0181010264 452070018 0182010219 0182010211 0182010212 9182015330301 0182011803 4104-55705 410031710 Switch Box 1 Switch With Kay 1 Switch Key 1 End Cap (front }aft 1 End Cap (front right 1 Sca/e Label Fro_ Rail *Self-TappingScrew.... 5O p_ CRAFTSMAN 10 in.


