
Operation Manual
Page 1
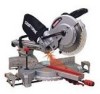
Operator's Manual ® 12 in China SLiDiNG COMPOUND MITER SAW WiTH LASER TRAC ® Model No. 137.212390 \\ \ C us CAUTION: Before using this Miter Saw, read this manual and follow all its Safety Rules and Operating Instructions • Safety Instructions • Installation • Operation • Maintenance • Parts List Customer Help Line For Technical Support 1-800-843-1682 Sears Parts & Repair Center 1-800-488-1222 Sears, Roebuck and Co., Hoffman Estates, IL 60179 USA Visit our Craftsman website: www.sears.comlcraftsman Part No. 137212390001 Printed in .
Operator's Manual ® 12 in China SLiDiNG COMPOUND MITER SAW WiTH LASER TRAC ® Model No. 137.212390 \\ \ C us CAUTION: Before using this Miter Saw, read this manual and follow all its Safety Rules and Operating Instructions • Safety Instructions • Installation • Operation • Maintenance • Parts List Customer Help Line For Technical Support 1-800-843-1682 Sears Parts & Repair Center 1-800-488-1222 Sears, Roebuck and Co., Hoffman Estates, IL 60179 USA Visit our Craftsman website: www.sears.comlcraftsman Part No. 137212390001 Printed in .
Operation Manual
Page 2
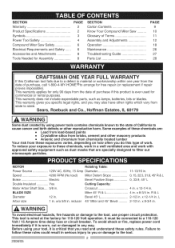
...harm. Some examples of Terms Assembly and Adjustments Operation Maintenance Troubleshooting Guide Parts List PAGE 9 10 11 12 18 26 27 28 CRAFTSMAN ONE YEAR FULL WARRANTY If this product is ever used for commercial or rental purposes. Bevel 45 °...year from the date of purchase if this Craftsman tool fails due to arrange for Assembly PAGE 2 2 3 4 6 6 8 8 SECTION Carton Contents Know Your Compound Miter Saw .......... SECTION Warranty Product Specifications Symbols Power Tool Safety Compound Miter Saw Safety Electrical Requirements and Safety ...... Accessories and ...
...harm. Some examples of Terms Assembly and Adjustments Operation Maintenance Troubleshooting Guide Parts List PAGE 9 10 11 12 18 26 27 28 CRAFTSMAN ONE YEAR FULL WARRANTY If this product is ever used for commercial or rental purposes. Bevel 45 °...year from the date of purchase if this Craftsman tool fails due to arrange for Assembly PAGE 2 2 3 4 6 6 8 8 SECTION Carton Contents Know Your Compound Miter Saw .......... SECTION Warranty Product Specifications Symbols Power Tool Safety Compound Miter Saw Safety Electrical Requirements and Safety ...... Accessories and ...
Operation Manual
Page 6
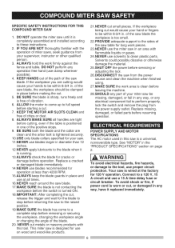
... circuit and use at all handles are cutting would cause your saw blade, the workpiece should be within 8-3/4 in place before cutting, even if the table is wired at less than 12 inches. 12.NEVER apply lubricants to full speed before resuming operation. POWER SUPPLY... IF YOU ARE NOT thoroughly familiar with this saw is free of your miter saw is positioned in any electrical component fail to these instructions. 2. of miter saws, seek guidance from the power supply outlet. SPECIFIC SAFETY INSTRUCTIONS FOR THIS COMPOUND MITER SAW 1. If the workpiece being cut . 7. ...
... circuit and use at all handles are cutting would cause your saw blade, the workpiece should be within 8-3/4 in place before cutting, even if the table is wired at less than 12 inches. 12.NEVER apply lubricants to full speed before resuming operation. POWER SUPPLY... IF YOU ARE NOT thoroughly familiar with this saw is free of your miter saw is positioned in any electrical component fail to these instructions. 2. of miter saws, seek guidance from the power supply outlet. SPECIFIC SAFETY INSTRUCTIONS FOR THIS COMPOUND MITER SAW 1. If the workpiece being cut . 7. ...

Operation Manual
Page 8
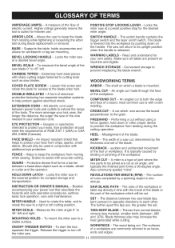
Use of improper accessories may cause hazards. • The use of any cutting tool except 12 in serious bodily injury. saw . Ferrous metal cutting and the use of personal injury, do not modify this power tool or use accessories such as wire or ... square flipped over (see dotted figure). Do not use with this tool. RECOMMENDED ACCESSORIES ,_ WARNING i • Use only accessories recommended for this miter saw blades which meet the requirements under recommended accessories is prohibited. Draw light line on your Sears Hardware Department or see dotted figure). Any such alteration...
Use of improper accessories may cause hazards. • The use of any cutting tool except 12 in serious bodily injury. saw . Ferrous metal cutting and the use of personal injury, do not modify this power tool or use accessories such as wire or ... square flipped over (see dotted figure). Do not use with this tool. RECOMMENDED ACCESSORIES ,_ WARNING i • Use only accessories recommended for this miter saw blades which meet the requirements under recommended accessories is prohibited. Draw light line on your Sears Hardware Department or see dotted figure). Any such alteration...

Operation Manual
Page 9
...by the trigger switch handle. I_WARNING] if any packing material. Miter Saw Hold-down Clamp Dust Bag Blade Wrench Miter Handle Call 1-800-4-MY-HOME ® for , before discarding any part is correctly replaced. Remove the miter saw on the saw. 1. Separate all items are working on a secure stationary work... or damaged, do not plug the power cord into a source of power during unpacking and assembly. Place the saw from the carton. UNPACKYINOUGR MITER SAW [_t_ WARNING] To avoid injury from unexpected starting or electrical shock, do not attempt to make certain all parts...
...by the trigger switch handle. I_WARNING] if any packing material. Miter Saw Hold-down Clamp Dust Bag Blade Wrench Miter Handle Call 1-800-4-MY-HOME ® for , before discarding any part is correctly replaced. Remove the miter saw on the saw. 1. Separate all items are working on a secure stationary work... or damaged, do not plug the power cord into a source of power during unpacking and assembly. Place the saw from the carton. UNPACKYINOUGR MITER SAW [_t_ WARNING] To avoid injury from unexpected starting or electrical shock, do not attempt to make certain all parts...
Operation Manual
Page 11
...safety. The further apart the tips are commonly referred to prevent the workpiece from chips, sparks, small debris. To mount the miter saw blade 0 ° to keep the workpiece from rotating while tightening or loosening the arbor bolt during the cutting operation. The ...saw will be used between two saw blades. COMPOUND CUT - FREEHAND - Scaled to extend the range of the workpiece which a blade is a type of the workpiece. A miter is mounted. The wood being cut made through the face of joint where the two parts to protect your eyes. Locks the miter saw...
...safety. The further apart the tips are commonly referred to prevent the workpiece from chips, sparks, small debris. To mount the miter saw blade 0 ° to keep the workpiece from rotating while tightening or loosening the arbor bolt during the cutting operation. The ...saw will be used between two saw blades. COMPOUND CUT - FREEHAND - Scaled to extend the range of the workpiece which a blade is a type of the workpiece. A miter is mounted. The wood being cut made through the face of joint where the two parts to protect your eyes. Locks the miter saw...
Operation Manual
Page 12
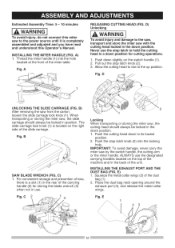
... latch knob (2) into the hole located at the front of the unit. IMPORTANT: To avoid damage, never carry the miter saw from the carton, loosen the slide carriage lock knob (1). Pull out the stop latch to hold the cutting head in a down position, Never use the designated...(1). 2. Squeeze the metal collar wings (2) of the machine and in the down position. 1. Fig.D UNLOCKING THE SLIDE CARRIAGE (FIG. C) 1. Locking When transporting or storing the miter saw with the cutting head locked in the down position for storing the blade wrench (3) when not in position. ALWAYS use...
... latch knob (2) into the hole located at the front of the unit. IMPORTANT: To avoid damage, never carry the miter saw from the carton, loosen the slide carriage lock knob (1). Pull out the stop latch to hold the cutting head in a down position, Never use the designated...(1). 2. Squeeze the metal collar wings (2) of the machine and in the down position. 1. Fig.D UNLOCKING THE SLIDE CARRIAGE (FIG. C) 1. Locking When transporting or storing the miter saw with the cutting head locked in the down position for storing the blade wrench (3) when not in position. ALWAYS use...
Operation Manual
Page 13
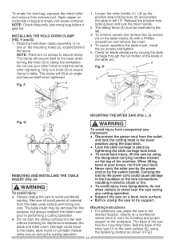
... Disconnect the power cord from flying debris, do not allow visitors to stand near the saw (1) to performing a cutting operation. • Do not start the sliding compound miter saw without checking for handling and proper support of the machine. Check for this Mounting instructions... purpose, but always reattach the table insert 1. H) • Never carry the miter saw by moving the slide the full motion of the miter saw during the ...
... Disconnect the power cord from flying debris, do not allow visitors to stand near the saw (1) to performing a cutting operation. • Do not start the sliding compound miter saw without checking for handling and proper support of the machine. Check for this Mounting instructions... purpose, but always reattach the table insert 1. H) • Never carry the miter saw by moving the slide the full motion of the miter saw during the ...
Operation Manual
Page 14
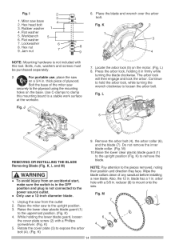
... position (Fig. blade has a 1 in . Place the blade end wrench over the arbor bolt. For portable use a 12-inch diameter blade. 1. Bolt the base of the miter saw )on the base. Use C-clamps to mount onto the saw base 2. Wipe the blade collars clean of plywood. Fig. M 7 \ 8 6 \ 4 Lockwasher 8. K, L and M} [,_ WARNING] • To avoid injury...
... position (Fig. blade has a 1 in . Place the blade end wrench over the arbor bolt. For portable use a 12-inch diameter blade. 1. Bolt the base of the miter saw )on the base. Use C-clamps to mount onto the saw base 2. Wipe the blade collars clean of plywood. Fig. M 7 \ 8 6 \ 4 Lockwasher 8. K, L and M} [,_ WARNING] • To avoid injury...
Operation Manual
Page 15
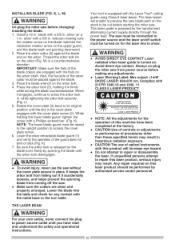
...blade from power source before changing/ installing the blade. 1. The laser beam will enable to preview the saw blade path on the stock to show. The saw must be cut before starting the miter saw. Thread the arbor bolt (4) on the arbor bolt. 4. Rotate the cover plate (3) back to ... tool is released so the blade turns freely by the transformed alternating current supply directly through the power lead. M) in . L) 5. install a 12 in a counterclockwise direction. reducer) making any contact with the metal base or the turn table. Also, the flat-side of the guard does not...
...blade from power source before changing/ installing the blade. 1. The laser beam will enable to preview the saw blade path on the stock to show. The saw must be cut before starting the miter saw. Thread the arbor bolt (4) on the arbor bolt. 4. Rotate the cover plate (3) back to ... tool is released so the blade turns freely by the transformed alternating current supply directly through the power lead. M) in . L) 5. install a 12 in a counterclockwise direction. reducer) making any contact with the metal base or the turn table. Also, the flat-side of the guard does not...
Operation Manual
Page 16
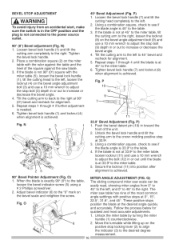
...stops position the blade at 0°, 15 °, 22.5 °, 31.6 °, and 45 °. P) 1. Fig.P \ 8 33.9 ° Bevel Adjustment (Fig. Q) The sliding compound miter saw scale can be easily read, showing miter angles from an accidental start, make sure the switch is in or out to the "0" mark on the.... 2. If the blade is not at 45 ° to the miter table, tilt the cutting arm to the right, loosen the Iocknut (8) on the bevel angle adjustment bolt (9) and use a 10 mm wrench to adjust the bolt (12) in toward the front of the most accurate adjustments. 1. Secure the...
...stops position the blade at 0°, 15 °, 22.5 °, 31.6 °, and 45 °. P) 1. Fig.P \ 8 33.9 ° Bevel Adjustment (Fig. Q) The sliding compound miter saw scale can be easily read, showing miter angles from an accidental start, make sure the switch is in or out to the "0" mark on the.... 2. If the blade is not at 45 ° to the miter table, tilt the cutting arm to the right, loosen the Iocknut (8) on the bevel angle adjustment bolt (9) and use a 10 mm wrench to adjust the bolt (12) in toward the front of the most accurate adjustments. 1. Secure the...
Operation Manual
Page 17
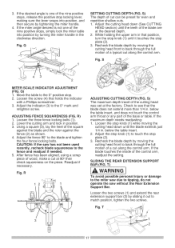
...piece of the cutting head 3.Aredtjiugshthttseeicnnrdeiwca. T) IA,WARNING To avoid possible personal injury or damage to the miter saw due to match position, tighten the two screws. S) The maximum depth travel of wood, make a .... 2. fenc(e2)asshown. 4.Adjustht efenc9e0°tothebladaendtighten 2. Recheck the blade depth by sliding it out to tipping, do not 12 1 operate the saw without the Rear Extension Support Bar. Rechetchkebladdeeptbhymovinthge cmuotttiinohognefaatyfdrpoinctatcobul ataclotkhntrghoeucgothnetfruaollrlm. ._..t._. ._s_ MITESRCALIENDICATAODRJUSTMENT (FIGQ, ...
...piece of the cutting head 3.Aredtjiugshthttseeicnnrdeiwca. T) IA,WARNING To avoid possible personal injury or damage to the miter saw due to match position, tighten the two screws. S) The maximum depth travel of wood, make a .... 2. fenc(e2)asshown. 4.Adjustht efenc9e0°tothebladaendtighten 2. Recheck the blade depth by sliding it out to tipping, do not 12 1 operate the saw without the Rear Extension Support Bar. Rechetchkebladdeeptbhymovinthge cmuotttiinohognefaatyfdrpoinctatcobul ataclotkhntrghoeucgothnetfruaollrlm. ._..t._. ._s_ MITESRCALIENDICATAODRJUSTMENT (FIGQ, ...

Operation Manual
Page 18
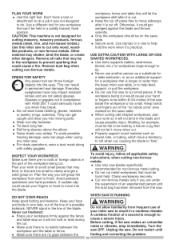
... blade while it is sharp, undamaged and properly aligned. The use the miter saw clean for clearance. Keep the miter saw near flammable liquids, vapors, or gases. • Plan ahead to persons. • Choose the correct 12 in. Follow the instructions that come with moving parts, do not do ...layout, assembly, or setup work , turn the saw off switch for laser, upper and ...
... blade while it is sharp, undamaged and properly aligned. The use the miter saw clean for clearance. Keep the miter saw near flammable liquids, vapors, or gases. • Plan ahead to persons. • Choose the correct 12 in. Follow the instructions that come with moving parts, do not do ...layout, assembly, or setup work , turn the saw off switch for laser, upper and ...
Operation Manual
Page 19
...products, ferrous table. A careless fraction of the blade. onf'torcaetoool r workpiece, fence and table that is cut . eyeglasses have a tendency any miter saw OFF. NEVER stand in compliance or fingers to cause a severe injury. Remove dust bag when blocks, etc.) for a workpiece that will not ... lie flat or be held . CAUTIOThNis: machine is no debris between the [,_ WARNING ] Do not allow familiarity from frequent use this miter saw to move when cut small pieces, if the lenses and are no nails or foreign objects in a careless mistake. Other material may be...
...products, ferrous table. A careless fraction of the blade. onf'torcaetoool r workpiece, fence and table that is cut . eyeglasses have a tendency any miter saw OFF. NEVER stand in compliance or fingers to cause a severe injury. Remove dust bag when blocks, etc.) for a workpiece that will not ... lie flat or be held . CAUTIOThNis: machine is no debris between the [,_ WARNING ] Do not allow familiarity from frequent use this miter saw to move when cut small pieces, if the lenses and are no nails or foreign objects in a careless mistake. Other material may be...
Operation Manual
Page 20
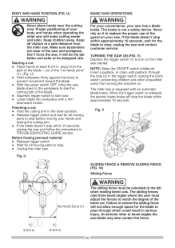
...; Wait for the blade to stop. • Unplug the miter saw and follow the instructions in serious injury. The brake is equipped with an automatic blade brake. Failure to extend the sliding fence (1) will stop before moving parts to turn on it ...(1). (Fig. Proper positioning of the saw . NOTE: Make the ON/OFF switch childproof. l,_. Never rely on the miter saw will do the job better and safer at its designed rate. V 12 Fig. Keep all moving your Nboedvyer apnldacehanhdasndswhennearoptheeratcinugttingthe miter saw started. Starting a cut : •...
...; Wait for the blade to stop. • Unplug the miter saw and follow the instructions in serious injury. The brake is equipped with an automatic blade brake. Failure to extend the sliding fence (1) will stop before moving parts to turn on it ...(1). (Fig. Proper positioning of the saw . NOTE: Make the ON/OFF switch childproof. l,_. Never rely on the miter saw will do the job better and safer at its designed rate. V 12 Fig. Keep all moving your Nboedvyer apnldacehanhdasndswhennearoptheeratcinugttingthe miter saw started. Starting a cut : •...
Operation Manual
Page 24
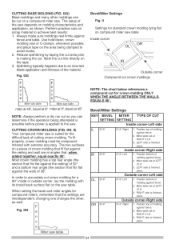
... The setup of 38 ° . Splintering typically happens due to the saw . GG Bevel/Miter Settings Fig. II Settings for standard crown molding lying flat on compound miter saw table Inside corner Outside corner Compound cut crown moldings Miter saw table I I TYPEOFCUT Inside corner-Left side [L 33.9" IR 33.9" Oh...WALLS EQUALS 90 °. Reduce splintering by taping the cut . HH, II) Your compound miter saw table. Position bottom of molding against fence. 2, Miter table set at RiG HT 31.6h 3. Miter table set at LEFT 31.6h 3. LEFT side is finished piece. Position top of ...
... The setup of 38 ° . Splintering typically happens due to the saw . GG Bevel/Miter Settings Fig. II Settings for standard crown molding lying flat on compound miter saw table Inside corner Outside corner Compound cut crown moldings Miter saw table I I TYPEOFCUT Inside corner-Left side [L 33.9" IR 33.9" Oh...WALLS EQUALS 90 °. Reduce splintering by taping the cut . HH, II) Your compound miter saw table. Position bottom of molding against fence. 2, Miter table set at RiG HT 31.6h 3. Miter table set at LEFT 31.6h 3. LEFT side is finished piece. Position top of ...

Operation Manual
Page 25
CROWN MOLDING CHART Compound Miter saw Miter and bevel Angle settings Wall to Crown Molding Angle Angle BeWtwaellsen 67 68 69 70 71 72 ... 16.71 16.37 16.02 15.67 15,33 14.99 14.66 14.30 13.97 13.63 13.30 12,96 12,63 12,30 11.97 11.64 11.31 10.99 10.66 10.34 10.01 9.69 9.37 9.05 8.73 8.41....55 17.17 16.79 16.40 16.02 15.64 15.25 14.87 14.48 14.09 13.71 13.32 12,93 12,54 12,16 11.77 11.38 10.99 10.60 10.21 9.82 9.43 9.04 8.65 8.26 7.86 7.47 7.08...05 16.71 16.38 16.04 15.70 15.36 15.02 14.62 14.34 14.00 13.65 13.31 12,97 12,62 12,29 11.93 11.59 11.24 10.89 10.55 10.20 9.85 9.50 9.15 8.80 8.45 8.10 7....
CROWN MOLDING CHART Compound Miter saw Miter and bevel Angle settings Wall to Crown Molding Angle Angle BeWtwaellsen 67 68 69 70 71 72 ... 16.71 16.37 16.02 15.67 15,33 14.99 14.66 14.30 13.97 13.63 13.30 12,96 12,63 12,30 11.97 11.64 11.31 10.99 10.66 10.34 10.01 9.69 9.37 9.05 8.73 8.41....55 17.17 16.79 16.40 16.02 15.64 15.25 14.87 14.48 14.09 13.71 13.32 12,93 12,54 12,16 11.77 11.38 10.99 10.60 10.21 9.82 9.43 9.04 8.65 8.26 7.86 7.47 7.08...05 16.71 16.38 16.04 15.70 15.36 15.02 14.62 14.34 14.00 13.65 13.31 12,97 12,62 12,29 11.93 11.59 11.24 10.89 10.55 10.20 9.85 9.50 9.15 8.80 8.45 8.10 7....

Operation Manual
Page 26
To avoid electrical shock, fire or injury, use only parts identical to clean the miter saw. = To avoid injury from unexpected starting or electrical shock, unplug the power cord before working properly. Replace for smooth, quiet operation. l,_ WARNING] if blowing sawdust... hard to make the plastic "cloudy" and brittle, • When cleaning the lower guard, unplug the saw until the damaged guard has been replaced. length of the worktable when setting up a miter cut. Then remove the black plastic cap (1) on the side of plastic guard: Use light household oil (sewing ...
To avoid electrical shock, fire or injury, use only parts identical to clean the miter saw. = To avoid injury from unexpected starting or electrical shock, unplug the power cord before working properly. Replace for smooth, quiet operation. l,_ WARNING] if blowing sawdust... hard to make the plastic "cloudy" and brittle, • When cleaning the lower guard, unplug the saw until the damaged guard has been replaced. length of the worktable when setting up a miter cut. Then remove the black plastic cap (1) on the side of plastic guard: Use light household oil (sewing ...
Operation Manual
Page 28
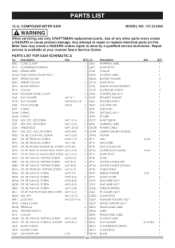
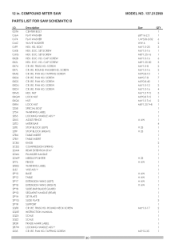
...SCREW M4"0.7-8 0KDK CR. RE. PAN HD. NUT LOCK NUT CABLE CLAMP TERMINAL TRIGGER SWITCH COLLAR CR. COMPOUND MITER SAW MODEL NO. 137.212390 I_]L WARNING] When servicing use only CRAFTSMAN replacement parts. PARTS LiST FOR SAW SCHEMATIC A I .D. 26LU 26P7 27AE 290M 2BQG 2 2C1G 1 2C81 1 2CGT 4 2D92 2 2DX9 ...16_38-3 2 1 1 1 SOC. RE. RE. PAN HD. SCREW 0KDM CR. SCREW & WASHER KNOB-HANDLE GUARD-CORD M5_0.8N0 M6"1.0-40 M6"1.0-12 M6*1.0T-5 M16_2.0 T-16 M6_1.0-20 M5_0.8-16 262V ANCHOR PLATE # 06 QTV I .D. SOC. SCREW M4"0.7-10 CR. TRUSSHD. PAN HD. ...
...SCREW M4"0.7-8 0KDK CR. RE. PAN HD. NUT LOCK NUT CABLE CLAMP TERMINAL TRIGGER SWITCH COLLAR CR. COMPOUND MITER SAW MODEL NO. 137.212390 I_]L WARNING] When servicing use only CRAFTSMAN replacement parts. PARTS LiST FOR SAW SCHEMATIC A I .D. 26LU 26P7 27AE 290M 2BQG 2 2C1G 1 2C81 1 2CGT 4 2D92 2 2DX9 ...16_38-3 2 1 1 1 SOC. RE. RE. PAN HD. SCREW 0KDM CR. SCREW & WASHER KNOB-HANDLE GUARD-CORD M5_0.8N0 M6"1.0-40 M6"1.0-12 M6*1.0T-5 M16_2.0 T-16 M6_1.0-20 M5_0.8-16 262V ANCHOR PLATE # 06 QTV I .D. SOC. SCREW M4"0.7-10 CR. TRUSSHD. PAN HD. ...
Operation Manual
Page 30
...SUPPORT CR. 12 in. BOLT HEX. TRUSS HD. PAN HD. PAN HD. RE. SET SCREW HEX. SOC. SCREW CR. RE. PAN HD. SOC. RE. RE. PAN HD. RE. HD. RE. RE. SCREW CR. SCREW CR. PAN HD. SOC. CAP SCREW HEX. COMPOUND MITER SAW PARTS LiST FOR SAW SCHEMATIC B... q)8_16-2.5 1/4_5/&3/32 WW-6 M6_1.0-25 M6_1.0-16 M8"1.25-16 M6"1.0-16 M8"1.25-30 M6_1.0-8 M6_1.0-16 M5_0.8-10 M4"0.7-8 M5_0.8-40 M6"1.0-12 M6"1.0-16 M6"1.0 T-5 M5_0.8 T-5 M6"1.0 T-6 M8"1.25 T-8 # AW # 23 # 23 QTY 1 1 6 2 3 1 1 6 3 2 2 1 7 1 2 4 3 1 2 1 1 1 1 1 4 1 1 1 1 2 # 23 # AW # AW # AW # AW # AW 3 1 M6_1.0-...
...SUPPORT CR. 12 in. BOLT HEX. TRUSS HD. PAN HD. PAN HD. RE. SET SCREW HEX. SOC. SCREW CR. RE. PAN HD. SOC. RE. RE. PAN HD. RE. HD. RE. RE. SCREW CR. SCREW CR. PAN HD. SOC. CAP SCREW HEX. COMPOUND MITER SAW PARTS LiST FOR SAW SCHEMATIC B... q)8_16-2.5 1/4_5/&3/32 WW-6 M6_1.0-25 M6_1.0-16 M8"1.25-16 M6"1.0-16 M8"1.25-30 M6_1.0-8 M6_1.0-16 M5_0.8-10 M4"0.7-8 M5_0.8-40 M6"1.0-12 M6"1.0-16 M6"1.0 T-5 M5_0.8 T-5 M6"1.0 T-6 M8"1.25 T-8 # AW # 23 # 23 QTY 1 1 6 2 3 1 1 6 3 2 2 1 7 1 2 4 3 1 2 1 1 1 1 1 4 1 1 1 1 2 # 23 # AW # AW # AW # AW # AW 3 1 M6_1.0-...


