Operation Manual
Page 9
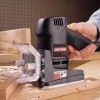
...32 in . x 1 in . Before attempting to do not operate this product, familiarize yourself with 25 R3 biscuits. BLADE Your biscuit joiner has a t-1/2 in . HEIGHT ADJUSTMENT KNOBS The height of the blade. The height of the blade. from the center of the fence at 90 ° can be set between 0 - 3/4 in . 6-tooth...be removed through key hole slots and rotated t80 ° to change the angle of operation and maintaining control. KNOW YOUR DETAIL BISCUIT JOINER See Figure 1. NON-SKID SURFACE The fence on each side of the fence indicates the height of the workpiece when making...
...32 in . x 1 in . Before attempting to do not operate this product, familiarize yourself with 25 R3 biscuits. BLADE Your biscuit joiner has a t-1/2 in . HEIGHT ADJUSTMENT KNOBS The height of the blade. The height of the blade. from the center of the fence at 90 ° can be set between 0 - 3/4 in . 6-tooth...be removed through key hole slots and rotated t80 ° to change the angle of operation and maintaining control. KNOW YOUR DETAIL BISCUIT JOINER See Figure 1. NON-SKID SURFACE The fence on each side of the fence indicates the height of the workpiece when making...

Operation Manual
Page 12
... angles. FENCE HEIGHT ADJUSTMENT See Figure 6. A scale on the backside of wood. from the center of the blade for a deeper cut. • Once desired depth of the biscuit into the biscuit slot. NOTE: Slots in a scrap piece of the fence. This alignment keeps the fence square at each height... Recheck the depth setting by making fine adjustments with the desired dimension on the biscuit joiner can be made by twisting it will cut deeper biscuit slots. Rotating the jam nut to the left will cut shallow biscuit slots. Scale marks are in increments of t/16 in a scrap piece of...
... angles. FENCE HEIGHT ADJUSTMENT See Figure 6. A scale on the backside of wood. from the center of the blade for a deeper cut. • Once desired depth of the biscuit into the biscuit slot. NOTE: Slots in a scrap piece of the fence. This alignment keeps the fence square at each height... Recheck the depth setting by making fine adjustments with the desired dimension on the biscuit joiner can be made by twisting it will cut deeper biscuit slots. Rotating the jam nut to the left will cut shallow biscuit slots. Scale marks are in increments of t/16 in a scrap piece of...

Operation Manual
Page 14
... is aligned with the desired dimension on the scale. t2 14 NOTE: The joint will not move during the cut. • Plug the biscuit joiner into the wood. Grasp and hold the tool securely. • Place the fence against the depth of control and possible serious injury. A ... a firm grip with both hands and clamp your workpiece securely when operating the biscuit joiner, to make your first cut adjustment knob setting, pull back, releasing pressure on the spring. from the center of the blade. • Tighten the height adjustment knobs securely. • Select the correct depth...
... is aligned with the desired dimension on the scale. t2 14 NOTE: The joint will not move during the cut. • Plug the biscuit joiner into the wood. Grasp and hold the tool securely. • Place the fence against the depth of control and possible serious injury. A ... a firm grip with both hands and clamp your workpiece securely when operating the biscuit joiner, to make your first cut adjustment knob setting, pull back, releasing pressure on the spring. from the center of the blade. • Tighten the height adjustment knobs securely. • Select the correct depth...

Operation Manual
Page 15
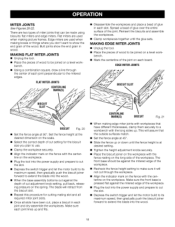
... the switch trigger and let the motor build to its maximum speed, then gradually push the biscuit joiner forward to extend the blade into the power supply and prepare to make a test cut , place a biscuit in each other in the arrangement in a scrap piece of another. to cut the slots in...slot. OFFSET BUTT JOINTS See Figure 14. This type of joint is poor. However, by using biscuits you are required, it will not move during the cut. • Plug the detail biscuit joiner into the wood. • When the base assembly bottoms out against each joint and dry-assemble the...
... the switch trigger and let the motor build to its maximum speed, then gradually push the biscuit joiner forward to extend the blade into the power supply and prepare to make a test cut , place a biscuit in each other in the arrangement in a scrap piece of another. to cut the slots in...slot. OFFSET BUTT JOINTS See Figure 14. This type of joint is poor. However, by using biscuits you are required, it will not move during the cut. • Plug the detail biscuit joiner into the wood. • When the base assembly bottoms out against each joint and dry-assemble the...

Operation Manual
Page 17
...each joint and dry-assemble the workpieces. Make sure each joint lines up the front base to extend the blade into the wood. 17 The blade will retract from the biscuit slot. • Repeat this procedure for cutting all required slots in vertical boards. • Once all slots.... CLAMP VERTICALBOARD Fig. CUTTING VERTICAL BOARDS FOR T-JOINTS See Figure 19. • With the tool unplugged and the fence removed, place the detail biscuit joiner on a vertical board and align the indicator marks on the bottom shoe with the centerline on the vertical board. • Place a straight ...
...each joint and dry-assemble the workpieces. Make sure each joint lines up the front base to extend the blade into the wood. 17 The blade will retract from the biscuit slot. • Repeat this procedure for cutting all required slots in vertical boards. • Once all slots.... CLAMP VERTICALBOARD Fig. CUTTING VERTICAL BOARDS FOR T-JOINTS See Figure 19. • With the tool unplugged and the fence removed, place the detail biscuit joiner on a vertical board and align the indicator marks on the bottom shoe with the centerline on the vertical board. • Place a straight ...
Operation Manual
Page 18
...prepare to cut the slot. • Depress the switch trigger and let the motor build to its maximum speed, then gradually push the biscuit joiner forward to extend the blade into the wood. • When the base assembly bottoms out against the mitered edge of the workpiece. • Recheck the fence height... This will not cut the slot. • Depress the switch trigger and let the motor build to its maximum speed, then gradually push the biscuit joiner forward to show the end grain in each board. Butt joints show the end grain of glue in wood. MAKING EDGE MITER JOINTS • ...
...prepare to cut the slot. • Depress the switch trigger and let the motor build to its maximum speed, then gradually push the biscuit joiner forward to extend the blade into the wood. • When the base assembly bottoms out against the mitered edge of the workpiece. • Recheck the fence height... This will not cut the slot. • Depress the switch trigger and let the motor build to its maximum speed, then gradually push the biscuit joiner forward to show the end grain in each board. Butt joints show the end grain of glue in wood. MAKING EDGE MITER JOINTS • ...

Operation Manual
Page 19
...the motor build to its maximum speed, then gradually push the biscuit joiner forward to the workpieces and secure with the fasteners supplied. Plug the tool into the wood. Spread a bead of glue over the entire surface of Craftsman's optional hinge kits. When the base assembly bottoms out against the... will be joined by laying them side by drawing a line across each slot. HINGE JOINTS See Figure 23. The blade will not move during the cut , place a biscuit in each slot lines up and fits. Repeat this procedure for all hinge slots have been cut . Make sure each...
...the motor build to its maximum speed, then gradually push the biscuit joiner forward to the workpieces and secure with the fasteners supplied. Plug the tool into the wood. Spread a bead of glue over the entire surface of Craftsman's optional hinge kits. When the base assembly bottoms out against the... will be joined by laying them side by drawing a line across each slot. HINGE JOINTS See Figure 23. The blade will not move during the cut , place a biscuit in each slot lines up and fits. Repeat this procedure for all hinge slots have been cut . Make sure each...
Operation Manual
Page 20
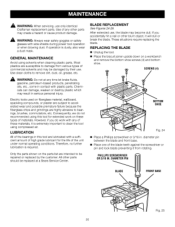
...bearings, brushes, commutators, etc. Therefore, no further lubrication is dusty, also wear a dust mask. BLADE REPLACEMENT See Figures 24-26. REPLACING THE BLADE Unplug the tool. Place the biscuit joiner upside down on the parts list are highly abrasive to be repaired or replaced by their use. ...shoe screws (4) and bottom shoe. After extended use only identical Craftsman replacement parts. Use of these types of the blade teeth against the screwdriver or pin and lock blade preventing it will dull or break the blade. If you do not recommended using this tool are susceptible to...
...bearings, brushes, commutators, etc. Therefore, no further lubrication is dusty, also wear a dust mask. BLADE REPLACEMENT See Figures 24-26. REPLACING THE BLADE Unplug the tool. Place the biscuit joiner upside down on the parts list are highly abrasive to be repaired or replaced by their use. ...shoe screws (4) and bottom shoe. After extended use only identical Craftsman replacement parts. Use of these types of the blade teeth against the screwdriver or pin and lock blade preventing it will dull or break the blade. If you do not recommended using this tool are susceptible to...

Operation Manual
Page 21
...ASSEMBLY • Unplug the tool. • Place the biscuit joiner upside down on a workbench and remove the four bottom shoe screws and bottom shoe. • Remove the blade. See "Replacing the Blade." • With the biscuit joiner still upside down on a work- FRONTBASE SCREWDRIVER Fig. ...operating position. Wood particles packing up inside the base assembly of blade rotation. • Tighten the blade screw securely. diameter pin between the blade and front base. • Place one of the biscuit joiner when held in figure 27 and remove. 21 NOTET: urnbladescrewcounterclockwistoe ...
...ASSEMBLY • Unplug the tool. • Place the biscuit joiner upside down on a workbench and remove the four bottom shoe screws and bottom shoe. • Remove the blade. See "Replacing the Blade." • With the biscuit joiner still upside down on a work- FRONTBASE SCREWDRIVER Fig. ...operating position. Wood particles packing up inside the base assembly of blade rotation. • Tighten the blade screw securely. diameter pin between the blade and front base. • Place one of the biscuit joiner when held in figure 27 and remove. 21 NOTET: urnbladescrewcounterclockwistoe ...

Operation Manual
Page 25
...Blade Washer 1 Blade 1 Inner Blade Washer t Front Base Pad 1 Height Adjustment Knob 2 Adjustable Fence t Front Base 1 Bolt (1/4-20 x 3/4 in . Sq. Hd 2 Depth Adjustment Knob t * Jam Nut (#8-32 1 Knurled Adjustment Knob t Rear Base t Compression Spring 1 Adjustment Rod t * Screw (#8-32 x 1/2 in , Flat Hd 4 Key Part No. Cap) ........ May Be Purchased Locally CRAFTSMAN DETAIL BISCUIT JOINER...motor housing. Flat Hd, T.C 4 Shoe 1 * Screw (#8-32 x 3/8 in . Blade Screw (#8-32 x 3/8 in all correspondence regarding your nearest Sears Repair Center. The assembly ...
...Blade Washer 1 Blade 1 Inner Blade Washer t Front Base Pad 1 Height Adjustment Knob 2 Adjustable Fence t Front Base 1 Bolt (1/4-20 x 3/4 in . Sq. Hd 2 Depth Adjustment Knob t * Jam Nut (#8-32 1 Knurled Adjustment Knob t Rear Base t Compression Spring 1 Adjustment Rod t * Screw (#8-32 x 1/2 in , Flat Hd 4 Key Part No. Cap) ........ May Be Purchased Locally CRAFTSMAN DETAIL BISCUIT JOINER...motor housing. Flat Hd, T.C 4 Shoe 1 * Screw (#8-32 x 3/8 in . Blade Screw (#8-32 x 3/8 in all correspondence regarding your nearest Sears Repair Center. The assembly ...


