
End User License Agreement
Page 2
... and conditions of such license. All intellectual property rights in relation to support services related to the LIMITATION ON REVERSE ENGINEERING. floppy disk, CD or DVD) or an equivalent solution delivered in any product identification, copyright notices or proprietary restrictions from the Software Product. 6. Restrictions. TERM. You agree that the right...
... and conditions of such license. All intellectual property rights in relation to support services related to the LIMITATION ON REVERSE ENGINEERING. floppy disk, CD or DVD) or an equivalent solution delivered in any product identification, copyright notices or proprietary restrictions from the Software Product. 6. Restrictions. TERM. You agree that the right...
Lithium-ion battery technology: Getting the most from Smart Batteries
Page 3
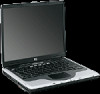
...300 cycles. 3 Battery energy, expressed in watt-hours (Wh), is expressed in a roughly linear manner as soon as CAD, gaming, and DVD movies drains the battery faster and decreases its useful life; FCC is affected by the average operating temperature of a rechargeable Li-Ion battery is ...difficult because cycle life is influenced by the typical discharge load on the notebook and by its full charge capacity. Estimating the cycle life of the battery and its power management settings. New batteries are expected ...
...300 cycles. 3 Battery energy, expressed in watt-hours (Wh), is expressed in a roughly linear manner as soon as CAD, gaming, and DVD movies drains the battery faster and decreases its useful life; FCC is affected by the average operating temperature of a rechargeable Li-Ion battery is ...difficult because cycle life is influenced by the typical discharge load on the notebook and by its full charge capacity. Estimating the cycle life of the battery and its power management settings. New batteries are expected ...
Lithium-ion battery technology: Getting the most from Smart Batteries
Page 4
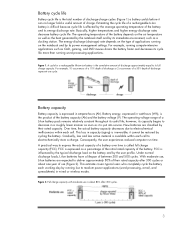
...) Battery cycled weekly (>35ºC, 95ºF) Low (word processing, Internet, e-mail) >80% 80% Moderate (wireless, spreadsheets, database management) 80% 70% High* (CAD, 3D games, DVDs, high LCD brightness) 60% *High power applications may cause a battery to decrease. Table 1 summarizes FCC projections after 300 cycles at low to operate below the...
...) Battery cycled weekly (>35ºC, 95ºF) Low (word processing, Internet, e-mail) >80% 80% Moderate (wireless, spreadsheets, database management) 80% 70% High* (CAD, 3D games, DVDs, high LCD brightness) 60% *High power applications may cause a battery to decrease. Table 1 summarizes FCC projections after 300 cycles at low to operate below the...

Maintenance and Service Guide
Page 3
... Small Parts ...2-12 Removing the Keyboard Cover...2-13 Removing the Speaker Assembly ...2-15 Removing the Keyboard ...2-16 Removing the Switchboard PCA ...2-19 Removing the CD/DVD Drive...2-20 Removing the Display Assembly...2-23 Removing the Top Case ...2-26 Removing the Floppy Drive...2-32 Removing the Infrared (I/R) PCA...2-36 Removing the Audio...
... Small Parts ...2-12 Removing the Keyboard Cover...2-13 Removing the Speaker Assembly ...2-15 Removing the Keyboard ...2-16 Removing the Switchboard PCA ...2-19 Removing the CD/DVD Drive...2-20 Removing the Display Assembly...2-23 Removing the Top Case ...2-26 Removing the Floppy Drive...2-32 Removing the Infrared (I/R) PCA...2-36 Removing the Audio...

Maintenance and Service Guide
Page 4
... Removing the Battery ...2-4 Figure 2-3. Removing the Mini PCI Card 2-8 Figure 2-7. Removing the Keyboard Cover 2-14 Figure 2-10. Removing the CD/DVD Drive 2-21 Figure 2-16. Removing the Floppy Drive 2-33 Figure 2-23. Removing the Heat Sink (with Fan 2-41 Figure 2-27. Bottom ...Speaker Cable 2-14 Figure 2-11. Intel CPU Module Removal 2-45 Figure 2-29. Figures Figure 1-1. Front View...1-8 Figure 1-2. Resetting the Notebook ...1-17 Figure 1-8. Removing the Mini PCI Card 2-7 Figure 2-6. Removing the Hard Disk Drive Tray 2-10 Figure 2-9. Removing the Speaker Assembly 2-15 Figure...
... Removing the Battery ...2-4 Figure 2-3. Removing the Mini PCI Card 2-8 Figure 2-7. Removing the Keyboard Cover 2-14 Figure 2-10. Removing the CD/DVD Drive 2-21 Figure 2-16. Removing the Floppy Drive 2-33 Figure 2-23. Removing the Heat Sink (with Fan 2-41 Figure 2-27. Bottom ...Speaker Cable 2-14 Figure 2-11. Intel CPU Module Removal 2-45 Figure 2-29. Figures Figure 1-1. Front View...1-8 Figure 1-2. Resetting the Notebook ...1-17 Figure 1-8. Removing the Mini PCI Card 2-7 Figure 2-6. Removing the Hard Disk Drive Tray 2-10 Figure 2-9. Removing the Speaker Assembly 2-15 Figure...

Maintenance and Service Guide
Page 14
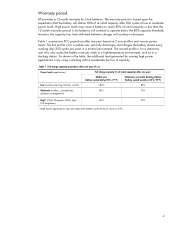
...to right), power mode, hard disk activity, and battery 7. One-touch buttons 3. Power button, turns the notebook on certain models 1-8 Product Information Service Manual Infrared port* 9. CD-ROM, DVD, or other drive 12. PS/2 keyboard or PS/2 mouse port (supports Y adapter) * on and off... button and indicator light* 10. Microphone option (not available) 8. Front View HP Pavilion ze4x00, HP Compaq nx9005 and nx9000, Compaq Evo Notebook N1050v and N1010v, and Compaq Presario 2100 and ...
...to right), power mode, hard disk activity, and battery 7. One-touch buttons 3. Power button, turns the notebook on certain models 1-8 Product Information Service Manual Infrared port* 9. CD-ROM, DVD, or other drive 12. PS/2 keyboard or PS/2 mouse port (supports Y adapter) * on and off... button and indicator light* 10. Microphone option (not available) 8. Front View HP Pavilion ze4x00, HP Compaq nx9005 and nx9000, Compaq Evo Notebook N1050v and N1010v, and Compaq Presario 2100 and ...
Maintenance and Service Guide
Page 17
... Notebook open/close latch 2. One-touch buttons 3. Power button, turns the notebook on -off 5. Universal Serial Bus (USB) port * on -off button and indicator light* 9. Front View HP Pavilion ze5x00, HP Compaq nx9010 and nx9008, and Compaq ...Presario 2500 1. Touch pad, scroll pad, Select buttons, plus on and off button 6. Audio mute button and audio mute light* 10. Infrared port* 8. Wireless on certain models Service Manual Product Information 1-11 Keyboard status lights 4. Volume controls* 12. Figure 1-4. Battery 11. CD-ROM, DVD...
... Notebook open/close latch 2. One-touch buttons 3. Power button, turns the notebook on -off 5. Universal Serial Bus (USB) port * on -off button and indicator light* 9. Front View HP Pavilion ze5x00, HP Compaq nx9010 and nx9008, and Compaq ...Presario 2500 1. Touch pad, scroll pad, Select buttons, plus on and off button 6. Audio mute button and audio mute light* 10. Infrared port* 8. Wireless on certain models Service Manual Product Information 1-11 Keyboard status lights 4. Volume controls* 12. Figure 1-4. Battery 11. CD-ROM, DVD...
Maintenance and Service Guide
Page 23
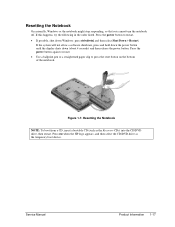
... bootable CD (such as the temporary boot device. Resetting the Notebook Occasionally, Windows or the notebook might stop responding, so that you cannot turn the notebook off. Press the power button to press the reset button on the bottom of the notebook. Press esc when the HP logo appears, and then select the... CD/DVD drive as the Recovery CDs) into the CD/DVD drive, then...
... bootable CD (such as the temporary boot device. Resetting the Notebook Occasionally, Windows or the notebook might stop responding, so that you cannot turn the notebook off. Press the power button to press the reset button on the bottom of the notebook. Press esc when the HP logo appears, and then select the... CD/DVD drive as the Recovery CDs) into the CD/DVD drive, then...
Maintenance and Service Guide
Page 25
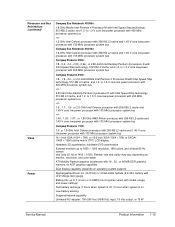
...TFT) LCD display Hardware 3D acceleration, hardware DVD acceleration External monitors up to 1600 × 1200 resolution, 16M colors, and at least 85 Hz refresh rate (only 60 Hz at 1400 × 1050). Processor and Bus Architecture (continued) Video Power Compaq Evo Notebook N1050v: 1.8-GHz Mobile Intel Pentium 4 Processor...GHz Intel Celeron processor with 256-KB L2 cache and 1.45-V core low-power processor with 133-MHz processor system bus Compaq Evo Notebook N1010v: 1.6-GHz Intel Celeron processor with 256-KB L2 cache and 1.45-V core low-power processor with 133-MHz processor system bus...
...TFT) LCD display Hardware 3D acceleration, hardware DVD acceleration External monitors up to 1600 × 1200 resolution, 16M colors, and at least 85 Hz refresh rate (only 60 Hz at 1400 × 1050). Processor and Bus Architecture (continued) Video Power Compaq Evo Notebook N1050v: 1.8-GHz Mobile Intel Pentium 4 Processor...GHz Intel Celeron processor with 256-KB L2 cache and 1.45-V core low-power processor with 133-MHz processor system bus Compaq Evo Notebook N1010v: 1.6-GHz Intel Celeron processor with 256-KB L2 cache and 1.45-V core low-power processor with 133-MHz processor system bus...
Maintenance and Service Guide
Page 26
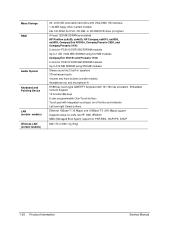
...100 interface 1.44-MB floppy drive (certain models) 24x CD-ROM, 8x DVD, CD-RW, or CD-RW/DVD drive (or higher) At least 128 MB SDRAM preinstalled HP Pavilion ze5x00, ze4x00, HP Compaq nx9010, nx9008, nx9005, Compaq Evo N1050v, Compaq Presario 2500, and Compaq Presario 2100: 2 slots for PC2100 DDR-266 SDRAM modules Up to 1...LAN, fast IP, DMI, dRMON MBA (Managed Boot Agent) support for PC2100 DDR-266 SDRAM modules Up to 512 MB SDRAM using 512 MB modules Compaq Evo N1010v and Presario 1100: 2 slots for PXE/BINL, NCP/IPX, DHCP 802.11b or 802.11g (54g) 1-20 Product Information Service Manual Mass...
...100 interface 1.44-MB floppy drive (certain models) 24x CD-ROM, 8x DVD, CD-RW, or CD-RW/DVD drive (or higher) At least 128 MB SDRAM preinstalled HP Pavilion ze5x00, ze4x00, HP Compaq nx9010, nx9008, nx9005, Compaq Evo N1050v, Compaq Presario 2500, and Compaq Presario 2100: 2 slots for PC2100 DDR-266 SDRAM modules Up to 1...LAN, fast IP, DMI, dRMON MBA (Managed Boot Agent) support for PC2100 DDR-266 SDRAM modules Up to 512 MB SDRAM using 512 MB modules Compaq Evo N1010v and Presario 1100: 2 slots for PXE/BINL, NCP/IPX, DHCP 802.11b or 802.11g (54g) 1-20 Product Information Service Manual Mass...
Maintenance and Service Guide
Page 31
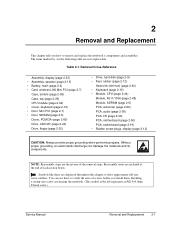
...44) • Cover, keyboard (page 2-16) • Door, Mini PCI (page 2-7) • Door, SDRAM (page 2-5) Doors, PCMCIA (page 2-60) Drive, CD/DVD (page 2-20) Drive, floppy (page 2-32) • Drive, hard disk (page 2-9) • Feet, rubber (page 2-12) Heat sink (with fan) (page 2-40... plugs, display (page 2-12) CAUTION: Always provide proper grounding when performing repairs. Symbols like these to remove and replace the notebook's components and assemblies. Without proper grounding, an electrostatic discharge can use these are user-replaceable. Reassembly notes are the reverse of ...
...44) • Cover, keyboard (page 2-16) • Door, Mini PCI (page 2-7) • Door, SDRAM (page 2-5) Doors, PCMCIA (page 2-60) Drive, CD/DVD (page 2-20) Drive, floppy (page 2-32) • Drive, hard disk (page 2-9) • Feet, rubber (page 2-12) Heat sink (with fan) (page 2-40... plugs, display (page 2-12) CAUTION: Always provide proper grounding when performing repairs. Symbols like these to remove and replace the notebook's components and assemblies. Without proper grounding, an electrostatic discharge can use these are user-replaceable. Reassembly notes are the reverse of ...
Maintenance and Service Guide
Page 41
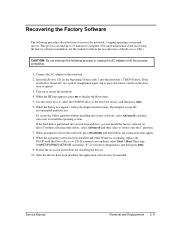
...readme.txt file in the root directory of the Recovery CDs.) CAUTION: Do not interrupt the following procedure describes how to reboot the notebook, press ctrl+alt+del, and then follow the displayed instructions. select Advanced and then select to open it. 3. If autorun is partitioned ...into the notebook's CD/DVD drive. If the notebook is turned off, use a pin or straightened paper clip to press the release switch on drive C without installing the factory software,...
...readme.txt file in the root directory of the Recovery CDs.) CAUTION: Do not interrupt the following procedure describes how to reboot the notebook, press ctrl+alt+del, and then follow the displayed instructions. select Advanced and then select to open it. 3. If autorun is partitioned ...into the notebook's CD/DVD drive. If the notebook is turned off, use a pin or straightened paper clip to press the release switch on drive C without installing the factory software,...
Maintenance and Service Guide
Page 50
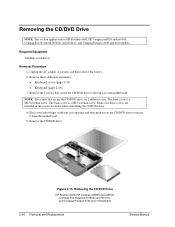
...: • Keyboard cover (page 2-13) • Keyboard (page 2-16) 3. Removing the CD/DVD Drive HP Pavilion 4x00, HP Compaq nx9005 and nx9000, Compaq Evo Notebook N1050v and N1010v, and Compaq Presario 2100 and 1100 Models 2-20 Removal and Replacement Service Manual Unplug the AC adapter, if present, ...screwdriver Removal Procedure 1. Remove the 2 screws that secure the CD/DVD drive are installed in the top case opening, and then push out on the CD/DVD drive to HP Pavilion 4x00, HP Compaq nx9005 and nx9000, Compaq Evo Notebook N1050v and N1010v, and Compaq Presario 2100 and 1100 models.
...: • Keyboard cover (page 2-13) • Keyboard (page 2-16) 3. Removing the CD/DVD Drive HP Pavilion 4x00, HP Compaq nx9005 and nx9000, Compaq Evo Notebook N1050v and N1010v, and Compaq Presario 2100 and 1100 Models 2-20 Removal and Replacement Service Manual Unplug the AC adapter, if present, ...screwdriver Removal Procedure 1. Remove the 2 screws that secure the CD/DVD drive are installed in the top case opening, and then push out on the CD/DVD drive to HP Pavilion 4x00, HP Compaq nx9005 and nx9000, Compaq Evo Notebook N1050v and N1010v, and Compaq Presario 2100 and 1100 models.

Maintenance and Service Guide
Page 51
... to release it from the motherboard. 5. Removing the CD/DVD Drive HP Pavilion 5x00, HP Compaq nx9010 and HP nx9008, and Compaq Presario 2500 Models Service Manual Removal and Replacement 2-21 Figure 2-16. Remove the CD/DVD drive. Required Equipment 1 Phillips screwdriver Removal Procedure 1. Place your... index finger in the top case opening and push out on the CD/DVD drive to HP Pavilion 5x00, HP Compaq nx9010 and nx9008, and Compaq Presario 2500 models. Remove the ...
... to release it from the motherboard. 5. Removing the CD/DVD Drive HP Pavilion 5x00, HP Compaq nx9010 and HP nx9008, and Compaq Presario 2500 Models Service Manual Removal and Replacement 2-21 Figure 2-16. Remove the CD/DVD drive. Required Equipment 1 Phillips screwdriver Removal Procedure 1. Place your... index finger in the top case opening and push out on the CD/DVD drive to HP Pavilion 5x00, HP Compaq nx9010 and nx9008, and Compaq Presario 2500 models. Remove the ...

Maintenance and Service Guide
Page 54
... cover (page 2-13) • Speaker assembly (page 2-23) • Keyboard (page 2-16) • Switchboard PCA (page 2-19) • CD/DVD drive (page 2-20) • Display assembly (page 2-23) 3. Lift the top case off of the notebook and then disconnect the touch pad cable from the top case. 9. Turn the... from the rear panel. 8. Removing the Top Case (Service Partners Only) NOTE: This section applies only to HP Pavilion 4x00, HP Compaq nx9005 and nx9000, Compaq Evo Notebook N1050v and N1010v, and Compaq Presario 2100 and 1100 models. Remove the remaining 14 M2.5×6.0mm screws. 6.
... cover (page 2-13) • Speaker assembly (page 2-23) • Keyboard (page 2-16) • Switchboard PCA (page 2-19) • CD/DVD drive (page 2-20) • Display assembly (page 2-23) 3. Lift the top case off of the notebook and then disconnect the touch pad cable from the top case. 9. Turn the... from the rear panel. 8. Removing the Top Case (Service Partners Only) NOTE: This section applies only to HP Pavilion 4x00, HP Compaq nx9005 and nx9000, Compaq Evo Notebook N1050v and N1010v, and Compaq Presario 2100 and 1100 models. Remove the remaining 14 M2.5×6.0mm screws. 6.

Maintenance and Service Guide
Page 56
...page 2-15) • Keyboard (page 2-16) • Switchboard PCA (page 2-19) • CD/DVD drive (page 2-20) • Display assembly (page 2-23) 3. NOTE: This section applies only to the notebook. 2-26 Removal and Replacement Service Manual Remove the following 16 screws: • Six M2.5×7.0mm screws ... location. Be sure to note of the correct location of the notebook CAUTION: The 16 screws removed in damage to HP Pavilion 5x00, HP Compaq nx9010 and HP nx9008, and Compaq Presario 2500 models. Turn the notebook bottom side up with the front facing forward. 4. Failure to ...
...page 2-15) • Keyboard (page 2-16) • Switchboard PCA (page 2-19) • CD/DVD drive (page 2-20) • Display assembly (page 2-23) 3. NOTE: This section applies only to the notebook. 2-26 Removal and Replacement Service Manual Remove the following 16 screws: • Six M2.5×7.0mm screws ... location. Be sure to note of the correct location of the notebook CAUTION: The 16 screws removed in damage to HP Pavilion 5x00, HP Compaq nx9010 and HP nx9008, and Compaq Presario 2500 models. Turn the notebook bottom side up with the front facing forward. 4. Failure to ...

Maintenance and Service Guide
Page 79
... floppy disk. 1. Remove these additional assemblies: • Hard disk drive (page 2-9) • Keyboard cover (page 2-13) • Keyboard (page 2-16) • CD/DVD drive (page 2-20) • Display assembly (page 2-23) • Top case (page 2-26) • Floppy drive (page 2-32) • Heat sink (page... motherboard on either the built-in display or the external monitor), press esc to HP Pavilion 4x00, HP Compaq nx9005 and nx9000, Compaq Evo Notebook N1050v and N1010v, and Compaq Presario 2100 and 1100 models. When prompted, type A for the automatic update option. You will then store...
... floppy disk. 1. Remove these additional assemblies: • Hard disk drive (page 2-9) • Keyboard cover (page 2-13) • Keyboard (page 2-16) • CD/DVD drive (page 2-20) • Display assembly (page 2-23) • Top case (page 2-26) • Floppy drive (page 2-32) • Heat sink (page... motherboard on either the built-in display or the external monitor), press esc to HP Pavilion 4x00, HP Compaq nx9005 and nx9000, Compaq Evo Notebook N1050v and N1010v, and Compaq Presario 2100 and 1100 models. When prompted, type A for the automatic update option. You will then store...

Maintenance and Service Guide
Page 81
...press esc to HP Pavilion 5x00, HP Compaq nx9010, HP nx9008, and Compaq Presario 2500 models. Select the Serial Number option from the boot menu. 6. You will then store the electronic serial number in the floppy drive. 4. Download the notebook service package from the Partnership Web site ... battery. 2. Remove these additional assemblies: • Hard disk drive (page 2-9) • Keyboard cover (page 2-13) • Keyboard (page 2-16) • CD/DVD drive (page 2-20) • Display assembly (page 2-23) • Top case (page 2-26) • Heat sink (page 2-40) • Floppy drive (page...
...press esc to HP Pavilion 5x00, HP Compaq nx9010, HP nx9008, and Compaq Presario 2500 models. Select the Serial Number option from the boot menu. 6. You will then store the electronic serial number in the floppy drive. 4. Download the notebook service package from the Partnership Web site ... battery. 2. Remove these additional assemblies: • Hard disk drive (page 2-9) • Keyboard cover (page 2-13) • Keyboard (page 2-16) • CD/DVD drive (page 2-20) • Display assembly (page 2-23) • Top case (page 2-26) • Heat sink (page 2-40) • Floppy drive (page...

Maintenance and Service Guide
Page 83
... 9. Remove the 2 screws that secures the right side of the rail is a M2.0×4.0mm screw. The screw that secure the CD/DVD drive front alignment rail to the bottom case. Service Manual Removal and Replacement 2-53 Disconnecting the Motherboard Cables 11. Make sure these screws are ...2 different sizes. Disconnect the fan cable from the notebook rear panel (2 on each side of the rail is a M2.5×6.0mm countersink screw. Figure 2-36. Remove the four M5.0×10mm ...
... 9. Remove the 2 screws that secures the right side of the rail is a M2.0×4.0mm screw. The screw that secure the CD/DVD drive front alignment rail to the bottom case. Service Manual Removal and Replacement 2-53 Disconnecting the Motherboard Cables 11. Make sure these screws are ...2 different sizes. Disconnect the fan cable from the notebook rear panel (2 on each side of the rail is a M2.5×6.0mm countersink screw. Figure 2-36. Remove the four M5.0×10mm ...

Maintenance and Service Guide
Page 84
... on the motherboard. 19. Removing the Motherboard 2-54 Removal and Replacement Service Manual Carefully lift the motherboard out of the motherboard. 18. Remove the CD/DVD drive front alignment rail. 16.
... on the motherboard. 19. Removing the Motherboard 2-54 Removal and Replacement Service Manual Carefully lift the motherboard out of the motherboard. 18. Remove the CD/DVD drive front alignment rail. 16.


