HP Client Manager 6.1
Page 3
...of client-side events, such as a chassis intrusion, disk drive error, battery status, thermal changes, and "walking assets" such as new or missing PCs, memory, battery, disk drives, CPUs, and monitors. With HPCM, SoftPaq installation can press the F10 key to pause the boot process in order to happen ...you can use HPCM to change the BIOS settings, such as the Storage Options or the Boot Order, as shown in setting-up -to upgrade the BIOS firmware on those client computers that you specify. Normally, a SoftPaq would be used to -date and highest-quality system software. HPCM...
...of client-side events, such as a chassis intrusion, disk drive error, battery status, thermal changes, and "walking assets" such as new or missing PCs, memory, battery, disk drives, CPUs, and monitors. With HPCM, SoftPaq installation can press the F10 key to pause the boot process in order to happen ...you can use HPCM to change the BIOS settings, such as the Storage Options or the Boot Order, as shown in setting-up -to upgrade the BIOS firmware on those client computers that you specify. Normally, a SoftPaq would be used to -date and highest-quality system software. HPCM...
Hard Drive White Paper
Page 5
..., movement of data to the hard drive. HP Recommendations for Notebook Users • Install HP Notebook LidSwitch Policy, or as an alternative, place the notebook into Standby mode before transporting it from one location to another. • Upgrade to the latest system BIOS, as given in the "F10 Setup... for an extended period of time, e.g., when you are working in applications such as a word processor that executes primarily from electronic memory without having to access the hard drive very often. • Perform the Defrag operation periodically to optimize the reading and writing of ...
..., movement of data to the hard drive. HP Recommendations for Notebook Users • Install HP Notebook LidSwitch Policy, or as an alternative, place the notebook into Standby mode before transporting it from one location to another. • Upgrade to the latest system BIOS, as given in the "F10 Setup... for an extended period of time, e.g., when you are working in applications such as a word processor that executes primarily from electronic memory without having to access the hard drive very often. • Perform the Defrag operation periodically to optimize the reading and writing of ...
Hardware Guide
Page 6
... Legacy Support 7-3 Connecting an Optional External MultiBay 7-4 Connecting an Optional Cable Lock 7-5 8 Hardware Upgrades Using PC Cards 8-1 Inserting a PC Card 8-2 Removing a PC Card 8-3 Using SD Cards 8-4 Inserting an SD Card 8-4 Removing an SD Card 8-5 Adding and Upgrading Memory Modules 8-6 Effects of Increasing Memory 8-12 9 Specifications Notebook Dimensions 9-1 Operating Environment 9-2 Rated Input Power 9-2 Modem Specifications 9-3 Index vi Hardware Guide
... Legacy Support 7-3 Connecting an Optional External MultiBay 7-4 Connecting an Optional Cable Lock 7-5 8 Hardware Upgrades Using PC Cards 8-1 Inserting a PC Card 8-2 Removing a PC Card 8-3 Using SD Cards 8-4 Inserting an SD Card 8-4 Removing an SD Card 8-5 Adding and Upgrading Memory Modules 8-6 Effects of Increasing Memory 8-12 9 Specifications Notebook Dimensions 9-1 Operating Environment 9-2 Rated Input Power 9-2 Modem Specifications 9-3 Index vi Hardware Guide
Hardware Guide
Page 95
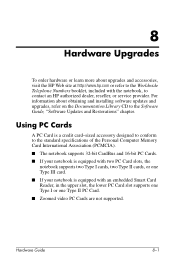
...the Documentation Library CD to the Software Guide, "Software Updates and Restorations" chapter. Hardware Guide 8-1 For information about upgrades and accessories, visit the HP Web site at http://www.hp.com or refer to the Worldwide Telephone Numbers booklet, ...card. ■ If your notebook is equipped with the notebook, to the standard specifications of the Personal Computer Memory Card International Association (PCMCIA). ■ The notebook supports 32-bit CardBus and 16-bit PC Cards. ■ If your notebook is equipped with two PC Card slots, the notebook supports two Type I cards,...
...the Documentation Library CD to the Software Guide, "Software Updates and Restorations" chapter. Hardware Guide 8-1 For information about upgrades and accessories, visit the HP Web site at http://www.hp.com or refer to the Worldwide Telephone Numbers booklet, ...card. ■ If your notebook is equipped with the notebook, to the standard specifications of the Personal Computer Memory Card International Association (PCMCIA). ■ The notebook supports 32-bit CardBus and 16-bit PC Cards. ■ If your notebook is equipped with two PC Card slots, the notebook supports two Type I cards,...
Hardware Guide
Page 100
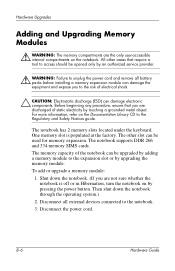
... cord. 8-6 Hardware Guide Hardware Upgrades Adding and Upgrading Memory Modules Å WARNING: The memory compartments are the only user-accessible internal compartments on by pressing the power button. Then shut down the notebook. (If you are not sure whether the notebook is populated at the factory. The notebook supports DDR 266 and 334 memory SIMS cards. For more...
... cord. 8-6 Hardware Guide Hardware Upgrades Adding and Upgrading Memory Modules Å WARNING: The memory compartments are the only user-accessible internal compartments on by pressing the power button. Then shut down the notebook. (If you are not sure whether the notebook is populated at the factory. The notebook supports DDR 266 and 334 memory SIMS cards. For more...
Hardware Guide
Page 103
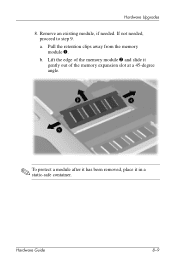
Remove an existing module, if needed , proceed to step 9. a. Pull the retention clips away from the memory module 1. If not needed . Lift the edge of the memory module 2 and slide it gently out of the memory expansion slot at a 45-degree angle. ✎ To protect a module after it has been removed, place it in a static-safe container. b. Hardware Guide 8-9 Hardware Upgrades 8.
Remove an existing module, if needed , proceed to step 9. a. Pull the retention clips away from the memory module 1. If not needed . Lift the edge of the memory module 2 and slide it gently out of the memory expansion slot at a 45-degree angle. ✎ To protect a module after it has been removed, place it in a static-safe container. b. Hardware Guide 8-9 Hardware Upgrades 8.

Hardware Guide
Page 104
Align the keyed (notched) edge of the module 1 with the keyed area in the expansion slot. Insert the memory module 1 into place. 8-10 Hardware Guide Insert the new memory module: a. b. Push the memory module 2 down until it gently into place until the retention clips snap into the empty memory expansion slot at a 45-degree angle. Hardware Upgrades 9. Then slide it is seated while tilted. ✎ 10.
Align the keyed (notched) edge of the module 1 with the keyed area in the expansion slot. Insert the memory module 1 into place. 8-10 Hardware Guide Insert the new memory module: a. b. Push the memory module 2 down until it gently into place until the retention clips snap into the empty memory expansion slot at a 45-degree angle. Hardware Upgrades 9. Then slide it is seated while tilted. ✎ 10.
Hardware Guide
Page 106
... in a status bar at the bottom of the window. ■ To display the amount of Increasing Memory When random access memory (RAM) increases, the operating system increases the hard drive space reserved for the Hibernation file. Hardware Upgrades Effects of space required by the Hibernation file: ❏ In Windows 2000, select Start > Settings...
... in a status bar at the bottom of the window. ■ To display the amount of Increasing Memory When random access memory (RAM) increases, the operating system increases the hard drive space reserved for the Hibernation file. Hardware Upgrades Effects of space required by the Hibernation file: ❏ In Windows 2000, select Start > Settings...

