Getting Started Guide
Page 3
Table of contents 1 Getting information 2 Setting up your computer Protecting your computer 3 Guidelines for installing software and hardware devices 4 Connecting to the Internet 4 Transferring files and settings to your new computer 5 3 Troubleshooting and maintenance Computer does not start 5 Power 6 Display (monitor 6 Keyboard and mouse (with cable 7 Keyboard and mouse (wireless 8 Speakers and sound 9 Internet access 10 Software troubleshooting 11 Maintenance 14 System Recovery 16 Recovery discs 18 ENWW iii
Table of contents 1 Getting information 2 Setting up your computer Protecting your computer 3 Guidelines for installing software and hardware devices 4 Connecting to the Internet 4 Transferring files and settings to your new computer 5 3 Troubleshooting and maintenance Computer does not start 5 Power 6 Display (monitor 6 Keyboard and mouse (with cable 7 Keyboard and mouse (wireless 8 Speakers and sound 9 Internet access 10 Software troubleshooting 11 Maintenance 14 System Recovery 16 Recovery discs 18 ENWW iii
Getting Started Guide
Page 5
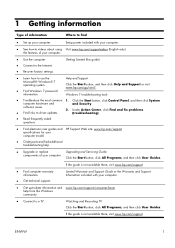
... Center, click Find and fix problems (troubleshooting). ● Read frequently asked questions. ● Find electronic user guides and HP Support Web site: www.hp.com/support specifications for your computer model. ● Order parts and find ● Set up -to-date information and www.hp.com/support/consumer-forum help from the Windows community. ● Connect to a TV. Watching and Recording TV Click the Start button...
... Center, click Find and fix problems (troubleshooting). ● Read frequently asked questions. ● Find electronic user guides and HP Support Web site: www.hp.com/support specifications for your computer model. ● Order parts and find ● Set up -to-date information and www.hp.com/support/consumer-forum help from the Windows community. ● Connect to a TV. Watching and Recording TV Click the Start button...
Getting Started Guide
Page 6
... not disable the power cord grounding plug. Disconnect power from the equipment by using automated updates, onboard diagnostics, and guided assistance. WARNING! Where to open the enclosure of the CD or DVD drives. Safety & Comfort Guide Click the Start button, click All Programs, and then click User Guides or visit www.hp.com/ergo. Click the Start button, click All Programs, click HP, and then click HP Support Assistant...
... not disable the power cord grounding plug. Disconnect power from the equipment by using automated updates, onboard diagnostics, and guided assistance. WARNING! Where to open the enclosure of the CD or DVD drives. Safety & Comfort Guide Click the Start button, click All Programs, and then click User Guides or visit www.hp.com/ergo. Click the Start button, click All Programs, click HP, and then click HP Support Assistant...
Getting Started Guide
Page 7
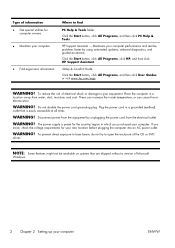
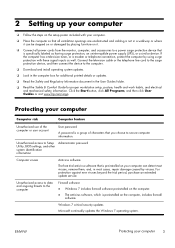
... you choose to Setup Utility, BIOS settings, and other system identification information Administrator password Computer viruses Antivirus software The free trial antivirus software that is preinstalled on your computer 3 Click the Start button, click All Programs, and then click User Guides or visit www.hp.com/ergo. ENWW Protecting your computer can detect most viruses, remove them, and, in most cases, repair damage caused by...
... you choose to Setup Utility, BIOS settings, and other system identification information Administrator password Computer viruses Antivirus software The free trial antivirus software that is preinstalled on your computer 3 Click the Start button, click All Programs, and then click User Guides or visit www.hp.com/ergo. ENWW Protecting your computer can detect most viruses, remove them, and, in most cases, repair damage caused by...
Getting Started Guide
Page 8
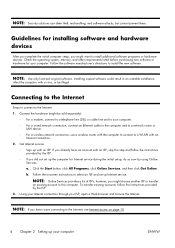
... by using Online Services: a. NOTE: Use only licensed original software. Follow the onscreen instructions to the Internet: 1. Connecting to the Internet Steps to connect to select an ISP and set up the computer for installing software and hardware devices After you complete the initial computer setup, you did not set up Internet service. Click the Start button, click All Programs, click Online Services, and then click Get Online. NOTE: Online Services provides a list...
... by using Online Services: a. NOTE: Use only licensed original software. Follow the onscreen instructions to the Internet: 1. Connecting to the Internet Steps to connect to select an ISP and set up the computer for installing software and hardware devices After you complete the initial computer setup, you did not set up Internet service. Click the Start button, click All Programs, click Online Services, and then click Get Online. NOTE: Online Services provides a list...

Getting Started Guide
Page 9
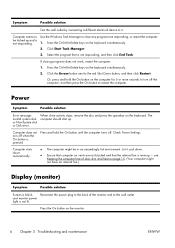
... monitor might not be on or start Symptom Possible solution Error message: Hard disk drive error. Computer does not start . When the cables connecting the computer to the external power source are plugged in properly, and the wall outlet is a USB cable designed specifically to connect two computers and to your new computer 5 See Display (monitor) on systems that the cables connecting the computer to the external power source are plugged in properly. Click the Start button, type Windows...
... monitor might not be on or start Symptom Possible solution Error message: Hard disk drive error. Computer does not start . When the cables connecting the computer to the external power source are plugged in properly, and the wall outlet is a USB cable designed specifically to connect two computers and to your new computer 5 See Display (monitor) on systems that the cables connecting the computer to the external power source are plugged in properly. Click the Start button, type Windows...
Getting Started Guide
Page 10
... internal fan.) Display (monitor) Symptom Possible solution Screen is pressed. Press the On button on the keyboard simultaneously. 2. Computer seems to close any programs not responding, or restart the computer: 1. Use the Windows Task Manager to be in an exceedingly hot environment. Press the Ctrl+Alt+Delete keys on the keyboard. Click the Arrow button next to the wall outlet. When drive activity stops, remove...
... internal fan.) Display (monitor) Symptom Possible solution Screen is pressed. Press the On button on the keyboard simultaneously. 2. Computer seems to close any programs not responding, or restart the computer: 1. Use the Windows Task Manager to be in an exceedingly hot environment. Press the Ctrl+Alt+Delete keys on the keyboard. Click the Arrow button next to the wall outlet. When drive activity stops, remove...
Getting Started Guide
Page 11
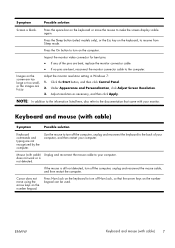
... restart the computer. Press the On button to make the screen display visible again. Press Num Lock on the keyboard to resume from Sleep mode. Images on the keyboard or move using the arrow keys on the keyboard, to turn on the number keypad can be used. Click the Start button, and then click Control Panel. 2. does not work or is blank. Keyboard and mouse (with cable) 7 Adjust resolution as necessary, and then...
... restart the computer. Press the On button to make the screen display visible again. Press Num Lock on the keyboard to resume from Sleep mode. Images on the keyboard or move using the arrow keys on the keyboard, to turn on the number keypad can be used. Click the Start button, and then click Control Panel. 2. does not work or is blank. Keyboard and mouse (with cable) 7 Adjust resolution as necessary, and then...
Getting Started Guide
Page 12
... display the Windows Start menu. 5. Select Shut Down, and then press Enter. 6. Ensure that you are using a damp, lint-free cloth (not paper). For an optical mouse: ● Clean the optical mouse: Gently wipe the light sensor lens on the keyboard simultaneously to Shut Down. Click the left mouse button to mouse movement. After the shutdown is complete, unplug and reconnect the mouse connector to the receiver using a lint-free...
... display the Windows Start menu. 5. Select Shut Down, and then press Enter. 6. Ensure that you are using a damp, lint-free cloth (not paper). For an optical mouse: ● Clean the optical mouse: Gently wipe the light sensor lens on the keyboard simultaneously to Shut Down. Click the left mouse button to mouse movement. After the shutdown is complete, unplug and reconnect the mouse connector to the receiver using a lint-free...
Getting Started Guide
Page 13
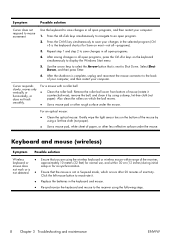
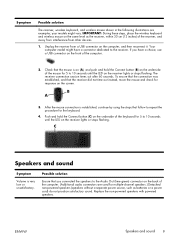
... hold the Connect button (B) on the front of the computer. 2. Symptom Possible solution The receiver, wireless keyboard, and wireless mouse shown in the following illustrations are used for multiple-channel speakers.) Detached non-powered speakers (speakers without a separate power source, such as the receiver, within 30 cm (12 inches) of the receiver, and away from interference from a USB connector on the screen. Replace the non-powered speakers with powered speakers.
... hold the Connect button (B) on the front of the computer. 2. Symptom Possible solution The receiver, wireless keyboard, and wireless mouse shown in the following illustrations are used for multiple-channel speakers.) Detached non-powered speakers (speakers without a separate power source, such as the receiver, within 30 cm (12 inches) of the receiver, and away from interference from a USB connector on the screen. Replace the non-powered speakers with powered speakers.
Getting Started Guide
Page 14
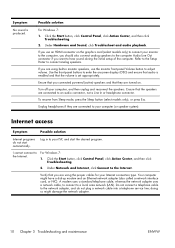
... Sleep mode, press the Sleep button (select models only), or press Esc. Internet access Symptom Possible solution Internet programs do not plug a network cable into a telephone service line; Under Network and Internet, click Connect to connect analog speakers. A modem uses a standard telephone cable, whereas the network adapter uses a network cable, to connect to hear sound during the initial setup of the computer. Click the Start button, click Control Panel, click Action Center, and then click Troubleshooting. 2. Ensure that you want to a local area network (LAN...
... Sleep mode, press the Sleep button (select models only), or press Esc. Internet access Symptom Possible solution Internet programs do not plug a network cable into a telephone service line; Under Network and Internet, click Connect to connect analog speakers. A modem uses a standard telephone cable, whereas the network adapter uses a network cable, to connect to hear sound during the initial setup of the computer. Click the Start button, click Control Panel, click Action Center, and then click Troubleshooting. 2. Ensure that you want to a local area network (LAN...
Getting Started Guide
Page 15
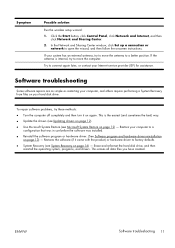
... the Start button, click Control Panel, click Network and Internet, and then click Network and Sharing Center. 2. This erases all data files you have created. Software troubleshooting Some software repairs are as simple as restarting your system has an external antenna, try to move the antenna to move the computer. In the Network and Sharing Center window, click Set up a connection or network to connect again later, or contact your hard disk drive...
... the Start button, click Control Panel, click Network and Internet, and then click Network and Sharing Center. 2. This erases all data files you have created. Software troubleshooting Some software repairs are as simple as restarting your system has an external antenna, try to move the antenna to move the computer. In the Network and Sharing Center window, click Set up a connection or network to connect again later, or contact your hard disk drive...

Getting Started Guide
Page 16
..., hard disk drive, mouse, or keyboard. Click the plus sign (+) to update or rollback. (For example, DVD/CD- To update a driver, click Update Driver, and then follow the onscreen instructions. NOTE: Always use this System Restore procedure before you want to expand the type of Microsoft Windows. Click System protection, System Restore, click Next, and then follow the onscreen instructions. 12 Chapter 3 Troubleshooting and maintenance ENWW You can also set restore points manually...
..., hard disk drive, mouse, or keyboard. Click the plus sign (+) to update or rollback. (For example, DVD/CD- To update a driver, click Update Driver, and then follow the onscreen instructions. NOTE: Always use this System Restore procedure before you want to expand the type of Microsoft Windows. Click System protection, System Restore, click Next, and then follow the onscreen instructions. 12 Chapter 3 Troubleshooting and maintenance ENWW You can also set restore points manually...
Limited Warranty and Support Guide
Page 4
... REPAIR OR REPLACEMENT OF ANY HARDWARE COMPONENTS THAT MALFUNCTION IN CONDITIONS OF NORMAL USE. YOU SHOULD MAKE PERIODIC BACKUP COPIES OF THE DATA STORED ON YOUR HARD DRIVE OR OTHER STORAGE DEVICES AS A PRECAUTION AGAINST POSSIBLE FAILURES, ALTERATION, OR LOSS OF THE DATA. HP IS NOT RESPONSIBLE FOR DAMAGE TO OR LOSS OF ANY PROGRAMS, DATA, OR REMOVABLE STORAGE MEDIA. No change...
... REPAIR OR REPLACEMENT OF ANY HARDWARE COMPONENTS THAT MALFUNCTION IN CONDITIONS OF NORMAL USE. YOU SHOULD MAKE PERIODIC BACKUP COPIES OF THE DATA STORED ON YOUR HARD DRIVE OR OTHER STORAGE DEVICES AS A PRECAUTION AGAINST POSSIBLE FAILURES, ALTERATION, OR LOSS OF THE DATA. HP IS NOT RESPONSIBLE FOR DAMAGE TO OR LOSS OF ANY PROGRAMS, DATA, OR REMOVABLE STORAGE MEDIA. No change...
Upgrading and Servicing Guide
Page 3
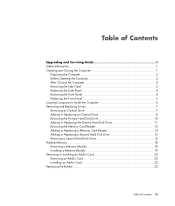
... Upgrading and Servicing Guide 1 Safety Information 1 Opening and Closing the Computer 1 Preparing the Computer 2 Before Opening the Computer 2 After Closing the Computer 3 Removing the Side Panel 3 Replacing the Side Panel 4 Removing the Front Panel 4 Replacing the Front Panel 5 Locating Components Inside the Computer 6 Removing and Replacing Drives 7 Removing an Optical Drive 7 Adding or Replacing an Optical Drive 8 Removing the Primary Hard Disk Drive 10 Adding or Replacing the Primary Hard Disk Drive 11 Removing the Memory Card Reader 13 Adding or Replacing a Memory Card...
... Upgrading and Servicing Guide 1 Safety Information 1 Opening and Closing the Computer 1 Preparing the Computer 2 Before Opening the Computer 2 After Closing the Computer 3 Removing the Side Panel 3 Replacing the Side Panel 4 Removing the Front Panel 4 Replacing the Front Panel 5 Locating Components Inside the Computer 6 Removing and Replacing Drives 7 Removing an Optical Drive 7 Adding or Replacing an Optical Drive 8 Removing the Primary Hard Disk Drive 10 Adding or Replacing the Primary Hard Disk Drive 11 Removing the Memory Card Reader 13 Adding or Replacing a Memory Card...
Upgrading and Servicing Guide
Page 7
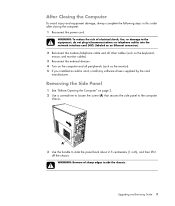
... the side panel to the computer chassis. 3 Use the handle to the equipment, do not plug telecommunications or telephone cables into the network interface card (NIC) (labeled as an Ethernet connector). 2 Reconnect the modem/telephone cable and all other cables (such as the keyboard, mouse, and monitor cables). 3 Reconnect the external devices. 4 Turn on the computer and all peripherals (such as the monitor). 5 If you installed an add-in this...
... the side panel to the computer chassis. 3 Use the handle to the equipment, do not plug telecommunications or telephone cables into the network interface card (NIC) (labeled as an Ethernet connector). 2 Reconnect the modem/telephone cable and all other cables (such as the keyboard, mouse, and monitor cables). 3 Reconnect the external devices. 4 Turn on the computer and all peripherals (such as the monitor). 5 If you installed an add-in this...
Upgrading and Servicing Guide
Page 11
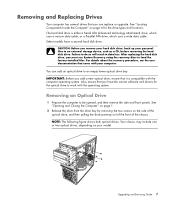
..., before removing the hard disk drive. IMPORTANT: Before you can add an optical drive to work with the computer operating system. Upgrading and Servicing Guide 7 Select models have the correct software and drivers for the drive types and locations. Also, ensure that you remove your hard disk drive, back up your personal files to do so will result in data loss. You can replace or upgrade. Removing and Replacing Drives Your computer has several drives that you add a new optical drive, ensure...
..., before removing the hard disk drive. IMPORTANT: Before you can add an optical drive to work with the computer operating system. Upgrading and Servicing Guide 7 Select models have the correct software and drivers for the drive types and locations. Also, ensure that you remove your hard disk drive, back up your personal files to do so will result in data loss. You can replace or upgrade. Removing and Replacing Drives Your computer has several drives that you add a new optical drive, ensure...
Upgrading and Servicing Guide
Page 19
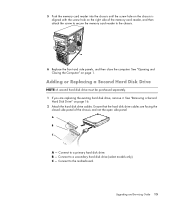
Adding or Replacing a Second Hard Disk Drive NOTE: A second hard disk drive must be purchased separately. 1 If you are facing the closed side panel of the memory card reader, and then attach the screw to secure the memory card reader to the motherboard. B - Connect to a primary hard disk drive. Connect to a secondary hard disk drive (select models only). Connect to the chassis. 6 Replace the front and side panels, and then close the computer. Upgrading and Servicing Guide 15 See "Opening and Closing the...
Adding or Replacing a Second Hard Disk Drive NOTE: A second hard disk drive must be purchased separately. 1 If you are facing the closed side panel of the memory card reader, and then attach the screw to secure the memory card reader to the motherboard. B - Connect to a primary hard disk drive. Connect to a secondary hard disk drive (select models only). Connect to the chassis. 6 Replace the front and side panels, and then close the computer. Upgrading and Servicing Guide 15 See "Opening and Closing the...
Upgrading and Servicing Guide
Page 24
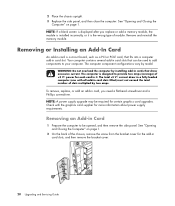
...: Do not overload the computer by model. Removing an Add-in card, you replace or add a memory module, the module is installed incorrectly, or it . The computer component configurations vary by installing add-in a fully loaded computer (one with the graphics card supplier for certain graphics card upgrades. NOTE: A power supply upgrade may be used to add components to be opened, and then remove the side panel. See "Opening and Closing the Computer" on page...
...: Do not overload the computer by model. Removing an Add-in card, you replace or add a memory module, the module is installed incorrectly, or it . The computer component configurations vary by installing add-in a fully loaded computer (one with the graphics card supplier for certain graphics card upgrades. NOTE: A power supply upgrade may be used to add components to be opened, and then remove the side panel. See "Opening and Closing the Computer" on page...
Upgrading and Servicing Guide
Page 26
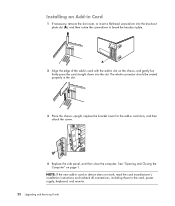
... to the card, power supply, keyboard, and monitor. 22 Upgrading and Servicing Guide NOTE: If the new add-in card or device does not work, read the card manufacturer's installation instructions and recheck all connections, including those to break the knockout plate. 2 Align the edge of the add-in card with the add-in card slots, and then attach the screw. 4 Replace the side panel, and then close the computer. The whole connector should be...
... to the card, power supply, keyboard, and monitor. 22 Upgrading and Servicing Guide NOTE: If the new add-in card or device does not work, read the card manufacturer's installation instructions and recheck all connections, including those to break the knockout plate. 2 Align the edge of the add-in card with the add-in card slots, and then attach the screw. 4 Replace the side panel, and then close the computer. The whole connector should be...


