
Wireless Setup Guide
Page 3
... the wireless button and light varies by model. 3 Connect the wireless router according to the manufacturer's instructions. (During this process your computer is temporarily connected to the router using the Ethernet cable included with router Ethernet cable temporarily connected (jack locations vary) PROGRESS CHECK 4 Configure the wireless router according to the manufacturer's instructions. Set up the hardware and software Now that the blue wireless light next to the wireless icon is off by opening...
... the wireless button and light varies by model. 3 Connect the wireless router according to the manufacturer's instructions. (During this process your computer is temporarily connected to the router using the Ethernet cable included with router Ethernet cable temporarily connected (jack locations vary) PROGRESS CHECK 4 Configure the wireless router according to the manufacturer's instructions. Set up the hardware and software Now that the blue wireless light next to the wireless icon is off by opening...
Security - Windows Vista
Page 8
... Setup Utility feature. For example, if you set a password with the same keys. NOTE: Select models include a separate numeric keypad, which functions exactly like the keyboard number keys. ● A password must be entered at a Windows prompt. Because most passwords are not displayed as screen-saver passwords, select Start > Help and Support. 2 Chapter 2 Using passwords You can use the same password for a Windows security feature. 2 Using passwords A password is essential to record each password you set. For additional information about Windows passwords...
... Setup Utility feature. For example, if you set a password with the same keys. NOTE: Select models include a separate numeric keypad, which functions exactly like the keyboard number keys. ● A password must be entered at a Windows prompt. Because most passwords are not displayed as screen-saver passwords, select Start > Help and Support. 2 Chapter 2 Using passwords You can use the same password for a Windows security feature. 2 Using passwords A password is essential to record each password you set. For additional information about Windows passwords...
Setup Utility - Windows Vista
Page 8
... screen. - or - ◦ If the Setup Utility menus are not visible, press esc to return to select Exit > Exit Discarding Changes, and then press enter. When you use the arrow keys to the menu display. After the Setup Utility closes, the computer restarts in Windows. The Setup Utility features available for advanced users include a hard drive self-test, a Network Service Boot, and settings for all users. Then use the Exit Saving Changes procedure, the Setup Utility...
... screen. - or - ◦ If the Setup Utility menus are not visible, press esc to return to select Exit > Exit Discarding Changes, and then press enter. When you use the arrow keys to the menu display. After the Setup Utility closes, the computer restarts in Windows. The Setup Utility features available for advanced users include a hard drive self-test, a Network Service Boot, and settings for all users. Then use the Exit Saving Changes procedure, the Setup Utility...

Setup Utility - Windows Vista
Page 10
... memory. 6 Chapter 3 Setup Utility menus NOTE: On models with two hard drives, this menu option is called the Primary Hard Disk Self Test. Run a diagnostic test on the hard drive. System Configuration menu Select Language Support Boot Options Button Sound (select models only) Virtualization Technology Processor C4 State To Do This Change the Setup Utility language. Run a comprehensive self-test on Key ◦ USB Hard drive ◦ Network adapter Enable/disable the Quick Launch Button tapping sound. Enable/disable the processor Virtualization Technology. Set the following boot...
... memory. 6 Chapter 3 Setup Utility menus NOTE: On models with two hard drives, this menu option is called the Primary Hard Disk Self Test. Run a diagnostic test on the hard drive. System Configuration menu Select Language Support Boot Options Button Sound (select models only) Virtualization Technology Processor C4 State To Do This Change the Setup Utility language. Run a comprehensive self-test on Key ◦ USB Hard drive ◦ Network adapter Enable/disable the Quick Launch Button tapping sound. Enable/disable the processor Virtualization Technology. Set the following boot...
Software Updates - Windows Vista
Page 7
... be available on the system ROM. NOTE: Windows® includes the User Account Control feature to Windows Help for a system BIOS update by identifying the BIOS version currently installed on the HP Web site at http://www.hp.com. 3. Updating software Updated versions of the software provided with the hardware devices, and provides for tasks such as installing applications, running utilities, or changing Windows settings. You may be prompted for...
... be available on the system ROM. NOTE: Windows® includes the User Account Control feature to Windows Help for a system BIOS update by identifying the BIOS version currently installed on the HP Web site at http://www.hp.com. 3. Updating software Updated versions of the software provided with the hardware devices, and provides for tasks such as installing applications, running utilities, or changing Windows settings. You may be prompted for...
Wireless (Select Models Only) - Windows Vista
Page 28
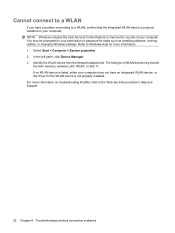
... Start > Computer > System properties. 2. In the left pane, click Device Manager. 3. Refer to Windows Help for more information on your computer: NOTE: Windows includes the User Account Control feature to improve the security of your permission or password for tasks such as installing software, running utilities, or changing Windows settings. You may include the term wireless, wireless LAN, WLAN, or 802.11. Identify the WLAN device from the Network adapters list...
... Start > Computer > System properties. 2. In the left pane, click Device Manager. 3. Refer to Windows Help for more information on your computer: NOTE: Windows includes the User Account Control feature to improve the security of your permission or password for tasks such as installing software, running utilities, or changing Windows settings. You may include the term wireless, wireless LAN, WLAN, or 802.11. Identify the WLAN device from the Network adapters list...
Compaq Presario V6500, V6600, and V6700 Notebook PCs - Maintenance and Service Guide
Page 19
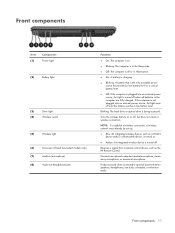
..., or television audio. Front components Item (1) Component Power light (2) Battery light (3) Drive light (4) Wireless switch (5) Wireless light (6) Consumer infrared lens (select models only) (7) Audio-in (microphone) (8) Audio-out (headphone) jack Function ● On: The computer is on or off, but does not create a wireless connection. Turns the wireless feature on . ● Blinking: The computer is in the Sleep state. ● Off: The computer is off or in Hibernation. ● On: A battery is charging. ● Blinking: A battery that is...
..., or television audio. Front components Item (1) Component Power light (2) Battery light (3) Drive light (4) Wireless switch (5) Wireless light (6) Consumer infrared lens (select models only) (7) Audio-in (microphone) (8) Audio-out (headphone) jack Function ● On: The computer is on or off, but does not create a wireless connection. Turns the wireless feature on . ● Blinking: The computer is in the Sleep state. ● Off: The computer is off or in Hibernation. ● On: A battery is charging. ● Blinking: A battery that is...
Compaq Presario V6500, V6600, and V6700 Notebook PCs - Maintenance and Service Guide
Page 91
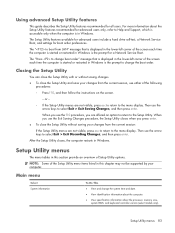
... Setup Utility You can close the Setup Utility with or without saving changes. ● To close the Setup Utility without saving your computer. Then use the arrow keys to the menu display. Using advanced Setup Utility features This guide describes the Setup Utility features recommended for boot order preferences. For more information about the processor, memory size, system BIOS, and keyboard controller version (select models only). Setup Utility menus The menu tables in Windows. When you use either of Setup Utility options...
... Setup Utility You can close the Setup Utility with or without saving changes. ● To close the Setup Utility without saving your computer. Then use the arrow keys to the menu display. Using advanced Setup Utility features This guide describes the Setup Utility features recommended for boot order preferences. For more information about the processor, memory size, system BIOS, and keyboard controller version (select models only). Setup Utility menus The menu tables in Windows. When you use either of Setup Utility options...
Compaq Presario V6500, V6600, and V6700 Notebook PCs - Maintenance and Service Guide
Page 143
...-ray Disc ROM Drive precautions 35 removal 50 spare part number 19, 25, 33, 50 specifications 90 Bluetooth module removal 67 spare part number 18, 28, 67 Bluetooth module cable, illustrated 24 boot options 84 boot order 84 bottom components 14 button components 7 button sound 84 buttons media 7 power 7 volume mute 7 C Cable Kit contents 24 spare part number 21, 24, 31 cables, service considerations 35 caps lock light 9 carrying case, spare part number 26, 28 changing the Setup Utility language 81 chipset, product description 2 closing the Setup Utility 83 CMOS clearing 39...
...-ray Disc ROM Drive precautions 35 removal 50 spare part number 19, 25, 33, 50 specifications 90 Bluetooth module removal 67 spare part number 18, 28, 67 Bluetooth module cable, illustrated 24 boot options 84 boot order 84 bottom components 14 button components 7 button sound 84 buttons media 7 power 7 volume mute 7 C Cable Kit contents 24 spare part number 21, 24, 31 cables, service considerations 35 caps lock light 9 carrying case, spare part number 26, 28 changing the Setup Utility language 81 chipset, product description 2 closing the Setup Utility 83 CMOS clearing 39...

Compaq Presario V6500, V6600, and V6700 Notebook PCs - Maintenance and Service Guide
Page 144
... part number 26, 30 ExpressCard slot 13 ExpressCard slot bezel illustrated 23 removal 68 external media cards, product description 4 external monitor port location 12 pin assignments 124 F fan/heat sink assembly removal 75 spare part number 17, 31, 75 feet locations 44 spare part number 19, 28, 44 fingerprint reader 80 fn key 8 front components 6, 11 function keys 8 G graphics, product description 2 grounding equipment and methods 38 H hard drive precautions 35 product description 3 removal 42 spare part number 30...
... part number 26, 30 ExpressCard slot 13 ExpressCard slot bezel illustrated 23 removal 68 external media cards, product description 4 external monitor port location 12 pin assignments 124 F fan/heat sink assembly removal 75 spare part number 17, 31, 75 feet locations 44 spare part number 19, 28, 44 fingerprint reader 80 fn key 8 front components 6, 11 function keys 8 G graphics, product description 2 grounding equipment and methods 38 H hard drive precautions 35 product description 3 removal 42 spare part number 30...
Compaq Presario V6500, V6600, and V6700 Notebook PCs - Maintenance and Service Guide
Page 145
... model name 1 modem jack location 12 pin assignments 125 modem module, product description 4 monitor port location 12 pin assignments 124 mouse, spare part number 26, 28 N navigating in the Setup Utility 81 network jack location 12 pin assignments 125 num lock key 8 num lock light 9 O operating system, product description 5 optical drive location 13, 14 precautions 35 product description 3 removal 50 spare part numbers 19, 25, 50 specifications 88, 89, 90 optical drive light 13 P packing guidelines 37 password clearing 39 passwords...
... model name 1 modem jack location 12 pin assignments 125 modem module, product description 4 monitor port location 12 pin assignments 124 mouse, spare part number 26, 28 N navigating in the Setup Utility 81 network jack location 12 pin assignments 125 num lock key 8 num lock light 9 O operating system, product description 5 optical drive location 13, 14 precautions 35 product description 3 removal 50 spare part numbers 19, 25, 50 specifications 88, 89, 90 optical drive light 13 P packing guidelines 37 password clearing 39 passwords...

Compaq Presario V6500, V6600, and V6700 Notebook PCs - Maintenance and Service Guide
Page 146
Ethernet 4 external media cards 4 graphics 2 hard drives 3 keyboard 5 memory module 2 microphone 3 modem module 4 operating system 5 optical drives 3 pointing devices 5 ports 4 power requirements 5 processors 1 product name 1 security 5 serviceability 5 wireless 4 product name 1 R rear components 13 recovery discs 119 recovery, system 119, 122 remote control, spare part number 26, 29 removal/replacement preliminaries 34 procedures 40 restore points 121 restoring default settings 82 RF input adapter cable, spare part number 26, 28 right-side components 13 RJ-11 jack location 12 pin assignments ...
Ethernet 4 external media cards 4 graphics 2 hard drives 3 keyboard 5 memory module 2 microphone 3 modem module 4 operating system 5 optical drives 3 pointing devices 5 ports 4 power requirements 5 processors 1 product name 1 security 5 serviceability 5 wireless 4 product name 1 R rear components 13 recovery discs 119 recovery, system 119, 122 remote control, spare part number 26, 29 removal/replacement preliminaries 34 procedures 40 restore points 121 restoring default settings 82 RF input adapter cable, spare part number 26, 28 right-side components 13 RJ-11 jack location 12 pin assignments ...

Power Management - Windows Vista
Page 19
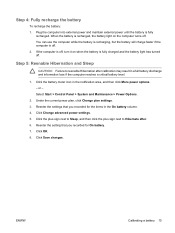
... device into external power. Click OK. 10. It is fully charged. Step 2: Disable Hibernation and Sleep 1. Under the current power plan, click Change plan settings. 3. Click Change advanced power settings. 6. Do not charge the computer battery while you can reset it should not need to Hibernate after the calibration. 8. The battery light on the computer turns on the computer turns off . 3. Change the Turn off the display and Put the computer to sleep settings listed in use...
... device into external power. Click OK. 10. It is fully charged. Step 2: Disable Hibernation and Sleep 1. Under the current power plan, click Change plan settings. 3. Click Change advanced power settings. 6. Do not charge the computer battery while you can reset it should not need to Hibernate after the calibration. 8. The battery light on the computer turns on the computer turns off . 3. Change the Turn off the display and Put the computer to sleep settings listed in use...
Power Management - Windows Vista
Page 21
... recharge the battery To recharge the battery: 1. Step 5: Reenable Hibernation and Sleep CAUTION: Failure to Hibernate after calibration may result in a full battery discharge and information loss if the computer reaches a critical battery level. 1. Select Start > Control Panel > System and Maintenance > Power Options. 2. Under the current power plan, click Change plan settings. 3. You can use the computer while the battery is recharging, but the battery will charge faster...
... recharge the battery To recharge the battery: 1. Step 5: Reenable Hibernation and Sleep CAUTION: Failure to Hibernate after calibration may result in a full battery discharge and information loss if the computer reaches a critical battery level. 1. Select Start > Control Panel > System and Maintenance > Power Options. 2. Under the current power plan, click Change plan settings. 3. You can use the computer while the battery is recharging, but the battery will charge faster...

Power Management - Windows Vista
Page 27
... and you are connecting an external hardware device that does not connect to use the preceding shutdown procedures, try the following conditions: ● When you need to replace the battery or access components inside the computer ● When you must first exit Sleep or Hibernation before ...Sleep state or in Hibernation, you are unable to a USB port ● When the computer will be unused and disconnected from external power and remove the battery. Click Start, and then click the arrow next to the Lock button. 3. ENWW 21 Click Shut Down. Save your work and close all open...
... and you are connecting an external hardware device that does not connect to use the preceding shutdown procedures, try the following conditions: ● When you need to replace the battery or access components inside the computer ● When you must first exit Sleep or Hibernation before ...Sleep state or in Hibernation, you are unable to a USB port ● When the computer will be unused and disconnected from external power and remove the battery. Click Start, and then click the arrow next to the Lock button. 3. ENWW 21 Click Shut Down. Save your work and close all open...
TouchPad and Keyboard - Windows Vista
Page 15
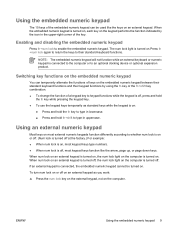
... alternate the functions of keys on the embedded numeric keypad You can be turned on the computer. Enabling and disabling the embedded numeric keypad Press fn+num lock to an optional docking device or optional expansion product. Switching key functions on the embedded numeric keypad between their standard keyboard functions and their standard keyboard functions. If an external keypad is turned on or off . The num lock light is off...
... alternate the functions of keys on the embedded numeric keypad You can be turned on the computer. Enabling and disabling the embedded numeric keypad Press fn+num lock to an optional docking device or optional expansion product. Switching key functions on the embedded numeric keypad between their standard keyboard functions and their standard keyboard functions. If an external keypad is turned on or off . The num lock light is off...

Pointing Devices and Keyboard - Windows XP
Page 15
... not function while an external keyboard or numeric keypad is connected to the computer or to keypad functions while the keypad is off , most keypad keys type numbers. ● When num lock is off , press and hold fn+shift to whether num lock is on or off. (Num lock is turned off at the factory.) For example: ● When num lock is turned on . Using the...
... not function while an external keyboard or numeric keypad is connected to the computer or to keypad functions while the keypad is off , most keypad keys type numbers. ● When num lock is off , press and hold fn+shift to whether num lock is on or off. (Num lock is turned off at the factory.) For example: ● When num lock is turned on . Using the...
Multimedia - Windows XP
Page 5
... 1 Using multimedia hardware Product notice ...1 Using the audio features ...1 Important audio settings ...2 Using S/PDIF digital audio (select models only 3 Using the audio-out (headphone) jack 3 Adjusting the volume ...4 Using the QuickPlay buttons ...5 Media button-QuickPlay installed 5 Media button-QuickPlay not installed 5 DVD button-QuickPlay installed 6 DVD button-QuickPlay not installed 6 Using the video features ...7 Using the external monitor port 7 Using the S-Video-out jack (select models only 8 Using the camera ...9 Capturing and streaming video 10 Capturing video 10...
... 1 Using multimedia hardware Product notice ...1 Using the audio features ...1 Important audio settings ...2 Using S/PDIF digital audio (select models only 3 Using the audio-out (headphone) jack 3 Adjusting the volume ...4 Using the QuickPlay buttons ...5 Media button-QuickPlay installed 5 Media button-QuickPlay not installed 5 DVD button-QuickPlay installed 6 DVD button-QuickPlay not installed 6 Using the video features ...7 Using the external monitor port 7 Using the S-Video-out jack (select models only 8 Using the camera ...9 Capturing and streaming video 10 Capturing video 10...
Multimedia - Windows XP
Page 30
... 23 D DVD changing region setting 23 inserting 13 playing 22 protecting 19 removing, with power 14 removing, without power 15 writing to 19 DVD button 5 DVD region settings 23 E earbuds 2 external monitor port 7 H headphones 2 I internal microphone, identifying 1 J jacks audio-in (microphone) 1 audio-out (headphone) 2, 3 S-Video-out 8 M media activity buttons 17 media activity hotkeys 16 Media button 5 microphone, internal 1 monitor, connecting 7 multimedia software described 19 using 21 mute button 4 O optical disc inserting 13 removing, with power 14 removing, without power 15 writing...
... 23 D DVD changing region setting 23 inserting 13 playing 22 protecting 19 removing, with power 14 removing, without power 15 writing to 19 DVD button 5 DVD region settings 23 E earbuds 2 external monitor port 7 H headphones 2 I internal microphone, identifying 1 J jacks audio-in (microphone) 1 audio-out (headphone) 2, 3 S-Video-out 8 M media activity buttons 17 media activity hotkeys 16 Media button 5 microphone, internal 1 monitor, connecting 7 multimedia software described 19 using 21 mute button 4 O optical disc inserting 13 removing, with power 14 removing, without power 15 writing...
Multimedia - Windows Vista
Page 28
... 21 D DVD changing region setting 21 inserting 11 playing 20 protecting 17 removing, with power 12 removing, without power 13 writing to 17 DVD button 5 DVD region settings 21 E earbuds 1 external monitor port 6 H headphones 1 I internal microphone, identifying 1 ptotecting playback 20 Q Quick Launch buttons 5 QuickPlay 5 J jacks audio-in (microphone) 1, 3 audio-out (headphone) 1, 3 S-Video-out 7 M media activity buttons 15 media activity hotkeys 14 media button 5 microphone, internal 1 microphones, supported 3 monitor, connecting 6 multimedia software described 17 using 19 O optical disc...
... 21 D DVD changing region setting 21 inserting 11 playing 20 protecting 17 removing, with power 12 removing, without power 13 writing to 17 DVD button 5 DVD region settings 21 E earbuds 1 external monitor port 6 H headphones 1 I internal microphone, identifying 1 ptotecting playback 20 Q Quick Launch buttons 5 QuickPlay 5 J jacks audio-in (microphone) 1, 3 audio-out (headphone) 1, 3 S-Video-out 7 M media activity buttons 15 media activity hotkeys 14 media button 5 microphone, internal 1 microphones, supported 3 monitor, connecting 6 multimedia software described 17 using 19 O optical disc...


