Upgrading and Servicing Guide
Page 12
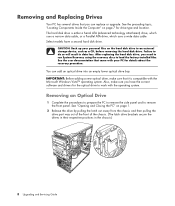
... removing the hard disk drive. Removing and Replacing Drives Your PC has several drives that you need to run System Recovery using the recovery discs to load the factory-installed files. You can replace or upgrade. IMPORTANT: Before adding a new optical drive, make sure you have a second hard disk drive. The hard disk drive is compatible with the operating system. Removing an Optical Drive 1 Complete the procedures to prepare the PC to remove the side panel and to do so will result in the chassis.) 8 Upgrading and Servicing Guide CAUTION...
... removing the hard disk drive. Removing and Replacing Drives Your PC has several drives that you need to run System Recovery using the recovery discs to load the factory-installed files. You can replace or upgrade. IMPORTANT: Before adding a new optical drive, make sure you have a second hard disk drive. The hard disk drive is compatible with the operating system. Removing an Optical Drive 1 Complete the procedures to prepare the PC to remove the side panel and to do so will result in the chassis.) 8 Upgrading and Servicing Guide CAUTION...

Upgrading and Servicing Guide
Page 18
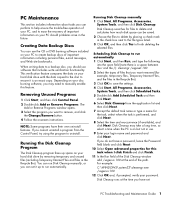
B - See "Opening and Closing the PC" on page 1. 14 Upgrading and Servicing Guide Connect to the PC motherboard. 5 Complete the procedures to the back of the HP Pocket Media, diskette (floppy), or hard disk drive. 4 Connect the power and data cables to replace the front panel, replace the side panel, and close the PC. Connect to a primary hard disk drive. A B MASTER C SLAVE To CPU A - C - Connect to a secondary hard disk drive (select models only).
B - See "Opening and Closing the PC" on page 1. 14 Upgrading and Servicing Guide Connect to the PC motherboard. 5 Complete the procedures to the back of the HP Pocket Media, diskette (floppy), or hard disk drive. 4 Connect the power and data cables to replace the front panel, replace the side panel, and close the PC. Connect to a primary hard disk drive. A B MASTER C SLAVE To CPU A - C - Connect to a secondary hard disk drive (select models only).

Upgrading and Servicing Guide
Page 28
... Upgrading and Servicing Guide The total +5 Vv current draw in a fully loaded system (one with the graphics card supplier for certain graphics card upgrades. NOTE: A power supply upgrade may be used to add components to replace the side panel, and close the PC. Check with all add-in the computer. See "Opening and Closing the PC" on page 1. Remove and reinstall the memory module. Your PC contains several add-in card. The PC component configurations vary...
... Upgrading and Servicing Guide The total +5 Vv current draw in a fully loaded system (one with the graphics card supplier for certain graphics card upgrades. NOTE: A power supply upgrade may be used to add components to replace the side panel, and close the PC. Check with all add-in the computer. See "Opening and Closing the PC" on page 1. Remove and reinstall the memory module. Your PC contains several add-in card. The PC component configurations vary...

Upgrading and Servicing Guide
Page 30
... new card or device isn't working, read through the card manufacturer's installation instructions and recheck all connections, including those to replace the side panel, and close the PC. See "Opening and Closing the PC" on the chassis and gently but firmly press the card straight down into the add-in card slots, and then install the screw. 3 Set the chassis upright. 4 Complete the procedures to the card, power supply, keyboard, and monitor. 26 Upgrading and Servicing Guide Installing...
... new card or device isn't working, read through the card manufacturer's installation instructions and recheck all connections, including those to replace the side panel, and close the PC. See "Opening and Closing the PC" on the chassis and gently but firmly press the card straight down into the add-in card slots, and then install the screw. 3 Set the chassis upright. 4 Complete the procedures to the card, power supply, keyboard, and monitor. 26 Upgrading and Servicing Guide Installing...

Warranty
Page 15
... placed a security seal on your system. Where Are My User Guides? For software not listed, the HP Customer Care Center provides 30-day limited support. Click the Windows Vista start button, All Programs, and then click User Guides. In addition, we have made us famous for your computer to upgrade your new computer. The appropriate number or Web address is also available at http://www...
... placed a security seal on your system. Where Are My User Guides? For software not listed, the HP Customer Care Center provides 30-day limited support. Click the Windows Vista start button, All Programs, and then click User Guides. In addition, we have made us famous for your computer to upgrade your new computer. The appropriate number or Web address is also available at http://www...

Warranty and Support Guide
Page 11
... uses the operating system and installed software programs during normal operation. To turn it records the computer settings at that follow the onscreen instructions. If your computer works improperly or stops because of the driver if the new one does not solve your hard disk drive. Turning Off Your Computer When you turn off your computer and then turn off your computer: 1 Close all open programs. 2 Click the Windows Vista start button...
... uses the operating system and installed software programs during normal operation. To turn it records the computer settings at that follow the onscreen instructions. If your computer works improperly or stops because of the driver if the new one does not solve your hard disk drive. Turning Off Your Computer When you turn off your computer and then turn off your computer: 1 Close all open programs. 2 Click the Windows Vista start button...

Warranty and Support Guide
Page 14
... you see the initial company logo screen appear, repeatedly press the F11 key on your keyboard until the computer turns off the computer. Otherwise, click the Recover without backing up your files, and you to back up . 2 Insert recovery disc #1 into the disc slot. 3 If the computer works, click the Windows Vista start button, click the Arrow button next to keep . When you want...
... you see the initial company logo screen appear, repeatedly press the F11 key on your keyboard until the computer turns off the computer. Otherwise, click the Recover without backing up your files, and you to back up . 2 Insert recovery disc #1 into the disc slot. 3 If the computer works, click the Windows Vista start button, click the Arrow button next to keep . When you want...
PC Troubleshooting
Page 5
... ease the recovery of important information on your PC to a backup disc, you should problems arise in use software that you want to ensure it up space on your hard disk drive with the data copied to the disc to remove, and click the Change/Remove button. 4 Follow the onscreen instructions. Disk Cleanup may need to run automatically 1 Click Start, and then Run, and type the following into the open field (note...
... ease the recovery of important information on your PC to a backup disc, you should problems arise in use software that you want to ensure it up space on your hard disk drive with the data copied to the disc to remove, and click the Change/Remove button. 4 Follow the onscreen instructions. Disk Cleanup may need to run automatically 1 Click Start, and then Run, and type the following into the open field (note...
PC Troubleshooting
Page 8
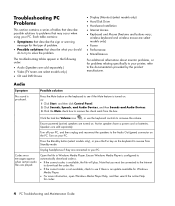
...information about monitor problems, or for codec. 4 PC Troubleshooting and Maintenance Guide wireless keyboard and wireless mouse are played. Active speakers have a power cord or batteries. Unplug headphones if they are select models only.) • CD and DVD Drives • Display (Monitor) (select models only) • Hard Disk Drive • Hardware Installation • Internet Access • Keyboard and Mouse (Features and buttons vary; Troubleshooting PC Problems This section contains a series of problem. • Possible solutions that may occur when using your PC. Note...
...information about monitor problems, or for codec. 4 PC Troubleshooting and Maintenance Guide wireless keyboard and wireless mouse are played. Active speakers have a power cord or batteries. Unplug headphones if they are select models only.) • CD and DVD Drives • Display (Monitor) (select models only) • Hard Disk Drive • Hardware Installation • Internet Access • Keyboard and Mouse (Features and buttons vary; Troubleshooting PC Problems This section contains a series of problem. • Possible solutions that may occur when using your PC. Note...
PC Troubleshooting
Page 9
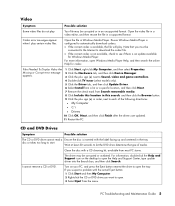
.... Turn on the desktop to start. PC Troubleshooting and Maintenance Guide 5 Codec error messages appear when I cannot remove a CD or DVD. Files Needed To Display Video Are Missing or Corrupt error message appears. 1 Click Start, right-click My Computer, and then select Properties. 2 Click the Hardware tab, and then click Device Manager. 3 Click the plus sign (+) next to Sound, video and game controllers. 4 Double-click TV tuner (select models only). 5 Click the Driver...
.... Turn on the desktop to start. PC Troubleshooting and Maintenance Guide 5 Codec error messages appear when I cannot remove a CD or DVD. Files Needed To Display Video Are Missing or Corrupt error message appears. 1 Click Start, right-click My Computer, and then select Properties. 2 Click the Hardware tab, and then click Device Manager. 3 Click the plus sign (+) next to Sound, video and game controllers. 4 Double-click TV tuner (select models only). 5 Click the Driver...
PC Troubleshooting
Page 10
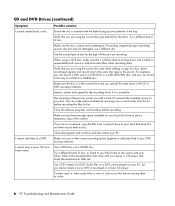
... are using the correct disc type (media) for the drive. Use the correct type of disc for the recording drive, if it is inserted with space to disc. Select a slower write speed for the type of a disc. Close all programs and windows and then restart your hard disk drive to .wav or .cda music files before recording. Make sure you are recording. Audio files on a DVD can make sure that you add...
... are using the correct disc type (media) for the drive. Use the correct type of disc for the recording drive, if it is inserted with space to disc. Select a slower write speed for the type of a disc. Close all programs and windows and then restart your hard disk drive to .wav or .cda music files before recording. Make sure you are recording. Audio files on a DVD can make sure that you add...
PC Troubleshooting
Page 12
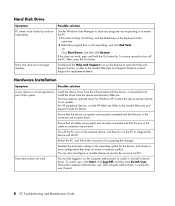
.... You may need an updated driver for 5 or more seconds to turn off the PC, turn on the external device, and then turn on the keyboard at the same time. 2 Select the program that the pins in the cable or connector are properly and securely connected and that is usually the user Owner.) 8 PC Troubleshooting and Maintenance Guide Restart the PC, and follow the instructions for accepting the changes. Hard Disk Drive Symptom PC seems to be...
.... You may need an updated driver for 5 or more seconds to turn off the PC, turn on the external device, and then turn on the keyboard at the same time. 2 Select the program that the pins in the cable or connector are properly and securely connected and that is usually the user Owner.) 8 PC Troubleshooting and Maintenance Guide Restart the PC, and follow the instructions for accepting the changes. Hard Disk Drive Symptom PC seems to be...
PC Troubleshooting
Page 13
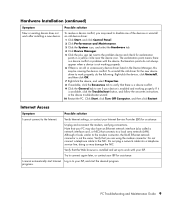
... Start, click Turn Off Computer, and then click Restart. Unplug and reconnect the modem, verifying connections. Do not connect a telephone cable to the modem connector, the RJ-45 Ethernet network connector is available, click the Troubleshoot button, and follow the onscreen instructions in to a local area network (LAN). Verify that the Web browser is installed and set up to the Internet. I cannot connect to work with the device. programs. PC Troubleshooting and Maintenance Guide...
... Start, click Turn Off Computer, and then click Restart. Unplug and reconnect the modem, verifying connections. Do not connect a telephone cable to the modem connector, the RJ-45 Ethernet network connector is available, click the Troubleshoot button, and follow the onscreen instructions in to a local area network (LAN). Verify that the Web browser is installed and set up to the Internet. I cannot connect to work with the device. programs. PC Troubleshooting and Maintenance Guide...
PC Troubleshooting
Page 15
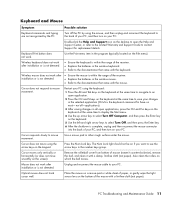
... Support Center, or refer to the Limited Warranty and Support Guide to contact Support for replacement details. Wireless keyboard does not work after installation or is not detected. • Ensure the mouse is within the range of the receiver. • Replace the batteries in the number keys group. Cursor moves only vertically or horizontally (or does not move using the arrow keys on the File menu). Turn off the PC...
... Support Center, or refer to the Limited Warranty and Support Guide to contact Support for replacement details. Wireless keyboard does not work after installation or is not detected. • Ensure the mouse is within the range of the receiver. • Replace the batteries in the number keys group. Cursor moves only vertically or horizontally (or does not move using the arrow keys on the File menu). Turn off the PC...
PC Troubleshooting
Page 18
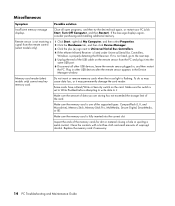
... other USB devices, leave the remote sensor plugged in the Device Manager window. Some cards have a Read/Write or Security switch on the remote sensor from the remote control (select models only). 1 Click Start, right-click My Computer, and then select Properties. 2 Click the Hardware tab, and then click Device Manager. 3 Click the plus (+) sign next to the next step. 5 Unplug the end of the USB cable on the card. Make...
... other USB devices, leave the remote sensor plugged in the Device Manager window. Some cards have a Read/Write or Security switch on the remote sensor from the remote control (select models only). 1 Click Start, right-click My Computer, and then select Properties. 2 Click the Hardware tab, and then click Device Manager. 3 Click the plus (+) sign next to the next step. 5 Unplug the end of the USB cable on the card. Make...

Getting Started
Page 25
... the wireless LAN antenna cable into the wireless LAN connector on the back of your wireless network, verify that the integrated WLAN device is installed on the computer correctly: 1 Click the Windows Start Button on the taskbar, click Help and Support, and then type Setting up a wireless network: Click the Windows Start Button on the taskbar. 2 Type Device Manager into the Start Search box, and then click Device Manager to open the Device Manager window. 3 Click Network adapters. NOTE: If no WLAN device is listed...
... the wireless LAN antenna cable into the wireless LAN connector on the back of your wireless network, verify that the integrated WLAN device is installed on the computer correctly: 1 Click the Windows Start Button on the taskbar, click Help and Support, and then type Setting up a wireless network: Click the Windows Start Button on the taskbar. 2 Type Device Manager into the Start Search box, and then click Device Manager to open the Device Manager window. 3 Click Network adapters. NOTE: If no WLAN device is listed...

Getting Started
Page 63
... area when critical updates are connected to the Internet, Windows Vista Update automatically notifies you run Windows Vista Update monthly to security threats and performance problems and is minimal. To configure Automatic Updates: 1 Click the Windows Start Button on the taskbar. 2 Click Control Panel. 3 Click Security. 4 Click Windows Update. 5 Click Change settings. 6 Select the desired configuration: Install updates automatically (recommended) - Turning On the Computer for automatic Microsoft software updates Microsoft continually updates the Windows Vista operating system. HP...
... area when critical updates are connected to the Internet, Windows Vista Update automatically notifies you run Windows Vista Update monthly to security threats and performance problems and is minimal. To configure Automatic Updates: 1 Click the Windows Start Button on the taskbar. 2 Click Control Panel. 3 Click Security. 4 Click Windows Update. 5 Click Change settings. 6 Select the desired configuration: Install updates automatically (recommended) - Turning On the Computer for automatic Microsoft software updates Microsoft continually updates the Windows Vista operating system. HP...

Getting Started
Page 218
... PowerDirector creating video disc 173 D desktop switching from Windows Media Center 164 devices connecting 10 digital camera connecting 8, 10 digital images 179 digital picture 119, 179 digital video camera connecting to a computer 8 recording videos 173, 195 troubleshooting 9 digital video camera capture 195 208 Getting Started (features vary by model) discs drive compatibility 115 erasing rewritable 170 features and compatibility 116 documentation, onscreen 39 DV camera capture 195 DVD movies changing audio settings 152 language...
... PowerDirector creating video disc 173 D desktop switching from Windows Media Center 164 devices connecting 10 digital camera connecting 8, 10 digital images 179 digital picture 119, 179 digital video camera connecting to a computer 8 recording videos 173, 195 troubleshooting 9 digital video camera capture 195 208 Getting Started (features vary by model) discs drive compatibility 115 erasing rewritable 170 features and compatibility 116 documentation, onscreen 39 DV camera capture 195 DVD movies changing audio settings 152 language...

Getting Started Guide
Page 25
... device is listed, either the computer does not have an integrated WLAN device, or the driver for wireless topics. To connect the wireless LAN antenna: 1 Screw the wireless LAN antenna cable into the wireless LAN connector on the back of your wireless network, verify that the integrated WLAN device is not properly installed. 4 Click the Windows Start Button on the taskbar. 2 Type Device Manager into the Start Search box, and then click Device Manager to open the Device Manager window. 3 Click Network adapters...
... device is listed, either the computer does not have an integrated WLAN device, or the driver for wireless topics. To connect the wireless LAN antenna: 1 Screw the wireless LAN antenna cable into the wireless LAN connector on the back of your wireless network, verify that the integrated WLAN device is not properly installed. 4 Click the Windows Start Button on the taskbar. 2 Type Device Manager into the Start Search box, and then click Device Manager to open the Device Manager window. 3 Click Network adapters...

Getting Started Guide
Page 63
... the Windows Start Button on the taskbar. 2 Click Control Panel. 3 Click Security. 4 Click Windows Update. 5 Click Change settings. 6 Select the desired configuration: Install updates automatically (recommended) - If you to specify a day and time to your system. Download updates but let me choose whether to install them Check for updates but let me choose whether to install these updates. This is to use the Automatic Updates feature. HP recommends that you run Windows Vista Update...
... the Windows Start Button on the taskbar. 2 Click Control Panel. 3 Click Security. 4 Click Windows Update. 5 Click Change settings. 6 Select the desired configuration: Install updates automatically (recommended) - If you to specify a day and time to your system. Download updates but let me choose whether to install them Check for updates but let me choose whether to install these updates. This is to use the Automatic Updates feature. HP recommends that you run Windows Vista Update...


