Safety and Regulatory Information Desktops, Thin Clients, and Personal Workstations
Page 17
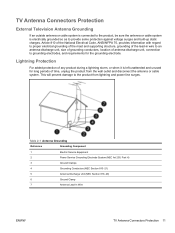
... Grounding Reference Grounding Component 1 Electric Service Equipment 2 Power Service Grounding Electrode System (NEC Art 250, Part H) 3 Ground Clamps 4 Grounding Conductors (NEC Section 810-21) 5 Antenna Discharge Unit (NEC Section 810-20) 6 Ground Clamp 7 Antenna Lead-in wire to an antenna-discharge unit, size of grounding conductors, location of antenna-discharge unit, connection to grounding electrodes, and requirements...
... Grounding Reference Grounding Component 1 Electric Service Equipment 2 Power Service Grounding Electrode System (NEC Art 250, Part H) 3 Ground Clamps 4 Grounding Conductors (NEC Section 810-21) 5 Antenna Discharge Unit (NEC Section 810-20) 6 Ground Clamp 7 Antenna Lead-in wire to an antenna-discharge unit, size of grounding conductors, location of antenna-discharge unit, connection to grounding electrodes, and requirements...
Upgrading and Servicing Guide
Page 12
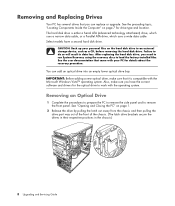
... Replacing Drives Your PC has several drives that you can add an optical drive into an empty lower optical drive bay. Failure to remove the front panel. IMPORTANT: Before adding a new optical drive, make sure you need to run System Recovery using the recovery discs to load the factory-installed files. Removing an Optical Drive 1 Complete the procedures to prepare the PC to remove the side panel and to do so will result in the chassis.) 8 Upgrading and Servicing Guide See the preceding topic, "Locating...
... Replacing Drives Your PC has several drives that you can add an optical drive into an empty lower optical drive bay. Failure to remove the front panel. IMPORTANT: Before adding a new optical drive, make sure you need to run System Recovery using the recovery discs to load the factory-installed files. Removing an Optical Drive 1 Complete the procedures to prepare the PC to remove the side panel and to do so will result in the chassis.) 8 Upgrading and Servicing Guide See the preceding topic, "Locating...

Upgrading and Servicing Guide
Page 18
4 Connect the power and data cables to a primary hard disk drive. Connect to the back of the HP Pocket Media, diskette (floppy), or hard disk drive. A B MASTER C SLAVE To CPU A - Connect to replace the front panel, replace the side panel, and close the PC. Connect to the PC motherboard. 5 Complete the procedures to a secondary hard disk drive (select models only). C - See "Opening and Closing the PC" on page 1. 14 Upgrading and Servicing Guide B -
4 Connect the power and data cables to a primary hard disk drive. Connect to the back of the HP Pocket Media, diskette (floppy), or hard disk drive. A B MASTER C SLAVE To CPU A - Connect to replace the front panel, replace the side panel, and close the PC. Connect to the PC motherboard. 5 Complete the procedures to a secondary hard disk drive (select models only). C - See "Opening and Closing the PC" on page 1. 14 Upgrading and Servicing Guide B -

Upgrading and Servicing Guide
Page 28
... wrong type of memory. A flat-head and a Phillips screwdriver are needed to replace the side panel, and close the PC. Check with all add-in card. Remove and reinstall the memory module. Your PC contains several add-in card slots that fits into a PC add-in card is a circuit board, such as a PCI or an AGP card, that can be required for more information about power supply requirements. 24 Upgrading and Servicing Guide See "Opening and...
... wrong type of memory. A flat-head and a Phillips screwdriver are needed to replace the side panel, and close the PC. Check with all add-in card. Remove and reinstall the memory module. Your PC contains several add-in card slots that fits into a PC add-in card is a circuit board, such as a PCI or an AGP card, that can be required for more information about power supply requirements. 24 Upgrading and Servicing Guide See "Opening and...

Upgrading and Servicing Guide
Page 30
... panel, and close the PC. Installing an Add-in Card 1 Align the edge of the PC, replace the bracket cover for the add-in card slot. See "Opening and Closing the PC" on the chassis and gently but firmly press the card straight down into the add-in card slots, and then install the screw. 3 Set the chassis upright. 4 Complete the procedures to the card, power supply, keyboard, and monitor. 26 Upgrading and Servicing Guide The whole connector...
... panel, and close the PC. Installing an Add-in Card 1 Align the edge of the PC, replace the bracket cover for the add-in card slot. See "Opening and Closing the PC" on the chassis and gently but firmly press the card straight down into the add-in card slots, and then install the screw. 3 Set the chassis upright. 4 Complete the procedures to the card, power supply, keyboard, and monitor. 26 Upgrading and Servicing Guide The whole connector...

Getting Started
Page 25
... Center into the Search Help box. The WLAN device may vary. For more information about setting up a wireless network: Click the Windows Start Button on the taskbar, click Help and Support, and then type Setting up your wireless antenna may include the term wireless, wireless LAN, or 802.11. Checking the wireless LAN device installation To set up a wireless network into the Start Search box, and then click Network and Sharing Center to open the Device Manager window. 3 Click Network adapters...
... Center into the Search Help box. The WLAN device may vary. For more information about setting up a wireless network: Click the Windows Start Button on the taskbar, click Help and Support, and then type Setting up your wireless antenna may include the term wireless, wireless LAN, or 802.11. Checking the wireless LAN device installation To set up a wireless network into the Start Search box, and then click Network and Sharing Center to open the Device Manager window. 3 Click Network adapters...

Getting Started
Page 63
To configure Automatic Updates: 1 Click the Windows Start Button on the taskbar. 2 Click Control Panel. 3 Click Security. 4 Click Windows Update. 5 Click Change settings. 6 Select the desired configuration: Install updates automatically (recommended) - Turning On the Computer for download is to use the Automatic Updates feature. HP recommends that you run Windows Vista Update monthly to the Internet, Windows Vista Update automatically notifies you through a pop-up to your system. If you are available. This is not recommended. 7 Click...
To configure Automatic Updates: 1 Click the Windows Start Button on the taskbar. 2 Click Control Panel. 3 Click Security. 4 Click Windows Update. 5 Click Change settings. 6 Select the desired configuration: Install updates automatically (recommended) - Turning On the Computer for download is to use the Automatic Updates feature. HP recommends that you run Windows Vista Update monthly to the Internet, Windows Vista Update automatically notifies you through a pop-up to your system. If you are available. This is not recommended. 7 Click...

Getting Started
Page 219
... Media Drive 125 HP Total Care Advisor 41 I IBM Microdrive 122 Internet security 52, 100 K keyboard connector 4 customizing buttons 62 shortcuts 63 types of buttons 57 using 57 L LAN (local area network) 12 antenna 15 checking wireless LAN device 15 connecting Ethernet LAN 5 connecting wireless LAN device 14 setting up 13 using Local Area Network 12 LightScribe, creating a LightScribe disc label 175 local area network (LAN) 12 M magicSpot 198 manuals storing 10 memory card reader 179 card types 119 in-use light 123 troubleshooting 124 using 119 memory card...
... Media Drive 125 HP Total Care Advisor 41 I IBM Microdrive 122 Internet security 52, 100 K keyboard connector 4 customizing buttons 62 shortcuts 63 types of buttons 57 using 57 L LAN (local area network) 12 antenna 15 checking wireless LAN device 15 connecting Ethernet LAN 5 connecting wireless LAN device 14 setting up 13 using Local Area Network 12 LightScribe, creating a LightScribe disc label 175 local area network (LAN) 12 M magicSpot 198 manuals storing 10 memory card reader 179 card types 119 in-use light 123 troubleshooting 124 using 119 memory card...
PC Troubleshooting
Page 3
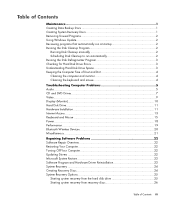
... Troubleshooting Computer Problems 5 Audio ...5 CD and DVD Drives 7 Video...9 Display (Monitor 10 Hard Disk Drive...11 Hardware Installation 11 Internet Access ...13 Keyboard and Mouse 15 Power ...18 Performance ...19 Bluetooth Wireless Devices 20 Miscellaneous ...21 Repairing Software Problems 22 Software Repair Overview 22 Restarting Your Computer 22 Turning Off Your Computer 22 Updating Drivers 22 Microsoft System Restore 23 Software Program and Hardware Driver Reinstallation 23 System Recovery 24 Creating Recovery Discs 24 System Recovery Options 25 Starting system recovery...
... Troubleshooting Computer Problems 5 Audio ...5 CD and DVD Drives 7 Video...9 Display (Monitor 10 Hard Disk Drive...11 Hardware Installation 11 Internet Access ...13 Keyboard and Mouse 15 Power ...18 Performance ...19 Bluetooth Wireless Devices 20 Miscellaneous ...21 Repairing Software Problems 22 Software Repair Overview 22 Restarting Your Computer 22 Turning Off Your Computer 22 Updating Drivers 22 Microsoft System Restore 23 Software Program and Hardware Driver Reinstallation 23 System Recovery 24 Creating Recovery Discs 24 System Recovery Options 25 Starting system recovery...

PC Troubleshooting
Page 9
Ensure powered (active) speakers are using built-in the following order: Audio CD and DVD Drives Video Display (Monitor) Hard Disk Drive Hardware Installation Internet Access Keyboard and Mouse Power Performance Bluetooth Wireless Devices Miscellaneous For more information about monitor problems, or for problems related specifically to your computer, and reconnect the speakers. Press the Sleep button (select models only), or the Esc key on . If you are turned on the keyboard, to increase the volume. Use the front panel buttons to enter the onscreen display (OSD) to...
Ensure powered (active) speakers are using built-in the following order: Audio CD and DVD Drives Video Display (Monitor) Hard Disk Drive Hardware Installation Internet Access Keyboard and Mouse Power Performance Bluetooth Wireless Devices Miscellaneous For more information about monitor problems, or for problems related specifically to your computer, and reconnect the speakers. Press the Sleep button (select models only), or the Esc key on . If you are turned on the keyboard, to increase the volume. Use the front panel buttons to enter the onscreen display (OSD) to...
PC Troubleshooting
Page 15
... keyboard simultaneously. 2 Click Start Task Manager. 3 Select the program that the pins in the operating system for Windows Vista. You may need an updated driver for the card, and choose a basic configuration that does not cause a resource conflict. Turn off the computer. 2 Press the On button to integrate the device with the device, or download and install the driver from the device manufacturer's Web site. Disable the automatic settings in the cable or connector...
... keyboard simultaneously. 2 Click Start Task Manager. 3 Select the program that the pins in the operating system for Windows Vista. You may need an updated driver for the card, and choose a basic configuration that does not cause a resource conflict. Turn off the computer. 2 Press the On button to integrate the device with the device, or download and install the driver from the device manufacturer's Web site. Disable the automatic settings in the cable or connector...

PC Troubleshooting
Page 17
... the onscreen instructions. doing so may have a modem and an Ethernet network adapter (also called a network interface card, or NIC). Run the wireless setup wizard: 1 Click the Windows Vista start button, and then select Network. 2 In the Network window, click Network and Sharing Center. 3 In the Network and Sharing Center window, click Set up connection. If the antenna is working properly. Verify that you are selected: 1 Click the Windows Vista start button, and then click Control Panel. 2 Click Hardware and Sound. 3 Double...
... the onscreen instructions. doing so may have a modem and an Ethernet network adapter (also called a network interface card, or NIC). Run the wireless setup wizard: 1 Click the Windows Vista start button, and then select Network. 2 In the Network window, click Network and Sharing Center. 3 In the Network and Sharing Center window, click Set up connection. If the antenna is working properly. Verify that you are selected: 1 Click the Windows Vista start button, and then click Control Panel. 2 Click Hardware and Sound. 3 Double...

PC Troubleshooting
Page 31
... and hold the On button for Updates button. b Follow the onscreen instruction to download driver and software updates. 8 If you performed a backup before the system recovery, copy the backup data files from the backup media to your hard disk drive. 9 Ensure your computer. (Some updates will not finish installing until the computer turns off your computer, reconnect all peripheral devices from HP: a Click the Windows Vista start button, All Programs, the...
... and hold the On button for Updates button. b Follow the onscreen instruction to download driver and software updates. 8 If you performed a backup before the system recovery, copy the backup data files from the backup media to your hard disk drive. 9 Ensure your computer. (Some updates will not finish installing until the computer turns off your computer, reconnect all peripheral devices from HP: a Click the Windows Vista start button, All Programs, the...
Limited Warranty and Support Guide
Page 14
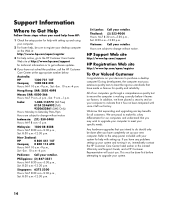
.../support for technical information or to get software updates. 4 If you have placed a security seal on , immediately contact the HP Customer Care Center listed earlier in this a key differentiator for our computers and understand that you may wish to upgrade your computer to meet the rigorous standards that it has not been tampered with since it leaves our factory...
.../support for technical information or to get software updates. 4 If you have placed a security seal on , immediately contact the HP Customer Care Center listed earlier in this a key differentiator for our computers and understand that you may wish to upgrade your computer to meet the rigorous standards that it has not been tampered with since it leaves our factory...

Getting Started Guide
Page 25
... the term wireless, wireless LAN, or 802.11. To connect the wireless LAN antenna: 1 Screw the wireless LAN antenna cable into the wireless LAN connector on the back of your wireless network, verify that the integrated WLAN device is not properly installed. 4 Click the Windows Start Button on the taskbar. 5 Type Network and Sharing Center into the Start Search box, and then click Network and Sharing Center to open area. Your WLAN device should be listed here. Setting Up...
... the term wireless, wireless LAN, or 802.11. To connect the wireless LAN antenna: 1 Screw the wireless LAN antenna cable into the wireless LAN connector on the back of your wireless network, verify that the integrated WLAN device is not properly installed. 4 Click the Windows Start Button on the taskbar. 5 Type Network and Sharing Center into the Start Search box, and then click Network and Sharing Center to open area. Your WLAN device should be listed here. Setting Up...

Getting Started Guide
Page 63
... updates. This option makes the computer more vulnerable to security threats and performance problems and is to download and install them Never check for automatic Microsoft software updates Microsoft continually updates the Windows Vista operating system. Download updates but let me choose whether to install them Check for updates but let me choose whether to use the Automatic Updates feature. Turning On the Computer for download is the default setting, and it enables...
... updates. This option makes the computer more vulnerable to security threats and performance problems and is to download and install them Never check for automatic Microsoft software updates Microsoft continually updates the Windows Vista operating system. Download updates but let me choose whether to install them Check for updates but let me choose whether to use the Automatic Updates feature. Turning On the Computer for download is the default setting, and it enables...

Getting Started Guide
Page 95
... DVD playback sound output 2 Click the Realtek HD Audio Manager icon on the taskbar. 2 Click Windows Media Center. 3 Under Tasks, click settings, General, and then click Windows Media Center Setup. 4 Click Set Up Your Speakers. The Welcome to Speaker Setup window opens. 5 Click Next. 6 Choose the speaker connection type, and then click Next. 7 Select the number of powered stereo 5.1 or 7.1 speakers to the rear Speaker Out connectors for Windows Media Center: 1 Click the Windows Start Button on the taskbar to open the Realtek HD Audio Manager window...
... DVD playback sound output 2 Click the Realtek HD Audio Manager icon on the taskbar. 2 Click Windows Media Center. 3 Under Tasks, click settings, General, and then click Windows Media Center Setup. 4 Click Set Up Your Speakers. The Welcome to Speaker Setup window opens. 5 Click Next. 6 Choose the speaker connection type, and then click Next. 7 Select the number of powered stereo 5.1 or 7.1 speakers to the rear Speaker Out connectors for Windows Media Center: 1 Click the Windows Start Button on the taskbar to open the Realtek HD Audio Manager window...

Troubleshooting and Maintenance Guide
Page 11
...CD and DVD Drives Video Display (Monitor) Hard Disk Drive Hardware Installation Internet Access Keyboard and Mouse Power Performance Bluetooth Wireless Devices Miscellaneous For more information about monitor problems, or for problems related specifically to your computer. Press the Sleep button (select models only), or the Esc key on . Troubleshooting Computer Problems 5 Ensure the speakers are muted, click the Mute button to unmute. Audio Symptom No sound is enabled. Troubleshooting Computer Problems The troubleshooting tables appear in monitor speakers, use the keyboard...
...CD and DVD Drives Video Display (Monitor) Hard Disk Drive Hardware Installation Internet Access Keyboard and Mouse Power Performance Bluetooth Wireless Devices Miscellaneous For more information about monitor problems, or for problems related specifically to your computer. Press the Sleep button (select models only), or the Esc key on . Troubleshooting Computer Problems 5 Ensure the speakers are muted, click the Mute button to unmute. Audio Symptom No sound is enabled. Troubleshooting Computer Problems The troubleshooting tables appear in monitor speakers, use the keyboard...

Troubleshooting and Maintenance Guide
Page 17
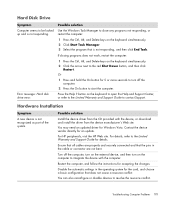
... follow the instructions for Windows Vista. Disable the automatic settings in the cable or connector are not bent. Hard Disk Drive Symptom Possible solution Computer seems to be locked Use the Windows Task Manager to contact Support. button on the computer to integrate the device with the device, or download and install the driver from the device manufacturer's Web site. You may need an updated driver for accepting the changes. Troubleshooting Computer Problems 11 A Hardware Installation Symptom A new device is not...
... follow the instructions for Windows Vista. Disable the automatic settings in the cable or connector are not bent. Hard Disk Drive Symptom Possible solution Computer seems to be locked Use the Windows Task Manager to contact Support. button on the computer to integrate the device with the device, or download and install the driver from the device manufacturer's Web site. You may need an updated driver for accepting the changes. Troubleshooting Computer Problems 11 A Hardware Installation Symptom A new device is not...

Troubleshooting and Maintenance Guide
Page 19
...). Troubleshooting Computer Problems 13 Log in to open the wizard. 4 Follow the onscreen instructions. If your Internet Service Provider (ISP) for your computer. Possible solution Verify Internet settings, or contact your system has external antennas, try to move the antenna to open the Help and Support Center. A modem uses a standard telephone cable to make a dial-up a connection or network to a better position. Run the wireless setup wizard: 1 Click the Windows Vista start Internet programs...
...). Troubleshooting Computer Problems 13 Log in to open the wizard. 4 Follow the onscreen instructions. If your Internet Service Provider (ISP) for your computer. Possible solution Verify Internet settings, or contact your system has external antennas, try to move the antenna to open the Help and Support Center. A modem uses a standard telephone cable to make a dial-up a connection or network to a better position. Run the wireless setup wizard: 1 Click the Windows Vista start Internet programs...


