Limited Warranty and Support Guide (Refurbished Desktops)
Page 5
... Option is being used in all component replacements, support uplift contracts are being installed, whichever period is your warranty start date. Failure to return the defective unit may vary with sufficient, free, and safe access to and use of a Customer Self Repair (CSR) part that all manufacturers labels (such as defective, HP will be fixed by HP. On-site Warranty Service (Digital Entertainment Centers...
... Option is being used in all component replacements, support uplift contracts are being installed, whichever period is your warranty start date. Failure to return the defective unit may vary with sufficient, free, and safe access to and use of a Customer Self Repair (CSR) part that all manufacturers labels (such as defective, HP will be fixed by HP. On-site Warranty Service (Digital Entertainment Centers...
Start Here Guide
Page 4
... desktop on a TV screen 49 Adjusting the screen resolution 49 Connecting more than one display 50 Using the Windows Media Center Setup for Optional Setup of Your TV Display...........50 Disabling the TV-out Option 51 Disconnecting the TV 51 Connecting to a Monitor or High-Definition TV 52 Choosing the AV connection to use 52 Connecting an HDMI device 54 Connecting a DVI device 55 Connecting to a Standard TV 56 Connecting to component video 56 Connecting to S-video 57 iv Start...
... desktop on a TV screen 49 Adjusting the screen resolution 49 Connecting more than one display 50 Using the Windows Media Center Setup for Optional Setup of Your TV Display...........50 Disabling the TV-out Option 51 Disconnecting the TV 51 Connecting to a Monitor or High-Definition TV 52 Choosing the AV connection to use 52 Connecting an HDMI device 54 Connecting a DVI device 55 Connecting to a Standard TV 56 Connecting to component video 56 Connecting to S-video 57 iv Start...
Start Here Guide
Page 20
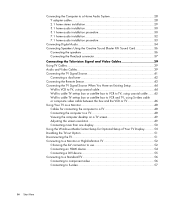
... then type Setting up your wireless network, verify that the integrated WLAN device is installed on the taskbar. 5 Type Network and Sharing Center into the Search box, and then click Network and Sharing Center to open the Device Manager window. 3 Click Network adapters. Change the default network name (SSID) and password. NOTE: If no WLAN device is not properly installed. 4 Click the Windows Start Button on your network from unauthorized access. Go to the network and follow any onscreen instructions...
... then type Setting up your wireless network, verify that the integrated WLAN device is installed on the taskbar. 5 Type Network and Sharing Center into the Search box, and then click Network and Sharing Center to open the Device Manager window. 3 Click Network adapters. Change the default network name (SSID) and password. NOTE: If no WLAN device is not properly installed. 4 Click the Windows Start Button on your network from unauthorized access. Go to the network and follow any onscreen instructions...
Start Here Guide
Page 26
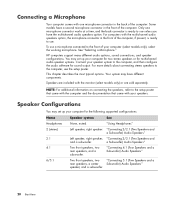
...may set up your speakers. "Connecting 4.1 (Four Speakers and a Subwoofer) Audio Speakers" Two front speakers, two "Connecting 5.1 (Five Speakers and a rear speakers, a center Subwoofer) Audio Speakers" speaker, and a subwoofer. 20 Start Here To use unless you have the multichannel audio speakers option. For more details about connecting stereo speakers to the computer, see the setup poster. "Using Headphones" Left speaker, right speaker. Some models have different components. HP computers support many different audio options, sound connections, and speaker configurations. NOTE...
...may set up your speakers. "Connecting 4.1 (Four Speakers and a Subwoofer) Audio Speakers" Two front speakers, two "Connecting 5.1 (Five Speakers and a rear speakers, a center Subwoofer) Audio Speakers" speaker, and a subwoofer. 20 Start Here To use unless you have the multichannel audio speakers option. For more details about connecting stereo speakers to the computer, see the setup poster. "Using Headphones" Left speaker, right speaker. Some models have different components. HP computers support many different audio options, sound connections, and speaker configurations. NOTE...
Upgrading and Servicing Guide
Page 6
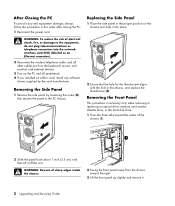
... necessary only when removing or replacing an optical drive, memory card reader, diskette drive, or the hard disk drive. 1 Press the three tabs toward the right. 3 Lift the front panel up slightly and remove it. 2 Upgrading and Servicing Guide WARNING: Beware of sharp edges inside the chassis. 2 Swing the front panel away from the chassis toward the center of electrical shock, fire, or damage to the PC chassis. 2 Ensure that...
... necessary only when removing or replacing an optical drive, memory card reader, diskette drive, or the hard disk drive. 1 Press the three tabs toward the right. 3 Lift the front panel up slightly and remove it. 2 Upgrading and Servicing Guide WARNING: Beware of sharp edges inside the chassis. 2 Swing the front panel away from the chassis toward the center of electrical shock, fire, or damage to the PC chassis. 2 Ensure that...

Upgrading and Servicing Guide
Page 7
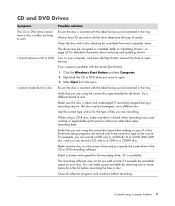
...the hard disk drive to an external storage device, such as a CD, before removing the hard disk drive. After replacing the hard disk drive, you can add an optical drive into place. A Upper optical drive bay, may be a CD-ROM, CD-RW, DVD-ROM, DVD+RW/+R, or combination drive B Lower optical drive bay, may be empty (blank plate) or a CD-ROM, CD-RW, DVD-ROM, DVD+RW/+R, or combination drive C Memory card reader (select models) D Diskette (floppy) drive (select models) E Front connector panel (no replacement instructions) F Hard disk drive G Second hard disk drive (select models) Upgrading...
...the hard disk drive to an external storage device, such as a CD, before removing the hard disk drive. After replacing the hard disk drive, you can add an optical drive into place. A Upper optical drive bay, may be a CD-ROM, CD-RW, DVD-ROM, DVD+RW/+R, or combination drive B Lower optical drive bay, may be empty (blank plate) or a CD-ROM, CD-RW, DVD-ROM, DVD+RW/+R, or combination drive C Memory card reader (select models) D Diskette (floppy) drive (select models) E Front connector panel (no replacement instructions) F Hard disk drive G Second hard disk drive (select models) Upgrading...

Upgrading and Servicing Guide
Page 9
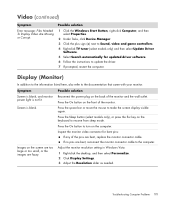
... old drive. 6 5 Disconnecting the Serial ATA Hard Disk Drive Cables 3 Make sure the jumper on the new optical drive or new Parallel ATA hard disk drive is in the bay. The Serial ATA hard disk drive does not use Cable Select. To do so, insert a flat screwdriver into the drive bay, making sure to install the new drive. Upgrading and Servicing Guide 5 CS SL MA Disconnecting the Parallel ATA Hard Disk Drive Cables 5 Pull the drive out of the drive bay. 6 If you must remove the...
... old drive. 6 5 Disconnecting the Serial ATA Hard Disk Drive Cables 3 Make sure the jumper on the new optical drive or new Parallel ATA hard disk drive is in the bay. The Serial ATA hard disk drive does not use Cable Select. To do so, insert a flat screwdriver into the drive bay, making sure to install the new drive. Upgrading and Servicing Guide 5 CS SL MA Disconnecting the Parallel ATA Hard Disk Drive Cables 5 Pull the drive out of the drive bay. 6 If you must remove the...

Upgrading and Servicing Guide
Page 12
... add-in card. 8 Upgrading and Servicing Guide The system is the wrong type of memory. 5 Push down the two retaining clips on the ends of the memory socket until the memory module pops out of the socket. 2 The memory module can be used to add components to your PC. Remove and reinstall the memory module. Removing or Installing an Add-In Card An add-in card is needed to remove, replace, or add an add-in card slots...
... add-in card. 8 Upgrading and Servicing Guide The system is the wrong type of memory. 5 Push down the two retaining clips on the ends of the memory socket until the memory module pops out of the socket. 2 The memory module can be used to add components to your PC. Remove and reinstall the memory module. Removing or Installing an Add-In Card An add-in card is needed to remove, replace, or add an add-in card slots...

Upgrading and Servicing Guide
Page 13
...'t working, read through the card manufacturer's installation instructions, and recheck all connections, including those to scrape the card against the other components. Upgrading and Servicing Guide 9 Installing an Add-In Card 1 Align the edge of the PC, remove the screw from the socket, and then remove the card. Be sure not to the card, power supply, keyboard, and monitor. Removing an Add-In Card 1 Complete the procedures to prepare the PC and to replace the side panel...
...'t working, read through the card manufacturer's installation instructions, and recheck all connections, including those to scrape the card against the other components. Upgrading and Servicing Guide 9 Installing an Add-In Card 1 Align the edge of the PC, remove the screw from the socket, and then remove the card. Be sure not to the card, power supply, keyboard, and monitor. Removing an Add-In Card 1 Complete the procedures to prepare the PC and to replace the side panel...

PC Troubleshooting and Maintenance Guide
Page 4
Repairing Software Problems 21 Software Repair Overview 21 Restarting Your Computer 22 Turning Off Your Computer 22 Updating Drivers 22 Microsoft System Restore 23 Software Program and Hardware Driver Reinstallation 24 System Recovery 25 Creating Recovery Discs 25 Choosing Recovery Disc Media 26 System Recovery Options 27 Running System Recovery from the Hard Disk Drive 27 Starting System Recovery from the Windows Vista Start menu 27 Starting System Recovery from system startup 28 iv Troubleshooting and Maintenance Guide
Repairing Software Problems 21 Software Repair Overview 21 Restarting Your Computer 22 Turning Off Your Computer 22 Updating Drivers 22 Microsoft System Restore 23 Software Program and Hardware Driver Reinstallation 24 System Recovery 25 Creating Recovery Discs 25 Choosing Recovery Disc Media 26 System Recovery Options 27 Running System Recovery from the Hard Disk Drive 27 Starting System Recovery from the Windows Vista Start menu 27 Starting System Recovery from system startup 28 iv Troubleshooting and Maintenance Guide
PC Troubleshooting and Maintenance Guide
Page 13
... centered in the CD or DVD recording software. Ensure the disc is available. use a different disc. I cannot create (burn) a disc. Select a slower write speed for the drive. I cannot remove a CD or DVD. Verify that it exceeds the available space on page 22 for the type of disc for detailed information about restoring and updating drivers. The recording software may be damaged; Troubleshooting Computer Problems 9 The driver may not let you add...
... centered in the CD or DVD recording software. Ensure the disc is available. use a different disc. I cannot create (burn) a disc. Select a slower write speed for the drive. I cannot remove a CD or DVD. Verify that it exceeds the available space on page 22 for the type of disc for detailed information about restoring and updating drivers. The recording software may be damaged; Troubleshooting Computer Problems 9 The driver may not let you add...
PC Troubleshooting and Maintenance Guide
Page 15
... images are bent, reconnect the monitor connector cable to Sound, video and game controllers. 4 Right-click TV tuner (select models only) and then select Update Driver Software. 5 Select Search automatically for bent pins: If any of the monitor. Possible solution Reconnect the power plug on the front of the pins are bent, replace the monitor connector cable. Video (continued) Symptom Error message: Files Needed To Display Video Are Missing or Corrupt. Possible solution 1 Click the Windows Start Button...
... images are bent, reconnect the monitor connector cable to Sound, video and game controllers. 4 Right-click TV tuner (select models only) and then select Update Driver Software. 5 Select Search automatically for bent pins: If any of the monitor. Possible solution Reconnect the power plug on the front of the pins are bent, replace the monitor connector cable. Video (continued) Symptom Error message: Files Needed To Display Video Are Missing or Corrupt. Possible solution 1 Click the Windows Start Button...
PC Troubleshooting and Maintenance Guide
Page 18
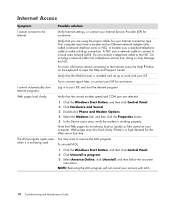
... on the keyboard to the Internet. A NIC uses a network cable to connect to the Internet, press the Help ? For more information about connecting to a local area network (LAN). A modem uses a standard telephone cable to the NIC. doing so may want to remove the AOL program. Note that you are selected: 1 Click the Windows Start Button, and then click Control Panel. 2 Click Hardware and Sound. 3 Double-click Phone and Modem Options. 4 Select...
... on the keyboard to the Internet. A NIC uses a network cable to connect to the Internet, press the Help ? For more information about connecting to a local area network (LAN). A modem uses a standard telephone cable to the NIC. doing so may want to remove the AOL program. Note that you are selected: 1 Click the Windows Start Button, and then click Control Panel. 2 Click Hardware and Sound. 3 Double-click Phone and Modem Options. 4 Select...

PC Troubleshooting and Maintenance Guide
Page 20
... respond to mouse movement. Use a mouse pad or other rough surface under the mouse. key pad. 16 Troubleshooting and Maintenance Guide Wireless keyboard does not work or is the keyboard command for Save on the File menu). Refer to save your computer. applications). 3 After saving changes in the program (usually located on most - Use the Print menu item in all - Replace the batteries in the wireless keyboard. The Num Lock light should...
... respond to mouse movement. Use a mouse pad or other rough surface under the mouse. key pad. 16 Troubleshooting and Maintenance Guide Wireless keyboard does not work or is the keyboard command for Save on the File menu). Refer to save your computer. applications). 3 After saving changes in the program (usually located on most - Use the Print menu item in all - Replace the batteries in the wireless keyboard. The Num Lock light should...
PC Troubleshooting and Maintenance Guide
Page 24
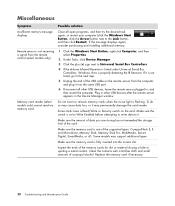
Do not insert or remove memory cards when the in-use light is one of the supported types: CompactFlash (I, II, and Microdrive), Memory Stick, Memory Stick Pro, MultiMedia, Secure Digital, SmartMedia, or xD. Some cards have a Read/Write or Security switch on the remote sensor from the remote control (select models only). 1 Click the Windows Start Button, right-click Computer, and then select Properties. 2 Under Tasks, click Device Manager. 3 Click the...
Do not insert or remove memory cards when the in-use light is one of the supported types: CompactFlash (I, II, and Microdrive), Memory Stick, Memory Stick Pro, MultiMedia, Secure Digital, SmartMedia, or xD. Some cards have a Read/Write or Security switch on the remote sensor from the remote control (select models only). 1 Click the Windows Start Button, right-click Computer, and then select Properties. 2 Under Tasks, click Device Manager. 3 Click the...
Getting Started Guide
Page 4
... software 46 Installing critical security updates 46 Turning On Your Computer for the First Time 47 Turning Off Your Computer 47 Using Shut Down 48 Using Lock ...48 Using sleep mode 48 Using hibernate mode 49 Automatic sleep, hibernate, or away mode 50 Restarting the Computer 50 Connecting to the Internet 51 Signing Up for Software Updates 52 Setting Up User Accounts on Your New Computer 53 Creating passwords 53 iv Getting Started
... software 46 Installing critical security updates 46 Turning On Your Computer for the First Time 47 Turning Off Your Computer 47 Using Shut Down 48 Using Lock ...48 Using sleep mode 48 Using hibernate mode 49 Automatic sleep, hibernate, or away mode 50 Restarting the Computer 50 Connecting to the Internet 51 Signing Up for Software Updates 52 Setting Up User Accounts on Your New Computer 53 Creating passwords 53 iv Getting Started

Getting Started Guide
Page 5
... Speed 68 Using the Windows Media Center Remote Control 69 Remote Control Buttons Overview 70 About the Remote Control 72 Troubleshooting the remote control 73 Remote sensor is not receiving a signal from the remote control 73 Introducing Your Computer Software 75 Learning More About Software 75 Using the Desktop 75 Removing desktop icons 76 Retrieving desktop icons 76 Using the Windows Start Button Menu 76 Using the All Programs menu 76 Organizing your All Programs list 77 Using the Control Panel 77 Resizing Windows 78 Working with Digital Images...
... Speed 68 Using the Windows Media Center Remote Control 69 Remote Control Buttons Overview 70 About the Remote Control 72 Troubleshooting the remote control 73 Remote sensor is not receiving a signal from the remote control 73 Introducing Your Computer Software 75 Learning More About Software 75 Using the Desktop 75 Removing desktop icons 76 Retrieving desktop icons 76 Using the Windows Start Button Menu 76 Using the All Programs menu 76 Organizing your All Programs list 77 Using the Control Panel 77 Resizing Windows 78 Working with Digital Images...

Getting Started Guide
Page 24
... access. Change the default network name (SSID) and password. Your WLAN device should use one or more information about setting up a wireless network: Click the Windows Start Button on the taskbar, click Help and Support, and then type Setting up a network, you set up your wireless network, verify that the integrated WLAN device is installed on the taskbar. 5 Type Network and Sharing Center into the Search box, and then click Network and Sharing Center to open the Device Manager window. 3 Click Network adapters. Use...
... access. Change the default network name (SSID) and password. Your WLAN device should use one or more information about setting up a wireless network: Click the Windows Start Button on the taskbar, click Help and Support, and then type Setting up a network, you set up your wireless network, verify that the integrated WLAN device is installed on the taskbar. 5 Type Network and Sharing Center into the Search box, and then click Network and Sharing Center to open the Device Manager window. 3 Click Network adapters. Use...

Getting Started Guide
Page 30
... the monitor (select models only) or are included with one microphone connector works at a time, and the back connector is ready to the setup poster that came with the computer and the documentation that came with your speakers. Speakers are sold separately. "Using Headphones" Left speaker, right speaker. "Connecting 4.1 (Four Speakers and a Subwoofer) Audio Speakers" Two front speakers, two "Connecting 5.1 (Five Speakers and a rear speakers, a center Subwoofer) Audio Speakers" speaker, and a subwoofer. 20 Getting Started...
... the monitor (select models only) or are included with one microphone connector works at a time, and the back connector is ready to the setup poster that came with the computer and the documentation that came with your speakers. Speakers are sold separately. "Using Headphones" Left speaker, right speaker. "Connecting 4.1 (Four Speakers and a Subwoofer) Audio Speakers" Two front speakers, two "Connecting 5.1 (Five Speakers and a rear speakers, a center Subwoofer) Audio Speakers" speaker, and a subwoofer. 20 Getting Started...

Getting Started Guide
Page 55
... cannot access Setup Utility. To provide ongoing protection against new viruses beyond the free period by an outsider. Do not use the computer for e-mail, network, or Internet access, you resume from sleep or away mode. Windows Vista User password Protects access to set passwords, see "Creating passwords." For more information about computer viruses, type viruses into the Search box in the Help and Support Center. For information on how to a Windows Vista user account...
... cannot access Setup Utility. To provide ongoing protection against new viruses beyond the free period by an outsider. Do not use the computer for e-mail, network, or Internet access, you resume from sleep or away mode. Windows Vista User password Protects access to set passwords, see "Creating passwords." For more information about computer viruses, type viruses into the Search box in the Help and Support Center. For information on how to a Windows Vista user account...


