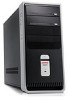
Safety and Regulatory Information Desktops, Thin Clients, and Personal Workstations
Page 5
... Notice ...3 Laser Safety ...3 CDRH Regulations ...3 Compliance with International Regulations 4 Laser Product Label ...4 Laser Information ...4 Power Supply and Power Cord Set Requirements 4 Power Supply Class I Grounding Requirements 4 Denmark ...4 Norway ...4 Sweden ...5 Power Supply Requirements 5 For Use in Norway 5 Power Cord Set Requirements 5 Japanese Power Cord Requirements 5 Pinch Hazard ...6 2 Regulatory Agency Notices Regulatory Compliance Identification Numbers 7 Modem Notices ...7 Telecommunications...
Safety and Regulatory Information Desktops, Thin Clients, and Personal Workstations
Page 7
...system with a voltage select switch for use ergonomically correct lifting procedures when moving it. Always disconnect the modem cord from the AC power outlet. Always use in a grounded (earthed) outlet that is provided with no direct connection to earth, according to avoid the ...telephone lines), networks, or modems before installing or removing your computer and void any service procedures. Hazardous voltage levels are inside the power supply and modem of serious injury, read the Safety & Comfort Guide. Changing the voltage select switch to the correct voltage setting...
Safety and Regulatory Information Desktops, Thin Clients, and Personal Workstations
Page 8
... to forward them to recycling or proper disposal, please use the public collection system or return them to the equipment before removing the enclosure. Disconnect power to HP, an authorized HP partner, or their agents. The Taiwan EPA requires dry battery manufacturing or importing firms, in fire or water. • Risk...
Safety and Regulatory Information Desktops, Thin Clients, and Personal Workstations
Page 10
...For protection from fault currents, the equipment shall be connected to the Class 1 Laser Product label on the system. Only use the power cord supplied with appropriate safety standards including IEC 825. Laser Product Label The following label or equivalent is located on a laser device installed... cords may not provide adequate fault protection. Norway Apparatet må kun tilkoples jordet stikkontakt. 4 Chapter 1 Safety Notices ENWW Plug the system power cord into an AC outlet that the product is located next to a grounding terminal. If you have an LS-120 drive or an LS...
Safety and Regulatory Information Desktops, Thin Clients, and Personal Workstations
Page 11
...200-240 volts AC. CAUTION: Do not use in the country where the power cord set . Power Supply Requirements The power supplies on or pinched by an acceptable accredited agency responsible for use the power cord received with internal circuits that it to operate from Hewlett-Packard or an... in any other countries must be paid to hazards. For more information on any manner, replace it . WARNING! If the power cord set requirements, contact your authorized HP dealer, reseller, or service provider. The requirements listed below are equipped with this product. The...
Safety and Regulatory Information Desktops, Thin Clients, and Personal Workstations
Page 17
Table 2-1 Antenna Grounding Reference Grounding Component 1 Electric Service Equipment 2 Power Service Grounding Electrode System (NEC Art 250, Part H) 3 Ground Clamps 4 Grounding Conductors (NEC Section 810-21) 5 Antenna Discharge Unit (NEC Section 810-20) 6 ...it is electrically grounded so as to an antenna-discharge unit, size of grounding conductors, location of time, unplug the product from lightning and power line surges. This will prevent damage to grounding electrodes, and requirements for long periods of antenna-discharge unit, connection to the product from the...
Safety and Regulatory Information Desktops, Thin Clients, and Personal Workstations
Page 19
... part, series, or model number found on the product. Exposure to Radio Frequency Radiation The radiated output power of this product is restricted to indoor use, due to cochannel mobile satellite systems. High-power radar is below the FCC radio frequency exposure limits. CAUTION: When using IEEE 802.11a wireless LAN, this...
Safety and Regulatory Information Desktops, Thin Clients, and Personal Workstations
Page 20
... requirements of the device. These radar stations can cause interference with and/or damage to this product to co-channel mobile satellite systems. High-power radar is 6 dBi. The antenna for harmful interference to be used indoors for the frequency range of the 5.25to 5.35-GHz and 5.65...- For the Belkin Dual-Band Wireless A+G Desktop Card the maximum antenna gain permitted as specified by the Canadian e.i.r.p. For the Atheros AR5BHB92 card the maximum antenna gain permitted as specified by ...
Safety and Regulatory Information Desktops, Thin Clients, and Personal Workstations
Page 22
.../95/EC ● EMC Directive 2004/108/EC ● EuP Directive 2005/32/EC where applicable CE compliance of this product is valid only if powered with these directives implies conformity to the regulatory label provided on the product. ● The following CE marking is valid for non-telecommunications products and...
Safety and Regulatory Information Desktops, Thin Clients, and Personal Workstations
Page 26
... video distortion when an Energy Save timeout occurs. 20 Chapter 2 Regulatory Agency Notices ENWW When used through the Microsoft Windows Power Management feature. To take advantage of the computer input devices (mouse, keyboard, and so on all ENERGY STAR-qualified computers... of this feature also supports the similar power management features of inactivity. See the EPA ENERGY STAR Power Management Web site for more information about the energy and financial savings potential of inactivity: Business Desktops Consumer Desktops Thin Clients Workstations Operating System XP Vista ...
Safety and Regulatory Information Desktops, Thin Clients, and Personal Workstations
Page 27
...Linux workstations. For disposal or recycling information, please contact your computer, select Start > Control Panel, and then double-click Power Options. Mercury Statement This HP product may require special handling when recycled or disposed of in California. Perchlorate Material-special handling... (Regulation EC No. 1907/2006 of the European Parliament and the Council). If it is not supported on Linux or FreeDOS Desktop PCs. See http://www.dtsc.ca.gov/hazardouswaste/perchlorate/. A chemical information report for your local authorities or the Electronic Industries Alliance ...
Safety and Regulatory Information Desktops, Thin Clients, and Personal Workstations
Page 29
... SJ/T11363-2006. Table 2-2 Toxic and Hazardous Substances and Elements (continued) Part Name Lead (Pb) Mercury (Hg) Cadmium (Cd) Hexavalent Chromium (Cr(VI)) Memory X O O O I/O PCAs X O O O Power supply X O O O Keyboard X O O O Mouse X O O O Chassis/Other X O O O Fans X O O O Internal/External Media Reading X O O O Devices External Control Devices X O O O Cable X O O O Hard Disk Drive X O O O Display X X O O Polybrominated biphenyls (PBB) Polybrominated diphenyl ethers...
Upgrading and Servicing Guide
Page 5
... according to cool before removing the front and side panels of personal injury from electrical shock or hot surfaces, disconnect the power cord from the PC. 5 Disconnect all external devices. Click Turn Off. 3 Disconnect the modem/telephone cable, if present. Read the following items... or equipment damage. WARNING: Always disconnect the modem cord from the telephone system, and then disconnect the PC from the power source before touching. 4 Disconnect the power cord from the electrical outlet and then from the wall outlet, and allow the internal system components to IEC...
Upgrading and Servicing Guide
Page 6
.... Press one tab (2), and then press the other cables (such as the keyboard, mouse, and monitor) and external devices. 3 Turn on the PC and all peripherals. 4 If you installed an add-in the proper position on the chassis and slide it off the unit. WARNING: To reduce the...the screw (D) that the hole for the thumbscrew aligns with the hole in this order after closing the PC. 1 Reconnect the power cord. WARNING: Beware of electrical shock, fire, or damage to the PC chassis. 2 Ensure that secures the panel to the equipment, do not plug telecommunications or telephone connectors into...
Upgrading and Servicing Guide
Page 8
...Reader Drive Cable Removing the Second Hard Disk Drive 4 Upgrading and Servicing Guide Disconnecting the Diskette (Floppy) Drive Cables See "Opening and Closing the PC" on the latch drive bracket, and then sliding (2) the drive partway out of the bay. (The latch drive bracket secures the drives in ... the drive part way back out of the drive you want to remove, as indicated in the following illustrations: • For optical drives, disconnect the power cable (P) and the data cable (D) from the back of the drive you want to remove. If the drive has a sound cable (S), disconnect it ...
Upgrading and Servicing Guide
Page 10
If it is present, reconnect the sound cable. Connect this cable also. Connecting the Serial ATA Hard Disk Drive Cables 6 Upgrading and Servicing Guide Connecting the Memory Card Reader Drive Cable Connecting the Diskette (Floppy) Drive Cables 6 Reconnect the power and data cables to your drive as indicated in the following illustrations. Connecting the Optical Drive Cables NOTE: An optical drive may include a sound cable. Insert the two screws (4). For a second hard disk drive, slide the drive into the bay (with connectors facing out) and align the screw holes (3).
Upgrading and Servicing Guide
Page 12
...: • If you are replacing a memory module, put the new memory module in the computer. Your PC contains several add-in card slots that can be used to add components to touch any of +5 V power for each board/card in the same memory slot from the memory socket. The total +5 V current draw...
Upgrading and Servicing Guide
Page 13
Removing an Add-In Card 1 Complete the procedures to prepare the PC and to the card, power supply, keyboard, and monitor. NOTE: If the new card or device isn't working, read through the card manufacturer's installation instructions, and recheck all connections, ...including those to remove the side panel. The whole connector should be seated properly in the card slot. 4 Inside the PC, locate the ...
Upgrading and Servicing Guide
Page 14
... procedures to replace the side panel, and to weaken, the date and time may be incorrect. See "Opening and Closing the PC" on the motherboard provides backup power for the PC's timekeeping capability. The battery has an estimated life expectancy of explosion if the battery is danger of seven years. Discard used batteries...
PC Basics Guide
Page 3
Table of Contents Introducing the PC 1 Protecting Your PC 2 Using a Power Surge Suppressor 2 Using Virus Protection Programs 3 Using Windows Update 3 Turning Off the PC 4 Standby Mode 4 Hibernation Mode 5 Automatic Standby or Hibernation 5 Restarting the PC 6 Using the Mouse 6 Using the Mouse Buttons 7 Scrolling 7 Autoscrolling 8 Panning...Keyboard Features 9 Adjusting the Monitor 13 Using a TV as a Monitor 13 Cables You May Need 13 Viewing the PC Image on Your TV Screen 13 Using Speakers 14 Adjusting Speaker Volume 14 Using a Microphone 15 Adjusting Microphone Volume 16 ...