
Safety and Regulatory Information Desktops, Thin Clients, and Personal Workstations
Page 17
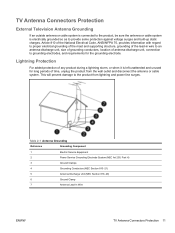
... 7 Antenna Lead-in wire to an antenna-discharge unit, size of grounding conductors, location of antenna-discharge unit, connection to grounding electrodes, and requirements for long periods of time, unplug the product from lightning and power line surges. TV Antenna Connectors Protection External Television Antenna Grounding If an outside antenna or cable system is connected to the product...
... 7 Antenna Lead-in wire to an antenna-discharge unit, size of grounding conductors, location of antenna-discharge unit, connection to grounding electrodes, and requirements for long periods of time, unplug the product from lightning and power line surges. TV Antenna Connectors Protection External Television Antenna Grounding If an outside antenna or cable system is connected to the product...
Compaq Presario Desktop Products - Upgrading and Servicing Guide
Page 6
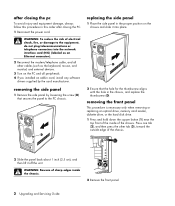
... removing or replacing an optical drive, memory card reader, diskette drive, or the hard disk drive. 1 Press and hold down the square button (1) near the top front of the inside of sharp edges inside the chassis. 2 Remove the front panel. 2 Upgrading and Servicing Guide WARNING: To reduce the risk of the chassis. 2 Slide the panel back about 1 inch (2.5 cm), and then lift it into the network interface card (NIC) (labeled as an Ethernet connector...
... removing or replacing an optical drive, memory card reader, diskette drive, or the hard disk drive. 1 Press and hold down the square button (1) near the top front of the inside of sharp edges inside the chassis. 2 Remove the front panel. 2 Upgrading and Servicing Guide WARNING: To reduce the risk of the chassis. 2 Slide the panel back about 1 inch (2.5 cm), and then lift it into the network interface card (NIC) (labeled as an Ethernet connector...

Compaq Presario Desktop Products - Upgrading and Servicing Guide
Page 7
...IMPORTANT: Before adding a new optical drive, make sure you want to work with the operating system. Failure to remove the front panel. A Upper optical drive bay, may be a CD-ROM, CD-RW, DVD-ROM, DVD+RW/+R, or combination drive B Lower optical drive bay, may be empty (blank plate) or a CD-ROM, CD-RW, DVD-ROM, DVD+RW/+R, or combination drive C Memory card reader (select models) D Diskette (floppy) drive (select models) E Front connector panel (no replacement instructions) F Hard disk drive Upgrading and Servicing Guide 3 See the User's Guide for details about the recovery procedure...
...IMPORTANT: Before adding a new optical drive, make sure you want to work with the operating system. Failure to remove the front panel. A Upper optical drive bay, may be a CD-ROM, CD-RW, DVD-ROM, DVD+RW/+R, or combination drive B Lower optical drive bay, may be empty (blank plate) or a CD-ROM, CD-RW, DVD-ROM, DVD+RW/+R, or combination drive C Memory card reader (select models) D Diskette (floppy) drive (select models) E Front connector panel (no replacement instructions) F Hard disk drive Upgrading and Servicing Guide 3 See the User's Guide for details about the recovery procedure...

Compaq Presario Desktop Products - Upgrading and Servicing Guide
Page 8
... old drive with a new drive, remove the four guide screws (two on page 3. 2 If you must remove the blank plate from the old drive. See "removing a drive" on each side) from the bay. disconnecting the diskette (floppy) drive cables 4 Upgrading and Servicing Guide disconnecting the optical drive cables disconnecting the memory card reader drive cable disconnecting the hard disk drive cables 5 Pull the drive out of the drive bay. 6 If you are adding a drive to install the new drive. If so, disconnect the sound cable (3). Use...
... old drive with a new drive, remove the four guide screws (two on page 3. 2 If you must remove the blank plate from the old drive. See "removing a drive" on each side) from the bay. disconnecting the diskette (floppy) drive cables 4 Upgrading and Servicing Guide disconnecting the optical drive cables disconnecting the memory card reader drive cable disconnecting the hard disk drive cables 5 Pull the drive out of the drive bay. 6 If you are adding a drive to install the new drive. If so, disconnect the sound cable (3). Use...

Compaq Presario Desktop Products - Upgrading and Servicing Guide
Page 11
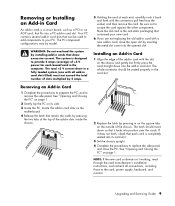
... that fits into a PC add-in card slot. removing or installing an add-in card An add-in card slots that the latches on the motherboard. Your PC contains several add-in card is needed to remove, replace, or add an add-in card. 4 Inside the PC, locate the add-in card slot cover. 5 Remove the slot cover. A Phillips screwdriver is a circuit board, such as a PCI or an AGP card that contained your PC. Upgrading and Servicing Guide 7 WARNING: Be careful of +5 V power for the add-in only one with...
... that fits into a PC add-in card slot. removing or installing an add-in card An add-in card slots that the latches on the motherboard. Your PC contains several add-in card is needed to remove, replace, or add an add-in card. 4 Inside the PC, locate the add-in card slot cover. 5 Remove the slot cover. A Phillips screwdriver is a circuit board, such as a PCI or an AGP card that contained your PC. Upgrading and Servicing Guide 7 WARNING: Be careful of +5 V power for the add-in only one with...
Compaq Presario Desktop Products - Upgrading and Servicing Guide
Page 12
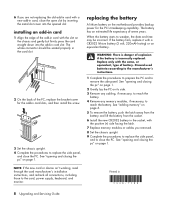
... same, or equivalent, type of explosion if the battery is incorrectly replaced. See "adding memory" on the motherboard provides backup power for the add-in card, close the open slot by inserting the metal slot cover into the add-in 8 Upgrading and Servicing Guide replacing the battery A lithium battery on page 6. 5 To remove the battery, push the latch away from the battery and lift the battery from the socket. 6 Install the new CR2032 battery in the socket...
... same, or equivalent, type of explosion if the battery is incorrectly replaced. See "adding memory" on the motherboard provides backup power for the add-in card, close the open slot by inserting the metal slot cover into the add-in 8 Upgrading and Servicing Guide replacing the battery A lithium battery on page 6. 5 To remove the battery, push the latch away from the battery and lift the battery from the socket. 6 Install the new CR2032 battery in the socket...
Upgrading and Servicing Guide
Page 6
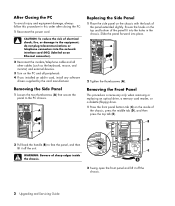
... replacing an optical drive, a memory card reader, or a diskette (floppy) drive. 1 Press the front panel bottom tab (C) on the PC and all other cables (such as the keyboard, mouse, and monitor) and external devices. 3 Turn on the inside the chassis. 2 Swing open the front panel and lift it off the chassis. 2 Upgrading and Servicing Guide Removing the Side Panel 1 Loosen the two thumbscrews (A) that secure the panel to the equipment, do not plug telecommunications or telephone connectors...
... replacing an optical drive, a memory card reader, or a diskette (floppy) drive. 1 Press the front panel bottom tab (C) on the PC and all other cables (such as the keyboard, mouse, and monitor) and external devices. 3 Turn on the inside the chassis. 2 Swing open the front panel and lift it off the chassis. 2 Upgrading and Servicing Guide Removing the Side Panel 1 Loosen the two thumbscrews (A) that secure the panel to the equipment, do not plug telecommunications or telephone connectors...

Upgrading and Servicing Guide
Page 7
..., "Locating Components Inside the PC," for the drive to work with the operating system. 2 Swing the front panel closed, and then press the left side of the front panel to latch it is compatible with operating system partition). If so, disconnect the sound cable (3). E Diskette (floppy) drive (select models) or may have the correct software and drivers for drive type and location. IMPORTANT: Before adding a new diskette drive, memory card reader, optical drive, or hard disk drive, make sure you can add a drive...
..., "Locating Components Inside the PC," for the drive to work with the operating system. 2 Swing the front panel closed, and then press the left side of the front panel to latch it is compatible with operating system partition). If so, disconnect the sound cable (3). E Diskette (floppy) drive (select models) or may have the correct software and drivers for drive type and location. IMPORTANT: Before adding a new diskette drive, memory card reader, optical drive, or hard disk drive, make sure you can add a drive...

Upgrading and Servicing Guide
Page 9
... secondary hard disk drives (select models). Connecting the optical drive cables Upgrading and Servicing Guide 5 Your drive may include a sound cable. The hard disk drive is the top drive in the three-drive non-removable cage in the following illustrations: Connecting the memory card reader drive cables 7 Complete the procedures to your drive as indicated in the chassis; Connecting the diskette drive cables 6 Reconnect the power and data cables to replace the front panel, replace the side panel, and close the PC. Removing a Hard Disk Drive The system hard disk drive is...
... secondary hard disk drives (select models). Connecting the optical drive cables Upgrading and Servicing Guide 5 Your drive may include a sound cable. The hard disk drive is the top drive in the three-drive non-removable cage in the following illustrations: Connecting the memory card reader drive cables 7 Complete the procedures to your drive as indicated in the chassis; Connecting the diskette drive cables 6 Reconnect the power and data cables to replace the front panel, replace the side panel, and close the PC. Removing a Hard Disk Drive The system hard disk drive is...

Upgrading and Servicing Guide
Page 10
... remove. After replacing the hard disk drive, you want to remove the side panel. You need to run System Recovery using the recovery discs to load the factory-installed files. 1 Complete the procedures to prepare the PC, and to remove. 3 Disconnect the power cable and data cable from the illustration. Your drive may vary from the back of the cage. (The latch secures the drive in the cage in the bay. 6 Upgrading and Servicing Guide...
... remove. After replacing the hard disk drive, you want to remove the side panel. You need to run System Recovery using the recovery discs to load the factory-installed files. 1 Complete the procedures to prepare the PC, and to remove. 3 Disconnect the power cable and data cable from the illustration. Your drive may vary from the back of the cage. (The latch secures the drive in the cage in the bay. 6 Upgrading and Servicing Guide...

Upgrading and Servicing Guide
Page 12
... memory. Installing a Memory Module Upgrade the memory in your computer shows a blank screen after you replace or add a memory module, the memory is installed incorrectly, or it is the wrong type of the memory module socket: • If you are replacing a memory module, put the new memory module in the next available sockets. Remove and reinstall the memory module. CAUTION: When handling a memory module, be careful not to remove the side panel...
... memory. Installing a Memory Module Upgrade the memory in your computer shows a blank screen after you replace or add a memory module, the memory is installed incorrectly, or it is the wrong type of the memory module socket: • If you are replacing a memory module, put the new memory module in the next available sockets. Remove and reinstall the memory module. CAUTION: When handling a memory module, be careful not to remove the side panel...
Upgrading and Servicing Guide
Page 13
... the card, power supply, keyboard, and monitor. Removing or Installing an Add-in Card An add-in card is a circuit board, such as a PCI or an AGP card, that draw excessive current. Your PC contains several add-in card slots that retains the cards by pressing the two tabs at each card is designed to replace the side panel, and close the open slot by installing add-in card with the slot on page 1. The PC component configurations vary by model...
... the card, power supply, keyboard, and monitor. Removing or Installing an Add-in Card An add-in card is a circuit board, such as a PCI or an AGP card, that draw excessive current. Your PC contains several add-in card slots that retains the cards by pressing the two tabs at each card is designed to replace the side panel, and close the open slot by installing add-in card with the slot on page 1. The PC component configurations vary by model...

Getting Started Guide
Page 12
... need it. 6 Getting Started Guide Use one of these methods: • Double-click the ISP-provided icon on the keyboard (select models only). Or • If your PC - Restart the PC after installation. Check the manufacturer's documentation or customer service information for compatibility with your PC is compatible with your ISP and the Internet. check the operating system, memory, and other requirements listed for the new software...
... need it. 6 Getting Started Guide Use one of these methods: • Double-click the ISP-provided icon on the keyboard (select models only). Or • If your PC - Restart the PC after installation. Check the manufacturer's documentation or customer service information for compatibility with your PC is compatible with your ISP and the Internet. check the operating system, memory, and other requirements listed for the new software...

Getting Started Guide
Page 13
... that make your desktop and review the products and services offered under Backup Data. Or, as an alternative, double-click the PC Tune Up & Repair icon (select models only) on your recovery discs. Easy Internet Sign-up Set up a new or an existing Internet account. search for moving your files onto your PC. Refer to Your New PC See the built-in Microsoft Windows Help and Support Center; repair options include using...
... that make your desktop and review the products and services offered under Backup Data. Or, as an alternative, double-click the PC Tune Up & Repair icon (select models only) on your recovery discs. Easy Internet Sign-up Set up a new or an existing Internet account. search for moving your files onto your PC. Refer to Your New PC See the built-in Microsoft Windows Help and Support Center; repair options include using...

Getting Started Guide
Page 24
... this window, and Compaq Connections remains active. 18 Getting Started Guide With Instant Support you can close a message, it will not automatically display again. Most Support updates delivered by Compaq Connections messages are also available to solve a PC-related problem, use Instant Support (select models only). When you submit a problem, you communicate over the Internet. Compaq Connections opens and lists the message titles. Using Instant Support When you need assistance to you through the Support Web...
... this window, and Compaq Connections remains active. 18 Getting Started Guide With Instant Support you can close a message, it will not automatically display again. Most Support updates delivered by Compaq Connections messages are also available to solve a PC-related problem, use Instant Support (select models only). When you submit a problem, you communicate over the Internet. Compaq Connections opens and lists the message titles. Using Instant Support When you need assistance to you through the Support Web...

Getting Started Guide
Page 40
... any player or drive in any country/region. Using Country/Region Codes Most DVD discs have country/region codes embedded in the WinDVD control panel. To use the WinDVD control panel: • To move the WinDVD control panel, place the mouse pointer on the panel (but not on a button), and drag it to the desired location on the screen. • To resize the video window when it is coded for a different...
... any player or drive in any country/region. Using Country/Region Codes Most DVD discs have country/region codes embedded in the WinDVD control panel. To use the WinDVD control panel: • To move the WinDVD control panel, place the mouse pointer on the panel (but not on a button), and drag it to the desired location on the screen. • To resize the video window when it is coded for a different...

Getting Started Guide
Page 77
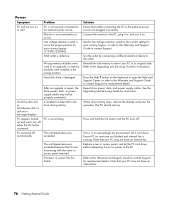
... user Owner.) Troubleshooting 71 A Plug and Play card may need an updated driver for the card, and choose a basic configuration that the pins in the connector are not bent down. Solution Install the device driver from the device manufacturer's Web site. Ensure that the device is properly and securely connected and that doesn't cause a resource conflict. Turn off the PC, turn on the external device, and then turn on . Restart the PC, and follow the instructions...
... user Owner.) Troubleshooting 71 A Plug and Play card may need an updated driver for the card, and choose a basic configuration that the pins in the connector are not bent down. Solution Install the device driver from the device manufacturer's Web site. Ensure that the device is properly and securely connected and that doesn't cause a resource conflict. Turn off the PC, turn on the external device, and then turn on . Restart the PC, and follow the instructions...

Getting Started Guide
Page 80
... on the keyboard to open the Help and Support Center, or refer to the Warranty and Support Guide to contact Support for replacement details. Press the Help ? Wireless keyboard does not work . button on . Replace the two AA alkaline batteries in the mouse; Use a mouse pad or other rough surface for a roller-ball type mouse is too slow. Cursor will not move using the mouse. Keyboard batteries are low or empty. then set the...
... on the keyboard to open the Help and Support Center, or refer to the Warranty and Support Guide to contact Support for replacement details. Press the Help ? Wireless keyboard does not work . button on . Replace the two AA alkaline batteries in the mouse; Use a mouse pad or other rough surface for a roller-ball type mouse is too slow. Cursor will not move using the mouse. Keyboard batteries are low or empty. then set the...
Getting Started Guide
Page 82
... the Upgrading and Servicing Guide for replacement details. Wall outlet is damaged. Hard disk drive is defective. The unit temperature was functioning with the cover or access panel removed. Press and hold the On button until the PC turns off when the On button is not securely connected to its original state. Wrong memory modules were used in an upgrade, or memory modules were installed in the drive during startup. Reseat drive power, data, and power supply cables...
... the Upgrading and Servicing Guide for replacement details. Wall outlet is damaged. Hard disk drive is defective. The unit temperature was functioning with the cover or access panel removed. Press and hold the On button until the PC turns off when the On button is not securely connected to its original state. Wrong memory modules were used in an upgrade, or memory modules were installed in the drive during startup. Reseat drive power, data, and power supply cables...

Getting Started Guide
Page 86
..., 26 cables, 26 connecting a TV set, 26 disabling TV option, 29 viewing PC image on TV, 27 U updating, system, 18 upgrading to V.92 modem features, 6 User button, 12 V V.92 modem, 6 VCD playing with Windows Media Player, 35 playing with WinDVD, 35 video capture error, 68 Video CDs playing with Windows Media Player, 35 playing with WinDVD, 35 video files recording, 46 video recording length, 50 viewing onscreen guides, 8 volume adjusting, 66 controls...
..., 26 cables, 26 connecting a TV set, 26 disabling TV option, 29 viewing PC image on TV, 27 U updating, system, 18 upgrading to V.92 modem features, 6 User button, 12 V V.92 modem, 6 VCD playing with Windows Media Player, 35 playing with WinDVD, 35 video capture error, 68 Video CDs playing with Windows Media Player, 35 playing with WinDVD, 35 video files recording, 46 video recording length, 50 viewing onscreen guides, 8 volume adjusting, 66 controls...


