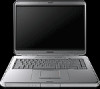
Using LightScribe (Select Models Only)
Page 7
...out better than a picture in the "Required for other activities. The LightScribe software indicates the time remaining to the PC. ■ If you are using your notebook. While the disc is being created, you can create a LightScribe label, you can continue to use look on...mostly soft middle tones. If you are using a notebook, install the software included on disc. ■ Keep using a notebook, avoid sudden loss of power. Use your software's preview feature to see how the graphics you use your notebook AC adapter and power cord plugged into a working electrical outlet.
...out better than a picture in the "Required for other activities. The LightScribe software indicates the time remaining to the PC. ■ If you are using your notebook. While the disc is being created, you can create a LightScribe label, you can continue to use look on...mostly soft middle tones. If you are using a notebook, install the software included on disc. ■ Keep using a notebook, avoid sudden loss of power. Use your software's preview feature to see how the graphics you use your notebook AC adapter and power cord plugged into a working electrical outlet.

Hardware-Software Guide
Page 17
Connects the modem cable. *The notebook has 5 vents. Connects an optional VGA monitor or projector. Component ID Rear Components Component Description 1 Power connector Connects the AC adapter cable. 2 Exhaust vents (2)* Provides airflow to block airflow. Do not allow a hard surface, such as a printer, or a soft surface, ...jack Ä To prevent overheating, do not obstruct vents. All vents are on the right side and the left side of the notebook. 1-8 Hardware and Software Guide Connects an optional USB device. Another one of these vents is visible on the bottom of the...
Connects the modem cable. *The notebook has 5 vents. Connects an optional VGA monitor or projector. Component ID Rear Components Component Description 1 Power connector Connects the AC adapter cable. 2 Exhaust vents (2)* Provides airflow to block airflow. Do not allow a hard surface, such as a printer, or a soft surface, ...jack Ä To prevent overheating, do not obstruct vents. All vents are on the right side and the left side of the notebook. 1-8 Hardware and Software Guide Connects an optional USB device. Another one of these vents is visible on the bottom of the...

Hardware-Software Guide
Page 25
... components described in this table vary in appearance by telephone jack. Power and Modem Hardware Component 1 AC adapter* Description Converts AC power to DC power. 2 Power cord* Connects an AC adapter to an AC outlet. 3 Battery pack* Powers the notebook when the notebook is not connected to external power. 4 Modem cable* Connects the modem to an RJ-11...
... components described in this table vary in appearance by telephone jack. Power and Modem Hardware Component 1 AC adapter* Description Converts AC power to DC power. 2 Power cord* Connects an AC adapter to an AC outlet. 3 Battery pack* Powers the notebook when the notebook is not connected to external power. 4 Modem cable* Connects the modem to an RJ-11...

Hardware-Software Guide
Page 30
... from an inserted battery pack or on external power supplied through the AC adapter or an optional docking device. Do not disable the power cord grounding pin; for example, by unplugging the power cord from the notebook). ■ If provided with a 3-pin attachment plug on your equipment... applications. The grounding pin is easily accessible at all times. ■ Disconnect power from the notebook by unplugging the power cord from the AC outlet (not by attaching a 2-pin adapter. It is recommended that is an important safety feature. Power Power Sources Selecting a Power Source ...
... from an inserted battery pack or on external power supplied through the AC adapter or an optional docking device. Do not disable the power cord grounding pin; for example, by unplugging the power cord from the notebook). ■ If provided with a 3-pin attachment plug on your equipment... applications. The grounding pin is easily accessible at all times. ■ Disconnect power from the notebook by unplugging the power cord from the AC outlet (not by attaching a 2-pin adapter. It is recommended that is an important safety feature. Power Power Sources Selecting a Power Source ...
Hardware-Software Guide
Page 46
... is fully charged or not installed. ■ Blinking: The charge in the battery pack is connected to external power through the AC adapter or through an optional docking device. Hardware and Software Guide 2-19 To prolong battery life and optimize the accuracy of battery charge displays... use, but the battery pack charges faster while the notebook is off. Power Charging Battery Packs A battery pack inserted in the notebook charges whenever the notebook is too low to start the notebook. A battery pack inserted in the notebook charges whether the notebook is off or in this chapter.
... is fully charged or not installed. ■ Blinking: The charge in the battery pack is connected to external power through the AC adapter or through an optional docking device. Hardware and Software Guide 2-19 To prolong battery life and optimize the accuracy of battery charge displays... use, but the battery pack charges faster while the notebook is off. Power Charging Battery Packs A battery pack inserted in the notebook charges whenever the notebook is too low to start the notebook. A battery pack inserted in the notebook charges whether the notebook is off or in this chapter.

Hardware-Software Guide
Page 47
..., calibrate the battery pack instead of a full charge through the AC adapter. ■ When you charge the battery pack, charge it fully. Power Charging a New Battery Pack To charge a new battery pack: ■ Charge the battery pack while the notebook is displayed by your notebook: ■ Allow a battery pack to discharge to about 10...
..., calibrate the battery pack instead of a full charge through the AC adapter. ■ When you charge the battery pack, charge it fully. Power Charging a New Battery Pack To charge a new battery pack: ■ Charge the battery pack while the notebook is displayed by your notebook: ■ Allow a battery pack to discharge to about 10...

Hardware-Software Guide
Page 50
...Available To resolve a low-battery condition when no power source is available, connect the notebook to the external power source. When the Notebook Cannot Restore from hibernation: If the notebook has reached a critical low-battery condition and has begun to initiate hibernation, do ...CAUTION: To prevent loss of the following items: ■ AC adapter ■ Optional docking device When a Charged Battery Pack Is Available To resolve a low-battery condition when a charged battery pack is available, shut down the notebook. When hibernation is complete. The external power source could be...
...Available To resolve a low-battery condition when no power source is available, connect the notebook to the external power source. When the Notebook Cannot Restore from hibernation: If the notebook has reached a critical low-battery condition and has begun to initiate hibernation, do ...CAUTION: To prevent loss of the following items: ■ AC adapter ■ Optional docking device When a Charged Battery Pack Is Available To resolve a low-battery condition when a charged battery pack is available, shut down the notebook. When hibernation is complete. The external power source could be...

Hardware-Software Guide
Page 52
... shut down. ■ The system will not turn off a connected optional monitor. Leave the notebook connected to external power until the battery pack is fully charged. (The notebook battery light is then turned off.) Discharging the Battery Pack Ä CAUTION: To prevent loss of work... be lost when the battery pack is fully discharged and the notebook is on throughout the discharge process. Connect the notebook to external power through the AC adapter. (The notebook battery light is in use the notebook occasionally during the discharge process described in the following procedure and ...
... shut down. ■ The system will not turn off a connected optional monitor. Leave the notebook connected to external power until the battery pack is fully charged. (The notebook battery light is then turned off.) Discharging the Battery Pack Ä CAUTION: To prevent loss of work... be lost when the battery pack is fully discharged and the notebook is on throughout the discharge process. Connect the notebook to external power through the AC adapter. (The notebook battery light is in use the notebook occasionally during the discharge process described in the following procedure and ...
Hardware-Software Guide
Page 182
....txt file contains detailed descriptive, installation, and troubleshooting information about connecting to the Internet using the AC adapter. (Do not download or install a ROM update while the notebook is connected to the Internet" section in an optional docking device or running on battery power.) ... ✎ This section describes the software updates available at the Compaq Web site is packaged in compressed files called ROMPaqs. Downloading System ROM Ä CAUTION: To prevent serious damage to the notebook or an unsuccessful installation, download and install a ROM update only...
....txt file contains detailed descriptive, installation, and troubleshooting information about connecting to the Internet using the AC adapter. (Do not download or install a ROM update while the notebook is connected to the Internet" section in an optional docking device or running on battery power.) ... ✎ This section describes the software updates available at the Compaq Web site is packaged in compressed files called ROMPaqs. Downloading System ROM Ä CAUTION: To prevent serious damage to the notebook or an unsuccessful installation, download and install a ROM update only...

Hardware-Software Guide
Page 186
In the folder containing your download, select the name or number of notebook functionality, perform the procedures described in this section only while the notebook is connected to reliable external power through the AC adapter. Select the file that includes an .exe extension-for example, Filename.exe. (The installation begins.) 9. Software Updates and Recovery 7. System...
In the folder containing your download, select the name or number of notebook functionality, perform the procedures described in this section only while the notebook is connected to reliable external power through the AC adapter. Select the file that includes an .exe extension-for example, Filename.exe. (The installation begins.) 9. Software Updates and Recovery 7. System...
Hardware-Software Guide
Page 188
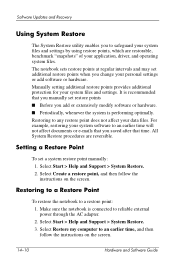
...follow the instructions on the screen. 14-10 Hardware and Software Guide Select Start > Help and Support > System Restore. 2. The notebook sets restore points at regular intervals and may set additional restore points when you change your application, driver, and operating system files....you add or extensively modify software or hardware. ■ Periodically, whenever the system is connected to reliable external power through the AC adapter. 2. Software Updates and Recovery Using System Restore The System Restore utility enables you to safeguard your system files and settings by ...
...follow the instructions on the screen. 14-10 Hardware and Software Guide Select Start > Help and Support > System Restore. 2. The notebook sets restore points at regular intervals and may set additional restore points when you change your application, driver, and operating system files....you add or extensively modify software or hardware. ■ Periodically, whenever the system is connected to reliable external power through the AC adapter. 2. Software Updates and Recovery Using System Restore The System Restore utility enables you to safeguard your system files and settings by ...

Hardware-Software Guide
Page 192
... power button for your personal data: 1. After the repair process is displayed). 8. Press R to a AC outlet through the AC adapter. 2. Insert the Operating System disc (included with the notebook) into the optical drive. 3. When prompted, press any key to boot from the drop-down list, ..."Welcome to Setup" page is displayed). ✎ On the "Welcome to several hours, the notebook restarts in this procedure) until you have completed steps 6 and 7. 6. Select Shut down the notebook using the standard shutdown procedure for 4 seconds. 4. Press enter to continue. (The "Licensing ...
... power button for your personal data: 1. After the repair process is displayed). 8. Press R to a AC outlet through the AC adapter. 2. Insert the Operating System disc (included with the notebook) into the optical drive. 3. When prompted, press any key to boot from the drop-down list, ..."Welcome to Setup" page is displayed). ✎ On the "Welcome to several hours, the notebook restarts in this procedure) until you have completed steps 6 and 7. 6. Select Shut down the notebook using the standard shutdown procedure for 4 seconds. 4. Press enter to continue. (The "Licensing ...

Hardware-Software Guide
Page 195
Make sure the notebook is connected to continue. (A "Licensing Agreement" page is displayed). 6. Press enter to a AC outlet through the AC adapter. 2. To reinstall the operating system using the standard shutdown procedure for your operating system: ❏ In Windows XP Home, press ctrl+alt+del, and then ...
Make sure the notebook is connected to continue. (A "Licensing Agreement" page is displayed). 6. Press enter to a AC outlet through the AC adapter. 2. To reinstall the operating system using the standard shutdown procedure for your operating system: ❏ In Windows XP Home, press ctrl+alt+del, and then ...
Hardware-Software Guide
Page 207
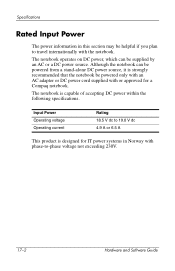
...Power Operating voltage Operating current Rating 18.5 V dc to 19.0 V dc 4.9 A or 6.5 A This product is designed for a Compaq notebook. The notebook operates on DC power, which can be powered from a stand-alone DC power source, it is capable of accepting DC power within the... may be helpful if you plan to -phase voltage not exceeding 230V. 17-2 Hardware and Software Guide Although the notebook can be powered only with an AC adapter or DC power cord supplied with the notebook. The notebook is strongly recommended that the notebook be supplied by an AC or a DC power source.
...Power Operating voltage Operating current Rating 18.5 V dc to 19.0 V dc 4.9 A or 6.5 A This product is designed for a Compaq notebook. The notebook operates on DC power, which can be powered from a stand-alone DC power source, it is capable of accepting DC power within the... may be helpful if you plan to -phase voltage not exceeding 230V. 17-2 Hardware and Software Guide Although the notebook can be powered only with an AC adapter or DC power cord supplied with the notebook. The notebook is strongly recommended that the notebook be supplied by an AC or a DC power source.
Hardware-Software Guide
Page 209
See docking device battery bay identifying 1-13 inserting, removing battery pack 2-17 labels inside 1-18 Hardware and Software Guide Index-1 battery power 2-4 adapters 2-pin (for power cord) 2-3 AC 1-16 country-specific modem 10-1 airport security devices 5-1, 16-1 altitude specifications 17-1 analog vs. digital line 10-1, 10-7 antennae 1-15 antivirus software 12-1, 12-... AT commands, modem 10-9 audio cable 4-7 audio-in (microphone) jack 4-1 audio-out (headphone) jack 4-2, 4-7 AutoPlay 4-17, 5-6 B backup 14-9, 14-15 base, docking. Index 1394 port 1-9, 9-3 A AC adapter 1-16 AC power vs.
See docking device battery bay identifying 1-13 inserting, removing battery pack 2-17 labels inside 1-18 Hardware and Software Guide Index-1 battery power 2-4 adapters 2-pin (for power cord) 2-3 AC 1-16 country-specific modem 10-1 airport security devices 5-1, 16-1 altitude specifications 17-1 analog vs. digital line 10-1, 10-7 antennae 1-15 antivirus software 12-1, 12-... AT commands, modem 10-9 audio cable 4-7 audio-in (microphone) jack 4-1 audio-out (headphone) jack 4-2, 4-7 AutoPlay 4-17, 5-6 B backup 14-9, 14-15 base, docking. Index 1394 port 1-9, 9-3 A AC adapter 1-16 AC power vs.
HP Pavilion zv6000 Notebook PC and Compaq Presario R4000 Notebook PC - Maintenance and Service Guide
Page 6
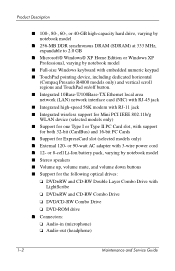
...Double Layer Combo Drive with support for both 32-bit (CardBus) and 16-bit PC Cards ■ Support for one Type I or Type II PC Card slot, with LightScribe ❏ DVD±RW and CD-RW Combo Drive... Service Guide or 8-cell Li-Ion battery pack, varying by notebook model ■ Full-size Windows keyboard with embedded numeric keypad ■ TouchPad pointing device, including dedicated horizontal (Compaq Presario R4000 models only) and vertical scroll regions and TouchPad on/off... slot (selected models only) ■ External 120- or 90-watt AC adapter with 3-wire power cord ■ 12-
...Double Layer Combo Drive with support for both 32-bit (CardBus) and 16-bit PC Cards ■ Support for one Type I or Type II PC Card slot, with LightScribe ❏ DVD±RW and CD-RW Combo Drive... Service Guide or 8-cell Li-Ion battery pack, varying by notebook model ■ Full-size Windows keyboard with embedded numeric keypad ■ TouchPad pointing device, including dedicated horizontal (Compaq Presario R4000 models only) and vertical scroll regions and TouchPad on/off... slot (selected models only) ■ External 120- or 90-watt AC adapter with 3-wire power cord ■ 12-

HP Pavilion zv6000 Notebook PC and Compaq Presario R4000 Notebook PC - Maintenance and Service Guide
Page 13
Product Description The external components on your notebook model, component locations may vary. Rear Panel Components Item 1 2 3 4 5 Table 1-3 Rear Panel Components Component Function Power connector Connects the AC adapter cable. Exhaust vents (2) Provide airflow to block airflow. External monitor port Connects an optional VGA monitor or projector. RJ-11 (modem) jack..., do not obstruct vents. USB port Connects an optional USB device. Maintenance and Service Guide 1-9 Depending on the rear panel of the notebook are shown below and described in Table 1-3.
Product Description The external components on your notebook model, component locations may vary. Rear Panel Components Item 1 2 3 4 5 Table 1-3 Rear Panel Components Component Function Power connector Connects the AC adapter cable. Exhaust vents (2) Provide airflow to block airflow. External monitor port Connects an optional VGA monitor or projector. RJ-11 (modem) jack..., do not obstruct vents. USB port Connects an optional USB device. Maintenance and Service Guide 1-9 Depending on the rear panel of the notebook are shown below and described in Table 1-3.

HP Pavilion zv6000 Notebook PC and Compaq Presario R4000 Notebook PC - Maintenance and Service Guide
Page 40
Plug directly into AC outlet. Y Power LED on ? Y Replace power cord. External Internal or external AC adapter? Y Power on ? N N Power outlet active? N Reseat AC adapter in notebook and at power source. Replace external AC adapter. Troubleshooting Flowchart 2.4-No Power, Part 3 Continued from "Flowchart 2.3-No Power, Part 2." N Done Done Try different outlet. N Power on ? Y Done Done 2-12 Maintenance and Service Guide Y Power on ? Internal Go to "Flowchart 2.5-No Power, Part 4."
Plug directly into AC outlet. Y Power LED on ? Y Replace power cord. External Internal or external AC adapter? Y Power on ? N N Power outlet active? N Reseat AC adapter in notebook and at power source. Replace external AC adapter. Troubleshooting Flowchart 2.4-No Power, Part 3 Continued from "Flowchart 2.3-No Power, Part 2." N Done Done Try different outlet. N Power on ? Y Done Done 2-12 Maintenance and Service Guide Y Power on ? Internal Go to "Flowchart 2.5-No Power, Part 4."

HP Pavilion zv6000 Notebook PC and Compaq Presario R4000 Notebook PC - Maintenance and Service Guide
Page 41
Internal DC-DC converter* 2. System board* *NOTE: Replace these items as a set to prevent shorting out among components. Processor board* 4. N Power on? Maintenance and Service Guide 2-13 Flowchart 2.5-No Power, Part 4 Continued from "Flowchart 2.4-No Power, Part 3." Y Done Replace the following items (if applicable). Check notebook operation after each replacement: 1. Troubleshooting Open notebook. Y Loose or damaged parts? N Reseat loose components and boards and replace damaged items. Close notebook and retest. Internal AC adapter 3.
Internal DC-DC converter* 2. System board* *NOTE: Replace these items as a set to prevent shorting out among components. Processor board* 4. N Power on? Maintenance and Service Guide 2-13 Flowchart 2.5-No Power, Part 4 Continued from "Flowchart 2.4-No Power, Part 3." Y Done Replace the following items (if applicable). Check notebook operation after each replacement: 1. Troubleshooting Open notebook. Y Loose or damaged parts? N Reseat loose components and boards and replace damaged items. Close notebook and retest. Internal AC adapter 3.


