
Wireless Setup Guide
Page 4
... Connection. (The Wireless Network Connection status icon and message are displayed on the taskbar. Complete the wireless network Now that correspond with wireless notebooks and wired desktop PROGRESS CHECK If you successfully complete step 6, all computers on your network can access a Web site. 4 6 Run... the Network Setup Wizard on the screen. Wireless Router Security Level Disable (no security) WEP WPA-PSK On the Wireless Network Connection screen: 1 Select the check box for Allow me to connect to your network.
... Connection. (The Wireless Network Connection status icon and message are displayed on the taskbar. Complete the wireless network Now that correspond with wireless notebooks and wired desktop PROGRESS CHECK If you successfully complete step 6, all computers on your network can access a Web site. 4 6 Run... the Network Setup Wizard on the screen. Wireless Router Security Level Disable (no security) WEP WPA-PSK On the Wireless Network Connection screen: 1 Select the check box for Allow me to connect to your network.

HP USB Digital Drive
Page 9
Gently unplug the Digital Drive from the USB port. ✎ If the USB connector cable is flashing. 1. A dialog box displays a list of connected devices. 2. Select the "Safely Remove Hardware" icon on your taskbar. Select the Digital Drive and wait until the "Safe to remove the Digital Drive when the status light on the Digital Drive is in the extended position, return it on its track for safe storage. 8 User Guide Disconnecting the Digital Drive ✎ Do not attempt to Remove Hardware" message appears on your screen. 3.
Gently unplug the Digital Drive from the USB port. ✎ If the USB connector cable is flashing. 1. A dialog box displays a list of connected devices. 2. Select the "Safely Remove Hardware" icon on your taskbar. Select the Digital Drive and wait until the "Safe to remove the Digital Drive when the status light on the Digital Drive is in the extended position, return it on its track for safe storage. 8 User Guide Disconnecting the Digital Drive ✎ Do not attempt to Remove Hardware" message appears on your screen. 3.
Backup and Recovery - Windows Vista
Page 6
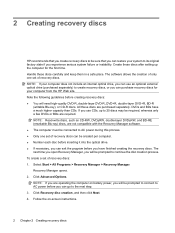
... serious system failure or instability. The software allows the creation of only one set of recovery discs: 1. All these discs are operating the computer on -screen instructions. 2 Chapter 2 Creating recovery discs Recovery Manager opens. 2. Click Advanced Options. DVDs and BDs have finished creating the recovery discs. NOTE: If you can be...
... serious system failure or instability. The software allows the creation of only one set of recovery discs: 1. All these discs are operating the computer on -screen instructions. 2 Chapter 2 Creating recovery discs Recovery Manager opens. 2. Click Advanced Options. DVDs and BDs have finished creating the recovery discs. NOTE: If you can be...

Backup and Recovery - Windows Vista
Page 9
...● Back up templates stored in their associated programs. ● Save customized settings in a window, toolbar, or menu bar by taking a screen shot of recovery discs using Recovery Manager. ● Create system restore points using the Windows® System Restore feature, and periodically copy them to... reset your settings. Copy the screen: To copy only the active window, press alt+fn+prt sc. c. To copy the screen and paste it into a word-processing document, follow these steps: a. To copy the entire...
...● Back up templates stored in their associated programs. ● Save customized settings in a window, toolbar, or menu bar by taking a screen shot of recovery discs using Recovery Manager. ● Create system restore points using the Windows® System Restore feature, and periodically copy them to... reset your settings. Copy the screen: To copy only the active window, press alt+fn+prt sc. c. To copy the screen and paste it into a word-processing document, follow these steps: a. To copy the entire...
Backup and Recovery - Windows Vista
Page 10
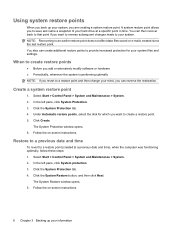
...5. Under Automatic restore points, select the disk for your system files and settings. The System Protection window opens. 6. Follow the on -screen instructions. You can reverse the restoration. Select Start > Control Panel > System and Maintenance > System. 2. A system restore point allows ...you to a restore point (created at a specific point in time. Click the System Protection tab. 4. Follow the on -screen instructions. 6 Chapter 3 Backing up your system, you are creating a system restore point. Select Start > Control Panel > System and Maintenance >...
...5. Under Automatic restore points, select the disk for your system files and settings. The System Protection window opens. 6. Follow the on -screen instructions. You can reverse the restoration. Select Start > Control Panel > System and Maintenance > System. 2. A system restore point allows ...you to a restore point (created at a specific point in time. Click the System Protection tab. 4. Follow the on -screen instructions. 6 Chapter 3 Backing up your system, you are creating a system restore point. Select Start > Control Panel > System and Maintenance >...
Backup and Recovery - Windows Vista
Page 11
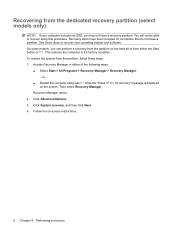
... discs have been included with this computer must be downloaded from the manufacturer's Web site or reinstalled from a dedicated recovery partition (select models only) on -screen instructions. Back up . Software not provided with your operating system and software. Follow the on the hard drive. Recovery Manager works from recovery discs or...
... discs have been included with this computer must be downloaded from the manufacturer's Web site or reinstalled from a dedicated recovery partition (select models only) on -screen instructions. Back up . Software not provided with your operating system and software. Follow the on the hard drive. Recovery Manager works from recovery discs or...
Backup and Recovery - Windows Vista
Page 12
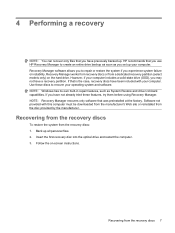
... from the partition, follow these discs to recover your computer includes an SSD, you can perform a recovery from the partition on the screen. Click Advanced Options. 3. Then select Recovery Manager. Recovery Manager opens. 2. On some models, you may not have a partition. ...or - ● Restart the computer and press f11 while the "Press for computers that do not have a recovery partition. Follow the on-screen instructions. 8 Chapter 4 Performing a recovery Use these steps: 1. Click System recovery, and then click Next. 4. Recovering from the dedicated recovery partition...
... from the partition, follow these discs to recover your computer includes an SSD, you can perform a recovery from the partition on the screen. Click Advanced Options. 3. Then select Recovery Manager. Recovery Manager opens. 2. On some models, you may not have a partition. ...or - ● Restart the computer and press f11 while the "Press for computers that do not have a recovery partition. Follow the on-screen instructions. 8 Chapter 4 Performing a recovery Use these steps: 1. Click System recovery, and then click Next. 4. Recovering from the dedicated recovery partition...

Drives - Windows Vista
Page 10
... of your permission or password for all media and devices check box at the upper left pane, click Device Manager. The number of the computer screen is displayed on the DVD Region tab. NOTE: Windows includes the User Account Control feature to prevent the automatic playing of copyrightprotected material, including computer...
... of your permission or password for all media and devices check box at the upper left pane, click Device Manager. The number of the computer screen is displayed on the DVD Region tab. NOTE: Windows includes the User Account Control feature to prevent the automatic playing of copyrightprotected material, including computer...

Drives - Windows Vista
Page 11
... because after the information is the same as Windows Media Player or CyberLink Power2Go to copy into the drive. CAUTION: To prevent loss of the screen. 4. Do not copy directly from a source disc to a destination disc or from the optical drive and insert a blank disc into the optical drive. 3. To burn...
... because after the information is the same as Windows Media Player or CyberLink Power2Go to copy into the drive. CAUTION: To prevent loss of the screen. 4. Do not copy directly from a source disc to a destination disc or from the optical drive and insert a blank disc into the optical drive. 3. To burn...
Drives - Windows Vista
Page 13
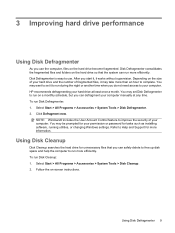
To run Disk Cleanup: 1. Refer to Help and Support for unnecessary files that the system can run on -screen instructions. You may want to set Disk Defragmenter to run more efficiently. Follow the on a monthly schedule, but you can safely delete to free up ...
To run Disk Cleanup: 1. Refer to Help and Support for unnecessary files that the system can run on -screen instructions. You may want to set Disk Defragmenter to run more efficiently. Follow the on a monthly schedule, but you can safely delete to free up ...
Drives - Windows Vista
Page 21
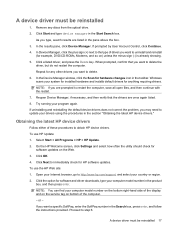
... immediately check for software and driver downloads, type your drivers using the procedures in the product box, and then press enter. On the HP Welcome screen, click Settings and select how often the utility should check for anything requiring drivers. Click OK. 4. Proceed to delete the driver, but do not restart...
... immediately check for software and driver downloads, type your drivers using the procedures in the product box, and then press enter. On the HP Welcome screen, click Settings and select how often the utility should check for anything requiring drivers. Click OK. 4. Proceed to delete the driver, but do not restart...
Drives - Windows Vista
Page 22
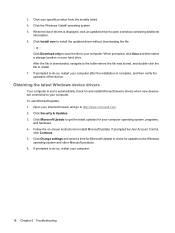
or - When prompted, click Save and then select a storage location on -screen instructions to your computer. Click Microsoft Update to http://www.microsoft.com. 2. Open your Internet browser and go to get the latest updates for your ...
or - When prompted, click Save and then select a storage location on -screen instructions to your computer. Click Microsoft Update to http://www.microsoft.com. 2. Open your Internet browser and go to get the latest updates for your ...
Notebook Tour - Windows Vista
Page 8
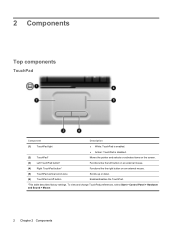
... Component Description (1) TouchPad light ● White: TouchPad is enabled. ● Amber: TouchPad is disabled. (2) TouchPad* Moves the pointer and selects or activates items on the screen. (3) Left TouchPad button* Functions like the left button on an external mouse. (4) Right TouchPad button* Functions like the right button on an external mouse. (5) TouchPad...
... Component Description (1) TouchPad light ● White: TouchPad is enabled. ● Amber: TouchPad is disabled. (2) TouchPad* Moves the pointer and selects or activates items on the screen. (3) Left TouchPad button* Functions like the left button on an external mouse. (4) Right TouchPad button* Functions like the right button on an external mouse. (5) TouchPad...

Notebook Tour - Windows Vista
Page 18
... water, cleaning fluids, or chemicals on the front of the computer is visible whether the computer is open . If the screen requires additional cleaning, use premoistened antistatic wipes or an antistatic screen cleaner. The light on the power button is visible only when the computer is enabled. *The 2 power lights display the...
... water, cleaning fluids, or chemicals on the front of the computer is visible whether the computer is open . If the screen requires additional cleaning, use premoistened antistatic wipes or an antistatic screen cleaner. The light on the power button is visible only when the computer is enabled. *The 2 power lights display the...
Pointing Devices and Keyboard - Windows Vista
Page 3
... Support (fn+f1 4 Opening the Print Options window (fn+f2 4 Opening a Web browser (fn+f3 5 Switching the screen image (fn+f4 5 Initiating Hibernation (fn+f5 6 Initiating QuickLock (fn+f6 6 Decreasing screen brightness (fn+f7 6 Increasing screen brightness (fn+f8 6 Playing, pausing or resuming an audio CD or a DVD (fn+f9 6 Stopping an audio...
... Support (fn+f1 4 Opening the Print Options window (fn+f2 4 Opening a Web browser (fn+f3 5 Switching the screen image (fn+f4 5 Initiating Hibernation (fn+f5 6 Initiating QuickLock (fn+f6 6 Decreasing screen brightness (fn+f7 6 Increasing screen brightness (fn+f8 6 Playing, pausing or resuming an audio CD or a DVD (fn+f9 6 Stopping an audio...
Pointing Devices and Keyboard - Windows Vista
Page 5
... Component Description (1) TouchPad light ● White: TouchPad is enabled. ● Amber: TouchPad is disabled. (2) TouchPad* Moves the pointer and selects or activates items on the screen. (3) Left TouchPad button* Functions like the left button on an external mouse. (4) Right TouchPad button* Functions like the right button on an external mouse. (5) TouchPad...
... Component Description (1) TouchPad light ● White: TouchPad is enabled. ● Amber: TouchPad is disabled. (2) TouchPad* Moves the pointer and selects or activates items on the screen. (3) Left TouchPad button* Functions like the left button on an external mouse. (4) Right TouchPad button* Functions like the right button on an external mouse. (5) TouchPad...

Pointing Devices and Keyboard - Windows Vista
Page 7
Open Help and Support. Switch the screen image. Initiate Hibernation. Increase screen brightness. Function Display system information. Open the Print Options window. Initiate QuickLock. Hotkey functions and procedures are combinations of the fn key (1) and the esc ...key (2), one of the function keys (3), or one of the volume keys (4). Open a Web browser. Decrease screen brightness. Hotkey fn+esc fn+f1 fn+f2 fn+f3 fn+f4 fn+f5 fn+f6 fn+f7 fn+f8 Using hotkeys 3 The icons on...
Open Help and Support. Switch the screen image. Initiate Hibernation. Increase screen brightness. Function Display system information. Open the Print Options window. Initiate QuickLock. Hotkey functions and procedures are combinations of the fn key (1) and the esc ...key (2), one of the function keys (3), or one of the volume keys (4). Open a Web browser. Decrease screen brightness. Hotkey fn+esc fn+f1 fn+f2 fn+f3 fn+f4 fn+f5 fn+f6 fn+f7 fn+f8 Using hotkeys 3 The icons on...
Pointing Devices and Keyboard - Windows Vista
Page 9
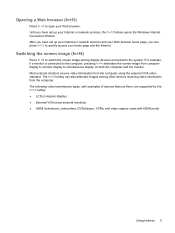
... the monitor. Most external monitors receive video information from computer display to monitor display to the computer, pressing fn+f4 alternates the screen image from the computer using the external VGA video standard. Until you can also alternate images among display devices connected to quickly access...page, you have set up your home page and the Internet. Opening a Web browser (fn+f3) Press fn+f3 to switch the screen image among other devices receiving video information from the computer. The following video transmission types, with examples of devices that use them, are ...
... the monitor. Most external monitors receive video information from computer display to monitor display to the computer, pressing fn+f4 alternates the screen image from the computer using the external VGA video standard. Until you can also alternate images among display devices connected to quickly access...page, you have set up your home page and the Internet. Opening a Web browser (fn+f3) Press fn+f3 to switch the screen image among other devices receiving video information from the computer. The following video transmission types, with examples of devices that use them, are ...

Pointing Devices and Keyboard - Windows Vista
Page 10
...initiating Hibernation. QuickLock protects your information is saved to decrease the brightness level incrementally. Hold down the hotkey to a hibernation file on the screen to display the Log On window and lock the computer. Stopping an audio CD or a DVD (fn+f10) Press fn+f10 to pause... instructions on the hard drive and the computer turns off. To exit Hibernation, press the power button. For instructions, refer to increase screen brightness. Increasing screen brightness (fn+f8) Press fn+f8 to Help and Support. Playing previous track or section of an audio CD or a DVD (fn...
...initiating Hibernation. QuickLock protects your information is saved to decrease the brightness level incrementally. Hold down the hotkey to a hibernation file on the screen to display the Log On window and lock the computer. Stopping an audio CD or a DVD (fn+f10) Press fn+f10 to pause... instructions on the hard drive and the computer turns off. To exit Hibernation, press the power button. For instructions, refer to increase screen brightness. Increasing screen brightness (fn+f8) Press fn+f8 to Help and Support. Playing previous track or section of an audio CD or a DVD (fn...

Pointing Devices and Keyboard - Windows Vista
Page 14
... the risk of compressed air with a damp cloth, and wash your hands frequently when using the computer. A vacuum cleaner could deposit household debris on the screen. To avoid this, clean the TouchPad with a straw extension can be used to blow air around and under the keys to jump around on the...
... the risk of compressed air with a damp cloth, and wash your hands frequently when using the computer. A vacuum cleaner could deposit household debris on the screen. To avoid this, clean the TouchPad with a straw extension can be used to blow air around and under the keys to jump around on the...


