Presario CQ60 No Screen - Compaq 100 Notebook PC
Presario CQ60 No Screen
View Results Below
Free Compaq Presario CQ60-100 manuals!
Problems with Compaq Presario CQ60-100?
Ask a Question
Free Compaq Presario CQ60-100 manuals!
Problems with Compaq Presario CQ60-100?
Ask a Question
Related Manual Pages


Related Videos

Compaq Presario CQ60-615DX Unboxing
Duration: 3:12
Total Views: 7,084
Duration: 3:12
Total Views: 7,084
Similar Questions

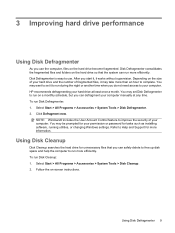
Black Screen On Defrag
When ask to reboot on defragment to complete the process, Black screen on reboot.
When ask to reboot on defragment to complete the process, Black screen on reboot.
(Posted by fab15jef 9 years ago)

The Cq60-615dx Turns On But The Screen Is Blank. It Dose Light Up But Stays Blan
i turn on the laptop and the screen turns on but stays blank.
i turn on the laptop and the screen turns on but stays blank.
(Posted by sakuracha26 11 years ago)

Print Screen
my prt sc(print screen is not functioning how do i fix it
my prt sc(print screen is not functioning how do i fix it
(Posted by geletahaile 11 years ago)
Screen Keeps Going Into Sleep Mode How Do I Change That I Tried Resetting Bios?
i reset bios and ram drive still nothing please help
i reset bios and ram drive still nothing please help
(Posted by nicky143babylnj 11 years ago)