Maintenance and Service Guide
Page 6
... Hard drive ...43 Keyboard ...46 Top cover ...49 Power button board 53 TouchPad button board 54 USB board ...56 Power connector cable 57 Speakers ...59 Optical drive connector cable 60 Display assembly ...61 System board ...68 RTC battery ...71 Fan/heat sink assembly 73 Processor ...79 5 Setup Utility (BIOS) and System Diagnostics 81 Using Setup Utility ...81 Starting Setup Utility 81 Changing the language of Setup Utility 81 Navigating and selecting in Setup Utility 82 Displaying system information 82 Restoring factory settings in Setup Utility 83 Exiting Setup Utility 83 Updating...
... Hard drive ...43 Keyboard ...46 Top cover ...49 Power button board 53 TouchPad button board 54 USB board ...56 Power connector cable 57 Speakers ...59 Optical drive connector cable 60 Display assembly ...61 System board ...68 RTC battery ...71 Fan/heat sink assembly 73 Processor ...79 5 Setup Utility (BIOS) and System Diagnostics 81 Using Setup Utility ...81 Starting Setup Utility 81 Changing the language of Setup Utility 81 Navigating and selecting in Setup Utility 82 Displaying system information 82 Restoring factory settings in Setup Utility 83 Exiting Setup Utility 83 Updating...
Maintenance and Service Guide
Page 19
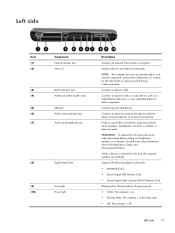
... Capacity (SDHC) Memory Card Blinking white: The hard drive is being accessed. ● White: The computer is on. ● Blinking white: The computer is in (microphone) jack Audio-out (headphone) jack Digital Media Slot Drive light Power light Description Connects an external VGA monitor or projector. Connect optional USB devices. Enable airflow to cycle on headphones, earbuds, or a headset. Left side Item (1) (2) (3) (4) (5) (6) (7) (8) (9) (10) Component External monitor port Vents (2) RJ-45 (network) jack HDMI port (select models only) USB port Audio-in the Sleep state. ●...
... Capacity (SDHC) Memory Card Blinking white: The hard drive is being accessed. ● White: The computer is on. ● Blinking white: The computer is in (microphone) jack Audio-out (headphone) jack Digital Media Slot Drive light Power light Description Connects an external VGA monitor or projector. Connect optional USB devices. Enable airflow to cycle on headphones, earbuds, or a headset. Left side Item (1) (2) (3) (4) (5) (6) (7) (8) (9) (10) Component External monitor port Vents (2) RJ-45 (network) jack HDMI port (select models only) USB port Audio-in the Sleep state. ●...
Maintenance and Service Guide
Page 20
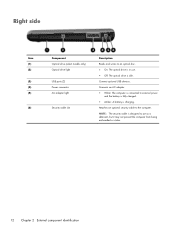
... cable is designed to the computer. Connect optional USB devices. Connects an AC adapter. ● White: The computer is connected to an optical disc. ● On: The optical drive is in use. ● Off: The optical drive is idle. Right side Item (1) (2) (3) (4) (5) (6) Component Optical drive (select models only) Optical drive light USB ports (2) Power connector AC adapter light Security cable slot Description Reads and writes to external power and the battery is fully charged. ● Amber: A battery is charging...
... cable is designed to the computer. Connect optional USB devices. Connects an AC adapter. ● White: The computer is connected to an optical disc. ● On: The optical drive is in use. ● Off: The optical drive is idle. Right side Item (1) (2) (3) (4) (5) (6) Component Optical drive (select models only) Optical drive light USB ports (2) Power connector AC adapter light Security cable slot Description Reads and writes to external power and the battery is fully charged. ● Amber: A battery is charging...
Maintenance and Service Guide
Page 51
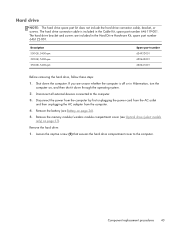
... 36). 5. Disconnect all external devices connected to the computer. Description 500-GB, 5400-rpm 320-GB, 5400-rpm 250-GB, 5400-rpm Spare part number 634932-001 622643-001 622641-001 Before removing the hard drive, follow these steps: 1. Remove the memory module/wireless module compartment cover (see Battery on page 37). Remove the hard drive: 1. Hard drive NOTE: The hard drive spare part kit does not include the hard drive connector cable, bracket, or screws...
... 36). 5. Disconnect all external devices connected to the computer. Description 500-GB, 5400-rpm 320-GB, 5400-rpm 250-GB, 5400-rpm Spare part number 634932-001 622643-001 622641-001 Before removing the hard drive, follow these steps: 1. Remove the memory module/wireless module compartment cover (see Battery on page 37). Remove the hard drive: 1. Hard drive NOTE: The hard drive spare part kit does not include the hard drive connector cable, bracket, or screws...
Maintenance and Service Guide
Page 89
... external keyboard or mouse connected to a USB port can prevent the computer from operating properly. When a confirmation prompt with Setup Utility only if USB legacy support is displayed, press enter. 5. Use the arrow keys to select a language, and then press enter. 4. Use the arrow keys to select System Configuration > Language, and then press enter. 3. Using Setup Utility 81 Changing the language of the screen. 2. Start Setup Utility. 2. 5 Setup Utility (BIOS) and System Diagnostics Using Setup Utility Setup Utility, or Basic Input/Output System (BIOS), controls...
... external keyboard or mouse connected to a USB port can prevent the computer from operating properly. When a confirmation prompt with Setup Utility only if USB legacy support is displayed, press enter. 5. Use the arrow keys to select a language, and then press enter. 4. Use the arrow keys to select System Configuration > Language, and then press enter. 3. Using Setup Utility 81 Changing the language of the screen. 2. Start Setup Utility. 2. 5 Setup Utility (BIOS) and System Diagnostics Using Setup Utility Setup Utility, or Basic Input/Output System (BIOS), controls...
Maintenance and Service Guide
Page 91
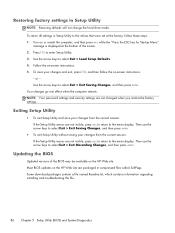
... Setup Utility menus are packaged in compressed files called SoftPaqs. Then use the arrow keys to select Exit > Exit Discarding Changes, and then press enter. Using Setup Utility 83 Your changes go into effect when the computer restarts. Use the arrow keys to select Exit > Exit Saving Changes, and then press enter. or - To return all settings in Setup Utility NOTE: Restoring defaults will not change the hard drive mode. Most BIOS updates on -screen instructions. 5. Restoring factory settings in Setup Utility...
... Setup Utility menus are packaged in compressed files called SoftPaqs. Then use the arrow keys to select Exit > Exit Discarding Changes, and then press enter. Using Setup Utility 83 Your changes go into effect when the computer restarts. Use the arrow keys to select Exit > Exit Saving Changes, and then press enter. or - To return all settings in Setup Utility NOTE: Restoring defaults will not change the hard drive mode. Most BIOS updates on -screen instructions. 5. Restoring factory settings in Setup Utility...
Maintenance and Service Guide
Page 92
... location on your hard drive where the BIOS update is connected to a network, consult the network administrator before installing any device, cable, or cord. 1. BIOS version information (also known as ROM date and System BIOS) can be displayed by using the AC adapter. Start Setup Utility (BIOS). 2. Do not insert, remove, connect, or disconnect any software updates, especially system BIOS updates. 84 Chapter 5 Setup Utility (BIOS) and System Diagnostics Make a note of the date, name, or other identifier. Follow the on-screen instructions...
... location on your hard drive where the BIOS update is connected to a network, consult the network administrator before installing any device, cable, or cord. 1. BIOS version information (also known as ROM date and System BIOS) can be displayed by using the AC adapter. Start Setup Utility (BIOS). 2. Do not insert, remove, connect, or disconnect any software updates, especially system BIOS updates. 84 Chapter 5 Setup Utility (BIOS) and System Diagnostics Make a note of the date, name, or other identifier. Follow the on-screen instructions...
Maintenance and Service Guide
Page 93
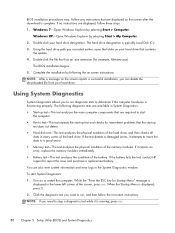
... problems that has an .exe extension (for Startup Menu" message is functioning properly. Windows 7-Open Windows Explorer by selecting Start > My Computer. 2. Windows XP-Open Windows Explorer by selecting Start > Computer. Using the hard drive path you recorded earlier, open the folder on your hard drive designation. If the battery fails the test, contact HP support to a good sector. ● Memory test-This test analyzes the physical condition of the hard drive. Turn on -screen instructions...
... problems that has an .exe extension (for Startup Menu" message is functioning properly. Windows 7-Open Windows Explorer by selecting Start > My Computer. 2. Windows XP-Open Windows Explorer by selecting Start > Computer. Using the hard drive path you recorded earlier, open the folder on your hard drive designation. If the battery fails the test, contact HP support to a good sector. ● Memory test-This test analyzes the physical condition of the hard drive. Turn on -screen instructions...
Maintenance and Service Guide
Page 97
... information ● Recovering a program or driver Restore In the event of hard drive failure, to its factory image you will need to restore your system to restore your system, this can create using the HP Recovery partition (select models only), without the need for the presence of recovery discs or a recovery flash drive that was preinstalled at the factory. CAUTION: HP Recovery Manager (partition, or discs/flash drive) restores only software that you need a set of recovery discs or a recovery flash drive immediately after software setup. If for...
... information ● Recovering a program or driver Restore In the event of hard drive failure, to its factory image you will need to restore your system to restore your system, this can create using the HP Recovery partition (select models only), without the need for the presence of recovery discs or a recovery flash drive that was preinstalled at the factory. CAUTION: HP Recovery Manager (partition, or discs/flash drive) restores only software that you need a set of recovery discs or a recovery flash drive immediately after software setup. If for...
Maintenance and Service Guide
Page 113
... 11 light components 9 lights AC adapter 12 caps lock 9 drive 11 optical drive 12 power 9, 11 TouchPad 9, 10 webcam 6 wireless 9 M mass storage device precautions 30 removal 43 spare part numbers 22, 43 memory module product description 2 removal 42 spare part numbers 19, 25, 26, 42 memory module compartment 13 memory module/wireless module compartment cover illustrated 24 removal 37 microphone location 6 product description 3 microphone jack 11 microphone module removal 63 spare part number 21, 26, 63 model description 15, 35 model name 1 monitor port 11 N network jack 11 O operating system...
... 11 light components 9 lights AC adapter 12 caps lock 9 drive 11 optical drive 12 power 9, 11 TouchPad 9, 10 webcam 6 wireless 9 M mass storage device precautions 30 removal 43 spare part numbers 22, 43 memory module product description 2 removal 42 spare part numbers 19, 25, 26, 42 memory module compartment 13 memory module/wireless module compartment cover illustrated 24 removal 37 microphone location 6 product description 3 microphone jack 11 microphone module removal 63 spare part number 21, 26, 63 model description 15, 35 model name 1 monitor port 11 N network jack 11 O operating system...
Maintenance and Service Guide
Page 114
... 79 spare part numbers 18, 25, 26, 79 product description audio 3 chipset 1 display panel 2 Ethernet 3 external media cards 4 graphics 1 hard drives 2 keyboard 4 memory module 2 microphone 3 operating system 5 optical drive 3 pointing device 4 ports 4 power requirements 4 processors 1 product name 1 security 5 serviceability 5 video 3 wireless 3 product name 1, 14, 34 product number 15, 34 R removal/replacement preliminaries 29 procedures 34 right-side components RJ-45 jack 11 RTC battery removal 71 spare part number 12 18, 28, 71 S Screw Kit, spare part number 23, 28 security cable slot 12...
... 79 spare part numbers 18, 25, 26, 79 product description audio 3 chipset 1 display panel 2 Ethernet 3 external media cards 4 graphics 1 hard drives 2 keyboard 4 memory module 2 microphone 3 operating system 5 optical drive 3 pointing device 4 ports 4 power requirements 4 processors 1 product name 1 security 5 serviceability 5 video 3 wireless 3 product name 1, 14, 34 product number 15, 34 R removal/replacement preliminaries 29 procedures 34 right-side components RJ-45 jack 11 RTC battery removal 71 spare part number 12 18, 28, 71 S Screw Kit, spare part number 23, 28 security cable slot 12...
Presario CQ57 Notebook PC Maintenance and Service Guide
Page 20
... audio component. Supports the following digital card formats: ● MultiMediaCard ● Secure Digital (SD) Memory Card ● Secure Digital High Capacity (SDHC) Memory Card Blinking white: The hard drive is being accessed. ● White: The computer is on. ● Blinking white: The computer is in (microphone) jack (7) Audio-out (headphone) jack (8) Digital Media Slot (9) (10) Drive light Power light 12 Chapter 2 External component identification Description Connects an external VGA monitor or projector. When a device is off during routine operation...
... audio component. Supports the following digital card formats: ● MultiMediaCard ● Secure Digital (SD) Memory Card ● Secure Digital High Capacity (SDHC) Memory Card Blinking white: The hard drive is being accessed. ● White: The computer is on. ● Blinking white: The computer is in (microphone) jack (7) Audio-out (headphone) jack (8) Digital Media Slot (9) (10) Drive light Power light 12 Chapter 2 External component identification Description Connects an external VGA monitor or projector. When a device is off during routine operation...
Presario CQ57 Notebook PC Maintenance and Service Guide
Page 27
... subsystem with an Intel processor 646135-001 RTC battery (includes cable and double-sided tape) 646132-001 Processor (includes replacement thermal material): Computer major components 19 USB board (includes cable) 646128-001 Power connector cable 646121-001 Plastics Kit, includes: 646131-001 Hard drive compartment cover (includes one captive screw, secured by a C-clip) Memory module/wireless module compartment cover (includes one captive screw, secured by a C-clip...
... subsystem with an Intel processor 646135-001 RTC battery (includes cable and double-sided tape) 646132-001 Processor (includes replacement thermal material): Computer major components 19 USB board (includes cable) 646128-001 Power connector cable 646121-001 Plastics Kit, includes: 646131-001 Hard drive compartment cover (includes one captive screw, secured by a C-clip) Memory module/wireless module compartment cover (includes one captive screw, secured by a C-clip...
Presario CQ57 Notebook PC Maintenance and Service Guide
Page 54
... the Cable Kit, spare part number 646119-001. Remove the battery (see Optical drive (select models only) on page 39). 5. Hard drive NOTE: The hard drive spare part kit does not include the hard drive connector cable, bracket, or screws. The hard drive connector cable is off or in the Hard Drive Hardware Kit, spare part number 646122-001. Disconnect all external devices connected to the computer. 46 Chapter 4 Removal and replacement procedures Shut down through the operating system...
... the Cable Kit, spare part number 646119-001. Remove the battery (see Optical drive (select models only) on page 39). 5. Hard drive NOTE: The hard drive spare part kit does not include the hard drive connector cable, bracket, or screws. The hard drive connector cable is off or in the Hard Drive Hardware Kit, spare part number 646122-001. Disconnect all external devices connected to the computer. 46 Chapter 4 Removal and replacement procedures Shut down through the operating system...
Presario CQ57 Notebook PC Maintenance and Service Guide
Page 92
... the ESC key for the types of peripherals installed, the startup sequence of the computer, and the amount of Setup Utility 1. When a confirmation prompt with Setup Utility only if USB legacy support is enabled. Turn on the system (such as disk drives, display, keyboard, mouse, and printer). Errors can be used with your change takes effect immediately. 84 Chapter 5 Setup Utility (BIOS) and System Diagnostics Start Setup Utility. 2. Setup Utility includes settings for Startup Menu" message is displayed, press enter. 5. Changing the language of...
... the ESC key for the types of peripherals installed, the startup sequence of the computer, and the amount of Setup Utility 1. When a confirmation prompt with Setup Utility only if USB legacy support is enabled. Turn on the system (such as disk drives, display, keyboard, mouse, and printer). Errors can be used with your change takes effect immediately. 84 Chapter 5 Setup Utility (BIOS) and System Diagnostics Start Setup Utility. 2. Setup Utility includes settings for Startup Menu" message is displayed, press enter. 5. Changing the language of...
Presario CQ57 Notebook PC Maintenance and Service Guide
Page 94
... key for Startup Menu" message is displayed at the factory, follow the on-screen instructions. - or - To return all settings in Setup Utility NOTE: Restoring defaults will not change the hard drive mode. To save your changes from the current session: If the Setup Utility menus are not visible, press esc to return to the menu display. Then use the arrow keys to select Exit > Exit Saving Changes, and then press enter. ● To exit Setup Utility...
... key for Startup Menu" message is displayed at the factory, follow the on-screen instructions. - or - To return all settings in Setup Utility NOTE: Restoring defaults will not change the hard drive mode. To save your changes from the current session: If the Setup Utility menus are not visible, press esc to return to the menu display. Then use the arrow keys to select Exit > Exit Saving Changes, and then press enter. ● To exit Setup Utility...

Presario CQ57 Notebook PC Maintenance and Service Guide
Page 95
Windows 7-Select Start > Help and Support > Maintain. Follow the on-screen instructions to identify your computer and access the BIOS update you connect your computer to reliable external power using Setup Utility. 1. b. Identify the BIOS update that is connected to a network, consult the network administrator before installing any device, cable, or cord. 1. Follow the on-screen instructions to download your changes, use the tab key and the arrow keys to install the update. Downloading a BIOS update CAUTION: To reduce the risk of the path to...
Windows 7-Select Start > Help and Support > Maintain. Follow the on-screen instructions to identify your computer and access the BIOS update you connect your computer to reliable external power using Setup Utility. 1. b. Identify the BIOS update that is connected to a network, consult the network administrator before installing any device, cable, or cord. 1. Follow the on-screen instructions to download your changes, use the tab key and the arrow keys to install the update. Downloading a BIOS update CAUTION: To reduce the risk of the path to...
Presario CQ57 Notebook PC Maintenance and Service Guide
Page 96
... that the start System Diagnostics: 1. BIOS installation procedures vary. You can delete the downloaded file from your hard drive designation. Double-click the file that contains the update. 4. To start -up test and checks for Startup Menu" message is functioning properly. Turn on -screen instructions. The hard drive designation is complete. Follow any instructions that are required to report the issue and purchase a replacement battery. If no instructions are displayed, follow...
... that the start System Diagnostics: 1. BIOS installation procedures vary. You can delete the downloaded file from your hard drive designation. Double-click the file that contains the update. 4. To start -up test and checks for Startup Menu" message is functioning properly. Turn on -screen instructions. The hard drive designation is complete. Follow any instructions that are required to report the issue and purchase a replacement battery. If no instructions are displayed, follow...

Presario CQ57 Notebook PC Maintenance and Service Guide
Page 116
... 12 light components 10 lights AC adapter 13 caps lock 10 drive 12 optical drive 13 power 10, 12 TouchPad 10, 11 webcam 7 wireless 10 M mass storage device precautions 33 removal 46 spare part numbers 24, 46 memory module product description 3 removal 45 spare part numbers 21, 28, 45 memory module compartment 14 memory module/wireless module compartment cover illustrated 26 removal 40 microphone location 7 product description 4 microphone jack 12 microphone module removal 66 spare part number 23, 28, 66 model description 16, 38 model name 1 monitor port 12 N network jack 12 O operating...
... 12 light components 10 lights AC adapter 13 caps lock 10 drive 12 optical drive 13 power 10, 12 TouchPad 10, 11 webcam 7 wireless 10 M mass storage device precautions 33 removal 46 spare part numbers 24, 46 memory module product description 3 removal 45 spare part numbers 21, 28, 45 memory module compartment 14 memory module/wireless module compartment cover illustrated 26 removal 40 microphone location 7 product description 4 microphone jack 12 microphone module removal 66 spare part number 23, 28, 66 model description 16, 38 model name 1 monitor port 12 N network jack 12 O operating...
Presario CQ57 Notebook PC Maintenance and Service Guide
Page 117
...spare part numbers 19, 27, 28, 31, 82 product description audio 4 chipset 2 display panel 3 Ethernet 4 external media cards 5 graphics 2 hard drives 3 keyboard 5 memory module 3 microphone 4 operating system 6 optical drive 4 pointing device 5 ports 5 power requirements 6 processors 1 product name 1 security 6 serviceability 6 video 4 wireless 4 product name 1, 15, 37 product number 16, 37 R removal/replacement preliminaries 32 procedures 37 right-side components RJ-45 jack 12 RTC battery removal 74 spare part number 13 19, 30, 74 S Screw Kit, spare part number 25, 30 security cable slot 13...
...spare part numbers 19, 27, 28, 31, 82 product description audio 4 chipset 2 display panel 3 Ethernet 4 external media cards 5 graphics 2 hard drives 3 keyboard 5 memory module 3 microphone 4 operating system 6 optical drive 4 pointing device 5 ports 5 power requirements 6 processors 1 product name 1 security 6 serviceability 6 video 4 wireless 4 product name 1, 15, 37 product number 16, 37 R removal/replacement preliminaries 32 procedures 37 right-side components RJ-45 jack 12 RTC battery removal 74 spare part number 13 19, 30, 74 S Screw Kit, spare part number 25, 30 security cable slot 13...


