Upgrading and Servicing Guide
Page 36
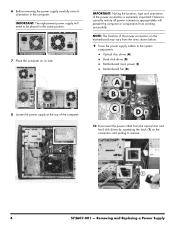
... replacement power supply will prevent the computer or components from working successfully. NOTE: The location of the power connectors on the motherboard may vary from the optical disc and hard disk drives by squeezing the latch (1) on its orientation in the same position.... 7 Place the computer on the connectors and pulling to the system components: Optical disc drives (A) Hard disk drives (B) Motherboard main power (C) Motherboard fan (D). A B C D 10 Disconnect the power cable from the ones shown below. 9 Trace the power supply cables to remove. 1 ...
... replacement power supply will prevent the computer or components from working successfully. NOTE: The location of the power connectors on the motherboard may vary from the optical disc and hard disk drives by squeezing the latch (1) on its orientation in the same position.... 7 Place the computer on the connectors and pulling to the system components: Optical disc drives (A) Hard disk drives (B) Motherboard main power (C) Motherboard fan (D). A B C D 10 Disconnect the power cable from the ones shown below. 9 Trace the power supply cables to remove. 1 ...
Upgrading and Servicing Guide
Page 37
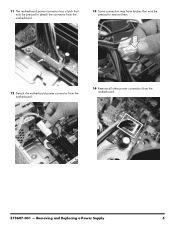
Removing and Replacing a Power Supply 5 11 The motherboard power connector has a latch that must be pressed to detach the connector from the motherboard. 13 Some connectors may have latches that must be pressed to remove them. 12 Detach the motherboard power connector from the motherboard. 14 Remove all other power connectors from the motherboard. 573607-001 -
Removing and Replacing a Power Supply 5 11 The motherboard power connector has a latch that must be pressed to detach the connector from the motherboard. 13 Some connectors may have latches that must be pressed to remove them. 12 Detach the motherboard power connector from the motherboard. 14 Remove all other power connectors from the motherboard. 573607-001 -
Upgrading and Servicing Guide
Page 39
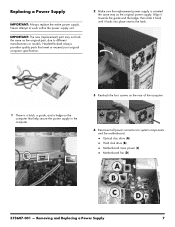
... towards the guide and the ledge, then slide it back until it locks into place next to system components and the motherboard: Optical disc drive (A) Hard disk drive (B) Motherboard main power (C) Motherboard fan (D) A B C D 573607-001 - Removing and Replacing a Power Supply 7 IMPORTANT: The new (replacement) part may not look the same as the original...
... towards the guide and the ledge, then slide it back until it locks into place next to system components and the motherboard: Optical disc drive (A) Hard disk drive (B) Motherboard main power (C) Motherboard fan (D) A B C D 573607-001 - Removing and Replacing a Power Supply 7 IMPORTANT: The new (replacement) part may not look the same as the original...
Upgrading and Servicing Guide
Page 43
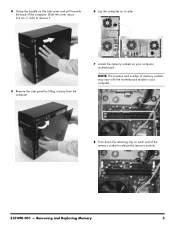
4 Grasp the handle on the side cover and pull towards the back of the memory socket to remove it. 6 Lay the computer on its side. 5 Remove the side panel by lifting it away from the computer. 7 Locate the memory sockets on each end of the computer. NOTE: The location and number of memory sockets may vary with the motherboard model in your computer. 8 Push down the retaining clip on your computer motherboard. Removing and Replacing Memory 3 Slide the cover about 2.4 cm (1 inch) to release the memory module. 537490-001 -
4 Grasp the handle on the side cover and pull towards the back of the memory socket to remove it. 6 Lay the computer on its side. 5 Remove the side panel by lifting it away from the computer. 7 Locate the memory sockets on each end of the computer. NOTE: The location and number of memory sockets may vary with the motherboard model in your computer. 8 Push down the retaining clip on your computer motherboard. Removing and Replacing Memory 3 Slide the cover about 2.4 cm (1 inch) to release the memory module. 537490-001 -


