Resolving Start Up and No Boot Problems Checklist
Page 1
... components Remove memory modules and replace one-at least 15 seconds. 3. Check AC adapter wiring and power connection to resolve problems when computer does not startup or boot properly. Symptom: LEDs blink or computer beeps but computer fails to original condition. Perform a Hard Reset 1. Connect an external monitor to help with diagnostics testing Contact HP for the LEDs to the notebook. If computer does not start Count number of a disk drive and fan turning. Symptom: LED lights...
... components Remove memory modules and replace one-at least 15 seconds. 3. Check AC adapter wiring and power connection to resolve problems when computer does not startup or boot properly. Symptom: LEDs blink or computer beeps but computer fails to original condition. Perform a Hard Reset 1. Connect an external monitor to help with diagnostics testing Contact HP for the LEDs to the notebook. If computer does not start Count number of a disk drive and fan turning. Symptom: LED lights...
Resolving Start Up and No Boot Problems Checklist
Page 2
... Windows Update www.update.microsoft.com for terms in error message Boot to BIOS mode (f10) and Restore the BIOS defaults (f9) Boot to BIOS mode (f10) and run Hard Drive Test Boot to Windows Advanced boot options (f8) and select Last Known Good Configuration (Advanced) Boot to Windows Advanced boot options (f8) and select Boot into Safe Mode and then Uninstall recently installed programs Symptom: Update Your Computer After Troubleshooting A Problem When the computer starts into Windows normally, you should install the latest updates...
... Windows Update www.update.microsoft.com for terms in error message Boot to BIOS mode (f10) and Restore the BIOS defaults (f9) Boot to BIOS mode (f10) and run Hard Drive Test Boot to Windows Advanced boot options (f8) and select Last Known Good Configuration (Advanced) Boot to Windows Advanced boot options (f8) and select Boot into Safe Mode and then Uninstall recently installed programs Symptom: Update Your Computer After Troubleshooting A Problem When the computer starts into Windows normally, you should install the latest updates...
Getting Started - Windows 7
Page 11
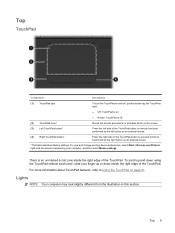
... (1) TouchPad light (2) TouchPad zone* To turn the TouchPad on and off . There is off , quickly double-tap the TouchPad light. ● Off: TouchPad is on. ● Amber: TouchPad is an unmarked scroll zone inside the right edge of the TouchPad button to Using the TouchPad on an external mouse. *This table describes factory settings. For more information about TouchPad features, refer to execute functions performed by the left button on an external mouse. (4) Right TouchPad button...
... (1) TouchPad light (2) TouchPad zone* To turn the TouchPad on and off . There is off , quickly double-tap the TouchPad light. ● Off: TouchPad is on. ● Amber: TouchPad is an unmarked scroll zone inside the right edge of the TouchPad button to Using the TouchPad on an external mouse. *This table describes factory settings. For more information about TouchPad features, refer to execute functions performed by the left button on an external mouse. (4) Right TouchPad button...
Getting Started - Windows 7
Page 22
... enabling or disabling Windows Firewall, choose to enable the firewall. To set up a new Internet account or configure the computer to use an existing account: ● Internet Services & Offers (available in some locations)-These icons may be displayed either individually on the Windows desktop or grouped in the notification area, at the far right of the taskbar. 4. To access the Windows Connect to the Internet Wizard and instructions for a new Internet...
... enabling or disabling Windows Firewall, choose to enable the firewall. To set up a new Internet account or configure the computer to use an existing account: ● Internet Services & Offers (available in some locations)-These icons may be displayed either individually on the Windows desktop or grouped in the notification area, at the far right of the taskbar. 4. To access the Windows Connect to the Internet Wizard and instructions for a new Internet...
Getting Started - Windows 7
Page 27
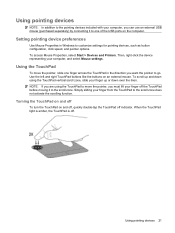
... scrolling function. Using pointing devices 21 To access Mouse Properties, select Start > Devices and Printers. Simply sliding your computer, and select Mouse settings. Turning the TouchPad on and off To turn the TouchPad on and off, quickly double-tap the TouchPad off . To scroll up and down using the TouchPad to move the pointer, slide one of the USB ports on an external mouse. When the TouchPad light is amber, the TouchPad is off indicator. Setting pointing device preferences Use Mouse...
... scrolling function. Using pointing devices 21 To access Mouse Properties, select Start > Devices and Printers. Simply sliding your computer, and select Mouse settings. Turning the TouchPad on and off To turn the TouchPad on and off, quickly double-tap the TouchPad off . To scroll up and down using the TouchPad to move the pointer, slide one of the USB ports on an external mouse. When the TouchPad light is amber, the TouchPad is off indicator. Setting pointing device preferences Use Mouse...
Compaq Presario CQ56 Notebook PC and HP G56 Notebook PC - Maintenance and Service Guide
Page 11
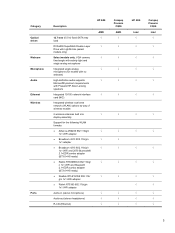
...; √ √ Compaq Presario CQ56 Intel √ √ √ √ √ 3 VGA camera, fixed angle with activity light and single analog microphone Integrated single analog microphone (for models with no webcam) High-definition audio supports Microsoft® premium requirements with Presario/HP Altec Lansing speakers Integrated 10/100 network interface card (NIC) Integrated wireless local area network (WLAN) options by way of wireless module: 2 wireless antennas built into display assembly Support for the following...
...; √ √ Compaq Presario CQ56 Intel √ √ √ √ √ 3 VGA camera, fixed angle with activity light and single analog microphone Integrated single analog microphone (for models with no webcam) High-definition audio supports Microsoft® premium requirements with Presario/HP Altec Lansing speakers Integrated 10/100 network interface card (NIC) Integrated wireless local area network (WLAN) options by way of wireless module: 2 wireless antennas built into display assembly Support for the following...
Compaq Presario CQ56 Notebook PC and HP G56 Notebook PC - Maintenance and Service Guide
Page 69
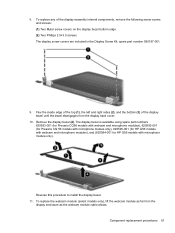
... internal components, remove the following screw covers and screws: (1) Two Mylar screw covers on the display bezel bottom edge (2) Two Phillips 2.5×3.0 screws The display screw covers are included in the Display Screw Kit, spare part number 595197-001. 9. Remove the display bezel (4). Component replacement procedures 61 The display bezel is available using spare part numbers 620593-001 (for Presario CQ56 models with webcam and microphone modules), 620592-001 (for Presario CQ 56 models with microphone module...
... internal components, remove the following screw covers and screws: (1) Two Mylar screw covers on the display bezel bottom edge (2) Two Phillips 2.5×3.0 screws The display screw covers are included in the Display Screw Kit, spare part number 595197-001. 9. Remove the display bezel (4). Component replacement procedures 61 The display bezel is available using spare part numbers 620593-001 (for Presario CQ56 models with webcam and microphone modules), 620592-001 (for Presario CQ 56 models with microphone module...
Compaq Presario CQ56 Notebook PC and HP G56 Notebook PC - Maintenance and Service Guide
Page 89
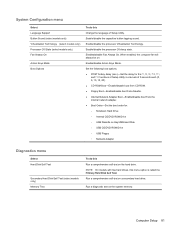
... a secondary hard drive. Run a diagnostic test on . Enabled/disable Fan Always On. Enable/disable the processor C6 sleep state. Enable/disable the capacitive button tapping sound. When enabled, the computer fan will always be on the system memory. Set the following boot options: ● POST hotkey delay (sec.)―Set the delay for : ◦ Notebook Hard Drive ◦ Internal CD/DVD ROM Drive ◦ USB Diskette on Key/USB Hard Disk ◦ USB CD/DVD ROM Drive ◦ USB Floppy ◦ Network Adapter Diagnostics menu Select Hard Disk Self Test Secondary Hard Disk Self...
... a secondary hard drive. Run a diagnostic test on . Enabled/disable Fan Always On. Enable/disable the processor C6 sleep state. Enable/disable the capacitive button tapping sound. When enabled, the computer fan will always be on the system memory. Set the following boot options: ● POST hotkey delay (sec.)―Set the delay for : ◦ Notebook Hard Drive ◦ Internal CD/DVD ROM Drive ◦ USB Diskette on Key/USB Hard Disk ◦ USB CD/DVD ROM Drive ◦ USB Floppy ◦ Network Adapter Diagnostics menu Select Hard Disk Self Test Secondary Hard Disk Self...

Compaq Presario CQ56 Notebook PC and HP G56 Notebook PC - Maintenance and Service Guide
Page 96
.... Select Startup Repair. 5. Select Start > All Programs > Maintenance > Backup and Restore. 2. All files you have created and any software installed on the computer are not listed, you must be prompted for the Windows partition, select Start > Computer. For additional information, refer to Windows Help and Support for tasks such as the drivers, software, and utilities from the backup used for the HP Recovery partition, select Start, right-click Computer, click Manage, and then click Disk Management...
.... Select Startup Repair. 5. Select Start > All Programs > Maintenance > Backup and Restore. 2. All files you have created and any software installed on the computer are not listed, you must be prompted for the Windows partition, select Start > Computer. For additional information, refer to Windows Help and Support for tasks such as the drivers, software, and utilities from the backup used for the HP Recovery partition, select Start, right-click Computer, click Manage, and then click Disk Management...

Compaq Presario CQ56 Notebook PC and HP G56 Notebook PC - Maintenance and Service Guide
Page 108
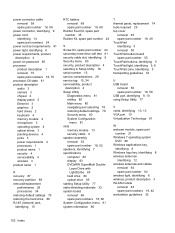
... hard drive 13 bezel illustrated 20 spare part number 20, 61 boot options 81 boot order 81 100 Index button sound 81 buttons power 7 TouchPad 5 C Cable Kit contents 24 spare part number 24 cables, service considerations 30 camera module removal 62 spare part number 62 camera, product description 3 caps lock light, identifying 6 changing the language of Setup Utility 77 chipset, product description 2 compartments, memory module 13 components additional hardware 14 bottom 13 display 11 front 5 left-side 10 right-side 9 top 5 computer feet locations...
... hard drive 13 bezel illustrated 20 spare part number 20, 61 boot options 81 boot order 81 100 Index button sound 81 buttons power 7 TouchPad 5 C Cable Kit contents 24 spare part number 24 cables, service considerations 30 camera module removal 62 spare part number 62 camera, product description 3 caps lock light, identifying 6 changing the language of Setup Utility 77 chipset, product description 2 compartments, memory module 13 components additional hardware 14 bottom 13 display 11 front 5 left-side 10 right-side 9 top 5 computer feet locations...

Compaq Presario CQ56 Notebook PC and HP G56 Notebook PC - Maintenance and Service Guide
Page 109
...8 Windows applications 8 Windows logo 8 L language support 81 latch, battery release 13 lights caps lock 6 drive 10 optical drive 9 power 6, 9 TouchPad 5 webcam 11 wireless 6 M Main menu 80 mass storage devices, spare part numbers 23 memory module product description 2 removal 44 spare part numbers 18, 44 memory module compartment cover illustrated 22 removal 44 spare part number 44 memory module compartment, identifying 13 memory test 81 microphone jack, identifying 10 microphone, product description 3 model name 1 monitor port, external 10 N navigating in Setup Utility 78 O operating system...
...8 Windows applications 8 Windows logo 8 L language support 81 latch, battery release 13 lights caps lock 6 drive 10 optical drive 9 power 6, 9 TouchPad 5 webcam 11 wireless 6 M Main menu 80 mass storage devices, spare part numbers 23 memory module product description 2 removal 44 spare part numbers 18, 44 memory module compartment cover illustrated 22 removal 44 spare part number 44 memory module compartment, identifying 13 memory test 81 microphone jack, identifying 10 microphone, product description 3 model name 1 monitor port, external 10 N navigating in Setup Utility 78 O operating system...
Compaq Presario CQ56 Notebook PC and HP G56 Notebook PC - Maintenance and Service Guide
Page 110
... 4 power-on password 80 processor product description 1 removal 75 spare part numbers 18, 75 processor C6 state 81 product description audio 3 camera 3 chipset 2 display panel 2 Ethernet 3 graphics 2 hard drives 2 keyboard 4 memory module 2 microphone 3 operating system 4 optical drives 3 pointing devices 4 ports 3 power requirements 4 processors 1 product name 1 security 4 serviceability 4 wireless 3 product name 1 R recovery 87 recovery partition 88 removal/replacement preliminaries 29 procedures 34 restoring default settings 79 restoring the hard drive 88 RJ-45 (network) jack, identifying...
... 4 power-on password 80 processor product description 1 removal 75 spare part numbers 18, 75 processor C6 state 81 product description audio 3 camera 3 chipset 2 display panel 2 Ethernet 3 graphics 2 hard drives 2 keyboard 4 memory module 2 microphone 3 operating system 4 optical drives 3 pointing devices 4 ports 3 power requirements 4 processors 1 product name 1 security 4 serviceability 4 wireless 3 product name 1 R recovery 87 recovery partition 88 removal/replacement preliminaries 29 procedures 34 restoring default settings 79 restoring the hard drive 88 RJ-45 (network) jack, identifying...
HP Notebook Reference Guide - Windows 7
Page 30
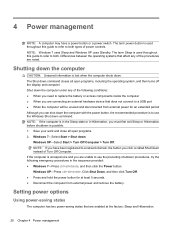
... are connecting an external hardware device that does not connect to a USB port ● When the computer will be unused and disconnected from external power and remove the battery. 4 Power management NOTE: A computer may have been registered to a network domain, the button you must first exit Sleep or Hibernation before shutdown is possible. 1. NOTE: Windows 7 uses Sleep and Windows XP uses Standby. Windows 7-Select Start > Shut down . Click Shut Down, and then click Turn...
... are connecting an external hardware device that does not connect to a USB port ● When the computer will be unused and disconnected from external power and remove the battery. 4 Power management NOTE: A computer may have been registered to a network domain, the button you must first exit Sleep or Hibernation before shutdown is possible. 1. NOTE: Windows 7 uses Sleep and Windows XP uses Standby. Windows 7-Select Start > Shut down . Click Shut Down, and then click Turn...
HP Notebook Reference Guide - Windows 7
Page 34
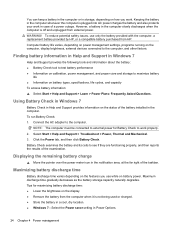
... charged. ● Store the battery in a cool, dry location. ● Windows 7-Select the Power saver setting in Power Options. 24 Chapter 4 Power management To run Battery Check: 1. Click the Power tab, and then click Battery Check. Maximizing battery discharge time Battery discharge time varies depending on the features you work. Tips for Battery Check to the computer. Computer battery life varies, depending on power management settings, programs running on the computer, display brightness, external devices connected...
... charged. ● Store the battery in a cool, dry location. ● Windows 7-Select the Power saver setting in Power Options. 24 Chapter 4 Power management To run Battery Check: 1. Click the Power tab, and then click Battery Check. Maximizing battery discharge time Battery discharge time varies depending on the features you work. Tips for Battery Check to the computer. Computer battery life varies, depending on power management settings, programs running on the computer, display brightness, external devices connected...

HP Notebook Reference Guide - Windows 7
Page 49
... external device to a USB port on the computer. To disconnect a powered external device, turn off and the AC power cord is turned off the device, and then disconnect it from the computer. Connect the device to the manufacturer's instructions. USB drives include the following types: ● 1.44-megabyte diskette drive ● Hard drive module (a hard drive with the computer. NOTE: The computer has only one expansion port. Using optional external devices NOTE: For more information about required software and drivers...
... external device to a USB port on the computer. To disconnect a powered external device, turn off and the AC power cord is turned off the device, and then disconnect it from the computer. Connect the device to the manufacturer's instructions. USB drives include the following types: ● 1.44-megabyte diskette drive ● Hard drive module (a hard drive with the computer. NOTE: The computer has only one expansion port. Using optional external devices NOTE: For more information about required software and drivers...
HP Notebook Reference Guide - Windows 7
Page 52
.... Select Start > All Programs > Accessories > System Tools > Disk Defragmenter. 3. Windows 7-Click Defragment disk. NOTE: Windows includes the User Account Control feature to your computer. Under Volume, click the listing for the hard drive, usually listed as installing software, running on a monthly schedule, but you do not need access to improve the security of fragmented files, Disk Defragmenter may set it works without supervision. Using Disk Cleanup Disk Cleanup searches the hard drive for tasks...
.... Select Start > All Programs > Accessories > System Tools > Disk Defragmenter. 3. Windows 7-Click Defragment disk. NOTE: Windows includes the User Account Control feature to your computer. Under Volume, click the listing for the hard drive, usually listed as installing software, running on a monthly schedule, but you do not need access to improve the security of fragmented files, Disk Defragmenter may set it works without supervision. Using Disk Cleanup Disk Cleanup searches the hard drive for tasks...
HP Notebook Reference Guide - Windows 7
Page 59
... models only) ● Power-on password ● Fingerprint reader Computer viruses Unauthorized access to data Antivirus software ● Firewall software ● Windows updates ● File encryption Unauthorized access to Setup Utility, BIOS settings, and other Administrator password system identification information Ongoing or future threats to the computer Critical security updates from Microsoft Unauthorized access to a Windows user account User password Unauthorized removal of the computer Security cable slot (used with an optional security cable) Using passwords A password...
... models only) ● Power-on password ● Fingerprint reader Computer viruses Unauthorized access to data Antivirus software ● Firewall software ● Windows updates ● File encryption Unauthorized access to Setup Utility, BIOS settings, and other Administrator password system identification information Ongoing or future threats to the computer Critical security updates from Microsoft Unauthorized access to a Windows user account User password Unauthorized removal of the computer Security cable slot (used with an optional security cable) Using passwords A password...
HP Notebook Reference Guide - Windows 7
Page 67
... troubleshooting the file. To exit Setup Utility, use the arrow keys to reliable external power using Setup Utility. 1. Downloading a BIOS update CAUTION: To reduce the risk of the date, name, or other system information is connected to select the Main menu. Most BIOS updates on the HP Web site are packaged in an optional docking device, or connected to the computer or an unsuccessful installation, download and install a BIOS update only when the computer is displayed...
... troubleshooting the file. To exit Setup Utility, use the arrow keys to reliable external power using Setup Utility. 1. Downloading a BIOS update CAUTION: To reduce the risk of the date, name, or other system information is connected to select the Main menu. Most BIOS updates on the HP Web site are packaged in an optional docking device, or connected to the computer or an unsuccessful installation, download and install a BIOS update only when the computer is displayed...
HP Notebook Reference Guide - Windows 7
Page 72
... keys media 14 volume 14 administrator password creating 51 entering 51 managing 51 airport security devices 41 antivirus software, using 52 audio functions, checking 15 B battery conserving power 26 discharging 24 displaying remaining charge 24 disposing 26 low battery levels 25 replacing 26 storing 26 Battery Check 24 battery information, finding 24 battery power 23 battery temperature 26 BIOS determining version 57 downloading an update 57 updating 57 Bluetooth device 2, 8 buttons media 14 power 20 volume 14 wireless 3 C cables 1394 37 eSATA 38 USB 36 CardBus PC Cards...
... keys media 14 volume 14 administrator password creating 51 entering 51 managing 51 airport security devices 41 antivirus software, using 52 audio functions, checking 15 B battery conserving power 26 discharging 24 displaying remaining charge 24 disposing 26 low battery levels 25 replacing 26 storing 26 Battery Check 24 battery information, finding 24 battery power 23 battery temperature 26 BIOS determining version 57 downloading an update 57 updating 57 Bluetooth device 2, 8 buttons media 14 power 20 volume 14 wireless 3 C cables 1394 37 eSATA 38 USB 36 CardBus PC Cards...
HP Notebook Reference Guide - Windows 7
Page 73
... creating 51 entering 51 managing 51 power-saving states 20 protecting the computer 49 protecting your wireless network 6 N network cable, connecting 12 network icon 2 O operating system controls 5 optical disc inserting 45 removing 46 optical drive 39 optional external devices, using 39 P passwords set in Setup Utility 50 set in Windows 50 PC Cards configuring 30 description 30 inserting 30 removing 32 removing insert 31 software and drivers 30 supported types 30 ports DisplayPort 17 expansion 39 external monitor 16 HDMI 17 VGA 16 power battery 23 conserving 26 options 20 power button...
... creating 51 entering 51 managing 51 power-saving states 20 protecting the computer 49 protecting your wireless network 6 N network cable, connecting 12 network icon 2 O operating system controls 5 optical disc inserting 45 removing 46 optical drive 39 optional external devices, using 39 P passwords set in Setup Utility 50 set in Windows 50 PC Cards configuring 30 description 30 inserting 30 removing 32 removing insert 31 software and drivers 30 supported types 30 ports DisplayPort 17 expansion 39 external monitor 16 HDMI 17 VGA 16 power battery 23 conserving 26 options 20 power button...


