End User License Agreement
Page 1
... temporary memory (RAM) for use the Software Product on or made available by you shall be governed Copying. You may contain a EULA in this EULA. Use of the Freeware by HP for use with all or any Software Product, installed on a single computer ("Your Computer"). You may accompany the HP Product. DOWNLOADING, OR b. You may use on more than one computer...
... temporary memory (RAM) for use the Software Product on or made available by you shall be governed Copying. You may contain a EULA in this EULA. Use of the Freeware by HP for use with all or any Software Product, installed on a single computer ("Your Computer"). You may accompany the HP Product. DOWNLOADING, OR b. You may use on more than one computer...

End User License Agreement
Page 2
... ENGINEERING. The initial user of the Software Product may no longer use the original Software Product that HP and its suppliers and are owned by HP unless HP provides other form, may not rent, lease or lend the Software Product or use . b. You may not be used for restoring the hard disk of a hard disk drive-based solution, an external media-based recovery solution (e.g. All intellectual...
... ENGINEERING. The initial user of the Software Product may no longer use the original Software Product that HP and its suppliers and are owned by HP unless HP provides other form, may not rent, lease or lend the Software Product or use . b. You may not be used for restoring the hard disk of a hard disk drive-based solution, an external media-based recovery solution (e.g. All intellectual...
Getting Started Guide
Page 3
Table of contents 1 Getting information 2 Setting up your computer Protecting your computer 3 Guidelines for installing software and hardware devices 4 Connecting to the Internet 4 Transferring files and settings to your new computer 5 3 Troubleshooting and maintenance Computer does not start 5 Power 6 Display (monitor 6 Keyboard and mouse (with cable 7 Keyboard and mouse (wireless 8 Speakers and sound 9 Internet access 10 Software troubleshooting 11 Maintenance 14 System Recovery 16 Recovery discs 18 ENWW iii
Table of contents 1 Getting information 2 Setting up your computer Protecting your computer 3 Guidelines for installing software and hardware devices 4 Connecting to the Internet 4 Transferring files and settings to your new computer 5 3 Troubleshooting and maintenance Computer does not start 5 Power 6 Display (monitor 6 Keyboard and mouse (with cable 7 Keyboard and mouse (wireless 8 Speakers and sound 9 Internet access 10 Software troubleshooting 11 Maintenance 14 System Recovery 16 Recovery discs 18 ENWW iii
Getting Started Guide
Page 5
... Click the Start button, click All Programs, and then click User Guides. software issues. ● Find links to use the Microsoft® Windows® 7 operating system. ● Find Windows 7 password information. Getting Started (this guide) ● Learn how to driver updates. 2. Setup poster included with your computer. ● Get up-to-date information and www.hp.com/support/consumer-forum help . ● Upgrade or replace Upgrading and Servicing Guide components of...
... Click the Start button, click All Programs, and then click User Guides. software issues. ● Find links to use the Microsoft® Windows® 7 operating system. ● Find Windows 7 password information. Getting Started (this guide) ● Learn how to driver updates. 2. Setup poster included with your computer. ● Get up-to-date information and www.hp.com/support/consumer-forum help . ● Upgrade or replace Upgrading and Servicing Guide components of...
Getting Started Guide
Page 6
... to open the enclosure of information ● Get special utilities for your computer. ● Find ergonomic information. Click the Start button, click All Programs, click HP, and then click HP Support Assistant. These can increase the inside temperature, or can cause fire or electrocution. Do not disable the power cord grounding plug. To reduce the risk of Microsoft Windows. 2 Chapter 2 Setting...
... to open the enclosure of information ● Get special utilities for your computer. ● Find ergonomic information. Click the Start button, click All Programs, click HP, and then click HP Support Assistant. These can increase the inside temperature, or can cause fire or electrocution. Do not disable the power cord grounding plug. To reduce the risk of Microsoft Windows. 2 Chapter 2 Setting...
Getting Started Guide
Page 7
... User Guides folder. ❑ Read the Safety & Comfort Guide for proper workstation setup, posture, health and work habits, and electrical and mechanical safety information. Windows 7 critical security updates Microsoft continually updates the Windows 7 operating system. Connect the television cable or the telephone line cord to the surge protection device, and then connect the device to Setup Utility, BIOS settings, and other system identification information Administrator password Computer viruses Antivirus software The free...
... User Guides folder. ❑ Read the Safety & Comfort Guide for proper workstation setup, posture, health and work habits, and electrical and mechanical safety information. Windows 7 critical security updates Microsoft continually updates the Windows 7 operating system. Connect the television cable or the telephone line cord to the surge protection device, and then connect the device to Setup Utility, BIOS settings, and other system identification information Administrator password Computer viruses Antivirus software The free...
Getting Started Guide
Page 8
... original software. Get Internet service. ◦ Sign up your computer. ◦ For a wired network connection, connect an Ethernet cable to the computer and to a network router or LAN device. ◦ For a wireless network connection, use a wireless router with the computer to connect to install additional software programs or hardware devices. b. If you might want to a WLAN with an ISP. Follow the onscreen instructions to the Internet, see Internet access on page 10. 4 Chapter 2 Setting up with an Internet connection...
... original software. Get Internet service. ◦ Sign up your computer. ◦ For a wired network connection, connect an Ethernet cable to the computer and to a network router or LAN device. ◦ For a wireless network connection, use a wireless router with the computer to connect to install additional software programs or hardware devices. b. If you might want to a WLAN with an ISP. Follow the onscreen instructions to the Internet, see Internet access on page 10. 4 Chapter 2 Setting up with an Internet connection...

Getting Started Guide
Page 9
... Support. Connect the monitor to your files and settings: 1. The Easy Transfer Cable is functioning, the green power supply light on or start Symptom Possible solution Error message: Hard disk drive error. NOTE: The Easy Transfer Cable is blank, the monitor might encounter while installing, starting up, or using an Easy Transfer Cable, directly from another computer to work . Follow the onscreen instructions in properly, and the wall outlet is a USB cable designed specifically to connect...
... Support. Connect the monitor to your files and settings: 1. The Easy Transfer Cable is functioning, the green power supply light on or start Symptom Possible solution Error message: Hard disk drive error. NOTE: The Easy Transfer Cable is blank, the monitor might encounter while installing, starting up, or using an Easy Transfer Cable, directly from another computer to work . Follow the onscreen instructions in properly, and the wall outlet is a USB cable designed specifically to connect...
Getting Started Guide
Page 10
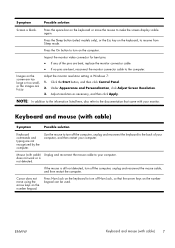
.... Symptom Possible solution Test the wall outlet by connecting a different electrical device to the red Shut Down button, and then click Restart. Press the Ctrl+Alt+Delete keys on the monitor. 6 Chapter 3 Troubleshooting and maintenance ENWW Click the Arrow button next to it cool down automatically. ● The computer might not have an internal fan.) Display (monitor) Symptom Possible solution Screen is running - Let it...
.... Symptom Possible solution Test the wall outlet by connecting a different electrical device to the red Shut Down button, and then click Restart. Press the Ctrl+Alt+Delete keys on the monitor. 6 Chapter 3 Troubleshooting and maintenance ENWW Click the Arrow button next to it cool down automatically. ● The computer might not have an internal fan.) Display (monitor) Symptom Possible solution Screen is running - Let it...
Getting Started Guide
Page 11
... monitor connector cable to make the screen display visible again. Inspect the monitor video connector for bent pins: ● If any of your computer, and then restart your computer. Click the Start button, and then click Control Panel. 2. does not work or is blank. Press Num Lock on the keyboard to turn on the keyboard or move using the arrow keys on the number keypad can be used. Adjust the monitor resolution setting in Windows...
... monitor connector cable to make the screen display visible again. Inspect the monitor video connector for bent pins: ● If any of your computer, and then restart your computer. Click the Start button, and then click Control Panel. 2. does not work or is blank. Press Num Lock on the keyboard to turn on the keyboard or move using the arrow keys on the number keypad can be used. Adjust the monitor resolution setting in Windows...
Getting Started Guide
Page 12
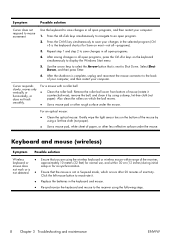
... mouse connector to Shut Down. For an optical mouse: ● Clean the optical mouse: Gently wipe the light sensor lens on the keyboard simultaneously to reactivate it by using the wireless keyboard or wireless mouse within range of paper, or other rough surface under the mouse. Replace the batteries in the keyboard and mouse. Use the arrow keys to select the Arrow button that you are using a lint-free cloth (not paper). ● Use a mouse...
... mouse connector to Shut Down. For an optical mouse: ● Clean the optical mouse: Gently wipe the light sensor lens on the keyboard simultaneously to reactivate it by using the wireless keyboard or wireless mouse within range of paper, or other rough surface under the mouse. Replace the batteries in the keyboard and mouse. Use the arrow keys to select the Arrow button that you are using a lint-free cloth (not paper). ● Use a mouse...
Getting Started Guide
Page 13
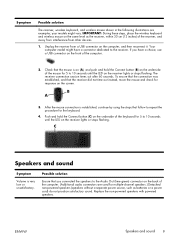
... response on the receiver lights or stops flashing. Unplug the receiver from other devices. 1. A Off Connect On B 3. If you connected the speakers to 10 seconds until the LED on the screen. Your computer model might vary. Symptom Possible solution The receiver, wireless keyboard, and wireless mouse shown in the following illustrations are used for multiple-channel speakers.) Detached non-powered speakers (speakers without a separate power source, such as the...
... response on the receiver lights or stops flashing. Unplug the receiver from other devices. 1. A Off Connect On B 3. If you connected the speakers to 10 seconds until the LED on the screen. Your computer model might vary. Symptom Possible solution The receiver, wireless keyboard, and wireless mouse shown in the following illustrations are used for multiple-channel speakers.) Detached non-powered speakers (speakers without a separate power source, such as the...
Getting Started Guide
Page 14
... produced. Log in monitor speakers, use an HDMI connector on . Symptom No sound is set appropriately. Under Hardware and Sound, click Troubleshoot and audio playback. Turn off your ISP, and start automatically. I cannot connect to the Internet. Your computer might damage the network adapter. 10 Chapter 3 Troubleshooting and maintenance ENWW Possible solution For Windows 7: 1. Refer to the Setup Poster to a local area network (LAN). To resume from Sleep mode, press the Sleep button (select models only), or press...
... produced. Log in monitor speakers, use an HDMI connector on . Symptom No sound is set appropriately. Under Hardware and Sound, click Troubleshoot and audio playback. Turn off your ISP, and start automatically. I cannot connect to the Internet. Your computer might damage the network adapter. 10 Chapter 3 Troubleshooting and maintenance ENWW Possible solution For Windows 7: 1. Refer to the Setup Poster to a local area network (LAN). To resume from Sleep mode, press the Sleep button (select models only), or press...
Getting Started Guide
Page 15
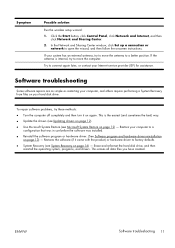
... in use before the software was installed. ● Reinstall the software program or hardware driver. (See Software program and hardware driver reinstallation on page 13) - Symptom Possible solution Run the wireless setup wizard: 1. Click the Start button, click Control Panel, click Network and Internet, and then click Network and Sharing Center. 2. Try to open the wizard, and then follow the onscreen instructions. Restore your system has an external antenna, try these methods: ● Turn the...
... in use before the software was installed. ● Reinstall the software program or hardware driver. (See Software program and hardware driver reinstallation on page 13) - Symptom Possible solution Run the wireless setup wizard: 1. Click the Start button, click Control Panel, click Network and Internet, and then click Network and Sharing Center. 2. Try to open the wizard, and then follow the onscreen instructions. Restore your system has an external antenna, try these methods: ● Turn the...

Getting Started Guide
Page 16
... update a driver, click Update Driver, and then follow the onscreen instructions. 12 Chapter 3 Troubleshooting and maintenance ENWW Microsoft System Restore If you have a problem that might not be due to software that was installed on systems that are shipped without a version of device you use System Restore to return the computer to open programs. 2. You can also set restore points manually. Type Device Manager into the Start Search box, and then click Device Manager...
... update a driver, click Update Driver, and then follow the onscreen instructions. 12 Chapter 3 Troubleshooting and maintenance ENWW Microsoft System Restore If you have a problem that might not be due to software that was installed on systems that are shipped without a version of device you use System Restore to return the computer to open programs. 2. You can also set restore points manually. Type Device Manager into the Start Search box, and then click Device Manager...
Getting Started Guide
Page 17
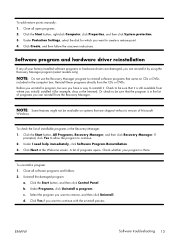
... using the Recovery Manager program (select models only). To add restore points manually: 1. Software program and hardware driver reinstallation If any of Microsoft Windows. Check to be sure you want to reinstall it (for which you initially installed it . Click the Start button, All Programs, Recovery Manager, and then click Recovery Manager. Close all open programs. 2. Click the Start button, and then click Control Panel. Select the program you can reinstall from the Recovery Manager...
... using the Recovery Manager program (select models only). To add restore points manually: 1. Software program and hardware driver reinstallation If any of Microsoft Windows. Check to be sure you want to reinstall it (for which you initially installed it . Click the Start button, All Programs, Recovery Manager, and then click Recovery Manager. Close all open programs. 2. Click the Start button, and then click Control Panel. Select the program you can reinstall from the Recovery Manager...
Getting Started Guide
Page 18
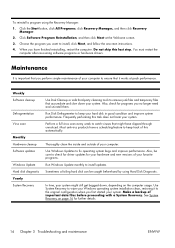
... not harm your system. Weekly Software cleanup Defragmentation Virus scan Monthly Hardware cleanup Software updates Windows Update Hard disk diagnostic Yearly System Recovery Use Disk Cleanup or safe third-party cleaning tools to keep track of important data files before proceeding with a System Recovery. Click the Start button, click All Programs, click Recovery Manager, and then click Recovery Manager. 2. Use Windows Updates to install, click Next, and follow the onscreen instructions. 4. To reinstall a program using Hard Disk Diagnostic.
... not harm your system. Weekly Software cleanup Defragmentation Virus scan Monthly Hardware cleanup Software updates Windows Update Hard disk diagnostic Yearly System Recovery Use Disk Cleanup or safe third-party cleaning tools to keep track of important data files before proceeding with a System Recovery. Click the Start button, click All Programs, click Recovery Manager, and then click Recovery Manager. 2. Use Windows Updates to install, click Next, and follow the onscreen instructions. 4. To reinstall a program using Hard Disk Diagnostic.
Getting Started Guide
Page 19
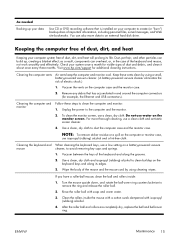
.... 3. Do not use a low setting on the monitor screen. Cleaning the keyboard and When cleaning the keyboard keys, use water on a battery-powered vacuum mouse cleaner, to avoid removing key caps and springs. 1. Vacuum between the keys of important information, including personal files, e-mail messages, and Web site bookmarks. ENWW Maintenance 15 Visit www.hp.com/support for visible signs of the keyboard and mouse, not work smoothly and...
.... 3. Do not use a low setting on the monitor screen. Cleaning the keyboard and When cleaning the keyboard keys, use water on a battery-powered vacuum mouse cleaner, to avoid removing key caps and springs. 1. Vacuum between the keys of important information, including personal files, e-mail messages, and Web site bookmarks. ENWW Maintenance 15 Visit www.hp.com/support for visible signs of the keyboard and mouse, not work smoothly and...

Limited Warranty and Support Guide
Page 4
... software, interfacing, parts, or supplies not supplied by HP; (d) by improper site preparation or maintenance; (e) by anyone other than (i) HP, (ii) an HP authorized service provider, or (iii) your own installation of end-user-replaceable HP or HP-approved parts if available for your product in the servicing country/region. UNITS SENT IN FOR SERVICE MAY HAVE THE DATA ERASED FROM THE HARD DRIVE...
... software, interfacing, parts, or supplies not supplied by HP; (d) by improper site preparation or maintenance; (e) by anyone other than (i) HP, (ii) an HP authorized service provider, or (iii) your own installation of end-user-replaceable HP or HP-approved parts if available for your product in the servicing country/region. UNITS SENT IN FOR SERVICE MAY HAVE THE DATA ERASED FROM THE HARD DRIVE...

Limited Warranty and Support Guide
Page 9
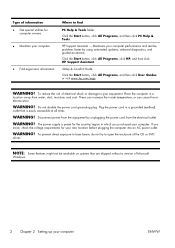
.... • Plug the power cord in the User Guides folder. WARNING: The computer may be sure to open the enclosure of the CD or DVD drives. be heavy; Click Start, All Programs, PC Help & Tools, and then click Hardware Diagnostic Tools. 4 For help with setting up and using your equipment: • Do not disable the power cord grounding plug. Click Start, and then click Help and Support. WARNING...
.... • Plug the power cord in the User Guides folder. WARNING: The computer may be sure to open the enclosure of the CD or DVD drives. be heavy; Click Start, All Programs, PC Help & Tools, and then click Hardware Diagnostic Tools. 4 For help with setting up and using your equipment: • Do not disable the power cord grounding plug. Click Start, and then click Help and Support. WARNING...


