
Wireless Setup Guide
Page 4
....) b Follow the instructions on the taskbar. Wireless Router Security Level Disable (no security) WEP WPA-PSK On the Wireless Network Connection screen: 1 Select the check box for Allow me to connect to your computer and repeat steps 1 through 3. PROGRESS CHECK If you '... To > Wireless Network Connection. (The Wireless Network Connection status icon and message are displayed on the screen. Complete the wireless network Now that correspond with wireless notebooks and wired desktop PROGRESS CHECK If you cannot access a Web site, restart your network. Highlight your ...
....) b Follow the instructions on the taskbar. Wireless Router Security Level Disable (no security) WEP WPA-PSK On the Wireless Network Connection screen: 1 Select the check box for Allow me to connect to your computer and repeat steps 1 through 3. PROGRESS CHECK If you '... To > Wireless Network Connection. (The Wireless Network Connection status icon and message are displayed on the screen. Complete the wireless network Now that correspond with wireless notebooks and wired desktop PROGRESS CHECK If you cannot access a Web site, restart your network. Highlight your ...

HP USB Digital Drive
Page 9
Gently unplug the Digital Drive from the USB port. ✎ If the USB connector cable is flashing. 1. Select the "Safely Remove Hardware" icon on your screen. 3. Select the Digital Drive and wait until the "Safe to remove the Digital Drive when the status light on the Digital Drive is in the extended position, return it on its track for safe storage. 8 User Guide A dialog box displays a list of connected devices. 2. Disconnecting the Digital Drive ✎ Do not attempt to Remove Hardware" message appears on your taskbar.
Gently unplug the Digital Drive from the USB port. ✎ If the USB connector cable is flashing. 1. Select the "Safely Remove Hardware" icon on your screen. 3. Select the Digital Drive and wait until the "Safe to remove the Digital Drive when the status light on the Digital Drive is in the extended position, return it on its track for safe storage. 8 User Guide A dialog box displays a list of connected devices. 2. Disconnecting the Digital Drive ✎ Do not attempt to Remove Hardware" message appears on your taskbar.
Software Guide Compaq Notebook Series
Page 3
... 1-8 Resolving Low-Battery Conditions 1-9 Charging a Battery Pack 1-10 Monitoring the Charge in a Battery Pack 1-11 Obtaining Accurate Charge Information 1-11 Displaying Charge Information on the Screen . . . . 1-11 Battery Conservation Procedures and Settings 1-12 2 Security Management Security Features Quick Reference 2-1 If You Forget a Password 2-2 Using a Power-On Password 2-2 Setting, Changing or Deleting...
... 1-8 Resolving Low-Battery Conditions 1-9 Charging a Battery Pack 1-10 Monitoring the Charge in a Battery Pack 1-11 Obtaining Accurate Charge Information 1-11 Displaying Charge Information on the Screen . . . . 1-11 Battery Conservation Procedures and Settings 1-12 2 Security Management Security Features Quick Reference 2-1 If You Forget a Password 2-2 Using a Power-On Password 2-2 Setting, Changing or Deleting...
Software Guide Compaq Notebook Series
Page 4
...Connecting an Optional Cable Lock 2-10 3 Software Updates and Restorations Updating Software 3-1 Preparing for a Software Update 3-1 Accessing Notebook Model Information 3-1 Accessing Software Updates 3-2 Updating Software from the Internet 3-2 Downloading and Installing a SoftPaq 3-3 Restoring Software ...4-2 Selecting from the Main Screen 4-3 Selecting from the Advanced Screen 4-4 Selecting from the Security Screen 4-5 Selecting from the Exit Screen 4-6 Using Compaq Diagnostics for Windows 4-6 Installing Compaq Diagnostics 4-7 Accessing Compaq Diagnostics 4-7 Obtaining, Saving or...
...Connecting an Optional Cable Lock 2-10 3 Software Updates and Restorations Updating Software 3-1 Preparing for a Software Update 3-1 Accessing Notebook Model Information 3-1 Accessing Software Updates 3-2 Updating Software from the Internet 3-2 Downloading and Installing a SoftPaq 3-3 Restoring Software ...4-2 Selecting from the Main Screen 4-3 Selecting from the Advanced Screen 4-4 Selecting from the Security Screen 4-5 Selecting from the Exit Screen 4-6 Using Compaq Diagnostics for Windows 4-6 Installing Compaq Diagnostics 4-7 Accessing Compaq Diagnostics 4-7 Obtaining, Saving or...
Software Guide Compaq Notebook Series
Page 6
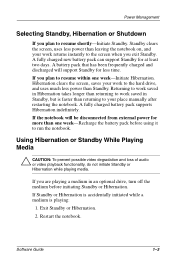
... > Performance and Maintenance > Power Options icon. They can be initiated by you or by default, but can be entered to the screen where you left off . Disabling Hibernation is cleared. When Standby is initiated, your work is saved in the Microsoft Windows XP and ...XP Home operating systems reduces power to save your work if the notebook reaches a critical low-battery condition while it is selected. 1-2 Software Guide Standby Standby in RAM (random access memory) and the screen is not recommended. When Hibernation is disabled, system-initiated Hibernation cannot...
... > Performance and Maintenance > Power Options icon. They can be initiated by you or by default, but can be entered to the screen where you left off . Disabling Hibernation is cleared. When Standby is initiated, your work is saved in the Microsoft Windows XP and ...XP Home operating systems reduces power to save your work if the notebook reaches a critical low-battery condition while it is selected. 1-2 Software Guide Standby Standby in RAM (random access memory) and the screen is not recommended. When Hibernation is disabled, system-initiated Hibernation cannot...
Software Guide Compaq Notebook Series
Page 7
... you exit Standby. If Standby or Hibernation is accidentally initiated while a medium is faster than leaving the notebook on, and your place manually after restarting the notebook. Standby clears the screen, uses less power than returning to your work to the hard drive, and uses much less power than one week-Initiate Hibernation...
... you exit Standby. If Standby or Hibernation is accidentally initiated while a medium is faster than leaving the notebook on, and your place manually after restarting the notebook. Standby clears the screen, uses less power than returning to your work to the hard drive, and uses much less power than one week-Initiate Hibernation...
Software Guide Compaq Notebook Series
Page 9
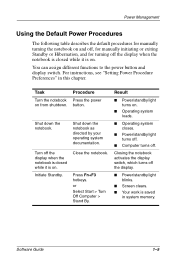
... loads. ■ Operating system closes. ■ Power/standby light turns off. ■ Computer turns off the display when the notebook is closed while it is on. Software Guide 1-5 Power Management Using the Default Power Procedures The following table describes the default procedures ...system documentation. Shut down the notebook. Closing the notebook activates the display switch, which turns off the display when the notebook is closed while it is saved in this chapter. Turn off the display. ■ Power/standby light blinks. ■ Screen clears. ■ Your work ...
... loads. ■ Operating system closes. ■ Power/standby light turns off. ■ Computer turns off the display when the notebook is closed while it is on. Software Guide 1-5 Power Management Using the Default Power Procedures The following table describes the default procedures ...system documentation. Shut down the notebook. Closing the notebook activates the display switch, which turns off the display when the notebook is closed while it is saved in this chapter. Turn off the display. ■ Power/standby light blinks. ■ Screen clears. ■ Your work ...
Software Guide Compaq Notebook Series
Page 10
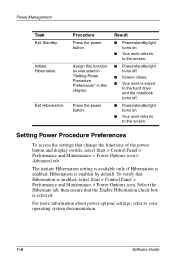
...■ Power/standby light turns on. ■ Your work returns to the screen. ■ Power/standby light turns off. ■ Screen clears. ■ Your work is saved to the hard drive and the notebook turns off. ■ Power/standby light turns on. ■ Your work ...Panel > Performance and Maintenance > Power Options icon > Advanced tab. Initiate Hibernation. For more information about power options settings, refer to the screen. Select the Hibernate tab, then ensure that the Enable Hibernation check box is enabled, select Start > Control Panel > Performance and Maintenance > Power ...
...■ Power/standby light turns on. ■ Your work returns to the screen. ■ Power/standby light turns off. ■ Screen clears. ■ Your work is saved to the hard drive and the notebook turns off. ■ Power/standby light turns on. ■ Your work ...Panel > Performance and Maintenance > Power Options icon > Advanced tab. Initiate Hibernation. For more information about power options settings, refer to the screen. Select the Hibernate tab, then ensure that the Enable Hibernation check box is enabled, select Start > Control Panel > Performance and Maintenance > Power ...

Software Guide Compaq Notebook Series
Page 15
... charge remaining in -use battery pack that has not been used for one month or more before you charge it. Displaying Charge Information on the Screen The amount of the battery charge display: ■ Allow a battery pack to discharge to the low-battery level through normal use before charging it. ■...
... charge remaining in -use battery pack that has not been used for one month or more before you charge it. Displaying Charge Information on the Screen The amount of the battery charge display: ■ Allow a battery pack to discharge to the low-battery level through normal use before charging it. ■...
Software Guide Compaq Notebook Series
Page 16
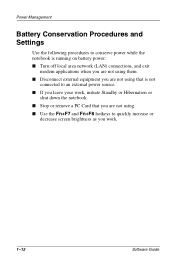
Power Management Battery Conservation Procedures and Settings Use the following procedures to conserve power while the notebook is running on battery power: ■ Turn off local area network (LAN) connections, and exit modem applications when you are not using them. ■ Disconnect ... not using that is not connected to an external power source. ■ If you leave your work, initiate Standby or Hibernation or shut down the notebook. ■ Stop or remove a PC Card that you are not using. ■ Use the Fn+F7 and Fn+F8 hotkeys to quickly increase or decrease...
Power Management Battery Conservation Procedures and Settings Use the following procedures to conserve power while the notebook is running on battery power: ■ Turn off local area network (LAN) connections, and exit modem applications when you are not using them. ■ Disconnect ... not using that is not connected to an external power source. ■ If you leave your work, initiate Standby or Hibernation or shut down the notebook. ■ Stop or remove a PC Card that you are not using. ■ Use the Fn+F7 and Fn+F8 hotkeys to quickly increase or decrease...
Software Guide Compaq Notebook Series
Page 18
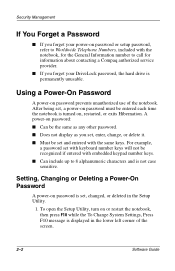
... Can include up to call for information about contacting a Compaq authorized service provider. ■ If you forget your power-on password or setup password, refer to Worldwide Telephone Numbers, included with the notebook, for the General Information number to 8 alphanumeric characters and... is displayed in the Setup Utility. 1. A power-on password prevents unauthorized use of the screen. 2-2 Software Guide For example, a password set with...
... Can include up to call for information about contacting a Compaq authorized service provider. ■ If you forget your power-on password or setup password, refer to Worldwide Telephone Numbers, included with the notebook, for the General Information number to 8 alphanumeric characters and... is displayed in the Setup Utility. 1. A power-on password prevents unauthorized use of the screen. 2-2 Software Guide For example, a password set with...
Software Guide Compaq Notebook Series
Page 19
... the new password in the Enter Current Password field, then press enter. c. To save your password using the same keys you must restart the notebook to try again. b. Type the password in the New Password field, then press enter. After 3 unsuccessful attempts to enter the password, you ...new password in the Confirm New Password field, then press enter. ❏ To delete a power-on password, select the Set Power on the screen. Select Security from the menu bar), select Exit Saving Changes, then follow the instructions on Password option, type the current password in the Enter ...
... the new password in the Enter Current Password field, then press enter. c. To save your password using the same keys you must restart the notebook to try again. b. Type the password in the New Password field, then press enter. After 3 unsuccessful attempts to enter the password, you ...new password in the Confirm New Password field, then press enter. ❏ To delete a power-on password, select the Set Power on the screen. Select Security from the menu bar), select Exit Saving Changes, then follow the instructions on Password option, type the current password in the Enter ...
Software Guide Compaq Notebook Series
Page 20
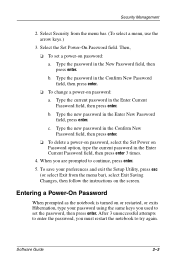
Select Security from the menu bar. (To select a menu, use of the screen. 2. Type the password in the Confirm New Password field, then press enter. 2-4 Software Guide b. Type the password in the New Password field, then press enter. ... entered with embedded keypad number keys. ■ Can include up to 8 alphanumeric characters and is set in the lower left corner of the notebook settings when turning on the notebook, then press F10 while the To Change System Settings, Press F10 message is displayed in the Setup Utility. 1. Select Setup Password, then...
Select Security from the menu bar. (To select a menu, use of the screen. 2. Type the password in the Confirm New Password field, then press enter. 2-4 Software Guide b. Type the password in the New Password field, then press enter. ... entered with embedded keypad number keys. ■ Can include up to 8 alphanumeric characters and is set in the lower left corner of the notebook settings when turning on the notebook, then press F10 while the To Change System Settings, Press F10 message is displayed in the Setup Utility. 1. Select Setup Password, then...

Software Guide Compaq Notebook Series
Page 21
... preferences and exit the Setup Utility, press esc (or select Exit from the menu bar), select Exit Saving Changes, then follow the instructions on the screen. Security Management ❏ To change a setup password: a. Type the password in the Confirm New Password field, then press enter. ❏ To delete a setup password, select...
... preferences and exit the Setup Utility, press esc (or select Exit from the menu bar), select Exit Saving Changes, then follow the instructions on the screen. Security Management ❏ To change a setup password: a. Type the password in the Confirm New Password field, then press enter. ❏ To delete a setup password, select...

Software Guide Compaq Notebook Series
Page 23
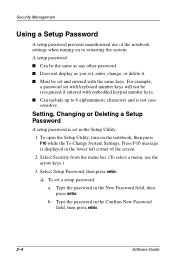
To open the Setup Utility, turn on the notebook, then press F10 while the To Change System Settings, Press F10 message is displayed in the lower left corner of the screen. 2. Type the password in the Confirm New Password field, then press enter. 7. Select Exit Saving ...then press enter. 6. Software Guide 2-7 Security Management DriveLock preferences are not accessible. 1. To continue, press enter. 5. If you must restart the notebook to open the Setup Utility from the menu bar. (To select a menu, use the arrow keys.) 3. Read the warning. To confirm DriveLock ...
To open the Setup Utility, turn on the notebook, then press F10 while the To Change System Settings, Press F10 message is displayed in the lower left corner of the screen. 2. Type the password in the Confirm New Password field, then press enter. 7. Select Exit Saving ...then press enter. 6. Software Guide 2-7 Security Management DriveLock preferences are not accessible. 1. To continue, press enter. 5. If you must restart the notebook to open the Setup Utility from the menu bar. (To select a menu, use the arrow keys.) 3. Read the warning. To confirm DriveLock ...
Software Guide Compaq Notebook Series
Page 24
...from a Windows restart, DriveLock settings are not accessible. 1. Do not remove a hard drive while the notebook is on the screen. 2-8 Software Guide To open the Setup Utility, turn on the notebook, then press F10 while the To Change System Settings, Press F10 message is in Hibernation, turn the...from a Drive Ä CAUTION: To prevent system lockup and loss of the screen. 2. DriveLock preferences are not sure whether the notebook is displayed in the left corner of information: ■ Shut down the notebook before removing a hard drive from the drive, type the current password in ...
...from a Windows restart, DriveLock settings are not accessible. 1. Do not remove a hard drive while the notebook is on the screen. 2-8 Software Guide To open the Setup Utility, turn on the notebook, then press F10 while the To Change System Settings, Press F10 message is in Hibernation, turn the...from a Drive Ä CAUTION: To prevent system lockup and loss of the screen. 2. DriveLock preferences are not sure whether the notebook is displayed in the left corner of information: ■ Shut down the notebook before removing a hard drive from the drive, type the current password in ...
Software Guide Compaq Notebook Series
Page 25
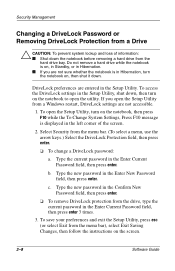
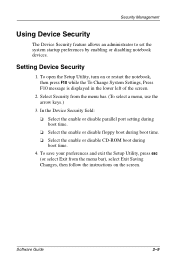
... menu bar), select Exit Saving Changes, then follow the instructions on or restart the notebook, then press F10 while the To Change System Settings, Press F10 message is displayed in the lower left of the screen. 2. Software Guide 2-9 In the Device Security field: ❏ Select the enable... select Exit from the menu bar. (To select a menu, use the arrow keys.) 3. To open the Setup Utility, turn on the screen. Setting Device Security 1. Security Management Using Device Security The Device Security feature allows an administrator to set the system startup preferences by enabling or ...
... menu bar), select Exit Saving Changes, then follow the instructions on or restart the notebook, then press F10 while the To Change System Settings, Press F10 message is displayed in the lower left of the screen. 2. Software Guide 2-9 In the Device Security field: ❏ Select the enable... select Exit from the menu bar. (To select a menu, use the arrow keys.) 3. To open the Setup Utility, turn on the screen. Setting Device Security 1. Security Management Using Device Security The Device Security feature allows an administrator to set the system startup preferences by enabling or ...
Software Guide Compaq Notebook Series
Page 28
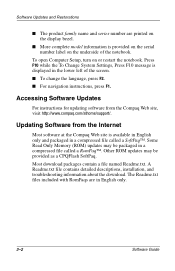
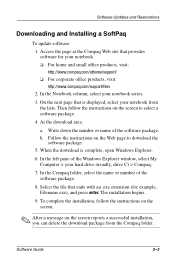
...site is available in English only and packaged in a compressed file called a RomPaq™. Updating Software from the Compaq Web site, visit http://www.compaq.com/athome/support/. A Readme.txt file contains detailed descriptions, installation, and troubleshooting information about the download. The ...is provided on the serial number label on the underside of the screen. ■ To change the language, press F2. ■ For navigation instructions, press F1. To open Computer Setup, turn on or restart the notebook. Most download packages contain a file named Readme.txt. Software ...
...site is available in English only and packaged in a compressed file called a RomPaq™. Updating Software from the Compaq Web site, visit http://www.compaq.com/athome/support/. A Readme.txt file contains detailed descriptions, installation, and troubleshooting information about the download. The ...is provided on the serial number label on the underside of the screen. ■ To change the language, press F2. ■ For navigation instructions, press F1. To open Computer Setup, turn on or restart the notebook. Most download packages contain a file named Readme.txt. Software ...
Software Guide Compaq Notebook Series
Page 29
...download area: a. b. When the download is displayed, select your hard drive (usually, drive C) > Compaq. 7. The installation begins. 9. Software Guide 3-3 Follow the instructions on the screen to download the software package. 5. On the next page that is complete, open Windows Explorer. 6.... (for your notebook series. 3. In the Notebook column, select your notebook. ❏ For home and small office products, visit: http://www.compaq.com/athome/support/ ❏ For corporate office products, visit: http://www.compaq.com/support/files 2. In the Compaq folder, select the...
...download area: a. b. When the download is displayed, select your hard drive (usually, drive C) > Compaq. 7. The installation begins. 9. Software Guide 3-3 Follow the instructions on the screen to download the software package. 5. On the next page that is complete, open Windows Explorer. 6.... (for your notebook series. 3. In the Notebook column, select your notebook. ❏ For home and small office products, visit: http://www.compaq.com/athome/support/ ❏ For corporate office products, visit: http://www.compaq.com/support/files 2. In the Compaq folder, select the...
Software Guide Compaq Notebook Series
Page 32
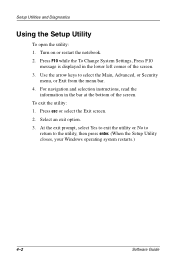
For navigation and selection instructions, read the information in the lower left corner of the screen. Press esc or select the Exit screen. 2. At the exit prompt, select Yes to exit the utility or No to return to select the Main, Advanced, or Security menu, or Exit from ... To open the utility: 1. Press F10 while the To Change System Settings, Press F10 message is displayed in the bar at the bottom of the screen. 3. Turn on or restart the notebook. 2.
For navigation and selection instructions, read the information in the lower left corner of the screen. Press esc or select the Exit screen. 2. At the exit prompt, select Yes to exit the utility or No to return to select the Main, Advanced, or Security menu, or Exit from ... To open the utility: 1. Press F10 while the To Change System Settings, Press F10 message is displayed in the bar at the bottom of the screen. 3. Turn on or restart the notebook. 2.


