Presario Select 1800 Series Maintenance and Service Guide
Page 7
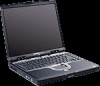
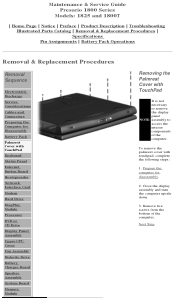
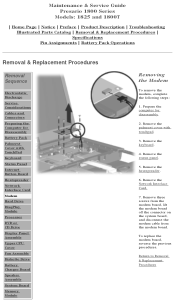
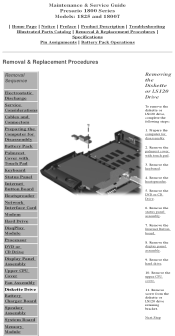
...the Computer for the computer. Maintenance & Service Guide Presario 1800 Series Models: 1825 and 1800T | Home Page | Notice | Preface | Product ...Description | Troubleshooting Illustrated Parts Catalog | Removal & Replacement Procedures | Specifications Pin Assignments | Battery Pack Operations Removal and Replacement Procedures This section explains the removal and replacement procedures for Disassembly Battery Pack Palmrest Cover with TouchPad Keyboard Status Panel Internet Button Board Report the computer serial number to Compaq...
...the Computer for the computer. Maintenance & Service Guide Presario 1800 Series Models: 1825 and 1800T | Home Page | Notice | Preface | Product ...Description | Troubleshooting Illustrated Parts Catalog | Removal & Replacement Procedures | Specifications Pin Assignments | Battery Pack Operations Removal and Replacement Procedures This section explains the removal and replacement procedures for Disassembly Battery Pack Palmrest Cover with TouchPad Keyboard Status Panel Internet Button Board Report the computer serial number to Compaq...
Presario Select 1800 Series Maintenance and Service Guide
Page 42
Maintenance & Service Guide Presario 1800 Series Models: 1825 and 1800T | Home Page | Notice | Preface | Product Description | Troubleshooting Illustrated Parts Catalog | Removal & Replacement Procedures | Specifications Pin Assignments | Battery Pack Operations Service Considerations Listed below are not interchangeable. Compaq strongly recommends that all screws removed during disassembly be kept with the part that you ...be placed away from the computer, it can damage the unit. IMPORTANT: As each subassembly is used in mind during the disassembly and assembly of the computer.
Maintenance & Service Guide Presario 1800 Series Models: 1825 and 1800T | Home Page | Notice | Preface | Product Description | Troubleshooting Illustrated Parts Catalog | Removal & Replacement Procedures | Specifications Pin Assignments | Battery Pack Operations Service Considerations Listed below are not interchangeable. Compaq strongly recommends that all screws removed during disassembly be kept with the part that you ...be placed away from the computer, it can damage the unit. IMPORTANT: As each subassembly is used in mind during the disassembly and assembly of the computer.
Presario Select 1800 Series Maintenance and Service Guide
Page 43
Return to the unit. q Avoid bending, twisting, or pulling on the cables. The ribbon cable position for the modem. Maintenance & Service Guide Presario 1800 Series Models: 1825 and 1800T | Home Page | Notice | Preface | Product Description | Troubleshooting Illustrated Parts Catalog | Removal & Replacement Procedures | Specifications Pin Assignments | Battery Pack Operations Cables and Connectors... parts can tear easily. Cables Use the following precautions when handling cables to avoid damage to seat or unseat the cables during disassembly and reassembly.
Return to the unit. q Avoid bending, twisting, or pulling on the cables. The ribbon cable position for the modem. Maintenance & Service Guide Presario 1800 Series Models: 1825 and 1800T | Home Page | Notice | Preface | Product Description | Troubleshooting Illustrated Parts Catalog | Removal & Replacement Procedures | Specifications Pin Assignments | Battery Pack Operations Cables and Connectors... parts can tear easily. Cables Use the following precautions when handling cables to avoid damage to seat or unseat the cables during disassembly and reassembly.

Presario Select 1800 Series Maintenance and Service Guide
Page 53
... the battery pack for Disassembly Removal Sequence Before beginning Removal & Replacement Procedures, complete the following steps: 1. Maintenance & Service Guide Presario 1800 Series Models: 1825 and 1800T | Home Page | Notice | Preface | Product Description | Troubleshooting Illustrated Parts Catalog | Removal & Replacement Procedures | Specifications Pin Assignments | Battery Pack Operations Preparing the Computer for the Compaq Presario 1800 Series Portable Computers into...
... the battery pack for Disassembly Removal Sequence Before beginning Removal & Replacement Procedures, complete the following steps: 1. Maintenance & Service Guide Presario 1800 Series Models: 1825 and 1800T | Home Page | Notice | Preface | Product Description | Troubleshooting Illustrated Parts Catalog | Removal & Replacement Procedures | Specifications Pin Assignments | Battery Pack Operations Preparing the Computer for the Compaq Presario 1800 Series Portable Computers into...

Presario Select 1800 Series Maintenance and Service Guide
Page 54
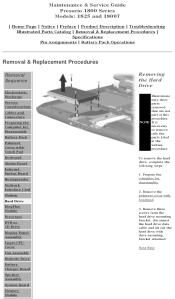
...the end of the battery pack. Return to Removal & Replacement Procedures Maintenance & Service Guide Presario 1800 Series Models: 1825 and 1800T | Home Page | Notice | Preface | Product Description | Troubleshooting Illustrated Parts Catalog | ...Removal & Replacement Procedures | Specifications Pin Assignments | Battery Pack Operations Removal & Replacement Procedures Removal Sequence Electrostatic Discharge Service Considerations Cables and Connectors Preparing the Computer for Disassembly...
...the end of the battery pack. Return to Removal & Replacement Procedures Maintenance & Service Guide Presario 1800 Series Models: 1825 and 1800T | Home Page | Notice | Preface | Product Description | Troubleshooting Illustrated Parts Catalog | ...Removal & Replacement Procedures | Specifications Pin Assignments | Battery Pack Operations Removal & Replacement Procedures Removal Sequence Electrostatic Discharge Service Considerations Cables and Connectors Preparing the Computer for Disassembly...
Presario Select 1800 Series Maintenance and Service Guide
Page 55
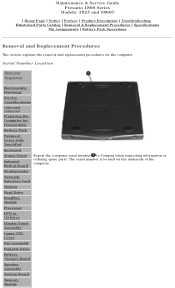
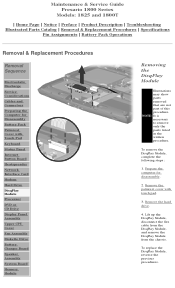
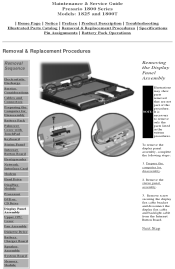
Next Step Prepare the computer for Disassembly Battery Pack Palmrest Cover with TouchPad Keyboard Status Panel Internet Button Board Heatspreader Network Interface Card Modem Hard Drive DisqPlay Module... panel NOTE: assembly to access the interior components of the computer. Remove five screws from the bottom of the computer. Maintenance & Service Guide Presario 1800 Series Models: 1825 and 1800T | Home Page | Notice | Preface | Product Description | Troubleshooting Illustrated Parts Catalog | Removal & Replacement Procedures | Specifications Pin Assignments | Battery Pack Operations ...
Next Step Prepare the computer for Disassembly Battery Pack Palmrest Cover with TouchPad Keyboard Status Panel Internet Button Board Heatspreader Network Interface Card Modem Hard Drive DisqPlay Module... panel NOTE: assembly to access the interior components of the computer. Remove five screws from the bottom of the computer. Maintenance & Service Guide Presario 1800 Series Models: 1825 and 1800T | Home Page | Notice | Preface | Product Description | Troubleshooting Illustrated Parts Catalog | Removal & Replacement Procedures | Specifications Pin Assignments | Battery Pack Operations ...
Presario Select 1800 Series Maintenance and Service Guide
Page 58
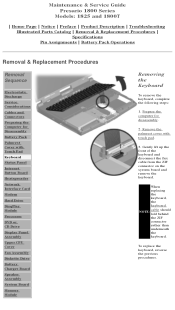
...Presario 1800 Series Models: 1825 and 1800T | Home Page | Notice | Preface | Product Description | Troubleshooting Illustrated Parts Catalog | Removal & Replacement Procedures | Specifications Pin Assignments | Battery Pack Operations Removal & Replacement Procedures Removal Sequence Electrostatic Discharge Service Considerations Cables and Connectors Preparing the Computer for disassembly...the keyboard. To replace the keyboard, reverse the previous procedures. Prepare the computer for Disassembly Battery Pack Palmrest Cover with touch pad. 3. When replacing the keyboard, the keyboard ...
...Presario 1800 Series Models: 1825 and 1800T | Home Page | Notice | Preface | Product Description | Troubleshooting Illustrated Parts Catalog | Removal & Replacement Procedures | Specifications Pin Assignments | Battery Pack Operations Removal & Replacement Procedures Removal Sequence Electrostatic Discharge Service Considerations Cables and Connectors Preparing the Computer for disassembly...the keyboard. To replace the keyboard, reverse the previous procedures. Prepare the computer for Disassembly Battery Pack Palmrest Cover with touch pad. 3. When replacing the keyboard, the keyboard ...

Presario Select 1800 Series Maintenance and Service Guide
Page 59
Maintenance & Service Guide Presario 1800 Series Models: 1825 and 1800T | Home Page | Notice | Preface | Product Description | Troubleshooting Illustrated Parts Catalog | Removal & Replacement Procedures | Specifications Pin Assignments | Battery Pack Operations Removal & Replacement Procedures Removal Sequence Electrostatic Discharge Service Considerations Cables and Connectors Preparing the Computer for disassembly. 2. Prepare the computer for Disassembly Battery Pack Palmrest Cover with...
Maintenance & Service Guide Presario 1800 Series Models: 1825 and 1800T | Home Page | Notice | Preface | Product Description | Troubleshooting Illustrated Parts Catalog | Removal & Replacement Procedures | Specifications Pin Assignments | Battery Pack Operations Removal & Replacement Procedures Removal Sequence Electrostatic Discharge Service Considerations Cables and Connectors Preparing the Computer for disassembly. 2. Prepare the computer for Disassembly Battery Pack Palmrest Cover with...
Presario Select 1800 Series Maintenance and Service Guide
Page 63
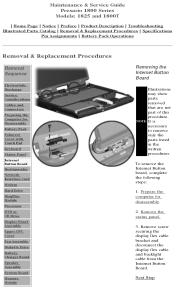
...It is necessary to remove only the parts listed in the written procedures. Prepare the computer for Disassembly Battery Pack Palmrest Cover with Touch Pad Keyboard Status Panel Internet Button Board Heatspreader Network Interface Card ...display flex cable bracket and disconnect the display flex cable and backlight cable from the Internet Button Board. Next Step Maintenance & Service Guide Presario 1800 Series Models: 1825 and 1800T | Home Page | Notice | Preface | Product Description | Troubleshooting Illustrated Parts Catalog | Removal & Replacement Procedures | Specifications Pin Assignments...
...It is necessary to remove only the parts listed in the written procedures. Prepare the computer for Disassembly Battery Pack Palmrest Cover with Touch Pad Keyboard Status Panel Internet Button Board Heatspreader Network Interface Card ...display flex cable bracket and disconnect the display flex cable and backlight cable from the Internet Button Board. Next Step Maintenance & Service Guide Presario 1800 Series Models: 1825 and 1800T | Home Page | Notice | Preface | Product Description | Troubleshooting Illustrated Parts Catalog | Removal & Replacement Procedures | Specifications Pin Assignments...
Presario Select 1800 Series Maintenance and Service Guide
Page 65
... with touch pad. 3. Maintenance & Service Guide Presario 1800 Series Models: 1825 and 1800T | Home Page | Notice | Preface | Product Description | Troubleshooting Illustrated Parts Catalog | Removal & Replacement Procedures | Specifications Pin Assignments | Battery Pack Operations Removal & Replacement Procedures Removal Sequence Electrostatic Discharge Service Considerations Cables and Connectors Preparing the Computer for disassembly. 2. Remove the keyboard. 4. Remove four...
... with touch pad. 3. Maintenance & Service Guide Presario 1800 Series Models: 1825 and 1800T | Home Page | Notice | Preface | Product Description | Troubleshooting Illustrated Parts Catalog | Removal & Replacement Procedures | Specifications Pin Assignments | Battery Pack Operations Removal & Replacement Procedures Removal Sequence Electrostatic Discharge Service Considerations Cables and Connectors Preparing the Computer for disassembly. 2. Remove the keyboard. 4. Remove four...

Presario Select 1800 Series Maintenance and Service Guide
Page 66
... Card To remove the Network Interface Card (NIC), complete the following steps: 1. Prepare the computer for Disassembly Battery Pack Palmrest Cover with touchpad. 3. Remove the keyboard. 4. Remove the heatspreader. 5. Maintenance & Service Guide Presario 1800 Series Models: 1825 and 1800T | Home Page | Notice | Preface | Product Description | Troubleshooting Illustrated Parts Catalog | Removal & Replacement Procedures | Specifications Pin...
... Card To remove the Network Interface Card (NIC), complete the following steps: 1. Prepare the computer for Disassembly Battery Pack Palmrest Cover with touchpad. 3. Remove the keyboard. 4. Remove the heatspreader. 5. Maintenance & Service Guide Presario 1800 Series Models: 1825 and 1800T | Home Page | Notice | Preface | Product Description | Troubleshooting Illustrated Parts Catalog | Removal & Replacement Procedures | Specifications Pin...
Presario Select 1800 Series Maintenance and Service Guide
Page 67
.... Maintenance & Service Guide Presario 1800 Series Models: 1825 and 1800T | Home Page | Notice | Preface | Product Description | Troubleshooting Illustrated Parts Catalog | Removal & Replacement Procedures | Specifications Pin Assignments | Battery Pack Operations Removal & Replacement Procedures Removal Sequence Electrostatic Discharge Service Considerations Cables and Connectors Preparing the Computer for disassembly. 2. Prepare the computer for Disassembly Battery Pack Palmrest Cover...
.... Maintenance & Service Guide Presario 1800 Series Models: 1825 and 1800T | Home Page | Notice | Preface | Product Description | Troubleshooting Illustrated Parts Catalog | Removal & Replacement Procedures | Specifications Pin Assignments | Battery Pack Operations Removal & Replacement Procedures Removal Sequence Electrostatic Discharge Service Considerations Cables and Connectors Preparing the Computer for disassembly. 2. Prepare the computer for Disassembly Battery Pack Palmrest Cover...
Presario Select 1800 Series Maintenance and Service Guide
Page 68
...in the written procedure. Maintenance & Service Guide Presario 1800 Series Models: 1825 and 1800T | Home Page | Notice | Preface | ...Product Description | Troubleshooting Illustrated Parts Catalog | Removal & Replacement Procedures | Specifications Pin Assignments | Battery Pack Operations Removal & Replacement Procedures Removal Sequence Electrostatic Discharge Service Considerations Cables and Connectors Preparing the Computer for disassembly. 2. Remove the palmrest cover with drive mounting bracket attached. Prepare the computer for Disassembly...
...in the written procedure. Maintenance & Service Guide Presario 1800 Series Models: 1825 and 1800T | Home Page | Notice | Preface | ...Product Description | Troubleshooting Illustrated Parts Catalog | Removal & Replacement Procedures | Specifications Pin Assignments | Battery Pack Operations Removal & Replacement Procedures Removal Sequence Electrostatic Discharge Service Considerations Cables and Connectors Preparing the Computer for disassembly. 2. Remove the palmrest cover with drive mounting bracket attached. Prepare the computer for Disassembly...
Presario Select 1800 Series Maintenance and Service Guide
Page 70
.... Maintenance & Service Guide Presario 1800 Series Models: 1825 and 1800T | Home Page | Notice | Preface | Product Description | Troubleshooting Illustrated Parts Catalog | Removal & Replacement Procedures | Specifications Pin Assignments | Battery Pack Operations Removal & Replacement Procedures Removal Sequence Electrostatic Discharge Service Considerations Cables and Connectors Preparing the Computer for disassembly. 2. Prepare the computer for Disassembly Battery Pack Palmrest Cover...
.... Maintenance & Service Guide Presario 1800 Series Models: 1825 and 1800T | Home Page | Notice | Preface | Product Description | Troubleshooting Illustrated Parts Catalog | Removal & Replacement Procedures | Specifications Pin Assignments | Battery Pack Operations Removal & Replacement Procedures Removal Sequence Electrostatic Discharge Service Considerations Cables and Connectors Preparing the Computer for disassembly. 2. Prepare the computer for Disassembly Battery Pack Palmrest Cover...
Presario Select 1800 Series Maintenance and Service Guide
Page 71
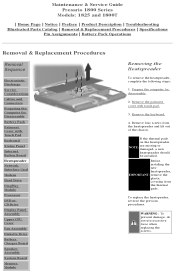
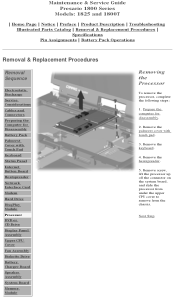
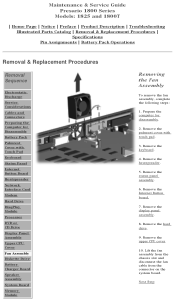
... Module Removing the Processor To remove the processor, complete the following steps: 1. Next Step Remove the keyboard. 4. Remove the heatspreader. 5. Maintenance & Service Guide Presario 1800 Series Models: 1825 and 1800T | Home Page | Notice | Preface | Product Description | Troubleshooting Illustrated Parts Catalog | Removal & Replacement Procedures | Specifications Pin Assignments | Battery Pack Operations Removal & Replacement Procedures Removal...
... Module Removing the Processor To remove the processor, complete the following steps: 1. Next Step Remove the keyboard. 4. Remove the heatspreader. 5. Maintenance & Service Guide Presario 1800 Series Models: 1825 and 1800T | Home Page | Notice | Preface | Product Description | Troubleshooting Illustrated Parts Catalog | Removal & Replacement Procedures | Specifications Pin Assignments | Battery Pack Operations Removal & Replacement Procedures Removal...
Presario Select 1800 Series Maintenance and Service Guide
Page 73
.... 4. Maintenance & Service Guide Presario 1800 Series Models: 1825 and 1800T | Home Page | Notice | Preface | Product Description | Troubleshooting Illustrated Parts Catalog | Removal & Replacement Procedures | Specifications Pin Assignments | Battery Pack Operations Removal & Replacement Procedures Removal Sequence Electrostatic Discharge Service Considerations Cables and Connectors Preparing the Computer for disassembly. 2. Prepare the computer for Disassembly Battery Pack Palmrest Cover...
.... 4. Maintenance & Service Guide Presario 1800 Series Models: 1825 and 1800T | Home Page | Notice | Preface | Product Description | Troubleshooting Illustrated Parts Catalog | Removal & Replacement Procedures | Specifications Pin Assignments | Battery Pack Operations Removal & Replacement Procedures Removal Sequence Electrostatic Discharge Service Considerations Cables and Connectors Preparing the Computer for disassembly. 2. Prepare the computer for Disassembly Battery Pack Palmrest Cover...
Presario Select 1800 Series Maintenance and Service Guide
Page 76
Prepare the computer for Disassembly Battery Pack Palmrest Cover with TouchPad Keyboard Status Panel Internet Button Board Heatspreader Network Interface Card Modem Hard Drive DisqPlay Module... panel assembly, complete the following steps: 1. NOTE: It is necessary to remove only the parts listed in the written procedures. Maintenance & Service Guide Presario 1800 Series Models: 1825 and 1800T | Home Page | Notice | Preface | Product Description | Troubleshooting Illustrated Parts Catalog | Removal & Replacement Procedures | Specifications Pin Assignments | Battery Pack Operations ...
Prepare the computer for Disassembly Battery Pack Palmrest Cover with TouchPad Keyboard Status Panel Internet Button Board Heatspreader Network Interface Card Modem Hard Drive DisqPlay Module... panel assembly, complete the following steps: 1. NOTE: It is necessary to remove only the parts listed in the written procedures. Maintenance & Service Guide Presario 1800 Series Models: 1825 and 1800T | Home Page | Notice | Preface | Product Description | Troubleshooting Illustrated Parts Catalog | Removal & Replacement Procedures | Specifications Pin Assignments | Battery Pack Operations ...
Presario Select 1800 Series Maintenance and Service Guide
Page 79
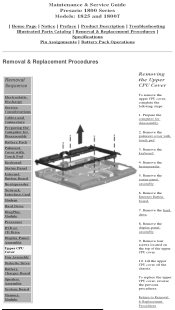
...the following steps: 1. Remove the heatspreader. 5. Lift the upper CPU cover off the chassis. Prepare the computer for Disassembly Battery Pack Palmrest Cover with touch pad. 3. Remove the keyboard. 4. Remove the status panel assembly. 6. Remove ... Procedures To replace the upper CPU cover, reverse the previous procedures. Remove the hard drive. 8. Maintenance & Service Guide Presario 1800 Series Models: 1825 and 1800T | Home Page | Notice | Preface | Product Description | Troubleshooting Illustrated Parts Catalog | Removal & Replacement Procedures | Specifications...
...the following steps: 1. Remove the heatspreader. 5. Lift the upper CPU cover off the chassis. Prepare the computer for Disassembly Battery Pack Palmrest Cover with touch pad. 3. Remove the keyboard. 4. Remove the status panel assembly. 6. Remove ... Procedures To replace the upper CPU cover, reverse the previous procedures. Remove the hard drive. 8. Maintenance & Service Guide Presario 1800 Series Models: 1825 and 1800T | Home Page | Notice | Preface | Product Description | Troubleshooting Illustrated Parts Catalog | Removal & Replacement Procedures | Specifications...
Presario Select 1800 Series Maintenance and Service Guide
Page 80
...the system board. Remove the heatspreader. 5. Remove the hard drive. 9. Remove the keyboard. 4. Maintenance & Service Guide Presario 1800 Series Models: 1825 and 1800T | Home Page | Notice | Preface | Product Description | Troubleshooting Illustrated Parts Catalog | Removal & Replacement Procedures | ... Electrostatic Discharge Service Considerations Cables and Connectors Preparing the Computer for disassembly. 2. Remove the Internet Button board. 7. Remove the display panel assembly. 8. Prepare the computer for Disassembly Battery Pack Palmrest Cover with touch pad. 3.
...the system board. Remove the heatspreader. 5. Remove the hard drive. 9. Remove the keyboard. 4. Maintenance & Service Guide Presario 1800 Series Models: 1825 and 1800T | Home Page | Notice | Preface | Product Description | Troubleshooting Illustrated Parts Catalog | Removal & Replacement Procedures | ... Electrostatic Discharge Service Considerations Cables and Connectors Preparing the Computer for disassembly. 2. Remove the Internet Button board. 7. Remove the display panel assembly. 8. Prepare the computer for Disassembly Battery Pack Palmrest Cover with touch pad. 3.
Presario Select 1800 Series Maintenance and Service Guide
Page 82
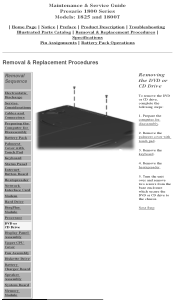
... 4. Next Step Remove the Internet Button board. 8. Remove the upper CPU cover. 11. Prepare the computer for Disassembly Battery Pack Palmrest Cover with touch pad. 3. Remove the status panel assembly. 7. Remove the hard drive. 10.... drive, complete the following steps: 1. Remove the DVD or CD Drive. 6. Remove the display panel assembly. 9. Maintenance & Service Guide Presario 1800 Series Models: 1825 and 1800T | Home Page | Notice | Preface | Product Description | Troubleshooting Illustrated Parts Catalog | Removal & Replacement Procedures | Specifications Pin Assignments | ...
... 4. Next Step Remove the Internet Button board. 8. Remove the upper CPU cover. 11. Prepare the computer for Disassembly Battery Pack Palmrest Cover with touch pad. 3. Remove the status panel assembly. 7. Remove the hard drive. 10.... drive, complete the following steps: 1. Remove the DVD or CD Drive. 6. Remove the display panel assembly. 9. Maintenance & Service Guide Presario 1800 Series Models: 1825 and 1800T | Home Page | Notice | Preface | Product Description | Troubleshooting Illustrated Parts Catalog | Removal & Replacement Procedures | Specifications Pin Assignments | ...


