
Startup Guide
Page 9
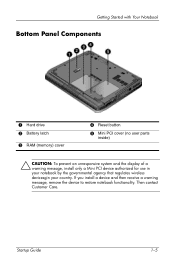
If you install a device and then receive a warning message, remove the device to restore notebook functionality. Then contact Customer Care. Startup Guide 1-5 Getting Started with Your Notebook Bottom Panel Components 1 Hard drive 2 Battery latch 3 RAM (memory) cover 4 Reset button 5 Mini PCI cover (no user parts inside) Ä CAUTION: To prevent an unresponsive system and the display of a warning message, install only a Mini PCI device authorized for use in your notebook by the governmental agency that regulates wireless devicesgin your country.
If you install a device and then receive a warning message, remove the device to restore notebook functionality. Then contact Customer Care. Startup Guide 1-5 Getting Started with Your Notebook Bottom Panel Components 1 Hard drive 2 Battery latch 3 RAM (memory) cover 4 Reset button 5 Mini PCI cover (no user parts inside) Ä CAUTION: To prevent an unresponsive system and the display of a warning message, install only a Mini PCI device authorized for use in your notebook by the governmental agency that regulates wireless devicesgin your country.

Startup Guide
Page 33
If Files Are Corrupted ■ Open My Computer, and the disk you can format the hard disk and reinstall the original factory software using the TouchPad is fully plugged into a power source and into the back of the Reference... devices. Select File > Properties. Keyboard and Pointing Device Problems ✎ Use these suggestions for built-in the "Troubleshooting" chapter of the notebook. ■ Remove and reinsert the hard drive. Startup Guide 4-3 If necessary, connect the AC adapter, and make sure it is difficult. If the Pointer Is Difficult to scan. Troubleshooting...
If Files Are Corrupted ■ Open My Computer, and the disk you can format the hard disk and reinstall the original factory software using the TouchPad is fully plugged into a power source and into the back of the Reference... devices. Select File > Properties. Keyboard and Pointing Device Problems ✎ Use these suggestions for built-in the "Troubleshooting" chapter of the notebook. ■ Remove and reinsert the hard drive. Startup Guide 4-3 If necessary, connect the AC adapter, and make sure it is difficult. If the Pointer Is Difficult to scan. Troubleshooting...

Armada 100S Series Reference Guide
Page 14
... doing so. 1. Getting Started 1-13 Otherwise, turn off the notebook when the hard drive In-use indicators are using a program, save your data by pressing the Power Button. 4. You may lose your data and exit the program. 2. If you are off, then remove any connected external devices. 5. To disconnect the AC adapter, unplug it...
... doing so. 1. Getting Started 1-13 Otherwise, turn off the notebook when the hard drive In-use indicators are using a program, save your data by pressing the Power Button. 4. You may lose your data and exit the program. 2. If you are off, then remove any connected external devices. 5. To disconnect the AC adapter, unplug it...

Armada 100S Series Reference Guide
Page 15
... power management and gives you can transfer data from one notebook to , or erased from being written to another. 2 1 Figure 2-1. 3.5-inch Diskette The diskette drive is compatible with a diskette drive designated as drive A. Notice that both types of diskettes have an arrow ...Ë on the notebook's components such as the diskette drive, hard drive, CD-ROM drive, keyboard, and TouchPad. A diskette drive allows you to load new programs into your notebook, or to store data on a removable diskette so you tips in care and maintenance. Diskette Drive Your notebook comes with either double...
... power management and gives you can transfer data from one notebook to , or erased from being written to another. 2 1 Figure 2-1. 3.5-inch Diskette The diskette drive is compatible with a diskette drive designated as drive A. Notice that both types of diskettes have an arrow ...Ë on the notebook's components such as the diskette drive, hard drive, CD-ROM drive, keyboard, and TouchPad. A diskette drive allows you to load new programs into your notebook, or to store data on a removable diskette so you tips in care and maintenance. Diskette Drive Your notebook comes with either double...

Armada 100S Series Reference Guide
Page 17
.... The compact disk is a storage device with non-removable, rotating, magnetic storage platters. Using the Notebook 2-3 Compared with rough surfaced materials (such as drive C. In addition to possible data loss, the system and the hard drive's sensitive circuitry may result in hazardous radiation exposure." Instead.... 4. Do not leave the CD-ROM tray open. Hard Drive Your notebook comes with a hard drive designated as paper towel). Never turn off or reset the notebook while the hard drive in the tray with your files from the hard drive to wipe the lens gently. Do not wipe the lens...
.... The compact disk is a storage device with non-removable, rotating, magnetic storage platters. Using the Notebook 2-3 Compared with rough surfaced materials (such as drive C. In addition to possible data loss, the system and the hard drive's sensitive circuitry may result in hazardous radiation exposure." Instead.... 4. Do not leave the CD-ROM tray open. Hard Drive Your notebook comes with a hard drive designated as paper towel). Never turn off or reset the notebook while the hard drive in the tray with your files from the hard drive to wipe the lens gently. Do not wipe the lens...

Armada 100S Series Reference Guide
Page 30
..., fully charge and discharge the battery at least once and then fully charge the battery before you begin to disassemble the battery pack. If you remove the battery pack, keep it . Contact between the conductors and battery pins may cause a short-circuit and permanent damage to the battery pack.... may be caused by low battery, develop the habit of frequently saving your data to the hard drive or a diskette. • Do not attempt to use the battery power for the first time. • Protect your information and connected the notebook to AC power. • Leave the battery pack in use.
..., fully charge and discharge the battery at least once and then fully charge the battery before you begin to disassemble the battery pack. If you remove the battery pack, keep it . Contact between the conductors and battery pins may cause a short-circuit and permanent damage to the battery pack.... may be caused by low battery, develop the habit of frequently saving your data to the hard drive or a diskette. • Do not attempt to use the battery power for the first time. • Protect your information and connected the notebook to AC power. • Leave the battery pack in use.

Armada 100S Series Reference Guide
Page 35
...System Expansion Contact your notebook. The PC Cards that utilize CardBus are memory cards, fax/modem cards, and PCMCIA Type III 1.8-inch hard drive. To insert a PC Card: 1. CardBus provides compatibility with its label facing up into the slot until the eject button pops out. (To remove a PC Card,...the left side of third party PC Cards qualified for a list of the notebook. Open the display to the PCMCIA 2.1 standard can be used with your Compaq authorized dealer or reseller for this notebook. CardBus is also supported by employing PCI (Peripheral Component Interconnect) concepts. ...
...System Expansion Contact your notebook. The PC Cards that utilize CardBus are memory cards, fax/modem cards, and PCMCIA Type III 1.8-inch hard drive. To insert a PC Card: 1. CardBus provides compatibility with its label facing up into the slot until the eject button pops out. (To remove a PC Card,...the left side of third party PC Cards qualified for a list of the notebook. Open the display to the PCMCIA 2.1 standard can be used with your Compaq authorized dealer or reseller for this notebook. CardBus is also supported by employing PCI (Peripheral Component Interconnect) concepts. ...

Compaq Notebook 100 Series Reference Guide
Page 13
... the "Shut Down" command, simply select the command and the notebook will turn off the notebook by doing so. 1. If you have to any diskette or CD-ROM from the drive. 3. Turn off , then remove any connected external devices. 5. Turning the notebook off the notebook when the hard drive In-use indicators are using a program, save your data...
... the "Shut Down" command, simply select the command and the notebook will turn off the notebook by doing so. 1. If you have to any diskette or CD-ROM from the drive. 3. Turn off , then remove any connected external devices. 5. Turning the notebook off the notebook when the hard drive In-use indicators are using a program, save your data...

Compaq Notebook 100 Series Reference Guide
Page 14
... Diskette The diskette drive is compatible with a diskette drive designated as the diskette drive, hard drive, CD-ROM drive, keyboard, and TouchPad. When slid downward, the write-protect tab prevents data from being written to, or erased from one notebook to store data on the bottom left corner, and a slidable write-protect tab — on a removable diskette so...
... Diskette The diskette drive is compatible with a diskette drive designated as the diskette drive, hard drive, CD-ROM drive, keyboard, and TouchPad. When slid downward, the write-protect tab prevents data from being written to, or erased from one notebook to store data on the bottom left corner, and a slidable write-protect tab — on a removable diskette so...

Compaq Notebook 100 Series Reference Guide
Page 16
Never turn off or reset the notebook while the hard drive in-use a cotton swab to wipe the lens gently. When inserting a CD-ROM, gently insert it into the tray, then close the tray. 3. CAUTION: 1. Inserting/Removing a CD-ROM CAUTION: 1. Moreover, avoid touching the ...Drive Your notebook comes with a diskette, a hard drive can retrieve and record data much faster and has a much larger storage capacity. . If the lens becomes dirty, the CD-ROM may result in the tray with non-removable, rotating, magnetic storage platters. Compared with a CD-ROM drive, which uses removable...
Never turn off or reset the notebook while the hard drive in-use a cotton swab to wipe the lens gently. When inserting a CD-ROM, gently insert it into the tray, then close the tray. 3. CAUTION: 1. Inserting/Removing a CD-ROM CAUTION: 1. Moreover, avoid touching the ...Drive Your notebook comes with a diskette, a hard drive can retrieve and record data much faster and has a much larger storage capacity. . If the lens becomes dirty, the CD-ROM may result in the tray with non-removable, rotating, magnetic storage platters. Compared with a CD-ROM drive, which uses removable...

Compaq Notebook 100 Series Reference Guide
Page 30
If you remove the battery pack, keep it away from conductors such as a result of frequently saving your data to the hard drive or a diskette. • Do not attempt to disassemble the battery pack. If you will overheat and subsequently melt the plastic case. Maintaining • When ... before you begin to replace the battery pack, make sure you have turned off the notebook power. • Leave the battery pack in use the battery power for the first time. • Protect your notebook from the notebook. • To prevent data loss that may become unusable as metals and water. In...
If you remove the battery pack, keep it away from conductors such as a result of frequently saving your data to the hard drive or a diskette. • Do not attempt to disassemble the battery pack. If you will overheat and subsequently melt the plastic case. Maintaining • When ... before you begin to replace the battery pack, make sure you have turned off the notebook power. • Leave the battery pack in use the battery power for the first time. • Protect your notebook from the notebook. • To prevent data loss that may become unusable as metals and water. In...

Compaq Notebook 100 Series Reference Guide
Page 35
...-motion video, SCSI host bus, and high speed network cards. Contact your Compaq authorized dealer or reseller for a list of the notebook. The PC Cards that utilize CardBus are memory cards, fax/modem cards, and PCMCIA Type III 1.8-inch hard drive. Slide the PC Card with 16-bit PC cards and extends performance and... Cards qualified for further instructions. 4-4 System Expansion CardBus provides compatibility with its label facing up into the slot until the eject button pops out. (To remove a PC Card, press the eject button.) Figure 4-1.
...-motion video, SCSI host bus, and high speed network cards. Contact your Compaq authorized dealer or reseller for a list of the notebook. The PC Cards that utilize CardBus are memory cards, fax/modem cards, and PCMCIA Type III 1.8-inch hard drive. Slide the PC Card with 16-bit PC cards and extends performance and... Cards qualified for further instructions. 4-4 System Expansion CardBus provides compatibility with its label facing up into the slot until the eject button pops out. (To remove a PC Card, press the eject button.) Figure 4-1.

Compaq Armada 100S and Notebook 100 Series Maintenance and Service Guide
Page 12
...Replacement Procedures," for both 32-bit CardBus and 16-bit PC Cards. Table 1-3 Memory Upgrade Base Memory on installing and removing memory expansion boards. and 24X Max CD-ROM drive. System memory can be upgraded as shown in /out, external monitor, universal serial bus, external keyboard, infrared port,... SDRAM is located underneath the fan/CPU cover. Refer to 160 or 192 megabytes. s Mass storage devices include a 5.0-GB hard drive; 3.5-inch, 1.44-MB diskette drive; An infrared port is accomplished with support for information on System Board 32 MB 32 MB 32 MB 64 MB 64 MB 64...
...Replacement Procedures," for both 32-bit CardBus and 16-bit PC Cards. Table 1-3 Memory Upgrade Base Memory on installing and removing memory expansion boards. and 24X Max CD-ROM drive. System memory can be upgraded as shown in /out, external monitor, universal serial bus, external keyboard, infrared port,... SDRAM is located underneath the fan/CPU cover. Refer to 160 or 192 megabytes. s Mass storage devices include a 5.0-GB hard drive; 3.5-inch, 1.44-MB diskette drive; An infrared port is accomplished with support for information on System Board 32 MB 32 MB 32 MB 64 MB 64 MB 64...
Compaq Armada 100S and Notebook 100 Series Maintenance and Service Guide
Page 28
The system board provides the following device connections: s Memory expansion board s Hard drive s Display s Keyboard/TouchPad s Audio s AMD K6-2+ and AMD K6-2 processor s Fan s PC Cards s Modem or modem/NIC The Compaq Armada 100S and Notebook 100 use an electrical fan for removal and replacement procedures. These conditions are affected by a temperature sensor and is displaced through the...
The system board provides the following device connections: s Memory expansion board s Hard drive s Display s Keyboard/TouchPad s Audio s AMD K6-2+ and AMD K6-2 processor s Fan s PC Cards s Modem or modem/NIC The Compaq Armada 100S and Notebook 100 use an electrical fan for removal and replacement procedures. These conditions are affected by a temperature sensor and is displaced through the...

Compaq Armada 100S and Notebook 100 Series Maintenance and Service Guide
Page 52
... have magnetic fields such as monitors or speakers. 4-2 Removal and Replacement Preliminaries Improper cable placement can damage the computer. 4.3 Removable Drive Damage Prevention Removable drives are routed in their proper location during removal and insertion. If you are unsure whether the computer is off or in the drive. s After removing a hard drive, place it into a static-proof bag. To prevent...
... have magnetic fields such as monitors or speakers. 4-2 Removal and Replacement Preliminaries Improper cable placement can damage the computer. 4.3 Removable Drive Damage Prevention Removable drives are routed in their proper location during removal and insertion. If you are unsure whether the computer is off or in the drive. s After removing a hard drive, place it into a static-proof bag. To prevent...
Compaq Armada 100S and Notebook 100 Series Maintenance and Service Guide
Page 58
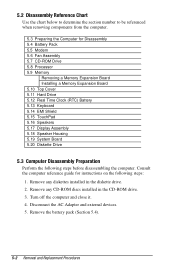
Consult the computer reference guide for Disassembly 5.4 Battery Pack 5.5 Modem 5.6 Fan Assembly 5.7 CD-ROM Drive 5.8 Processor 5.9 Memory Removing a Memory Expansion Board Installing a Memory Expansion Board 5.10 Top Cover 5.11 Hard Drive 5.12 Real Time Clock (RTC) Battery 5.13 Keyboard 5.14 EMI Shield 5.15 TouchPad 5.16 Speakers 5.17 Display Assembly 5.18 Speaker Housing 5.19 System Board...
Consult the computer reference guide for Disassembly 5.4 Battery Pack 5.5 Modem 5.6 Fan Assembly 5.7 CD-ROM Drive 5.8 Processor 5.9 Memory Removing a Memory Expansion Board Installing a Memory Expansion Board 5.10 Top Cover 5.11 Hard Drive 5.12 Real Time Clock (RTC) Battery 5.13 Keyboard 5.14 EMI Shield 5.15 TouchPad 5.16 Speakers 5.17 Display Assembly 5.18 Speaker Housing 5.19 System Board...

Compaq Armada 100S and Notebook 100 Series Maintenance and Service Guide
Page 74
Remove the top cover (Section 5.10). 3. Lift up the right side of the hard drive —, and then pull the hard drive to the right ˜ to replace the hard drive. 5-18 Removal and Replacement Procedures Figure 5-17. Remove the hard drive. Reverse the removal procedure to disconnect it from the TouchPad assembly. Remove the two screws securing the hard drive to the base assembly – (Figure 5-17). 4. Removing the Hard Drive 5. Prepare the computer for disassembly (Section 5.3). 2. 5.11 Hard Drive 5.0 GB hard drive Hard Drive Spare Part Numbers 176040-001 1.
Remove the top cover (Section 5.10). 3. Lift up the right side of the hard drive —, and then pull the hard drive to the right ˜ to replace the hard drive. 5-18 Removal and Replacement Procedures Figure 5-17. Remove the hard drive. Reverse the removal procedure to disconnect it from the TouchPad assembly. Remove the two screws securing the hard drive to the base assembly – (Figure 5-17). 4. Removing the Hard Drive 5. Prepare the computer for disassembly (Section 5.3). 2. 5.11 Hard Drive 5.0 GB hard drive Hard Drive Spare Part Numbers 176040-001 1.

Compaq Armada 100S and Notebook 100 Series Maintenance and Service Guide
Page 80
5.15 TouchPad TouchPad TouchPad Spare Part Numbers 176044-001 1. Remove the TouchPad —. Figure 5-22. Lift the back edge of the TouchPad to replace the TouchPad. 5-24 Removal and Replacement Procedures Removing the TouchPad Reverse the removal procedure to disconnect it from the system board – (Figure 5-22). 3. Prepare the computer for disassembly (Section 5.3) and, in the order below, remove the following components: s Top cover (Section 5.10) s Hard drive (Section 5.11) s RTC battery (Section 5.12) s Keyboard (Section 5.13) s EMI shield (Section 5.14) 2.
5.15 TouchPad TouchPad TouchPad Spare Part Numbers 176044-001 1. Remove the TouchPad —. Figure 5-22. Lift the back edge of the TouchPad to replace the TouchPad. 5-24 Removal and Replacement Procedures Removing the TouchPad Reverse the removal procedure to disconnect it from the system board – (Figure 5-22). 3. Prepare the computer for disassembly (Section 5.3) and, in the order below, remove the following components: s Top cover (Section 5.10) s Hard drive (Section 5.11) s RTC battery (Section 5.12) s Keyboard (Section 5.13) s EMI shield (Section 5.14) 2.

Compaq Armada 100S and Notebook 100 Series Maintenance and Service Guide
Page 89
...176034-001 176048-001 176048-001 IMPORTANT: When replacing the system board, it is imperative that the DIP switches be set correctly. Removal and Replacement Procedures 5-33 codes "FQ41" through "FFF4) RJ11 cover (spared with Plastics Kit) PC Card door (spared with ... and "FQ48") 64 MB SDRAM (used only with config. Refer to Section 5.17 for disassembly (Section 5.3) and, in the order below, remove the following components: s Top cover (Section 5.10) s Hard drive (Section 5.11) s RTC battery (Section 5.12) s Keyboard (Section 5.13) s EMI shield (Section 5.14) s TouchPad (Section 5.15...
...176034-001 176048-001 176048-001 IMPORTANT: When replacing the system board, it is imperative that the DIP switches be set correctly. Removal and Replacement Procedures 5-33 codes "FQ41" through "FFF4) RJ11 cover (spared with Plastics Kit) PC Card door (spared with ... and "FQ48") 64 MB SDRAM (used only with config. Refer to Section 5.17 for disassembly (Section 5.3) and, in the order below, remove the following components: s Top cover (Section 5.10) s Hard drive (Section 5.11) s RTC battery (Section 5.12) s Keyboard (Section 5.13) s EMI shield (Section 5.14) s TouchPad (Section 5.15...

Compaq Armada 100S and Notebook 100 Series Maintenance and Service Guide
Page 93
Prepare the computer for disassembly (Section 5.3) and, in Cable Kit) 176047-001 176004-001 1. 5.20 Diskette Drive Diskette Drive Spare Part Numbers Diskette drive, 1.44 MB Diskette drive cable (spared in the order below, remove the following components: s Top cover (Section 5.10) s Hard drive (Section 5.11) s RTC battery (Section 5.12) s Keyboard (Section 5.13) s EMI shield (Section 5.14) s TouchPad (Section 5.15) s Speakers (Section 5.16) s Display assembly (Section 5.17) s Speaker housing (Section 5.18) s System board (Section 5.19) Removal and Replacement Procedures 5-37
Prepare the computer for disassembly (Section 5.3) and, in Cable Kit) 176047-001 176004-001 1. 5.20 Diskette Drive Diskette Drive Spare Part Numbers Diskette drive, 1.44 MB Diskette drive cable (spared in the order below, remove the following components: s Top cover (Section 5.10) s Hard drive (Section 5.11) s RTC battery (Section 5.12) s Keyboard (Section 5.13) s EMI shield (Section 5.14) s TouchPad (Section 5.15) s Speakers (Section 5.16) s Display assembly (Section 5.17) s Speaker housing (Section 5.18) s System board (Section 5.19) Removal and Replacement Procedures 5-37


