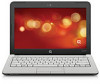

HP Pavilion dm1 HP Mini 311 Compaq Mini 311 - Maintenance and Service Guide
Page 22
... Maintenance and Service Guide Connect optional USB devices. Connects an external VGA monitor or projector. External component identification Right-side components Item Component (1) Digital Media Slot (2) Audio-out (headphone) jack/Audio-in (microphone) jack (3) USB ports (2) (4) External monitor port (5) RJ-45 (network) jack Description Supports the following optional digital card formats: ■ Memory Stick (MS) ■ Memory Stick Pro (MS/Pro) ■ MultiMediaCard (MMC) ■ Secure Digital (SD) Memory Card ■ xD-Picture Card Produces sound when connected to the jack...
... Maintenance and Service Guide Connect optional USB devices. Connects an external VGA monitor or projector. External component identification Right-side components Item Component (1) Digital Media Slot (2) Audio-out (headphone) jack/Audio-in (microphone) jack (3) USB ports (2) (4) External monitor port (5) RJ-45 (network) jack Description Supports the following optional digital card formats: ■ Memory Stick (MS) ■ Memory Stick Pro (MS/Pro) ■ MultiMediaCard (MMC) ■ Secure Digital (SD) Memory Card ■ xD-Picture Card Produces sound when connected to the jack...
HP Pavilion dm1 HP Mini 311 Compaq Mini 311 - Maintenance and Service Guide
Page 117
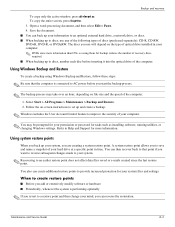
... installing software, running utilities, or changing Windows settings. A system restore point allows you use any of the following types of your hard drive at a specific point in your information to an optional external hard drive, a network drive, or discs. ■ When backing up to save and name a snapshot of discs (purchased separately): CD-R, CD-RW, DVD+R, DVD-R, or DVD±RW. Open a word-processing document, and then select Edit > Paste. 4. Select Start > All Programs > Maintenance > Backup and Restore...
... installing software, running utilities, or changing Windows settings. A system restore point allows you use any of the following types of your hard drive at a specific point in your information to an optional external hard drive, a network drive, or discs. ■ When backing up to save and name a snapshot of discs (purchased separately): CD-R, CD-RW, DVD+R, DVD-R, or DVD±RW. Open a word-processing document, and then select Edit > Paste. 4. Select Start > All Programs > Maintenance > Backup and Restore...

HP Pavilion dm1 HP Mini 311 Compaq Mini 311 - Maintenance and Service Guide
Page 135
... audio-out jack, connector pinout 9-1 B backing up files 8-2 base enclosure, spare part number 3-4, 3-15 battery removal 4-7 spare part numbers 3-8, 3-14, 4-7 battery bay 2-10 BIOS administrator password 5-3 Bluetooth module, spare part number 3-4, 3-13, 3-15 Blu-ray ROM DVD±R/RW SuperMulti Double-Layer Drive precautions 4-2 spare part number 3-10, 3-14 Blu-ray ROM with LightScribe DVD±R/RW SuperMulti DL Drive, specifications 6-5 boot options 5-4 boot order 5-4 bottom components 2-10 buttons power 2-3 TouchPad 2-6 wireless 2-3 C Cable Kit, spare part number 3-4, 3-16 cables, service...
... audio-out jack, connector pinout 9-1 B backing up files 8-2 base enclosure, spare part number 3-4, 3-15 battery removal 4-7 spare part numbers 3-8, 3-14, 4-7 battery bay 2-10 BIOS administrator password 5-3 Bluetooth module, spare part number 3-4, 3-13, 3-15 Blu-ray ROM DVD±R/RW SuperMulti Double-Layer Drive precautions 4-2 spare part number 3-10, 3-14 Blu-ray ROM with LightScribe DVD±R/RW SuperMulti DL Drive, specifications 6-5 boot options 5-4 boot order 5-4 bottom components 2-10 buttons power 2-3 TouchPad 2-6 wireless 2-3 C Cable Kit, spare part number 3-4, 3-16 cables, service...
HP Pavilion dm1 HP Mini 311 Compaq Mini 311 - Maintenance and Service Guide
Page 136
... numbers 3-14 hard drive recovery 8-4 HDMI port, connector pinout 9-3 headphone jack, connector pinout 9-1 heat sink removal 4-43 spare part number 3-15 spare part numbers 4-43 hinges, removal 4-34 J jacks modem 2-9 network 2-8 RJ-11 2-9 RJ-45 2-8 K key components 2-4 keyboard product description 1-4 removal 4-21 spare part number 3-3, 3-14, 3-15, 4-21 keys esc 2-4 fn 2-4 function 2-4 Windows applications 2-4 Windows logo 2-4 L language, changing in Computer Setup 5-4 left-side components 2-9 light components 2-5 lights caps lock 2-5 drive 2-7 power 2-5 webcam 2-1 wireless 2-5 M memory module...
... numbers 3-14 hard drive recovery 8-4 HDMI port, connector pinout 9-3 headphone jack, connector pinout 9-1 heat sink removal 4-43 spare part number 3-15 spare part numbers 4-43 hinges, removal 4-34 J jacks modem 2-9 network 2-8 RJ-11 2-9 RJ-45 2-8 K key components 2-4 keyboard product description 1-4 removal 4-21 spare part number 3-3, 3-14, 3-15, 4-21 keys esc 2-4 fn 2-4 function 2-4 Windows applications 2-4 Windows logo 2-4 L language, changing in Computer Setup 5-4 left-side components 2-9 light components 2-5 lights caps lock 2-5 drive 2-7 power 2-5 webcam 2-1 wireless 2-5 M memory module...
HP Pavilion dm1 HP Mini 311 Compaq Mini 311 - Maintenance and Service Guide
Page 137
...product description audio 1-3 chipset 1-1 diskette drive 1-3 display panel 1-2 Maintenance and Service Guide Index Ethernet 1-3 external media card 1-4 graphics 1-1 hard drive 1-2 keyboard 1-4 memory 1-2 microphone 1-3 modem 1-3 operating system 1-5 optical drive 1-3 pointing device 1-4 ports 1-4 power requirements 1-4 processor 1-1 security 1-5 serviceability 1-5 webcam 1-3 wireless 1-4 product name 3-1, 4-5 R recovering information 8-4 recovery, system 8-1 recycling battery 11-1 display components 11-1 removal/replacement preliminaries 4-1 procedures 4-5 restoring factory settings 5-2 right...
...product description audio 1-3 chipset 1-1 diskette drive 1-3 display panel 1-2 Maintenance and Service Guide Index Ethernet 1-3 external media card 1-4 graphics 1-1 hard drive 1-2 keyboard 1-4 memory 1-2 microphone 1-3 modem 1-3 operating system 1-5 optical drive 1-3 pointing device 1-4 ports 1-4 power requirements 1-4 processor 1-1 security 1-5 serviceability 1-5 webcam 1-3 wireless 1-4 product name 3-1, 4-5 R recovering information 8-4 recovery, system 8-1 recycling battery 11-1 display components 11-1 removal/replacement preliminaries 4-1 procedures 4-5 restoring factory settings 5-2 right...

HP Pavilion dm1 HP Mini 311 Compaq Mini 311 - Maintenance and Service Guide
Page 138
...specifications 6-7 system memory map specifications 6-6 system recovery 8-1 T tools required 4-1 top components 2-3 top cover removal 4-24 spare part numbers 3-3, 3-15, 4-24 TouchPad 2-6 TouchPad buttons 2-6 TouchPad scroll zone 2-6 U Universal Serial Bus (USB) port connector pinout 9-4 location 2-8, 2-9 USB board removal 4-37 spare part number 4-37 V vents 2-10 W warranty period 3-1, 4-5 webcam 2-1 webcam light 2-1 webcam module illustrated 3-9, 3-13, 4-31 removal 4-34 spare part number 3-9, 3-13, 4-31 webcam, product description 1-3 Windows applications key 2-4 Windows logo key 2-4 wireless...
...specifications 6-7 system memory map specifications 6-6 system recovery 8-1 T tools required 4-1 top components 2-3 top cover removal 4-24 spare part numbers 3-3, 3-15, 4-24 TouchPad 2-6 TouchPad buttons 2-6 TouchPad scroll zone 2-6 U Universal Serial Bus (USB) port connector pinout 9-4 location 2-8, 2-9 USB board removal 4-37 spare part number 4-37 V vents 2-10 W warranty period 3-1, 4-5 webcam 2-1 webcam light 2-1 webcam module illustrated 3-9, 3-13, 4-31 removal 4-34 spare part number 3-9, 3-13, 4-31 webcam, product description 1-3 Windows applications key 2-4 Windows logo key 2-4 wireless...
Mini User Guide - Windows 7
Page 6
... audio for HDMI (select models only 35 Webcam ...36 5 Drives and external devices Drives ...37 Identifying installed drives 37 Handling drives ...37 Improving hard drive performance 38 Using Disk Defragmenter 38 Using Disk Cleanup 39 Replacing the hard drive in the hard drive bay 39 Using external drives ...41 Connecting optional external drives 42 Sharing optical drives ...42 External devices ...43 Using a USB device ...43 Connecting a USB device 43 Removing a USB device 43 Using Digital Media Slot cards 44 Inserting a digital card 44 Removing a digital card 45 6 Memory modules...
... audio for HDMI (select models only 35 Webcam ...36 5 Drives and external devices Drives ...37 Identifying installed drives 37 Handling drives ...37 Improving hard drive performance 38 Using Disk Defragmenter 38 Using Disk Cleanup 39 Replacing the hard drive in the hard drive bay 39 Using external drives ...41 Connecting optional external drives 42 Sharing optical drives ...42 External devices ...43 Using a USB device ...43 Connecting a USB device 43 Removing a USB device 43 Using Digital Media Slot cards 44 Inserting a digital card 44 Removing a digital card 45 6 Memory modules...

Mini User Guide - Windows 7
Page 14
... (4) External monitor port (5) RJ-45 (network) jack Left-side components Description Connects an external VGA monitor or projector. Connects a network cable. Component (1) Security cable slot (2) Power connector (3) Vent (4) USB port (5) HDMI port Description Attaches an optional security cable to act as a high-definition television, or any compatible digital or audio component. Connects an optional video or audio device, such as a deterrent, but it may include an HDMI port or a USB port at this location. 6 Chapter 1 Hardware features Connects an AC adapter.
... (4) External monitor port (5) RJ-45 (network) jack Left-side components Description Connects an external VGA monitor or projector. Connects a network cable. Component (1) Security cable slot (2) Power connector (3) Vent (4) USB port (5) HDMI port Description Attaches an optional security cable to act as a high-definition television, or any compatible digital or audio component. Connects an optional video or audio device, such as a deterrent, but it may include an HDMI port or a USB port at this location. 6 Chapter 1 Hardware features Connects an AC adapter.
Mini User Guide - Windows 7
Page 32
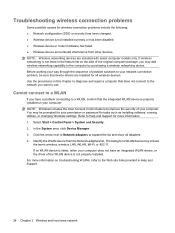
... computer models only. Refer to Help and Support for more information on the side of possible solutions to use. For more information. 1. Troubleshooting wireless connection problems Some possible causes for wireless connection problems include the following: ● Network configuration (SSID or security) has been changed. ● Wireless device is not installed correctly or has been disabled. ● Wireless device or router hardware has failed. ● Wireless device encountered interference from the Network adapters list. Before working...
... computer models only. Refer to Help and Support for more information on the side of possible solutions to use. For more information. 1. Troubleshooting wireless connection problems Some possible causes for wireless connection problems include the following: ● Network configuration (SSID or security) has been changed. ● Wireless device is not installed correctly or has been disabled. ● Wireless device or router hardware has failed. ● Wireless device encountered interference from the Network adapters list. Before working...
Mini User Guide - Windows 7
Page 47
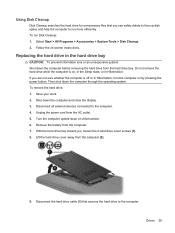
... external devices connected to the computer. 4. Turn the computer upside down the computer before removing the hard drive from the computer (2). 9. To run more efficiently. Replacing the hard drive in the hard drive bay CAUTION: To prevent information loss or an unresponsive system: Shut down on -screen instructions. To remove the hard drive: 1. Lift the hard drive cover away from the hard drive bay. Disconnect the hard drive cable (1) that you can safely delete to free up disk...
... external devices connected to the computer. 4. Turn the computer upside down the computer before removing the hard drive from the computer (2). 9. To run more efficiently. Replacing the hard drive in the hard drive bay CAUTION: To prevent information loss or an unresponsive system: Shut down on -screen instructions. To remove the hard drive: 1. Lift the hard drive cover away from the hard drive bay. Disconnect the hard drive cable (1) that you can safely delete to free up disk...
Mini User Guide - Windows 7
Page 49
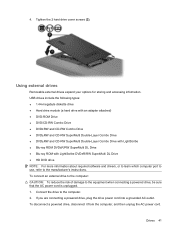
Using external drives Removable external drives expand your options for storing and accessing information. If you are connecting a powered drive, plug the drive power cord into a grounded AC outlet. To disconnect a powered drive, disconnect it from the computer, and then unplug the AC power cord. USB drives include the following types: ● 1.44-megabyte diskette drive ● Hard drive module (a hard drive with an adapter attached) ● DVD-ROM Drive ● DVD/CD-RW Combo Drive ● DVD±RW and CD-RW...
Using external drives Removable external drives expand your options for storing and accessing information. If you are connecting a powered drive, plug the drive power cord into a grounded AC outlet. To disconnect a powered drive, disconnect it from the computer, and then unplug the AC power cord. USB drives include the following types: ● 1.44-megabyte diskette drive ● Hard drive module (a hard drive with an adapter attached) ● DVD-ROM Drive ● DVD/CD-RW Combo Drive ● DVD±RW and CD-RW...
Mini User Guide - Windows 7
Page 58
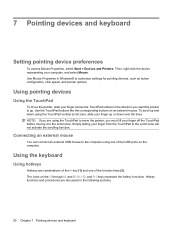
... are using the TouchPad vertical scroll zone, slide your finger from the TouchPad to customize settings for pointing devices, such as button configuration, click speed, and pointer options. Then, right-click the device representing your finger across the TouchPad surface in Windows® to the scroll zone will not activate the scrolling function. Connecting an external mouse You can connect an external USB mouse to go. 7 Pointing devices and keyboard Setting pointing device preferences To access Mouse Properties, select Start > Devices...
... are using the TouchPad vertical scroll zone, slide your finger from the TouchPad to customize settings for pointing devices, such as button configuration, click speed, and pointer options. Then, right-click the device representing your finger across the TouchPad surface in Windows® to the scroll zone will not activate the scrolling function. Connecting an external mouse You can connect an external USB mouse to go. 7 Pointing devices and keyboard Setting pointing device preferences To access Mouse Properties, select Start > Devices...

Mini User Guide - Windows 7
Page 69
... fully charged, in use, or not installed. When the battery reaches a critical battery level, the battery light begins blinking rapidly. ● Off: The battery is the sole power source for 2 weeks or more , calibrate the battery instead of simply charging it. Identifying low battery levels When a battery that is not resolved, the computer enters a critical battery level, and the battery light begins blinking rapidly. Managing low battery levels The information in Windows Control Panel...
... fully charged, in use, or not installed. When the battery reaches a critical battery level, the battery light begins blinking rapidly. ● Off: The battery is the sole power source for 2 weeks or more , calibrate the battery instead of simply charging it. Identifying low battery levels When a battery that is not resolved, the computer enters a critical battery level, and the battery light begins blinking rapidly. Managing low battery levels The information in Windows Control Panel...
Mini User Guide - Windows 7
Page 72
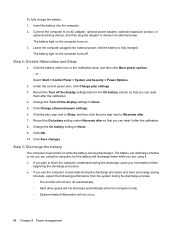
... you can reset them after the calibration. 8. Change the On battery setting to Never. 5. Insert the battery into external power until the battery is being discharged. Connect the computer to an AC adapter, optional power adapter, optional expansion product, or optional docking device, and then plug the adapter or device into external power. Record the Turn off . To fully charge the battery: 1. The battery light on the computer turns on the computer turns off the display settings listed in the...
... you can reset them after the calibration. 8. Change the On battery setting to Never. 5. Insert the battery into external power until the battery is being discharged. Connect the computer to an AC adapter, optional power adapter, optional expansion product, or optional docking device, and then plug the adapter or device into external power. Record the Turn off . To fully charge the battery: 1. The battery light on the computer turns on the computer turns off the display settings listed in the...
Mini User Guide - Windows 7
Page 74
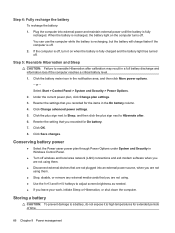
... Windows Control Panel. ● Turn off wireless and local area network (LAN) connections and exit modem software when you are not using them . ● Stop, disable, or remove any external media cards that you are not using. ● Use the fn+f3 and fn+f4 hotkeys to a battery, do not expose it on the computer turns off . 2. Under the current power plan, click Change plan settings. 3. Conserving battery power ● Select the Power saver power plan through Power Options...
... Windows Control Panel. ● Turn off wireless and local area network (LAN) connections and exit modem software when you are not using them . ● Stop, disable, or remove any external media cards that you are not using. ● Use the fn+f3 and fn+f4 hotkeys to a battery, do not expose it on the computer turns off . 2. Under the current power plan, click Change plan settings. 3. Conserving battery power ● Select the Power saver power plan through Power Options...

Mini User Guide - Windows 7
Page 75
... conditions: ● When you need to replace the battery or access components inside the computer ● When you are connecting an external hardware device that does not connect to use the Windows Shut down the computer with this computer. Disposing of in the sequence provided: ● Press ctrl+alt+delete, and then click the Power button. ● Press the power button and hold for at...
... conditions: ● When you need to replace the battery or access components inside the computer ● When you are connecting an external hardware device that does not connect to use the Windows Shut down the computer with this computer. Disposing of in the sequence provided: ● Press ctrl+alt+delete, and then click the Power button. ● Press the power button and hold for at...
Mini User Guide - Windows 7
Page 76
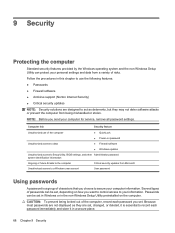
... for service, remove all password settings. Because most passwords are not displayed as deterrents, but they are designed to your information. NOTE: Before you set in Windows or in this chapter to use of the computer Unauthorized access to data ● QuickLock ● Power-on the computer. Several types of passwords can be set . 9 Security Protecting the computer Standard security features provided by the Windows operating...
... for service, remove all password settings. Because most passwords are not displayed as deterrents, but they are designed to your information. NOTE: Before you set in Windows or in this chapter to use of the computer Unauthorized access to data ● QuickLock ● Power-on the computer. Several types of passwords can be set . 9 Security Protecting the computer Standard security features provided by the Windows operating...
Mini User Guide - Windows 7
Page 91
...Digital Media Slot, identifying 5 Disk Cleanup software 39 Disk Defragmenter software 38 diskette drive 41 display image, switching 52 screen brightness hotkeys 52 display switch, identifying 7 displaying system information 80 drive light, identifying 5 drive media 54 drives connecting external 42 diskette 41 external 41 hard 39, 40, 41 optical 41 drives, boot order 81 DVD drive 41 E earbuds 5, 29 encryption 18 entering a power-on password 71 entering an administrator password 70 esc key 4 exiting Setup Utility 80 external audio devices, connecting 32 external drive 41 external monitor port 34...
...Digital Media Slot, identifying 5 Disk Cleanup software 39 Disk Defragmenter software 38 diskette drive 41 display image, switching 52 screen brightness hotkeys 52 display switch, identifying 7 displaying system information 80 drive light, identifying 5 drive media 54 drives connecting external 42 diskette 41 external 41 hard 39, 40, 41 optical 41 drives, boot order 81 DVD drive 41 E earbuds 5, 29 encryption 18 entering a power-on password 71 entering an administrator password 70 esc key 4 exiting Setup Utility 80 external audio devices, connecting 32 external drive 41 external monitor port 34...
Mini User Guide - Windows 7
Page 92
... 11 service tag 10 language support 81 latches, battery release 8 left TouchPad button, identifying 1 lights battery 5 caps lock 2 drive 5 power 2 webcam 7 wireless 2 local area network (LAN) cable required 27 connecting cable 27 low battery level 61 M Main menu 81 maintenance Disk Cleanup 39 Disk Defragmenter 38 managing a power-on password 71 managing an administrator password 70 memory module inserting 48 removing 47 memory module slot 8 memory test 82 microphone (audio-in) jack 5, 29 minimizing interference 26 monitor port, external 6 monitor, connecting 34 mouse, external connecting 50...
... 11 service tag 10 language support 81 latches, battery release 8 left TouchPad button, identifying 1 lights battery 5 caps lock 2 drive 5 power 2 webcam 7 wireless 2 local area network (LAN) cable required 27 connecting cable 27 low battery level 61 M Main menu 81 maintenance Disk Cleanup 39 Disk Defragmenter 38 managing a power-on password 71 managing an administrator password 70 memory module inserting 48 removing 47 memory module slot 8 memory test 82 microphone (audio-in) jack 5, 29 minimizing interference 26 monitor port, external 6 monitor, connecting 34 mouse, external connecting 50...
Mini User Guide - Windows 7
Page 93
... latches battery 8, 60 restoring default settings 80 right TouchPad button, identifying 2 RJ-45 (network) jack, identifying 6 S screen brightness hotkeys 52 screen image, switching 52 security cable slot, identifying 6 Security menu 81 security, wireless 17 selecting in Setup Utility 79 serial number, computer 10 service tag 10 setup of WLAN 17 Setup Utility, passwords set in 69 setup, computer 1 shared drives 42 shutdown 67 shutting down 67 SIM inserting 20 removing 21 Sleep exiting 54 initiating 54 Sleep hotkey 51 slots security cable 6 software Disk Cleanup 39 Disk Defragmenter...
... latches battery 8, 60 restoring default settings 80 right TouchPad button, identifying 2 RJ-45 (network) jack, identifying 6 S screen brightness hotkeys 52 screen image, switching 52 security cable slot, identifying 6 Security menu 81 security, wireless 17 selecting in Setup Utility 79 serial number, computer 10 service tag 10 setup of WLAN 17 Setup Utility, passwords set in 69 setup, computer 1 shared drives 42 shutdown 67 shutting down 67 SIM inserting 20 removing 21 Sleep exiting 54 initiating 54 Sleep hotkey 51 slots security cable 6 software Disk Cleanup 39 Disk Defragmenter...


