
Compaq Mini CQ10 Notebook PC and Compaq Mini 102 Notebook PC - Maintenance and Service Guide
Page 9
1 Product description Category Product name Processor Chipset Graphics Panels Memory Description Compaq Mini CQ10 Compaq Mini 102 Compaq Mini CQ10 Noteook PC ✓ Compaq Mini 102 Notebook PC ✓ Intel Atom N270 1.6-GHz processor, 512-KB Level 2 cache, 533-MHz front... on select models Wide aspect 16:9 ratio DDR2 PC2-6400, 533-MHz memory module One customer-accessible/upgradable memory module slot Supports the following configurations: ● 1024-MB total system memory (1024 × 1) ● 2048-MB total system memory (2048 × 1) ✓ ✓ ✓ ✓ ...
1 Product description Category Product name Processor Chipset Graphics Panels Memory Description Compaq Mini CQ10 Compaq Mini 102 Compaq Mini CQ10 Noteook PC ✓ Compaq Mini 102 Notebook PC ✓ Intel Atom N270 1.6-GHz processor, 512-KB Level 2 cache, 533-MHz front... on select models Wide aspect 16:9 ratio DDR2 PC2-6400, 533-MHz memory module One customer-accessible/upgradable memory module slot Supports the following configurations: ● 1024-MB total system memory (1024 × 1) ● 2048-MB total system memory (2048 × 1) ✓ ✓ ✓ ✓ ...

HP ProBook User Guide - Windows 7
Page 9
... ExpressCard 111 Using Smart Cards (select models only 113 Inserting a smart card ...113 Removing a smart card ...113 9 Memory modules Adding or replacing a memory module in the expansion memory module slot 115 Upgrading a memory module in the primary memory module slot 118 10 Security Protecting the computer ...122 Using passwords ...123 Setting passwords in Windows 123 Setting...
... ExpressCard 111 Using Smart Cards (select models only 113 Inserting a smart card ...113 Removing a smart card ...113 9 Memory modules Adding or replacing a memory module in the expansion memory module slot 115 Upgrading a memory module in the primary memory module slot 118 10 Security Protecting the computer ...122 Using passwords ...123 Setting passwords in Windows 123 Setting...
HP ProBook User Guide - Windows 7
Page 22
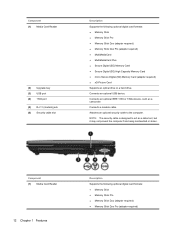
...) ● MultiMediaCard ● MultiMediaCard Plus ● Secure Digital (SD) Memory Card ● Secure Digital (SD) High Capacity Memory Card ● micro Secure Digital (SD) Memory Card (adapter required) ● xD-Picture Card Supports an optical drive or a hard drive. Component (1) Media Card Reader (2) Upgrade bay (3) USB port (4) 1394 port (5) RJ-11 (modem) jack (6) Security...
...) ● MultiMediaCard ● MultiMediaCard Plus ● Secure Digital (SD) Memory Card ● Secure Digital (SD) High Capacity Memory Card ● micro Secure Digital (SD) Memory Card (adapter required) ● xD-Picture Card Supports an optical drive or a hard drive. Component (1) Media Card Reader (2) Upgrade bay (3) USB port (4) 1394 port (5) RJ-11 (modem) jack (6) Security...

HP ProBook User Guide - Windows 7
Page 23
... computer fan starts up automatically to cool internal components. Component (2) Upgrade bay (3) USB port (4) 1394 port (5) Serial port Description ● MultiMediaCard ● MultiMediaCard Plus ● Secure Digital (SD) Memory Card ● Secure Digital (SD) High Capacity Memory Card ● micro Secure Digital (SD) Memory Card (adapter required) ● xD-Picture Card Supports an optical...
... computer fan starts up automatically to cool internal components. Component (2) Upgrade bay (3) USB port (4) 1394 port (5) Serial port Description ● MultiMediaCard ● MultiMediaCard Plus ● Secure Digital (SD) Memory Card ● Secure Digital (SD) High Capacity Memory Card ● micro Secure Digital (SD) Memory Card (adapter required) ● xD-Picture Card Supports an optical...

HP ProBook User Guide - Windows 7
Page 124
... procedure, touch a grounded metal object to be upgraded by adding a memory module to the equipment, unplug the power cord and remove all batteries before installing a memory module. The expansion memory module compartment is located under the keyboard. 9 Memory modules The computer has two memory module compartments. The primary memory module compartment is located on the bottom of...
... procedure, touch a grounded metal object to be upgraded by adding a memory module to the equipment, unplug the power cord and remove all batteries before installing a memory module. The expansion memory module compartment is located under the keyboard. 9 Memory modules The computer has two memory module compartments. The primary memory module compartment is located on the bottom of...

HP ProBook User Guide - Windows 7
Page 128
If you are not sure whether the computer is off or in the primary memory module slot, follow these steps: 1. Unplug the power cord from the computer. 7. Turn the computer over and open it. 9. Then shut down ...power button. Remove all external devices connected to release the keyboard. 118 Chapter 9 Memory modules Slide the 4 keyboard release latches (1) to the computer. 4. Disconnect all batteries from the AC outlet. 5. Upgrading a memory module in the primary memory module slot To upgrade a memory module in Hibernation, turn the computer on a flat surface. 6. Shut down ...
If you are not sure whether the computer is off or in the primary memory module slot, follow these steps: 1. Unplug the power cord from the computer. 7. Turn the computer over and open it. 9. Then shut down ...power button. Remove all external devices connected to release the keyboard. 118 Chapter 9 Memory modules Slide the 4 keyboard release latches (1) to the computer. 4. Disconnect all batteries from the AC outlet. 5. Upgrading a memory module in the primary memory module slot To upgrade a memory module in Hibernation, turn the computer on a flat surface. 6. Shut down ...

HP ProBook User Guide - Windows 7
Page 129
... the components on the palm rest of the computer. 11. Upgrading a memory module in an electrostatic-safe container. The memory module tilts up. To protect a memory module after removal, place it rests on the memory module. CAUTION: To prevent damage to the memory module, hold the memory module by the edges only. Gently lift the top edge...
... the components on the palm rest of the computer. 11. Upgrading a memory module in an electrostatic-safe container. The memory module tilts up. To protect a memory module after removal, place it rests on the memory module. CAUTION: To prevent damage to the memory module, hold the memory module by the edges only. Gently lift the top edge...

HP ProBook User Guide - Windows 7
Page 131
17. Upgrading a memory module in the primary memory module slot 121 Turn the computer right-side up, and then reconnect external power and external devices. 20. Turn on the computer. Tighten the 3 keyboard access screws. 18. Replace the batteries. 19.
17. Upgrading a memory module in the primary memory module slot 121 Turn the computer right-side up, and then reconnect external power and external devices. 20. Turn on the computer. Tighten the 3 keyboard access screws. 18. Replace the batteries. 19.

HP ProBook User Guide - Windows 7
Page 166
... computer uses a fixed boot order that consists of first searching for a boot location each time the computer turns on your computer. ● Notebook upgrade bay ● Internal hard drive ● USB diskette drive ● USB CD-ROM ● USB hard drive ● Notebook Ethernet ● Secure... Digital (SD) Memory Card ● Docking device upgrade bay ● External SATA drive You can use MultiBoot Express to set the computer to prompt you to start and operate properly. Drive...
... computer uses a fixed boot order that consists of first searching for a boot location each time the computer turns on your computer. ● Notebook upgrade bay ● Internal hard drive ● USB diskette drive ● USB CD-ROM ● USB hard drive ● Notebook Ethernet ● Secure... Digital (SD) Memory Card ● Docking device upgrade bay ● External SATA drive You can use MultiBoot Express to set the computer to prompt you to start and operate properly. Drive...

HP ProBook User Guide - Windows 7
Page 181
...6, 7 power connector, identifying 14, 15 power cord, identifying 19 power light, identifying 3, 4, 11 power plans 72 primary memory module inserting 120 removing 119 replacing 118 upgrading 118 Product Key 20 product name and number, computer 19 projector, connecting 55 public WLAN connection 27 PXE server 158 Q QuickLook...151 System Configuration menu 152 setup, computer 1 shut down 85 Sleep exiting 71 initiating 71 Sleep hotkey 42 slots business card 11 memory 114 security cable 12, 15 smart card defined 113 inserting 113 removing 113 smart card reader, identifying 14 software BIOS update 141 ...
...6, 7 power connector, identifying 14, 15 power cord, identifying 19 power light, identifying 3, 4, 11 power plans 72 primary memory module inserting 120 removing 119 replacing 118 upgrading 118 Product Key 20 product name and number, computer 19 projector, connecting 55 public WLAN connection 27 PXE server 158 Q QuickLook...151 System Configuration menu 152 setup, computer 1 shut down 85 Sleep exiting 71 initiating 71 Sleep hotkey 42 slots business card 11 memory 114 security cable 12, 15 smart card defined 113 inserting 113 removing 113 smart card reader, identifying 14 software BIOS update 141 ...

