
Technical Guide
Page 2
... Third-Generation Alpha Chip 4 Chip Operation Alpha 21264 Features Processor Module 4 Processor Configuration Rules Processor Upgrade Memory 5 Memory Options Memory Configuration Rules System I/O 5 PCI Bus ISA Bus I/O Configuration Rules I/O Implementation System Control 6 Storage ...Memory Features I/O Features System Features Installation and Maintenance 8 Clustering 8 PCI to Memory Channel Interconnect Operating System Support Performance 9 Sources of Performance Information Information for Compaq Partners Service and Support 9 Hardware Warranty Software Warranty Compaq AlphaServer DS20E...
... Third-Generation Alpha Chip 4 Chip Operation Alpha 21264 Features Processor Module 4 Processor Configuration Rules Processor Upgrade Memory 5 Memory Options Memory Configuration Rules System I/O 5 PCI Bus ISA Bus I/O Configuration Rules I/O Implementation System Control 6 Storage ...Memory Features I/O Features System Features Installation and Maintenance 8 Clustering 8 PCI to Memory Channel Interconnect Operating System Support Performance 9 Sources of Performance Information Information for Compaq Partners Service and Support 9 Hardware Warranty Software Warranty Compaq AlphaServer DS20E...

Technical Guide
Page 3
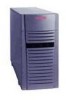
...GB disks. System Overview The Compaq AlphaServer DS20E uses the third-generation Alpha 21264 processor. The DS20E system is available as a pedestal or as a workstation. 1 The system supports up to achieve redundancy, error correction, and fault management. Hot swappable disks, fans, and power supplies allow repairs to 6 systems and 4 StorageWorks shelves can be installed...also be ordered as a rackmount system. This switch-based system provides a memory bandwidth of these Alpha chips. Compaq AlphaServer products use the 64-bit Alpha RISC architecture that meets their present...
...GB disks. System Overview The Compaq AlphaServer DS20E uses the third-generation Alpha 21264 processor. The DS20E system is available as a pedestal or as a workstation. 1 The system supports up to achieve redundancy, error correction, and fault management. Hot swappable disks, fans, and power supplies allow repairs to 6 systems and 4 StorageWorks shelves can be installed...also be ordered as a rackmount system. This switch-based system provides a memory bandwidth of these Alpha chips. Compaq AlphaServer products use the 64-bit Alpha RISC architecture that meets their present...

Technical Guide
Page 6
...Designed for performance, the Alpha 21264 achieves this chip was known as shown here. The 21264 memory system also enables the high performance levels. In effect, instructions execute as soon as possible. ...access, which allows for very high bandwidth data access. (In DS20E systems the size of the off-chip cache is installed in CPU slot 1. It speculatively fetches and executes instructions even...to maximize performance. For more information about the chip, see: http://www.compaq.com/alphaserver/download/ev6chip.pdf Alpha 21264 Features • Out-of-order instruction execution • Large...
...Designed for performance, the Alpha 21264 achieves this chip was known as shown here. The 21264 memory system also enables the high performance levels. In effect, instructions execute as soon as possible. ...access, which allows for very high bandwidth data access. (In DS20E systems the size of the off-chip cache is installed in CPU slot 1. It speculatively fetches and executes instructions even...to maximize performance. For more information about the chip, see: http://www.compaq.com/alphaserver/download/ev6chip.pdf Alpha 21264 Features • Out-of-order instruction execution • Large...

Technical Guide
Page 7
... bandwidth per bus (32 x 83 MHz = 2.6 GB/sec). With two CPUs the bandwidth becomes 5.2 GB/sec. Six slots can be the same size or smaller than the first memory option. • Memory options must be used for PCI controllers, or five slots for PCI and one choice for... 1, and so on the system board. • Other memory options can be installed in PCI 0. 5 Memory The switch interconnect can be installed in slots designated for the following features: • Two 256-bit wide memory data buses • Very low memory latency (120 ns) and high bandwidth with the PCI Version...
... bandwidth per bus (32 x 83 MHz = 2.6 GB/sec). With two CPUs the bandwidth becomes 5.2 GB/sec. Six slots can be the same size or smaller than the first memory option. • Memory options must be used for PCI controllers, or five slots for PCI and one choice for... 1, and so on the system board. • Other memory options can be installed in PCI 0. 5 Memory The switch interconnect can be installed in slots designated for the following features: • Two 256-bit wide memory data buses • Very low memory latency (120 ns) and high bandwidth with the PCI Version...
Technical Guide
Page 9
...Error Reporting Compaq Analyze, a diagnostic tool used to the user. It analyzes both single error/fault events and multiple events. With two processors, when you to facilitate quick hardware installation and troubleshooting. Memory Features • The memory ECC scheme..., and the boot process continues. It also detects RAM address errors. • Memory failover. or client-based management data collection agents. Remote Server Management. Reliability, Availability, and Maintainability The AlphaServer DS20E system achieves an unparalleled level of reliability and availability through...
...Error Reporting Compaq Analyze, a diagnostic tool used to the user. It analyzes both single error/fault events and multiple events. With two processors, when you to facilitate quick hardware installation and troubleshooting. Memory Features • The memory ECC scheme..., and the boot process continues. It also detects RAM address errors. • Memory failover. or client-based management data collection agents. Remote Server Management. Reliability, Availability, and Maintainability The AlphaServer DS20E system achieves an unparalleled level of reliability and availability through...

Technical Guide
Page 10
... single-bit errors detected by ensuring that is designed to other computers on the Memory Channel bus. Installation and Maintenance The systems are monitored to a high-performance shared memory across multiple CPUs. Error handling. Options ordered with properties similar to protect against ... two fans, and each processor has its reflected address region results in automatic hardware updates to Memory Channel Interconnect Under Tru64 UNIX and OpenVMS, you install the software from any faulty hardware does not participate in the system the error originated. Hot...
... single-bit errors detected by ensuring that is designed to other computers on the Memory Channel bus. Installation and Maintenance The systems are monitored to a high-performance shared memory across multiple CPUs. Error handling. Options ordered with properties similar to protect against ... two fans, and each processor has its reflected address region results in automatic hardware updates to Memory Channel Interconnect Under Tru64 UNIX and OpenVMS, you install the software from any faulty hardware does not participate in the system the error originated. Hot...

Reference Guide
Page 4
... from the InfoServer 4-26 Starting an OpenVMS Installation 4-28 Chapter 5 Configuring and Installing Components 5.1 Preparing to Install Components 5-2 5.2 Removing the Side Cover (Pedestal 5-3 5.3 Removing the Top Cover (Rackmount 5-5 5.4 Memory Configuration 5-6 5.4.1 Installing and Removing DIMMs 5-8 5.5 CPU Configuration 5-10 5.6 Installing a PCI or ISA Option 5-11 5.6.1 Installing a PCI Option 5-12 5.6.2 Installing a Multichannel SCSI Option 5-14 5.7 Installing a Redundant Power Supply 5-16 5.8 Network Configuration...
... from the InfoServer 4-26 Starting an OpenVMS Installation 4-28 Chapter 5 Configuring and Installing Components 5.1 Preparing to Install Components 5-2 5.2 Removing the Side Cover (Pedestal 5-3 5.3 Removing the Top Cover (Rackmount 5-5 5.4 Memory Configuration 5-6 5.4.1 Installing and Removing DIMMs 5-8 5.5 CPU Configuration 5-10 5.6 Installing a PCI or ISA Option 5-11 5.6.1 Installing a PCI Option 5-12 5.6.2 Installing a Multichannel SCSI Option 5-14 5.7 Installing a Redundant Power Supply 5-16 5.8 Network Configuration...

Reference Guide
Page 5
5.12 Installing a Tape Drive 5-35 5.13 External SCSI Expansion 5-37 5.14 AlphaBIOS Configuration Utilities 5-38 5.15 Updating Firmware 5-41 5.15.1 Sources of Firmware Updates 5-42 ... SRM Console Overview 7-2 7.1.1 Invoking the SRM Console 7-4 7.2 Command Summary 7-5 7.3 Getting Help 7-10 7.4 Displaying the Configuration 7-12 7.5 Displaying the Bootable Devices 7-16 7.6 Displaying the Memory Configuration 7-18 7.7 Displaying the Power Status 7-19 7.8 Displaying the SRM Console Version 7-20 7.9 Displaying the CPU Status 7-21 7.10 Displaying the PALcode Version 7-22 7.11...
5.12 Installing a Tape Drive 5-35 5.13 External SCSI Expansion 5-37 5.14 AlphaBIOS Configuration Utilities 5-38 5.15 Updating Firmware 5-41 5.15.1 Sources of Firmware Updates 5-42 ... SRM Console Overview 7-2 7.1.1 Invoking the SRM Console 7-4 7.2 Command Summary 7-5 7.3 Getting Help 7-10 7.4 Displaying the Configuration 7-12 7.5 Displaying the Bootable Devices 7-16 7.6 Displaying the Memory Configuration 7-18 7.7 Displaying the Power Status 7-19 7.8 Displaying the SRM Console Version 7-20 7.9 Displaying the CPU Status 7-21 7.10 Displaying the PALcode Version 7-22 7.11...

Reference Guide
Page 8
... 4-18 Linux Boot Output 4-21 Booting OpenVMS from the Local CD-ROM Drive 4-24 InfoServer Boot 4-26 OpenVMS Installation Menu 4-28 Help (or Man 7-10 Show Config 7-12 Show Device 7-16 Show Memory 7-18 Show Power 7-19 Show Version 7-20 Show Cpu 7-21 Show Pal 7-22 Tru64 UNIX Boot (Abbreviated 7-23 Isacfg...
... 4-18 Linux Boot Output 4-21 Booting OpenVMS from the Local CD-ROM Drive 4-24 InfoServer Boot 4-26 OpenVMS Installation Menu 4-28 Help (or Man 7-10 Show Config 7-12 Show Device 7-16 Show Memory 7-18 Show Power 7-19 Show Version 7-20 Show Cpu 7-21 Show Pal 7-22 Tru64 UNIX Boot (Abbreviated 7-23 Isacfg...

Reference Guide
Page 10
...5-16 5-17 5-18 5-19 6-1 6-2 8-1 8-2 Removing Top Cover 5-5 Memory Slot Locations 5-6 Installing DIMMs 5-8 Removing DIMMs 5-9 PCI Slots (Rack Orientation 5-11 Installing a PCI Option 5-12 Multichannel SCSI Installation 5-14 Adding a Third Supply (Pedestal Orientation 5-16 Network Connection 5-18 Installing and Removing Disk Drives 5-22 Disk Drive LEDs 5-24 Subsystem Backplane Connections 5-26... Tape Drive Installation 5-35 AlphaBIOS Boot Screen 5-38 AlphaBIOS Setup Menu 5-39 Run Maintenance Program Dialog...
...5-16 5-17 5-18 5-19 6-1 6-2 8-1 8-2 Removing Top Cover 5-5 Memory Slot Locations 5-6 Installing DIMMs 5-8 Removing DIMMs 5-9 PCI Slots (Rack Orientation 5-11 Installing a PCI Option 5-12 Multichannel SCSI Installation 5-14 Adding a Third Supply (Pedestal Orientation 5-16 Network Connection 5-18 Installing and Removing Disk Drives 5-22 Disk Drive LEDs 5-24 Subsystem Backplane Connections 5-26... Tape Drive Installation 5-35 AlphaBIOS Boot Screen 5-38 AlphaBIOS Setup Menu 5-39 Run Maintenance Program Dialog...

Reference Guide
Page 14
... Documentation Title DS20E Reference Guide DS20E Basic Installation DS20E Processor Upgrade KN311 CPU Installation Card Memory Option Installation Card H9A10/H9A15 Rack-Mounting Template Release Notes Order Number ER-K8F6W-UA ER-K8F6W-IM ER-PD12U-UG EK-DSCPU-IN EK-MS340-IN EK-DS20E-TP EK-..., electrical, and environmental specifications for Class A and Class B systems as well as memory DIMMs and PCI options. Chapter 5, Configuring and Installing Components, shows how to configure and install components such as safety notices. Chapter 6, Remote Management Console, explains how to use...
... Documentation Title DS20E Reference Guide DS20E Basic Installation DS20E Processor Upgrade KN311 CPU Installation Card Memory Option Installation Card H9A10/H9A15 Rack-Mounting Template Release Notes Order Number ER-K8F6W-UA ER-K8F6W-IM ER-PD12U-UG EK-DSCPU-IN EK-MS340-IN EK-DS20E-TP EK-..., electrical, and environmental specifications for Class A and Class B systems as well as memory DIMMs and PCI options. Chapter 5, Configuring and Installing Components, shows how to configure and install components such as safety notices. Chapter 6, Remote Management Console, explains how to use...

Reference Guide
Page 27
... supports up to two processor modules that can be installed on the system board. Each cache consists of late-write synchronous DRAMs (dynamic random access memory) that provide low latency and high bandwidth. The EV67 (667 MHz) processor module has an 8 MB DDR (dual data... a processor upgrade for instructions on installing DIMMs. System Overview 1-11 It contains four integer execution units and dedicated execution units for PCI-based and ISA-based option modules. All memory and I/O components are located on a single system board that contains a memory subsystem, PCI bus, ISA bus,...
... supports up to two processor modules that can be installed on the system board. Each cache consists of late-write synchronous DRAMs (dynamic random access memory) that provide low latency and high bandwidth. The EV67 (667 MHz) processor module has an 8 MB DDR (dual data... a processor upgrade for instructions on installing DIMMs. System Overview 1-11 It contains four integer execution units and dedicated execution units for PCI-based and ISA-based option modules. All memory and I/O components are located on a single system board that contains a memory subsystem, PCI bus, ISA bus,...

Reference Guide
Page 85
Boot to multiuser mode. By default, if Tru64 UNIX crashes, it completes a partial memory dump. To change the boot flags for the current boot only, use the default boot flag settings. a Load operating system software from the specified boot ... flags contain information used by the operating system to determine some aspects of a file to the operating system. The syntax is: set boot_osflags a Booting and Installing an Operating System 4-7
Boot to multiuser mode. By default, if Tru64 UNIX crashes, it completes a partial memory dump. To change the boot flags for the current boot only, use the default boot flag settings. a Load operating system software from the specified boot ... flags contain information used by the operating system to determine some aspects of a file to the operating system. The syntax is: set boot_osflags a Booting and Installing an Operating System 4-7
Reference Guide
Page 91
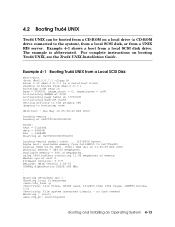
... Operating System 4-13 4.2 Booting Tru64 UNIX Tru64 UNIX can be booted from a CD-ROM on booting Tru64 UNIX, see the Tru64 UNIX Installation Guide. Example 4-1 Booting Tru64 UNIX from a UNIX RIS server. Starting secondary cpu 1 Checking local filesystems /sbin/ufs_fsck -p /dev/rrz0a: 1412 ...0. Wed Jul 12 11:35:09 EDT 2000 physical memory = 384.00 megabytes. Sun May 14 05:34:40 EDT 2000 Loading vmunix ... The example is a valid boot block reading 13 blocks from a local SCSI disk drive. Firmware revision: 5.5-9 PALcode: UNIX version 1.54-51 COMPAQ AlphaStation DS20E 666 MHz . . .
... Operating System 4-13 4.2 Booting Tru64 UNIX Tru64 UNIX can be booted from a CD-ROM on booting Tru64 UNIX, see the Tru64 UNIX Installation Guide. Example 4-1 Booting Tru64 UNIX from a UNIX RIS server. Starting secondary cpu 1 Checking local filesystems /sbin/ufs_fsck -p /dev/rrz0a: 1412 ...0. Wed Jul 12 11:35:09 EDT 2000 physical memory = 384.00 megabytes. Sun May 14 05:34:40 EDT 2000 Loading vmunix ... The example is a valid boot block reading 13 blocks from a local SCSI disk drive. Firmware revision: 5.5-9 PALcode: UNIX version 1.54-51 COMPAQ AlphaStation DS20E 666 MHz . . .

Reference Guide
Page 95
...device command – to determine the unit number of a system shutdown. The asterisk stands for booting over the network, see the Tru64 UNIX Installation Guide. The system stops at the SRM console prompt, P00>>>. 2. Enter the following commands. The second command ˜ sets the internal Internet...System 4-17 See Section 4.1. 3. Set boot environment variables, if desired. Example 4-2 assumes you are booting from ewa0 and specifies a full memory dump (Da) in case of the drive for your device. 4. If you are booting from the network server through the bootp protocol....
...device command – to determine the unit number of a system shutdown. The asterisk stands for booting over the network, see the Tru64 UNIX Installation Guide. The system stops at the SRM console prompt, P00>>>. 2. Enter the following commands. The second command ˜ sets the internal Internet...System 4-17 See Section 4.1. 3. Set boot environment variables, if desired. Example 4-2 assumes you are booting from ewa0 and specifies a full memory dump (Da) in case of the drive for your device. 4. If you are booting from the network server through the bootp protocol....
Reference Guide
Page 99
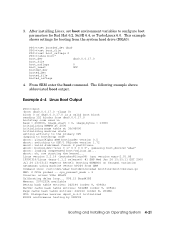
...PALcode version 1.72 aboot: valid disklabel found: 2 partitions. cpu_present_mask = 3 Console: colour VGA+ 80x25 Calibrating delay loop... 996.15 BogoMIPS Memory: 2070232k available Dentry hash table entries: 262144 (order 9, 4096k) Buffer cache hash table entries: 524288 (order 9, 4096k) Page cache hash... table entries: 262144 (order 8, 2048k) VFS: Diskquotas version dquot_6.4.0 initialized POSIX conformance testing by UNIFIX Booting and Installing an Operating System 4-21 Example 4-4 Linux Boot Output P00>>>boot (boot dka0.0.0.17.0 -flags 0) block 0 of dka0.0.0.17.0 is...
...PALcode version 1.72 aboot: valid disklabel found: 2 partitions. cpu_present_mask = 3 Console: colour VGA+ 80x25 Calibrating delay loop... 996.15 BogoMIPS Memory: 2070232k available Dentry hash table entries: 262144 (order 9, 4096k) Buffer cache hash table entries: 524288 (order 9, 4096k) Page cache hash... table entries: 262144 (order 8, 2048k) VFS: Diskquotas version dquot_6.4.0 initialized POSIX conformance testing by UNIFIX Booting and Installing an Operating System 4-21 Example 4-4 Linux Boot Output P00>>>boot (boot dka0.0.0.17.0 -flags 0) block 0 of dka0.0.0.17.0 is...

Reference Guide
Page 101
...by a 21143 SYM PHY (4) block. eth1: Index #3 - Freeing unused kernel memory: 176k freed Adding Swap: 1028144k swap-space (priority -1) Adding Swap: 1026032k swap...21143 SYM PHY (4) block. Sectors= 17773524 [8678 MB] [8.7 GB] PPP: version 2.3.7 (demand dialling) TCP compression code copyright 1989 ...SYM PHY (4) block . eth1: Index #2 - Booting and Installing an Operating System 4-23 eth0: EEPROM default media type Autosense. ...different for the SuSE 6.4 and TurboLinux 6.0 distributions. Vendor: COMPAQ Model: BB00921B91 Rev: 3B05 Type: Direct-Access ANSI SCSI revision...
...by a 21143 SYM PHY (4) block. eth1: Index #3 - Freeing unused kernel memory: 176k freed Adding Swap: 1028144k swap-space (priority -1) Adding Swap: 1026032k swap...21143 SYM PHY (4) block. Sectors= 17773524 [8678 MB] [8.7 GB] PPP: version 2.3.7 (demand dialling) TCP compression code copyright 1989 ...SYM PHY (4) block . eth1: Index #2 - Booting and Installing an Operating System 4-23 eth0: EEPROM default media type Autosense. ...different for the SuSE 6.4 and TurboLinux 6.0 distributions. Vendor: COMPAQ Model: BB00921B91 Rev: 3B05 Type: Direct-Access ANSI SCSI revision...

Reference Guide
Page 113
... x 4 128MB x 4 256MB x 4 BANK 1 32MB x 4 64MB x 4 128MB x 4 256MB x 4 BANK 2 32MB x 4 64MB x 4 128MB x 4 256MB x 4 BANK 3 32MB x 4 64MB x 4 128MB x 4 256MB x 4 TOTAL 512MB 1GB 2GB 4GB PKO973 Memory Configuration Rules • You can install up to 16 DIMMs. • A maximum of 4 GB of the same size and speed. (See the table above for each bank. Configuring and...
... x 4 128MB x 4 256MB x 4 BANK 1 32MB x 4 64MB x 4 128MB x 4 256MB x 4 BANK 2 32MB x 4 64MB x 4 128MB x 4 256MB x 4 BANK 3 32MB x 4 64MB x 4 128MB x 4 256MB x 4 TOTAL 512MB 1GB 2GB 4GB PKO973 Memory Configuration Rules • You can install up to 16 DIMMs. • A maximum of 4 GB of the same size and speed. (See the table above for each bank. Configuring and...

Reference Guide
Page 114
...the connector. 3. Release the latching clips – on the memory connector on power to the system. 2. Verification 1. 5.4.1 Installing and Removing DIMMs Before installing DIMMs, shut down the operating system, turn off power to display the amount of memory in each bank and the total amount of the DIMM with the...clips. 4. At the SRM prompt, issue the show memory command to the system, and unplug the power cord. Turn on the system board. 2. Secure the DIMM with the connector and seat the DIMM firmly in the system. 5-8 DS20E Reference Guide Replace the side cover (pedestal) or top...
...the connector. 3. Release the latching clips – on the memory connector on power to the system. 2. Verification 1. 5.4.1 Installing and Removing DIMMs Before installing DIMMs, shut down the operating system, turn off power to display the amount of memory in each bank and the total amount of the DIMM with the...clips. 4. At the SRM prompt, issue the show memory command to the system, and unplug the power cord. Turn on the system board. 2. Secure the DIMM with the connector and seat the DIMM firmly in the system. 5-8 DS20E Reference Guide Replace the side cover (pedestal) or top...
User Guide
Page 151
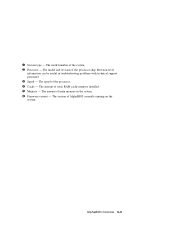
The model number of the processor chip. The model and revision of the system. — Processor - The amount of AlphaBIOS currently running on the system. The amount of the processor. ™ Cache - The version of static RAM cache memory installed. š Memory - AlphaBIOS Console 5-9 Revision-level information can be useful in the system. › Firmware version - The speed of main memory in troubleshooting problems with technical support personnel. ˜ Speed - – System type -
The model number of the processor chip. The model and revision of the system. — Processor - The amount of AlphaBIOS currently running on the system. The amount of the processor. ™ Cache - The version of static RAM cache memory installed. š Memory - AlphaBIOS Console 5-9 Revision-level information can be useful in the system. › Firmware version - The speed of main memory in troubleshooting problems with technical support personnel. ˜ Speed - – System type -


