
End User License Agreement
Page 2
... related to all component parts, media, printed materials, this EULA. 8. f. Any software recovery solution provided with the update or supplement. UPGRADES. ADDITIONAL SOFTWARE. The transfer may no longer use of a conflict between such terms, the other terms along with /for which the recovery...be governed by law, including but not limited to United States copyright, trade secret, and trademark law, as well as an upgrade, you provide in this limitation or it is effective unless terminated or rejected. LIMITATION ON REVERSE ENGINEERING. The use the original ...
... related to all component parts, media, printed materials, this EULA. 8. f. Any software recovery solution provided with the update or supplement. UPGRADES. ADDITIONAL SOFTWARE. The transfer may no longer use of a conflict between such terms, the other terms along with /for which the recovery...be governed by law, including but not limited to United States copyright, trade secret, and trademark law, as well as an upgrade, you provide in this limitation or it is effective unless terminated or rejected. LIMITATION ON REVERSE ENGINEERING. The use the original ...
HP Client Manager 6.1
Page 2
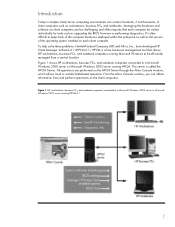
..., and notebook computers connected to be visited individually for tasks such as the version of the computer hardware deployed within the enterprise as well as upgrading the BIOS firmware or performing diagnostics. From the Altiris Console window, you can obtain information from a central location. Figure 1. To help solve these problems, Hewlett...
..., and notebook computers connected to be visited individually for tasks such as the version of the computer hardware deployed within the enterprise as well as upgrading the BIOS firmware or performing diagnostics. From the Altiris Console window, you can obtain information from a central location. Figure 1. To help solve these problems, Hewlett...
HP Client Manager 6.1
Page 3
... HPCM Server and then use HPCM to schedule the installation of the drivers on the HPCM Server. With HPCM, SoftPaq installation can be used to upgrade the BIOS firmware on the HPCM Server. With HPCM, the user can perform the following types of operations on the client computers from a central Filestore...
... HPCM Server and then use HPCM to schedule the installation of the drivers on the HPCM Server. With HPCM, SoftPaq installation can be used to upgrade the BIOS firmware on the HPCM Server. With HPCM, the user can perform the following types of operations on the client computers from a central Filestore...
Hardware Reference Guide
Page 1
b Hardware Reference Guide Compaq Evo Desktop D310v Series Document Part Number: 293388-001 August 2002 This guide provides basic information about upgrading this series of computers.
b Hardware Reference Guide Compaq Evo Desktop D310v Series Document Part Number: 293388-001 August 2002 This guide provides basic information about upgrading this series of computers.
Hardware Reference Guide
Page 3
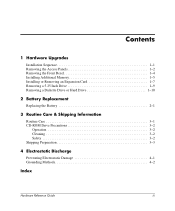
Contents 1 Hardware Upgrades Installation Sequence 1-1 Removing the Access Panels 1-2 Removing the Front Bezel 1-4 Installing Additional Memory 1-5 Installing or Removing an Expansion Card 1-7 Removing a 5.25 Inch Drive 1-9 Removing a Diskette Drive or Hard Drive 1-10 2 Battery Replacement Replacing the Battery 2-1 3 Routine Care & Shipping Information Routine Care 3-1 CD-ROM Drive Precautions 3-2 Operation 3-2 Cleaning 3-2 Safety 3-2 Shipping Preparation 3-3 4 Electrostatic Discharge Preventing Electrostatic Damage 4-1 Grounding Methods 4-2 Index Hardware Reference Guide iii
Contents 1 Hardware Upgrades Installation Sequence 1-1 Removing the Access Panels 1-2 Removing the Front Bezel 1-4 Installing Additional Memory 1-5 Installing or Removing an Expansion Card 1-7 Removing a 5.25 Inch Drive 1-9 Removing a Diskette Drive or Hard Drive 1-10 2 Battery Replacement Replacing the Battery 2-1 3 Routine Care & Shipping Information Routine Care 3-1 CD-ROM Drive Precautions 3-2 Operation 3-2 Cleaning 3-2 Safety 3-2 Shipping Preparation 3-3 4 Electrostatic Discharge Preventing Electrostatic Damage 4-1 Grounding Methods 4-2 Index Hardware Reference Guide iii

Hardware Reference Guide
Page 4
1 Hardware Upgrades Installation Sequence It is turned on, turn it off and disconnect the power cord from the wall outlet. Å WARNING: To reduce the risk of ...
1 Hardware Upgrades Installation Sequence It is turned on, turn it off and disconnect the power cord from the wall outlet. Å WARNING: To reduce the risk of ...
Hardware Reference Guide
Page 5
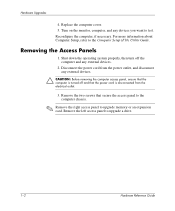
...CAUTION: Before removing the computer access panel, ensure that the computer is turned off the computer and any devices you want to upgrade memory or an expansion card. Hardware Upgrades 4. Turn on the monitor, computer, and any external devices. 2. Reconfigure the computer, if necessary. Remove the left access ...panel to the computer chassis. ✎ Remove the right access panel to test. For more information about Computer Setup, refer to upgrade a drive. 1-2 Hardware Reference Guide Removing the Access Panels 1. Disconnect the power cord from the electrical outlet. 3.
...CAUTION: Before removing the computer access panel, ensure that the computer is turned off the computer and any devices you want to upgrade memory or an expansion card. Hardware Upgrades 4. Turn on the monitor, computer, and any external devices. 2. Reconfigure the computer, if necessary. Remove the left access ...panel to the computer chassis. ✎ Remove the right access panel to test. For more information about Computer Setup, refer to upgrade a drive. 1-2 Hardware Reference Guide Removing the Access Panels 1. Disconnect the power cord from the electrical outlet. 3.

Hardware Reference Guide
Page 6
Hardware Reference Guide 1-3 Removing the Computer Access Panels To replace the access panel, reverse steps 1-4. Slide the access panel back about 1 inch (2.5 cm), then lift it away from and off the unit. Hardware Upgrades 4.
Hardware Reference Guide 1-3 Removing the Computer Access Panels To replace the access panel, reverse steps 1-4. Slide the access panel back about 1 inch (2.5 cm), then lift it away from and off the unit. Hardware Upgrades 4.

Hardware Reference Guide
Page 7
... two circular tabs inside the front of the chassis 1, then pull the front bezel away from the power outlet, and disconnect any external devices. 2. Hardware Upgrades Removing the Front Bezel ✎ Remove the front bezel to release it 2. Shut down the operating system properly, then turn off the computer and any...
... two circular tabs inside the front of the chassis 1, then pull the front bezel away from the power outlet, and disconnect any external devices. 2. Hardware Upgrades Removing the Front Bezel ✎ Remove the front bezel to release it 2. Shut down the operating system properly, then turn off the computer and any...
Hardware Reference Guide
Page 8
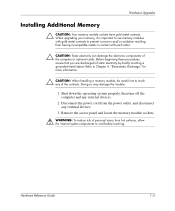
... metals in contact with each other. Ä CAUTION: Static electricity can damage the electronic components of static electricity by briefly touching a grounded metal object. When upgrading your memory, it is important to use memory modules with gold metal contacts to touch any external devices. 2. Hardware...
... metals in contact with each other. Ä CAUTION: Static electricity can damage the electronic components of static electricity by briefly touching a grounded metal object. When upgrading your memory, it is important to use memory modules with gold metal contacts to touch any external devices. 2. Hardware...
Hardware Reference Guide
Page 9
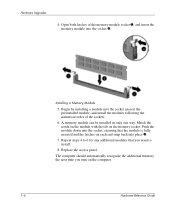
... nearest the preinstalled module, and install the modules following the numerical order of the memory module socket 1, and insert the memory module into place 3. 7. Hardware Upgrades 4.
... nearest the preinstalled module, and install the modules following the numerical order of the memory module socket 1, and insert the memory module into place 3. 7. Hardware Upgrades 4.

Hardware Reference Guide
Page 10
... expansion card or an expansion slot cover to the expansion card. 5. Be sure not to scrape the card against other components. 7. Hardware Reference Guide 1-7 Hardware Upgrades Installing or Removing an Expansion Card 1. Disconnect the power cord from the socket.
... expansion card or an expansion slot cover to the expansion card. 5. Be sure not to scrape the card against other components. 7. Hardware Reference Guide 1-7 Hardware Upgrades Installing or Removing an Expansion Card 1. Disconnect the power cord from the socket.

Hardware Reference Guide
Page 11
Hardware Upgrades 10. Slide the expansion card into the expansion socket and press it firmly into place. Replace the screw at the top of the expansion slot. 12. Reconfigure the computer, if necessary. 1-8 Hardware Reference Guide Installing an Expansion Card ✎ When you install an expansion card, make sure you press firmly on the card so that the entire connector seats properly in the expansion card socket. 11. Replace the access panel. 13. Connect external cables to the installed card, if needed.
Hardware Upgrades 10. Slide the expansion card into the expansion socket and press it firmly into place. Replace the screw at the top of the expansion slot. 12. Reconfigure the computer, if necessary. 1-8 Hardware Reference Guide Installing an Expansion Card ✎ When you install an expansion card, make sure you press firmly on the card so that the entire connector seats properly in the expansion card socket. 11. Replace the access panel. 13. Connect external cables to the installed card, if needed.

Hardware Reference Guide
Page 12
Hardware Upgrades Removing a 5.25 Inch Drive 1. Remove both access panels. 4. Slide the drive out of the drive. 6. Remove the four screws, two from the power outlet. 3. Removing the 5.25 Inch Drive Hardware Reference Guide 1-9 Remove the front bezel. 5. Shut down the operating system properly, then turn off the computer and any external devices. 2. Disconnect the power cord from each side, that secure the drive in the illustration below 2. Disconnect the power, data, and audio cables, as necessary, from the back of the drive cage, as shown in the drive cage 1. 7.
Hardware Upgrades Removing a 5.25 Inch Drive 1. Remove both access panels. 4. Slide the drive out of the drive. 6. Remove the four screws, two from the power outlet. 3. Removing the 5.25 Inch Drive Hardware Reference Guide 1-9 Remove the front bezel. 5. Shut down the operating system properly, then turn off the computer and any external devices. 2. Disconnect the power cord from each side, that secure the drive in the illustration below 2. Disconnect the power, data, and audio cables, as necessary, from the back of the drive cage, as shown in the drive cage 1. 7.

Hardware Reference Guide
Page 13
Hardware Upgrades Removing a Diskette Drive or Hard Drive 1. Remove the left access panel. 4. Remove the front bezel. 5. Remove the four screws, 3 in the front and 1 on the side, that secure the drive cage to the chassis. Remove the drive cage from the power outlet. 3. Disconnect the power cord from the chassis. 1-10 Hardware Reference Guide Shut down the operating system properly, then turn off the computer and any external devices. 2. Disconnect the power, data, and audio cables, as necessary, from the back of the drive. 6. Removing the Drive Cage 7.
Hardware Upgrades Removing a Diskette Drive or Hard Drive 1. Remove the left access panel. 4. Remove the front bezel. 5. Remove the four screws, 3 in the front and 1 on the side, that secure the drive cage to the chassis. Remove the drive cage from the power outlet. 3. Disconnect the power cord from the chassis. 1-10 Hardware Reference Guide Shut down the operating system properly, then turn off the computer and any external devices. 2. Disconnect the power, data, and audio cables, as necessary, from the back of the drive. 6. Removing the Drive Cage 7.

Hardware Reference Guide
Page 14
Hardware Upgrades 8. Remove the four screws, two from each side, that secure the drive in the illustrations below 2. Slide the drive out of the drive cage, as shown in the drive cage 1. 9. Hardware Reference Guide 1-11 Removing the Diskette Drive Removing the Hard Drive To replace the drive cage, reverse steps 5-6.
Hardware Upgrades 8. Remove the four screws, two from each side, that secure the drive in the illustrations below 2. Slide the drive out of the drive cage, as shown in the drive cage 1. 9. Hardware Reference Guide 1-11 Removing the Diskette Drive Removing the Hard Drive To replace the drive cage, reverse steps 5-6.
Quick Setup & Getting Started Guide
Page 3
... and Install the Operating System 1-6 Step 7: Turn Off the Personal Computer 1-7 2 Getting Started Accessibility 2-1 Software Setup 2-1 File System Format 2-1 Installing or Upgrading Device Drivers 2-2 Customizing the Monitor Display 2-3 Protecting Your Software 2-4 Compaq Restore Solution 2-4 Registration 2-4 For More Information 2-5 Getting Help 2-6 Basic Troubleshooting 2-7 Overview 2-7 Helpful Hints 2-7 Solving General Problems 2-9 Solving Hardware Installation Problems...
... and Install the Operating System 1-6 Step 7: Turn Off the Personal Computer 1-7 2 Getting Started Accessibility 2-1 Software Setup 2-1 File System Format 2-1 Installing or Upgrading Device Drivers 2-2 Customizing the Monitor Display 2-3 Protecting Your Software 2-4 Compaq Restore Solution 2-4 Registration 2-4 For More Information 2-5 Getting Help 2-6 Basic Troubleshooting 2-7 Overview 2-7 Helpful Hints 2-7 Solving General Problems 2-9 Solving Hardware Installation Problems...
Quick Setup & Getting Started Guide
Page 14
... or all data stored on select models only. Before converting your hard drive. This action points the OS to change the drive partitioning. Installing or Upgrading Device Drivers To install optional hardware devices after the OS installation is available on your drive, make a backup copy of all of the dialog box...
... or all data stored on select models only. Before converting your hard drive. This action points the OS to change the drive partitioning. Installing or Upgrading Device Drivers To install optional hardware devices after the OS installation is available on your drive, make a backup copy of all of the dialog box...


