End User License Agreement
Page 1
... is provided to distribute the Software PRODUCT ARE OFFERED ONLY Product. You may load the Software ON THE CONDITION THAT YOU Product into the local memory or storage device of the HP Product. d. Freeware. You may make archival or back-up purposes. You may include associated media, printed materials and "online... EULA. GRANT OF LICENSE. You may accompany the HP Product. You do not have Software Product into Your Computer's AGREE TO ALL TERMS AND temporary memory (RAM) for use with all or any Software Product, installed on a single computer ("Your Computer").
... is provided to distribute the Software PRODUCT ARE OFFERED ONLY Product. You may load the Software ON THE CONDITION THAT YOU Product into the local memory or storage device of the HP Product. d. Freeware. You may make archival or back-up purposes. You may include associated media, printed materials and "online... EULA. GRANT OF LICENSE. You may accompany the HP Product. You do not have Software Product into Your Computer's AGREE TO ALL TERMS AND temporary memory (RAM) for use with all or any Software Product, installed on a single computer ("Your Computer").

External Media Cards - Windows 7
Page 5
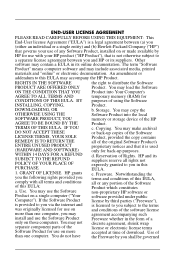
These cards are often used with digital media-equipped cameras and PDAs as well as with other computers. The Digital Media Slot supports the following digital card formats: ● Memory Stick (MS) ● Memory Stick Pro (MSP) ● MultiMediaCard (MMC) ● Secure Digital Input/Output (SD I/O) ● Secure Digital (SD) Memory Card ● xD-Picture Card (XD) ● xD-Picture Card (XD) Type H ● xD-Picture Card (XD) Type M 1 Using Digital Media Slot cards (select models only) Optional digital cards provide secure data storage and convenient data sharing.
These cards are often used with digital media-equipped cameras and PDAs as well as with other computers. The Digital Media Slot supports the following digital card formats: ● Memory Stick (MS) ● Memory Stick Pro (MSP) ● MultiMediaCard (MMC) ● Secure Digital Input/Output (SD I/O) ● Secure Digital (SD) Memory Card ● xD-Picture Card (XD) ● xD-Picture Card (XD) Type H ● xD-Picture Card (XD) Type M 1 Using Digital Media Slot cards (select models only) Optional digital cards provide secure data storage and convenient data sharing.
External Media Cards - Windows Vista
Page 5
These cards are often used with digital media-equipped cameras and PDAs as well as with other computers. Using Digital Media Slot cards (select models only) Optional digital cards provide secure data storage and convenient data sharing. The Digital Media Slot supports the following digital card formats: ● Memory Stick (MS) ● Memory Stick Pro (MSP) ● MultiMediaCard (MMC) ● Secure Digital Input/Output (SD I/O) ● Secure Digital (SD) Memory Card ● xD-Picture Card (XD) ● xD-Picture Card (XD) Type H ● xD-Picture Card (XD) Type M 1
These cards are often used with digital media-equipped cameras and PDAs as well as with other computers. Using Digital Media Slot cards (select models only) Optional digital cards provide secure data storage and convenient data sharing. The Digital Media Slot supports the following digital card formats: ● Memory Stick (MS) ● Memory Stick Pro (MSP) ● MultiMediaCard (MMC) ● Secure Digital Input/Output (SD I/O) ● Secure Digital (SD) Memory Card ● xD-Picture Card (XD) ● xD-Picture Card (XD) Type H ● xD-Picture Card (XD) Type M 1
Memory Modules - Windows Vista and Windows 7
Page 5
Table of contents Adding or replacing a memory module Index ...5 v
Table of contents Adding or replacing a memory module Index ...5 v
Memory Modules - Windows Vista and Windows 7
Page 7
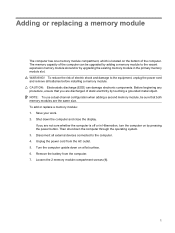
... the equipment, unplug the power cord and remove all external devices connected to the vacant expansion memory module slot and/or by upgrading the existing memory module in Hibernation, turn the computer on by pressing the power button. Save your work.... 6. WARNING! To add or replace a memory module: 1. Disconnect all batteries before installing a memory module. Loosen the 2 memory module compartment screws (1). 1 Adding or replacing a memory module The computer has one memory module compartment, which is off or in the primary memory module slot. Shut down the computer through...
... the equipment, unplug the power cord and remove all external devices connected to the vacant expansion memory module slot and/or by upgrading the existing memory module in Hibernation, turn the computer on by pressing the power button. Save your work.... 6. WARNING! To add or replace a memory module: 1. Disconnect all batteries before installing a memory module. Loosen the 2 memory module compartment screws (1). 1 Adding or replacing a memory module The computer has one memory module compartment, which is off or in the primary memory module slot. Shut down the computer through...
Memory Modules - Windows Vista and Windows 7
Page 8
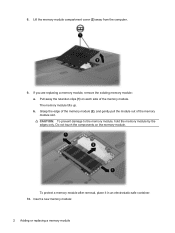
... away the retention clips (1) on the memory module. Grasp the edge of the memory module (2), and gently pull the module out of the memory module. Insert a new memory module: 2 Adding or replacing a memory module If you are replacing a memory module, remove the existing memory module: a. The memory module tilts up. To protect a memory module after removal, place it in...
... away the retention clips (1) on the memory module. Grasp the edge of the memory module (2), and gently pull the module out of the memory module. Insert a new memory module: 2 Adding or replacing a memory module If you are replacing a memory module, remove the existing memory module: a. The memory module tilts up. To protect a memory module after removal, place it in...
Memory Modules - Windows Vista and Windows 7
Page 9
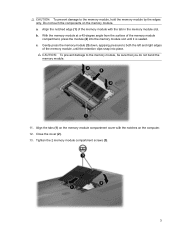
... the notches on the computer. 12. Tighten the 2 memory module compartment screws (3). 3 Do not touch the components on the memory module compartment cover with the tab in the memory module slot. Align the notched edge (1) of the memory module, until it is seated. With the memory module at a 45-degree angle from the surface of...
... the notches on the computer. 12. Tighten the 2 memory module compartment screws (3). 3 Do not touch the components on the memory module compartment cover with the tab in the memory module slot. Align the notched edge (1) of the memory module, until it is seated. With the memory module at a 45-degree angle from the surface of...
Memory Modules - Windows Vista and Windows 7
Page 10
Reconnect external power and external devices. 16. Turn on the computer. 4 Adding or replacing a memory module Replace the battery. 15. 14.
Reconnect external power and external devices. 16. Turn on the computer. 4 Adding or replacing a memory module Replace the battery. 15. 14.
Memory Modules - Windows Vista and Windows 7
Page 11
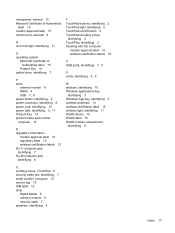
Index M memory adding memory modules 1 replacing memory modules 1 upgrading memory modules 1 memory module adding 1 inserting 2 removing 2 replacing 1 upgrading 1 memory module compartment cover removing 2 replacing 3 Index 5
Index M memory adding memory modules 1 replacing memory modules 1 upgrading memory modules 1 memory module adding 1 inserting 2 removing 2 replacing 1 upgrading 1 memory module compartment cover removing 2 replacing 3 Index 5
Notebook Tour - Windows 7
Page 14
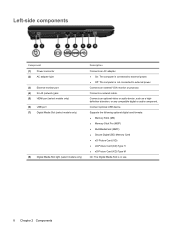
Connects an external VGA monitor or projector. Supports the following optional digital card formats: ● Memory Stick (MS) ● Memory Stick Pro (MSP) ● MultiMediaCard (MMC) ● Secure Digital (SD) Memory Card ● xD-Picture Card (XD) ● xD-Picture Card (XD) Type H ● xD-Picture Card (XD) Type M On: The Digital Media Slot...
Connects an external VGA monitor or projector. Supports the following optional digital card formats: ● Memory Stick (MS) ● Memory Stick Pro (MSP) ● MultiMediaCard (MMC) ● Secure Digital (SD) Memory Card ● xD-Picture Card (XD) ● xD-Picture Card (XD) Type H ● xD-Picture Card (XD) Type M On: The Digital Media Slot...
Notebook Tour - Windows 7
Page 15
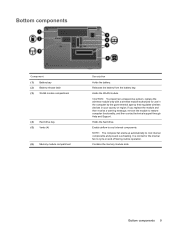
... internal components. Bottom components Component (1) Battery bay (2) Battery release latch (3) WLAN module compartment (4) Hard drive bay (5) Vents (4) (6) Memory module compartment Description Holds the battery. CAUTION: To prevent an unresponsive system, replace the wireless module only with a wireless module authorized for the internal... the module and then receive a warning message, remove the module to cycle on and off during routine operation. Contains the memory module slots. Releases the battery from the battery bay. Bottom components 9 It is normal for use in the computer by ...
... internal components. Bottom components Component (1) Battery bay (2) Battery release latch (3) WLAN module compartment (4) Hard drive bay (5) Vents (4) (6) Memory module compartment Description Holds the battery. CAUTION: To prevent an unresponsive system, replace the wireless module only with a wireless module authorized for the internal... the module and then receive a warning message, remove the module to cycle on and off during routine operation. Contains the memory module slots. Releases the battery from the battery bay. Bottom components 9 It is normal for use in the computer by ...
Notebook Tour - Windows 7
Page 22
... hard drive 9 Bluetooth label 15 buttons power 4 TouchPad 2 TouchPad on/off 2 C caps lock, lights 11 Certificate of Authenticity label 15 cleaning the display 12 compartments memory module 9 WLAN module 9 components additional hardware 14 bottom 9 display 10 front 5 left-side 8 rear 6 right-side 7 top 2 connectors, power 8 cord, power 14 D Digital Media Slot... 15 wireless certification 15 WLAN 15 latches battery release 9 lights battery 5, 11 caps lock 11 drive 5, 12 num lock 11 power 5, 11 TouchPad 2 wireless 11 M memory module compartment, identifying 9 microphone (audio-in) jack 5 16 Index
... hard drive 9 Bluetooth label 15 buttons power 4 TouchPad 2 TouchPad on/off 2 C caps lock, lights 11 Certificate of Authenticity label 15 cleaning the display 12 compartments memory module 9 WLAN module 9 components additional hardware 14 bottom 9 display 10 front 5 left-side 8 rear 6 right-side 7 top 2 connectors, power 8 cord, power 14 D Digital Media Slot... 15 wireless certification 15 WLAN 15 latches battery release 9 lights battery 5, 11 caps lock 11 drive 5, 12 num lock 11 power 5, 11 TouchPad 2 wireless 11 M memory module compartment, identifying 9 microphone (audio-in) jack 5 16 Index

Notebook Tour - Windows 7
Page 23
... 15 WLAN module compartment, identifying 9 S scrolling zones, TouchPad 2 security cable slot, identifying 7 serial number, computer 15 service tag 15 SIM label 15 slots Digital Media 8 memory module 9 security cable 7 speakers, identifying 4 Index 17
... 15 WLAN module compartment, identifying 9 S scrolling zones, TouchPad 2 security cable slot, identifying 7 serial number, computer 15 service tag 15 SIM label 15 slots Digital Media 8 memory module 9 security cable 7 speakers, identifying 4 Index 17

Notebook Tour - Windows Vista
Page 14
..., such as a highdefinition television, or any compatible digital or audio component. Supports the following optional digital card formats: ● Memory Stick (MS) ● Memory Stick Pro (MSP) ● MultiMediaCard (MMC) ● Secure Digital (SD) Memory Card ● xD-Picture Card (XD) ● xD-Picture Card (XD) Type H ● xD-Picture Card (XD) Type...
..., such as a highdefinition television, or any compatible digital or audio component. Supports the following optional digital card formats: ● Memory Stick (MS) ● Memory Stick Pro (MSP) ● MultiMediaCard (MMC) ● Secure Digital (SD) Memory Card ● xD-Picture Card (XD) ● xD-Picture Card (XD) Type H ● xD-Picture Card (XD) Type...

Notebook Tour - Windows Vista
Page 15
... module and then receive a warning message, remove the module to cycle on and off during routine operation. Contains the memory module slots. Bottom components 9 It is normal for use in the computer by the governmental agency that regulates wireless devices... prevent overheating. Bottom components Component (1) Battery bay (2) Battery release latch (3) WLAN module compartment (4) Hard drive bay (5) Vents (4) (6) Memory module compartment Description Holds the battery. NOTE: The computer fan starts up automatically to cool internal components. Releases the battery from the battery bay....
... module and then receive a warning message, remove the module to cycle on and off during routine operation. Contains the memory module slots. Bottom components 9 It is normal for use in the computer by the governmental agency that regulates wireless devices... prevent overheating. Bottom components Component (1) Battery bay (2) Battery release latch (3) WLAN module compartment (4) Hard drive bay (5) Vents (4) (6) Memory module compartment Description Holds the battery. NOTE: The computer fan starts up automatically to cool internal components. Releases the battery from the battery bay....

Notebook Tour - Windows Vista
Page 22
... hard drive 9 Bluetooth label 15 buttons power 4 TouchPad 2 TouchPad on/off 2 C caps lock, lights 11 Certificate of Authenticity label 15 cleaning the display 12 compartments memory module 9 WLAN module 9 components additional hardware 14 bottom 9 display 10 front 5 left-side 8 rear 6 right-side 7 top 2 connectors, power 8 cord, power 14 D Digital Media Slot... 15 wireless certification 15 WLAN 15 latches battery release 9 lights battery 5, 11 caps lock 11 drive 5, 12 num lock 11 power 5, 11 TouchPad 2 wireless 11 M memory module compartment, identifying 9 microphone (audio-in) jack 5 16 Index
... hard drive 9 Bluetooth label 15 buttons power 4 TouchPad 2 TouchPad on/off 2 C caps lock, lights 11 Certificate of Authenticity label 15 cleaning the display 12 compartments memory module 9 WLAN module 9 components additional hardware 14 bottom 9 display 10 front 5 left-side 8 rear 6 right-side 7 top 2 connectors, power 8 cord, power 14 D Digital Media Slot... 15 wireless certification 15 WLAN 15 latches battery release 9 lights battery 5, 11 caps lock 11 drive 5, 12 num lock 11 power 5, 11 TouchPad 2 wireless 11 M memory module compartment, identifying 9 microphone (audio-in) jack 5 16 Index
Notebook Tour - Windows Vista
Page 23
... 15 WLAN module compartment, identifying 9 S scrolling zones, TouchPad 2 security cable slot, identifying 7 serial number, computer 15 service tag 15 SIM label 15 slots Digital Media 8 memory module 9 security cable 7 speakers, identifying 4 Index 17
... 15 WLAN module compartment, identifying 9 S scrolling zones, TouchPad 2 security cable slot, identifying 7 serial number, computer 15 service tag 15 SIM label 15 slots Digital Media 8 memory module 9 security cable 7 speakers, identifying 4 Index 17

Pointing Devices and Keyboard - Windows 7
Page 10
...information is stored in Windows Control Panel. While the Log On window is displayed, the computer cannot be changed using Power Options in system memory, the screen is cleared, and power is saved to Help and Support. To use QuickLock, you can be accessed until a Windows ...user password or a Windows administrator password is in memory is conserved. Hold down the hotkey to increase the brightness level incrementally. For example, you must be changed . While the computer is entered...
...information is stored in Windows Control Panel. While the Log On window is displayed, the computer cannot be changed using Power Options in system memory, the screen is cleared, and power is saved to Help and Support. To use QuickLock, you can be accessed until a Windows ...user password or a Windows administrator password is in memory is conserved. Hold down the hotkey to increase the brightness level incrementally. For example, you must be changed . While the computer is entered...
Setup Utility - Windows Vista and Windows 7
Page 9
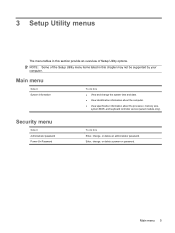
... do this ● View and change the system time and date. ● View identification information about the computer. ● View specification information about the processor, memory size, system BIOS, and keyboard controller version (select models only). Main menu Select System information To do this Enter, change , or delete a power-on password...
... do this ● View and change the system time and date. ● View identification information about the computer. ● View specification information about the processor, memory size, system BIOS, and keyboard controller version (select models only). Main menu Select System information To do this Enter, change , or delete a power-on password...
Setup Utility - Windows Vista and Windows 7
Page 10
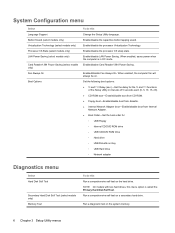
...Test. Run a diagnostic test on . Enable/disable the processor C6 sleep state. When enabled, the computer fan will always be on the system memory. 6 Chapter 3 Setup Utility menus Run a comprehensive self-test on Key ◦ USB Hard drive ◦ Network adapter Diagnostics menu Select ...Hard Disk Self Test Secondary Hard Disk Self Test (select models only) Memory Test To do this Run a comprehensive self-test on the hard drive. System Configuration menu Select Language Support Button Sound (select models ...
...Test. Run a diagnostic test on . Enable/disable the processor C6 sleep state. When enabled, the computer fan will always be on the system memory. 6 Chapter 3 Setup Utility menus Run a comprehensive self-test on Key ◦ USB Hard drive ◦ Network adapter Diagnostics menu Select ...Hard Disk Self Test Secondary Hard Disk Self Test (select models only) Memory Test To do this Run a comprehensive self-test on the hard drive. System Configuration menu Select Language Support Button Sound (select models ...


