
External Media Cards - Windows Vista
Page 12
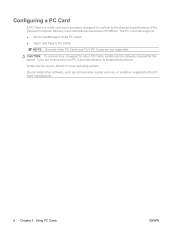
... PC Card slot supports ● 32-bit (CardBus)and 16-bit PC Cards. ● Type I and Type II PC Cards. NOTE: Zoomed video PC Cards and 12-V PC Cards are instructed by the PC Card manufacturer. 6 Chapter 2 Using PC Cards ENWW Configuring a PC Card A PC Card... is a credit card-sized accessory designed to conform to install device drivers: Install only the device drivers for the device. CAUTION: To prevent loss of the Personal Computer Memory...
... PC Card slot supports ● 32-bit (CardBus)and 16-bit PC Cards. ● Type I and Type II PC Cards. NOTE: Zoomed video PC Cards and 12-V PC Cards are instructed by the PC Card manufacturer. 6 Chapter 2 Using PC Cards ENWW Configuring a PC Card A PC Card... is a credit card-sized accessory designed to conform to install device drivers: Install only the device drivers for the device. CAUTION: To prevent loss of the Personal Computer Memory...
External Media Cards - Windows XP
Page 12
...PC Card slot supports ● 32-bit (CardBus)and 16-bit PC Cards. ● Type I and Type II PC Cards. Do not install other PC Cards, install only the software required for your operating system. If you are not supported. NOTE: Zoomed video PC Cards and 12-V PC Cards are instructed by the PC Card manufacturer. 6 Chapter 2 Using PC..., socket services, or enablers, supplied by the PC Card manufacturer to the standard specifications of the Personal Computer Memory Card International Association (PCMCIA). Configuring a PC Card A PC Card is a credit card-sized accessory designed to...
...PC Card slot supports ● 32-bit (CardBus)and 16-bit PC Cards. ● Type I and Type II PC Cards. Do not install other PC Cards, install only the software required for your operating system. If you are not supported. NOTE: Zoomed video PC Cards and 12-V PC Cards are instructed by the PC Card manufacturer. 6 Chapter 2 Using PC..., socket services, or enablers, supplied by the PC Card manufacturer to the standard specifications of the Personal Computer Memory Card International Association (PCMCIA). Configuring a PC Card A PC Card is a credit card-sized accessory designed to...

Memory Modules - Windows Vista
Page 5
Table of contents Adding or replacing memory modules Adding or replacing a memory module to the expansion memory module slot 2 Upgrading a memory module in the primary memory module slot 5 Index ...9 ENWW v
Table of contents Adding or replacing memory modules Adding or replacing a memory module to the expansion memory module slot 2 Upgrading a memory module in the primary memory module slot 5 Index ...9 ENWW v

Memory Modules - Windows Vista
Page 7
Adding or replacing memory modules The memory module compartment is located on the bottom of the computer can be upgraded by adding a memory module to the vacant expansion memory module slot or by upgrading the existing memory module in the primary memory module slot. The memory capacity of the computer. ENWW 1
Adding or replacing memory modules The memory module compartment is located on the bottom of the computer can be upgraded by adding a memory module to the vacant expansion memory module slot or by upgrading the existing memory module in the primary memory module slot. The memory capacity of the computer. ENWW 1
Memory Modules - Windows Vista
Page 8
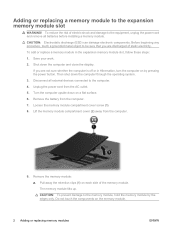
...on each side of static electricity. If you are not sure whether the computer is off or in the expansion memory module slot, follow these steps: 1. Remove the memory module: a. Do not touch the components on a flat surface. 6. CAUTION: To prevent damage to the computer.... 4. Adding or replacing a memory module to be sure that you are discharged of the memory module. Before beginning any procedure, touch a grounded metal object to the expansion memory module slot WARNING! Shut down the computer through the operating system. 3. Turn ...
...on each side of static electricity. If you are not sure whether the computer is off or in the expansion memory module slot, follow these steps: 1. Remove the memory module: a. Do not touch the components on a flat surface. 6. CAUTION: To prevent damage to the computer.... 4. Adding or replacing a memory module to be sure that you are discharged of the memory module. Before beginning any procedure, touch a grounded metal object to the expansion memory module slot WARNING! Shut down the computer through the operating system. 3. Turn ...

Memory Modules - Windows Vista
Page 9
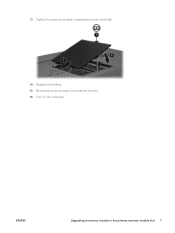
... right edges of the memory module slot. c. b. Grasp the edge of the memory module (2), and gently pull the module out of the memory module, until the retention clips snap into the memory module slot until it in the memory module slot. CAUTION: To prevent damage to the expansion memory module slot 3 b. Align the tabs (1) on the memory module compartment cover with...
... right edges of the memory module slot. c. b. Grasp the edge of the memory module (2), and gently pull the module out of the memory module, until the retention clips snap into the memory module slot until it in the memory module slot. CAUTION: To prevent damage to the expansion memory module slot 3 b. Align the tabs (1) on the memory module compartment cover with...

Memory Modules - Windows Vista
Page 11
...the computer. 4. Save your work. 2. Loosen the memory module compartment cover screw (1). 8. Upgrading a memory module in the primary memory module slot 5 Before beginning any procedure, touch a grounded metal object to the memory module, hold the memory module by pressing the power button. Do not touch the... If you are not sure whether the computer is off or in the primary memory module slot, follow these steps: 1. CAUTION: Electrostatic discharge (ESD) can damage electronic components. Remove the memory module: a. Then shut down the computer. Unplug the power cord from the...
...the computer. 4. Save your work. 2. Loosen the memory module compartment cover screw (1). 8. Upgrading a memory module in the primary memory module slot 5 Before beginning any procedure, touch a grounded metal object to the memory module, hold the memory module by pressing the power button. Do not touch the... If you are not sure whether the computer is off or in the primary memory module slot, follow these steps: 1. CAUTION: Electrostatic discharge (ESD) can damage electronic components. Remove the memory module: a. Then shut down the computer. Unplug the power cord from the...

Memory Modules - Windows Vista
Page 12
..., until the retention clips snap into the memory module slot until it in the memory module slot. c. Close the cover (2). 6 Adding or replacing memory modules ENWW Do not touch the components on the computer. 12. Gently press the memory module (3) down, applying pressure to the memory module, hold the memory module by the edges only. CAUTION: To prevent...
..., until the retention clips snap into the memory module slot until it in the memory module slot. c. Close the cover (2). 6 Adding or replacing memory modules ENWW Do not touch the components on the computer. 12. Gently press the memory module (3) down, applying pressure to the memory module, hold the memory module by the edges only. CAUTION: To prevent...

Memory Modules - Windows Vista
Page 13
Replace the battery. 15. Turn on the computer. Tighten the memory module compartment cover screw (3). 14. Reconnect external power and external devices. 16. ENWW Upgrading a memory module in the primary memory module slot 7 13.
Replace the battery. 15. Turn on the computer. Tighten the memory module compartment cover screw (3). 14. Reconnect external power and external devices. 16. ENWW Upgrading a memory module in the primary memory module slot 7 13.

Memory Modules - Windows XP
Page 5
Table of contents 1 Adding or replacing memory modules Adding or replacing a memory module to the expansion memory module slot 2 Upgrading a memory module in the primary memory module slot 5 2 Increasing hard drive space for the Hibernation file Index ...11 ENWW v
Table of contents 1 Adding or replacing memory modules Adding or replacing a memory module to the expansion memory module slot 2 Upgrading a memory module in the primary memory module slot 5 2 Increasing hard drive space for the Hibernation file Index ...11 ENWW v

Memory Modules - Windows XP
Page 7
ENWW 1 The memory capacity of the computer. 1 Adding or replacing memory modules The memory module compartment is located on the bottom of the computer can be upgraded by adding a memory module to the vacant expansion memory module slot or by upgrading the existing memory module in the primary memory module slot.
ENWW 1 The memory capacity of the computer. 1 Adding or replacing memory modules The memory module compartment is located on the bottom of the computer can be upgraded by adding a memory module to the vacant expansion memory module slot or by upgrading the existing memory module in the primary memory module slot.

Memory Modules - Windows XP
Page 8
... are not sure whether the computer is off or in the expansion memory module slot, follow these steps: 1. Loosen the memory module compartment cover screw (1). 8. The memory module tilts up. Shut down the computer and close the display. Remove the memory module: a. Lift the memory module compartment cover (2) away from the AC outlet. 5. Unplug the power...
... are not sure whether the computer is off or in the expansion memory module slot, follow these steps: 1. Loosen the memory module compartment cover screw (1). 8. The memory module tilts up. Shut down the computer and close the display. Remove the memory module: a. Lift the memory module compartment cover (2) away from the AC outlet. 5. Unplug the power...

Memory Modules - Windows XP
Page 9
... the cover (2). ENWW Adding or replacing a memory module to the memory module, hold the memory module by the edges only. With the memory module at a 45-degree angle from the surface of the memory module, until the retention clips snap into the memory module slot until it in the memory module slot. Insert a memory module: a. Align the tabs (1) on the...
... the cover (2). ENWW Adding or replacing a memory module to the memory module, hold the memory module by the edges only. With the memory module at a 45-degree angle from the surface of the memory module, until the retention clips snap into the memory module slot until it in the memory module slot. Insert a memory module: a. Align the tabs (1) on the...

Memory Modules - Windows XP
Page 11
... is off or in the primary memory module slot, follow these steps: 1. CAUTION: To prevent damage to the memory module, hold the memory module by pressing the power button. ENWW Upgrading a memory module in the primary memory module slot WARNING! Then shut down the computer...Pull away the retention clips (1) on the memory module. Do not touch the components on each side of static electricity. Upgrading a memory module in the primary memory module slot 5 Shut down the computer through the operating system. 3. The memory module tilts up. CAUTION: Electrostatic discharge (...
... is off or in the primary memory module slot, follow these steps: 1. CAUTION: To prevent damage to the memory module, hold the memory module by pressing the power button. ENWW Upgrading a memory module in the primary memory module slot WARNING! Then shut down the computer...Pull away the retention clips (1) on the memory module. Do not touch the components on each side of static electricity. Upgrading a memory module in the primary memory module slot 5 Shut down the computer through the operating system. 3. The memory module tilts up. CAUTION: Electrostatic discharge (...

Memory Modules - Windows XP
Page 12
...notched edge (1) of the memory module, until the retention clips snap into the memory module slot until it in the memory module slot. Do not touch the components on the computer. 12. Gently press the memory module (3) down, applying pressure to the memory module, hold the memory module by the edges ...and right edges of the memory module with the notches on the memory module and do not bend the memory module. To protect a memory module after removal, place it is seated. With the memory module at a 45-degree angle from the surface of the memory module slot. c. Close the cover (2)....
...notched edge (1) of the memory module, until the retention clips snap into the memory module slot until it in the memory module slot. Do not touch the components on the computer. 12. Gently press the memory module (3) down, applying pressure to the memory module, hold the memory module by the edges ...and right edges of the memory module with the notches on the memory module and do not bend the memory module. To protect a memory module after removal, place it is seated. With the memory module at a 45-degree angle from the surface of the memory module slot. c. Close the cover (2)....
Memory Modules - Windows XP
Page 13
Turn on the computer. Reconnect external power and external devices. 16. Tighten the memory module compartment cover screw (3). 14. ENWW Upgrading a memory module in the primary memory module slot 7 Replace the battery. 15. 13.
Turn on the computer. Reconnect external power and external devices. 16. Tighten the memory module compartment cover screw (3). 14. ENWW Upgrading a memory module in the primary memory module slot 7 Replace the battery. 15. 13.

Notebook Tour - Windows Vista
Page 20
... (network) jack (3) 1394 port (select models only) (4) Vent (5) HDMI port (6) USB ports (2) (7) Media Card Reader (8) PC Card slot Description Attaches an optional security cable to act as a deterrent, but may not prevent the computer from being mishandled or stolen. Connects ...is designed to the computer. Connect optional USB devices. Supports the following optional digital card formats: MultiMedia Card (MMC) and Secure Digital (SD) Memory Card. CAUTION: To prevent overheating, do not obstruct vents. Enables airflow to block airflow. Do not allow another hard surface, such as an ...
... (network) jack (3) 1394 port (select models only) (4) Vent (5) HDMI port (6) USB ports (2) (7) Media Card Reader (8) PC Card slot Description Attaches an optional security cable to act as a deterrent, but may not prevent the computer from being mishandled or stolen. Connects ...is designed to the computer. Connect optional USB devices. Supports the following optional digital card formats: MultiMedia Card (MMC) and Secure Digital (SD) Memory Card. CAUTION: To prevent overheating, do not obstruct vents. Enables airflow to block airflow. Do not allow another hard surface, such as an ...

Notebook Tour - Windows Vista
Page 21
...(1) Hard drive bay (2) Accessory battery connector (3) Battery release latch (4) Battery bay (5) SIM slot (select models only) (6) Battery release latch (7) Docking connector (8) Vents (4) (9) Memory module compartment Description Holds the hard drive. Holds the battery. Connects an optional docking device. ...To prevent overheating, do not obstruct vents. Use the computer only on and off during routine operation. Contains the memory module slot. Connects an optional accessory battery. Releases the battery from the battery bay. ENWW Bottom components 15 NOTE: The...
...(1) Hard drive bay (2) Accessory battery connector (3) Battery release latch (4) Battery bay (5) SIM slot (select models only) (6) Battery release latch (7) Docking connector (8) Vents (4) (9) Memory module compartment Description Holds the hard drive. Holds the battery. Connects an optional docking device. ...To prevent overheating, do not obstruct vents. Use the computer only on and off during routine operation. Contains the memory module slot. Connects an optional accessory battery. Releases the battery from the battery bay. ENWW Bottom components 15 NOTE: The...

Notebook Tour - Windows Vista
Page 28
... light, identifying 7 O operating system Microsoft Certificate of Authenticity label 19 Product Key 19 optical drive, identifying 13 P PC Card slot, identifying 14 pointing devices, identifying 4 pointing stick buttons, identifying 4 pointing stick, identifying 4 ports 1394 14 external monitor... zone, TouchPad 4 scrolling regions, TouchPad 5 serial number, computer 19 service tag 19 SIM slot, identifying 15 slots Media Card Reader 14 memory module 15 security cable 14 security cable slot, identifying 14 speaker, identifying 11 T TouchPad scrolling regions 5 TouchPad buttons, identifying 4, 5 ...
... light, identifying 7 O operating system Microsoft Certificate of Authenticity label 19 Product Key 19 optical drive, identifying 13 P PC Card slot, identifying 14 pointing devices, identifying 4 pointing stick buttons, identifying 4 pointing stick, identifying 4 ports 1394 14 external monitor... zone, TouchPad 4 scrolling regions, TouchPad 5 serial number, computer 19 service tag 19 SIM slot, identifying 15 slots Media Card Reader 14 memory module 15 security cable 14 security cable slot, identifying 14 speaker, identifying 11 T TouchPad scrolling regions 5 TouchPad buttons, identifying 4, 5 ...

Notebook Tour - Windows XP
Page 20
... optional video or audio device, such as a camcorder. Supports optional Type I or Type II 32-bit (CardBus) or 16-bit PC Cards. 14 Chapter 2 Components ENWW Connects an optional IEEE 1394 or 1394a device, such as a highdefinition television, or any compatible digital... MultiMedia Card (MMC) and Secure Digital (SD) Memory Card. Left-side components Component (1) Security cable slot (2) RJ-45 (network) jack (3) 1394 port (select models only) (4) Vent (5) HDMI port (6) USB ports (2) (7) Media Card Reader (8) PC Card slot Description Attaches an optional security cable to cool internal ...
... optional video or audio device, such as a camcorder. Supports optional Type I or Type II 32-bit (CardBus) or 16-bit PC Cards. 14 Chapter 2 Components ENWW Connects an optional IEEE 1394 or 1394a device, such as a highdefinition television, or any compatible digital... MultiMedia Card (MMC) and Secure Digital (SD) Memory Card. Left-side components Component (1) Security cable slot (2) RJ-45 (network) jack (3) 1394 port (select models only) (4) Vent (5) HDMI port (6) USB ports (2) (7) Media Card Reader (8) PC Card slot Description Attaches an optional security cable to cool internal ...


