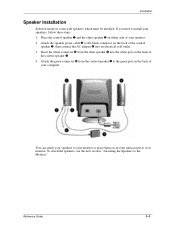
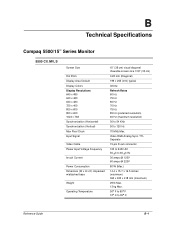
Compaq 7550 - V 17" CRT Display Research

Related Manual Pages


Similar Questions

What Is R429 Resistor Value In Hp S7500 Pe1163
(Posted by malibhms125 1 year ago)

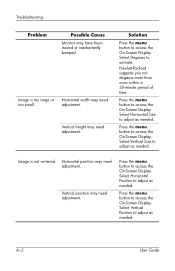
Computer Screen Goes Black When In Use
My compaq 7550 screen sometimes goes black when iin use
My compaq 7550 screen sometimes goes black when iin use
(Posted by retimmons5 11 years ago)
Monitor Problem
My monitor Compaq 7550 has width problem it has only centred screen even increase width up 100
My monitor Compaq 7550 has width problem it has only centred screen even increase width up 100
(Posted by munirsop 12 years ago)

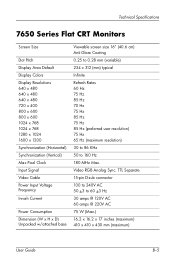
Crt Monitor Series 5500 - 9500.
During general use of the computer monitor cuts on and off. Once off the monitor must be unplugged a...
During general use of the computer monitor cuts on and off. Once off the monitor must be unplugged a...
(Posted by sheneka110 13 years ago)

Using Fs 7550 & Display Shrunk Horizontally. On Screen Setting At 100%. Pls Help
(Posted by morewala 13 years ago)