
Startup Guide
Page 3
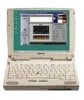
...Components 1-3 Left Panel and Back Panel Components 1-4 Bottom Panel Components 1-5 Status Lights 1-6 Setting Up Your Notebook 1-8 Step 1: Insert the Battery Pack 1-8 Step 2: Connect AC Power 1-9 Step 3: Connect a Phone Line 1-10 Step 4: Turn On the Notebook 1-11 Step 5: Set Up Windows 1-12 Using the Documentation CD 1-12 2 Basic Operation Operating Your Notebook 2-1 Default Power Settings 2-2 To Reset the Notebook 2-3 To Change the Boot Device 2-3 To Use the TouchPad 2-4 To Use the Tap to Click Function of the TouchPad 2-5 To Use the Function Hot Keys 2-6 Startup Guide iii
...Components 1-3 Left Panel and Back Panel Components 1-4 Bottom Panel Components 1-5 Status Lights 1-6 Setting Up Your Notebook 1-8 Step 1: Insert the Battery Pack 1-8 Step 2: Connect AC Power 1-9 Step 3: Connect a Phone Line 1-10 Step 4: Turn On the Notebook 1-11 Step 5: Set Up Windows 1-12 Using the Documentation CD 1-12 2 Basic Operation Operating Your Notebook 2-1 Default Power Settings 2-2 To Reset the Notebook 2-3 To Change the Boot Device 2-3 To Use the TouchPad 2-4 To Use the Tap to Click Function of the TouchPad 2-5 To Use the Function Hot Keys 2-6 Startup Guide iii
Startup Guide
Page 4
... Media (Select Models Only) . . . . 2-7 To Connect a TV to Your Notebook (Select Models Only 2-8 3 Battery Packs and Power Management Using Battery Power 3-1 To Respond to a Low-Battery Warning 3-3 To Recharge the Battery Pack 3-3 To Get the Most from Your Battery Packs 3-4 Disposing of a Used Battery Pack 3-6 4 Troubleshooting Troubleshooting Your Notebook 4-1 Display Problems 4-2 Hard Drive Problems 4-3 Performance Problems 4-4 Power and Battery Pack Problems 4-5 Startup Problems 4-6 Configuring Your Notebook 4-7 To Run the BIOS Setup Utility 4-7 Updating Software and Drivers...
... Media (Select Models Only) . . . . 2-7 To Connect a TV to Your Notebook (Select Models Only 2-8 3 Battery Packs and Power Management Using Battery Power 3-1 To Respond to a Low-Battery Warning 3-3 To Recharge the Battery Pack 3-3 To Get the Most from Your Battery Packs 3-4 Disposing of a Used Battery Pack 3-6 4 Troubleshooting Troubleshooting Your Notebook 4-1 Display Problems 4-2 Hard Drive Problems 4-3 Performance Problems 4-4 Power and Battery Pack Problems 4-5 Startup Problems 4-6 Configuring Your Notebook 4-7 To Run the BIOS Setup Utility 4-7 Updating Software and Drivers...

Startup Guide
Page 8
Getting Started with Your Notebook Left Panel and Back Panel Components 1 AC adapter jack 2 Universal serial bus (USB) ports 3 RJ-45 jack: connects a network cable 4 S-Video out jack (select models only) 5 External monitor port 6 Cable lock slot (security connector) 7 RJ-11 jack: connects the modem cable 8 PC Card and CardBus slot and button (select models only; location varies by model) 9 IEEE 1394 port (select models only) - Audio jacks (left to right): external microphone, audio out (headphones) q Volume control w Audio mute button and audio mute light 1-4 Startup Guide
Getting Started with Your Notebook Left Panel and Back Panel Components 1 AC adapter jack 2 Universal serial bus (USB) ports 3 RJ-45 jack: connects a network cable 4 S-Video out jack (select models only) 5 External monitor port 6 Cable lock slot (security connector) 7 RJ-11 jack: connects the modem cable 8 PC Card and CardBus slot and button (select models only; location varies by model) 9 IEEE 1394 port (select models only) - Audio jacks (left to right): external microphone, audio out (headphones) q Volume control w Audio mute button and audio mute light 1-4 Startup Guide
Startup Guide
Page 10
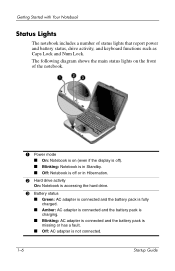
... Started with Your Notebook Status Lights The notebook includes a number of the notebook. 1 Power mode ■ On: Notebook is on the front of status lights that report power and battery status, drive activity, and keyboard functions such as Caps Lock and Num Lock. The following diagram shows the main status lights on (even if the display is off). ■ Blinking: Notebook is in Standby. ■ Off: Notebook is off or in Hibernation. 2 Hard drive activity On: Notebook is accessing...
... Started with Your Notebook Status Lights The notebook includes a number of the notebook. 1 Power mode ■ On: Notebook is on the front of status lights that report power and battery status, drive activity, and keyboard functions such as Caps Lock and Num Lock. The following diagram shows the main status lights on (even if the display is off). ■ Blinking: Notebook is in Standby. ■ Off: Notebook is off or in Hibernation. 2 Hard drive activity On: Notebook is accessing...

Startup Guide
Page 11
Startup Guide 1-7 Num Lock must also be on to use the embedded keypad.) 3 Keypad Lock On: The embedded keypad is active (Fn+F8). Getting Started with Your Notebook The keyboard status lights, located above the keyboard, indicate the states of the keyboard locks. 1 Caps Lock On: Caps Lock is active. 2 Num Lock On: Num Lock is active. (The Keypad Lock must also be on to activate the numeric keys. Otherwise, cursor control is active (as marked on an external keyboard).
Startup Guide 1-7 Num Lock must also be on to use the embedded keypad.) 3 Keypad Lock On: The embedded keypad is active (Fn+F8). Getting Started with Your Notebook The keyboard status lights, located above the keyboard, indicate the states of the keyboard locks. 1 Caps Lock On: Caps Lock is active. 2 Num Lock On: Num Lock is active. (The Keypad Lock must also be on to activate the numeric keys. Otherwise, cursor control is active (as marked on an external keyboard).
Startup Guide
Page 16
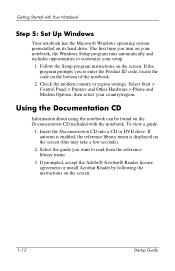
... enabled, the reference library menu is displayed on the screen. 1-12 Startup Guide Select the guide you to enter the Product ID code, locate the code on its hard drive. If the program prompts you want to customize your country/region. The first time you turn on the screen. Select Start > Control Panel > Printers and Other Hardware > Phone and Modem Options, then select your setup. 1. Follow the Setup program instructions on your notebook, the Windows Setup...
... enabled, the reference library menu is displayed on the screen. 1-12 Startup Guide Select the guide you to enter the Product ID code, locate the code on its hard drive. If the program prompts you want to customize your country/region. The first time you turn on the screen. Select Start > Control Panel > Printers and Other Hardware > Phone and Modem Options, then select your setup. 1. Follow the Setup program instructions on your notebook, the Windows Setup...
Startup Guide
Page 19
... the display shuts down Windows. Use the arrow keys to display the Boot menu. 3. Startup Guide 2-3 To Change the Boot Device The notebook normally boots from a diskette drive, a CD-ROM drive, or an internal network interface card. 1. You can also boot the notebook from its internal hard drive. When the logo screen appears, press esc to select the boot device, then press enter. Press the power button again to restart. -or■ Insert the tip of a paper clip into the reset button on...
... the display shuts down Windows. Use the arrow keys to display the Boot menu. 3. Startup Guide 2-3 To Change the Boot Device The notebook normally boots from a diskette drive, a CD-ROM drive, or an internal network interface card. 1. You can also boot the notebook from its internal hard drive. When the logo screen appears, press esc to select the boot device, then press enter. Press the power button again to restart. -or■ Insert the tip of a paper clip into the reset button on...

Startup Guide
Page 22
Increases the display brightness. Toggles the external monitor on and off. Toggles the built-in keypad on and off . Initiates Hibernation. Mutes/unmutes the audio output. 2-6 Startup Guide Basic Operation To Use the Function Hot Keys The combination of the Fn key plus another key creates a hot key-a shortcut key sequence-for various system controls. If Num Lock is active (as marked on an external keyboard). Increases the audio volume and cancels the mute setting. Does not...
Increases the display brightness. Toggles the external monitor on and off. Toggles the built-in keypad on and off . Initiates Hibernation. Mutes/unmutes the audio output. 2-6 Startup Guide Basic Operation To Use the Function Hot Keys The combination of the Fn key plus another key creates a hot key-a shortcut key sequence-for various system controls. If Num Lock is active (as marked on an external keyboard). Increases the audio volume and cancels the mute setting. Does not...

Startup Guide
Page 27
... notebook enters Hibernation in this way, you will not be able to turn it on the notebook model, power management settings, and level of the following procedures: ■ Replace the battery pack with a charged one. ■ Plug in the AC adapter. ✎ If you plug in a briefcase or other confined space, or the battery pack could overheat. » Plug the AC adapter into the notebook...
... notebook enters Hibernation in this way, you will not be able to turn it on the notebook model, power management settings, and level of the following procedures: ■ Replace the battery pack with a charged one. ■ Plug in the AC adapter. ✎ If you plug in a briefcase or other confined space, or the battery pack could overheat. » Plug the AC adapter into the notebook...

Startup Guide
Page 28
... using a CD-ROM or DVD drive, or any external connections such as a network card, remove it when you are inactive. ■ If you work with an application that uses the serial port or a PC Card, exit the application when you are not using it . Press the wireless on-off button to save your notebook has a wireless on battery power (the default settings conserve battery power). ■ If your current session but will not be using it. 3-4 Startup Guide...
... using a CD-ROM or DVD drive, or any external connections such as a network card, remove it when you are inactive. ■ If you work with an application that uses the serial port or a PC Card, exit the application when you are not using it . Press the wireless on-off button to save your notebook has a wireless on battery power (the default settings conserve battery power). ■ If your current session but will not be using it. 3-4 Startup Guide...
Startup Guide
Page 32
... external display is enabled. 4-2 Startup Guide In the BIOS Setup utility, try setting Video Display Device to Both in the display properties ❏ Continue to warm up. If the Screen Is Difficult to Read ■ Set the display resolution to its default setting of 1024 × 768 or higher, depending on your specific monitor ❏ Select the external monitor as the primary display device in the System Devices menu. ■ If you are using a TV connected to the optional S-Video port...
... external display is enabled. 4-2 Startup Guide In the BIOS Setup utility, try setting Video Display Device to Both in the display properties ❏ Continue to warm up. If the Screen Is Difficult to Read ■ Set the display resolution to its default setting of 1024 × 768 or higher, depending on your specific monitor ❏ Select the external monitor as the primary display device in the System Devices menu. ■ If you are using a TV connected to the optional S-Video port...

Startup Guide
Page 33
... pointer controls by selecting Start > Control Panel > Printers and Other Hardware > Mouse. ■ Ensure that your thumb or palm is difficult. If Files Are Corrupted ■ Open My Computer, and the disk you can format the hard disk and reinstall the original factory software using the TouchPad is not pressing or near the TouchPad on-off button while typing. ■ Use an external mouse if using the system recovery features described in or external devices. Startup Guide...
... pointer controls by selecting Start > Control Panel > Printers and Other Hardware > Mouse. ■ Ensure that your thumb or palm is difficult. If Files Are Corrupted ■ Open My Computer, and the disk you can format the hard disk and reinstall the original factory software using the TouchPad is not pressing or near the TouchPad on-off button while typing. ■ Use an external mouse if using the system recovery features described in or external devices. Startup Guide...
Startup Guide
Page 34
... devices are running. 4-4 Startup Guide Then press the power button again to turn the notebook back on the light. ■ Do not touch the TouchPad while the notebook is connected, the built-in this setting with the BIOS Setup utility. Troubleshooting If the TouchPad Does Not Work ■ Press the TouchPad on-off button to turn on . ■ To avoid lockup problems, avoid turning the notebook off or putting it into the reset button on the keyboard to turn...
... devices are running. 4-4 Startup Guide Then press the power button again to turn the notebook back on the light. ■ Do not touch the TouchPad while the notebook is connected, the built-in this setting with the BIOS Setup utility. Troubleshooting If the TouchPad Does Not Work ■ Press the TouchPad on-off button to turn on . ■ To avoid lockup problems, avoid turning the notebook off or putting it into the reset button on the keyboard to turn...

Startup Guide
Page 35
... AC adapter. If the Notebook Keeps Beeping The notebook beeps repeatedly or displays a warning when battery power is fully installed and locked in the AC adapter or insert a charged battery pack. If the battery pack gets too hot, it directly into a wall outlet. ■ Make sure the battery pack is low. Plug in place. ■ Make sure you are using only the AC adapter included with your work, shut...
... AC adapter. If the Notebook Keeps Beeping The notebook beeps repeatedly or displays a warning when battery power is fully installed and locked in the AC adapter or insert a charged battery pack. If the battery pack gets too hot, it directly into a wall outlet. ■ Make sure the battery pack is low. Plug in place. ■ Make sure you are using only the AC adapter included with your work, shut...
Startup Guide
Page 36
... reset the notebook using the reset button. The lights show the charge level. ■ If available, try another battery pack. 4-6 Startup Guide Then press the power button to turn it and pressing the pad on the side of the notebook. Troubleshooting Startup Problems If the Notebook Does Not Respond When You Turn It On ■ Connect the AC adapter. ■ Reset the notebook by removing it on. ■ If the notebook still does not respond, remove the battery...
... reset the notebook using the reset button. The lights show the charge level. ■ If available, try another battery pack. 4-6 Startup Guide Then press the power button to turn it and pressing the pad on the side of the notebook. Troubleshooting Startup Problems If the Notebook Does Not Respond When You Turn It On ■ Connect the AC adapter. ■ Reset the notebook by removing it on. ■ If the notebook still does not respond, remove the battery...

Startup Guide
Page 37
... enter to your notebook to change a setting. 4. The settings made in a menu. ❏ Press + or - Select Start > Turn Off Computer > Restart. 2. The pointing devices are not active in BIOS Setup, so you will need to use the Exit menu to enter BIOS Setup. 3. After you select the options you to make changes to the notebook system configuration and to tailor the operation of your individual work needs. To Run the BIOS Setup Utility The BIOS (basic input and output system) Setup utility enables...
... enter to your notebook to change a setting. 4. The settings made in a menu. ❏ Press + or - Select Start > Turn Off Computer > Restart. 2. The pointing devices are not active in BIOS Setup, so you will need to use the Exit menu to enter BIOS Setup. 3. After you select the options you to make changes to the notebook system configuration and to tailor the operation of your individual work needs. To Run the BIOS Setup Utility The BIOS (basic input and output system) Setup utility enables...
Startup Guide
Page 44
... of 3-4 installing 1-8 location 1-3 low-battery warning 3-3 recharging 3-3 release latch 1-5 Startup Guide status lights 1-6 troubleshooting 4-5 battery power check status 3-2 low-battery warning 3-3 recharging 3-3 battery status lights 3-2 BIOS Setup Utility 4-7 bottom panel components 1-5 brightness, adjusting 2-6 buttons Click 1-3 One-Touch 1-3 on-off (on TouchPad) 1-3 power 1-3, 1-11 reset 1-5 wireless on-off 1-3 C cable lock slot 1-4 changing the boot device 2-3 Click buttons 1-3 components back panel 1-4 bottom panel 1-5 keyboard status lights 1-3 left panel 1-4 status lights 1-2 Index...
... of 3-4 installing 1-8 location 1-3 low-battery warning 3-3 recharging 3-3 release latch 1-5 Startup Guide status lights 1-6 troubleshooting 4-5 battery power check status 3-2 low-battery warning 3-3 recharging 3-3 battery status lights 3-2 BIOS Setup Utility 4-7 bottom panel components 1-5 brightness, adjusting 2-6 buttons Click 1-3 One-Touch 1-3 on-off (on TouchPad) 1-3 power 1-3, 1-11 reset 1-5 wireless on-off 1-3 C cable lock slot 1-4 changing the boot device 2-3 Click buttons 1-3 components back panel 1-4 bottom panel 1-5 keyboard status lights 1-3 left panel 1-4 status lights 1-2 Index...
Startup Guide
Page 45
...data disc 2-7 creating movie disc 2-7 playing movies 2-7 setting region code 2-7 E external monitor connecting 2-8 port location 1-4 F function hot keys 2-6 H hard drive activity status light 1-6 location 1-3, 1-5 troubleshooting 4-3 Hibernation mode 2-2 hot keys 2-6 I identifying components 1-2 increasing display brightness 2-6 inserting the battery pack 1-8 K keyboard status lights 1-3, 1-7 troubleshooting 4-3 keys 2-6 L left panel components 1-4 low-battery warning 3-3 M Mini PCI cover 1-5 N network jack, location 1-4 O One-Touch buttons 1-3 on-off button 1-3 open/close latch 1-3 Operating...
...data disc 2-7 creating movie disc 2-7 playing movies 2-7 setting region code 2-7 E external monitor connecting 2-8 port location 1-4 F function hot keys 2-6 H hard drive activity status light 1-6 location 1-3, 1-5 troubleshooting 4-3 Hibernation mode 2-2 hot keys 2-6 I identifying components 1-2 increasing display brightness 2-6 inserting the battery pack 1-8 K keyboard status lights 1-3, 1-7 troubleshooting 4-3 keys 2-6 L left panel components 1-4 low-battery warning 3-3 M Mini PCI cover 1-5 N network jack, location 1-4 O One-Touch buttons 1-3 on-off button 1-3 open/close latch 1-3 Operating...
Startup Guide
Page 46
...-45 (network) jack 1-4 S safeguarding data 4-10 safety information 1-1 scroll pad, location 1-3 setting up the notebook connect phone line 1-10 connect power 1-9 install battery pack 1-8 power on 1-11 set up Windows 1-12 troubleshooting 4-6 settings, BIOS 4-8 setup utility 4-7 slot location cable lock 1-4 PC Card and CardBus 1-4 software, restoring 4-13 Standby mode 2-2 startup, troubleshooting 4-6 status lights battery charge 1-6 hard drive 1-6 keyboard 1-3, 1-7 location 1-3 main 1-3, 1-6 meanings 1-6 wireless indicator 1-3 S-Video out jack location 1-4 using 2-8 system recovery 4-9 Startup...
...-45 (network) jack 1-4 S safeguarding data 4-10 safety information 1-1 scroll pad, location 1-3 setting up the notebook connect phone line 1-10 connect power 1-9 install battery pack 1-8 power on 1-11 set up Windows 1-12 troubleshooting 4-6 settings, BIOS 4-8 setup utility 4-7 slot location cable lock 1-4 PC Card and CardBus 1-4 software, restoring 4-13 Standby mode 2-2 startup, troubleshooting 4-6 status lights battery charge 1-6 hard drive 1-6 keyboard 1-3, 1-7 location 1-3 main 1-3, 1-6 meanings 1-6 wireless indicator 1-3 S-Video out jack location 1-4 using 2-8 system recovery 4-9 Startup...
Startup Guide
Page 47
Index T telephone line connection 1-10 1394 port location 1-4 toggling built-in keypad 2-6 TouchPad 1-3 functions 2-5 troubleshooting 4-4 use of 2-4 troubleshooting battery packs 4-5 display 4-2 hard drive 4-3 keyboard 4-3 performance 4-4 power 4-5 startup 4-6 turning off the notebook 2-2 turning on the notebook 1-11, 2-2 U updating drivers 4-9 software 4-9 USB port location 1-4 using BIOS Setup Utility 4-7 V volume control 1-4 W wireless indicator light 1-3 on-off button 1-3 Index-4 Startup Guide
Index T telephone line connection 1-10 1394 port location 1-4 toggling built-in keypad 2-6 TouchPad 1-3 functions 2-5 troubleshooting 4-4 use of 2-4 troubleshooting battery packs 4-5 display 4-2 hard drive 4-3 keyboard 4-3 performance 4-4 power 4-5 startup 4-6 turning off the notebook 2-2 turning on the notebook 1-11, 2-2 U updating drivers 4-9 software 4-9 USB port location 1-4 using BIOS Setup Utility 4-7 V volume control 1-4 W wireless indicator light 1-3 on-off button 1-3 Index-4 Startup Guide


