Reference Guide
Page 3
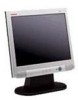
... full-screen support for flexible mounting solutions. I Security lock slot I AssetControl I Compliant with the following : I 15-inch (38.1 cm) viewable area display. I Removable base for lower resolutions. I Programmable sleep mode timer. I Wide viewing angle to allow viewing from a sitting or standing position, or moving side-to-side. The monitor features include the following regulated specifications: Reference Guide 1-1 I Energy Saver feature for ease of set-up and screen optimization. I On-Screen Display (OSD) adjustments in six different languages: English, Dutch...
... full-screen support for flexible mounting solutions. I Security lock slot I AssetControl I Compliant with the following : I 15-inch (38.1 cm) viewable area display. I Removable base for lower resolutions. I Programmable sleep mode timer. I Wide viewing angle to allow viewing from a sitting or standing position, or moving side-to-side. The monitor features include the following regulated specifications: Reference Guide 1-1 I Energy Saver feature for ease of set-up and screen optimization. I On-Screen Display (OSD) adjustments in six different languages: English, Dutch...

Reference Guide
Page 6
... from walls or other enclosures. Use a power strip whose manufacturer offers a Damage Replacement Policy so you can replace your monitor cabinet or attempt to the cord does not exceed the rating of your monitor, use the following guidelines: I Adjust only those controls that are covered in the operating instructions. I Do not open your equipment if surge protection fails. Disconnect the monitor by pulling the cord. 2-2 Reference Guide I Be...
... from walls or other enclosures. Use a power strip whose manufacturer offers a Damage Replacement Policy so you can replace your monitor cabinet or attempt to the cord does not exceed the rating of your monitor, use the following guidelines: I Adjust only those controls that are covered in the operating instructions. I Do not open your equipment if surge protection fails. Disconnect the monitor by pulling the cord. 2-2 Reference Guide I Be...

Reference Guide
Page 9
... Guide 3-1 Connect the power cable 8 to your computer and other peripheral devices. 2. Place the monitor signal cable into the clip 2 on the rear panel of the monitor. 3. Turn off the power to an electrical wall outlet. Connect the monitor signal cable to the audio connector 3 on the rear panel of the monitor. 6. Connect the monitor audio cable to the video connector 1 on the rear panel of the monitor. 4. 3 Installation Monitor Setup Before installing your monitor, place it in illustration) 5. Connect the AC power cord to the power connector...
... Guide 3-1 Connect the power cable 8 to your computer and other peripheral devices. 2. Place the monitor signal cable into the clip 2 on the rear panel of the monitor. 3. Turn off the power to an electrical wall outlet. Connect the monitor signal cable to the audio connector 3 on the rear panel of the monitor. 6. Connect the monitor audio cable to the video connector 1 on the rear panel of the monitor. 4. 3 Installation Monitor Setup Before installing your monitor, place it in illustration) 5. Connect the AC power cord to the power connector...
Reference Guide
Page 11
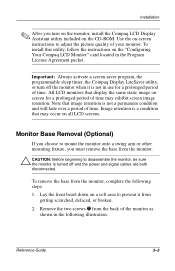
... other mounting fixture, you turn off and the power and signal cables are both disconnected. To install this utility, follow the instructions on screen for a prolonged period of time. All LCD monitors that image retention is not in use for a prolonged period of the monitor as shown in the Program License Agreement packet. To remove the base from getting scratched, defaced, or broken. 2. Note that display...
... other mounting fixture, you turn off and the power and signal cables are both disconnected. To install this utility, follow the instructions on screen for a prolonged period of time. All LCD monitors that image retention is not in use for a prolonged period of the monitor as shown in the Program License Agreement packet. To remove the base from getting scratched, defaced, or broken. 2. Note that display...

Reference Guide
Page 12
Installation 3. Remove the base 2 from the monitor by pushing the base away from the monitor. 3-4 Reference Guide
Installation 3. Remove the base 2 from the monitor by pushing the base away from the monitor. 3-4 Reference Guide

Reference Guide
Page 13
... information files to download the appropriate files. Access http://www.compaq.com/support/files/monitors/index.html and select your computer: 1. Reference Guide 4-1 an .INF file and an .ICM file. The .INF file defines monitor resources and provides specifications used by clicking on your monitor model to be installed onto your computer; When the CD-ROM menu launches, select Install INF and ICM...
... information files to download the appropriate files. Access http://www.compaq.com/support/files/monitors/index.html and select your computer: 1. Reference Guide 4-1 an .INF file and an .ICM file. The .INF file defines monitor resources and provides specifications used by clicking on your monitor model to be installed onto your computer; When the CD-ROM menu launches, select Install INF and ICM...

Reference Guide
Page 15
Power LED Illuminates when the monitor is on your viewing preferences. It eliminates the need to turn on the screen, see "On-Screen Display Functions" later in this mode, refer to the monitor. Note that appear on the monitor. 2. To access the OSD, do the following: 1. Reference Guide 4-3 For example, 1:15 p.m. On-Screen Display The On-Screen Display (OSD) adjusts the screen image based on . 7 Power switch Controls power to the Sleep Timer in a 24 hour clock format. For a description...
Power LED Illuminates when the monitor is on your viewing preferences. It eliminates the need to turn on the screen, see "On-Screen Display Functions" later in this mode, refer to the monitor. Note that appear on the monitor. 2. To access the OSD, do the following: 1. Reference Guide 4-3 For example, 1:15 p.m. On-Screen Display The On-Screen Display (OSD) adjusts the screen image based on . 7 Power switch Controls power to the Sleep Timer in a 24 hour clock format. For a description...

Reference Guide
Page 16
...Main Menu Brightness Contrast Image Control Color Advanced Menu Adjustment Scale Adjustment Scale Auto Adjustment Horizontal Image Position Vertical Image Position Clock Clock Phase Cancel Save and Return 9300 K Menu Level 3 Adjustment Message Adjustment Scale Adjustment Scale Adjustment Scale Adjustment Scale 4-4 Reference Guide On-Screen Display Functions Use the Right-Adjustment and Left-Adjustment buttons found on the front control panel of adjustment. 6. To exit the On-Screen Display, select the Exit icon and press the Select button once. The adjustment window displays. Operation...
...Main Menu Brightness Contrast Image Control Color Advanced Menu Adjustment Scale Adjustment Scale Auto Adjustment Horizontal Image Position Vertical Image Position Clock Clock Phase Cancel Save and Return 9300 K Menu Level 3 Adjustment Message Adjustment Scale Adjustment Scale Adjustment Scale Adjustment Scale 4-4 Reference Guide On-Screen Display Functions Use the Right-Adjustment and Left-Adjustment buttons found on the front control panel of adjustment. 6. To exit the On-Screen Display, select the Exit icon and press the Select button once. The adjustment window displays. Operation...

Reference Guide
Page 19
Main Menu Brightness Contrast Image Control Color Language Management OSD Control Factory Reset Exit Reference Guide 4-7 To launch the on-screen display menu, complete the following: ❏ Basic Main Menu: To display the Basic Main Menu, press the Select button on the monitor front panel. Main Menu Brightness Contrast Auto Adjustment Advanced Menu Exit ❏ Advanced Main Menu: Select "Advanced Menu" from the Basic Main Menu to Adjust Settings 1. Operation How to display the Advanced Main Menu shown below.
Main Menu Brightness Contrast Image Control Color Language Management OSD Control Factory Reset Exit Reference Guide 4-7 To launch the on-screen display menu, complete the following: ❏ Basic Main Menu: To display the Basic Main Menu, press the Select button on the monitor front panel. Main Menu Brightness Contrast Auto Adjustment Advanced Menu Exit ❏ Advanced Main Menu: Select "Advanced Menu" from the Basic Main Menu to Adjust Settings 1. Operation How to display the Advanced Main Menu shown below.

Reference Guide
Page 20
... the Right Adjustment (+) button to use, just follow the instructions on the monitor screen when identifying the following monitor conditions: 4-8 Reference Guide Adjust the third level menu displays using the same procedure as the second level. 6. The on-screen display is easy to increase the screen brightness and contrast. 5. Operation Note: After the Advanced Main Menu has been selected, it remains the default on-screen display each time the monitor is powered on...
... the Right Adjustment (+) button to use, just follow the instructions on the monitor screen when identifying the following monitor conditions: 4-8 Reference Guide Adjust the third level menu displays using the same procedure as the second level. 6. The on-screen display is easy to increase the screen brightness and contrast. 5. Operation Note: After the Advanced Main Menu has been selected, it remains the default on-screen display each time the monitor is powered on...
Reference Guide
Page 21
... Power LED is disabled, the warning message "OSD Lock" displays for five seconds. Operation I Input Signal Out of Range: Indicates the monitor is entering a sleep mode. I Check Video Cable: Indicates the video cable may not be enabled or disabled by pressing and holding the Menu button on the front panel for instructions on . I OSD Lock-The OSD can be turned on setting energy saver features (sometimes called power management features). ✎ The above energy saver feature only works when connected...
... Power LED is disabled, the warning message "OSD Lock" displays for five seconds. Operation I Input Signal Out of Range: Indicates the monitor is entering a sleep mode. I Check Video Cable: Indicates the video cable may not be enabled or disabled by pressing and holding the Menu button on the front panel for instructions on . I OSD Lock-The OSD can be turned on setting energy saver features (sometimes called power management features). ✎ The above energy saver feature only works when connected...

Reference Guide
Page 22
... Power LED blinks amber. When the monitor's Energy Saver utility causes the monitor to enter the adjustment mode for hours. 4-10 Reference Guide Sleep Timer Mode The Sleep Timer mode is an energy-saving feature that the time is displayed in a 24 hour clock format. This also extends the life of the backlight bulbs in the monitor. Note that enables you to display the Advanced Menu. 2. The Sleep Timer...
... Power LED blinks amber. When the monitor's Energy Saver utility causes the monitor to enter the adjustment mode for hours. 4-10 Reference Guide Sleep Timer Mode The Sleep Timer mode is an energy-saving feature that the time is displayed in a 24 hour clock format. This also extends the life of the backlight bulbs in the monitor. Note that enables you to display the Advanced Menu. 2. The Sleep Timer...

Reference Guide
Page 23
... the monitor to exit the menu. After setting the current time, the highlight automatically skips to adjust the minutes. 9. The fifth selection, Sleep Now, turns the monitor backlights off immediately and stays in the OSD automatically fine-tunes the image quality each time a new video mode is pressed. Operation 6. Press the Select button to Set On Time hours. If you are finished, select Save and...
... the monitor to exit the menu. After setting the current time, the highlight automatically skips to adjust the minutes. 9. The fifth selection, Sleep Now, turns the monitor backlights off immediately and stays in the OSD automatically fine-tunes the image quality each time a new video mode is pressed. Operation 6. Press the Select button to Set On Time hours. If you are finished, select Save and...
Reference Guide
Page 24
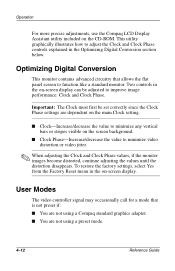
... vertical bars or stripes visible on the screen background. I You are not using a preset mode. 4-12 Reference Guide Two controls in the on -screen display can be set correctly since the Clock Phase settings are not using a Compaq standard graphics adapter. To restore the factory settings, select Yes from the Factory Reset menu in the on -screen display. I You are dependent on the CD-ROM. Operation For more precise adjustments, use the Compaq LCD Display...
... vertical bars or stripes visible on the screen background. I You are not using a preset mode. 4-12 Reference Guide Two controls in the on -screen display can be set correctly since the Clock Phase settings are not using a Compaq standard graphics adapter. To restore the factory settings, select Yes from the Factory Reset menu in the on -screen display. I You are dependent on the CD-ROM. Operation For more precise adjustments, use the Compaq LCD Display...
Reference Guide
Page 27
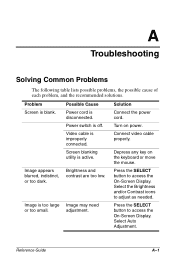
... improperly connected. Solution Connect the power cord. Press the SELECT button to access the On-Screen Display. Reference Guide A-1 Power switch is active. Screen blanking utility is off. Press the SELECT button to access the On-Screen Display. Select Auto Adjustment. Possible Cause Power cord is blank. Depress any key on power. adjustment. Select the Brightness and/or Contrast icons to adjust as needed. Image appears blurred, indistinct, or too dark. Problem Screen is disconnected. A Troubleshooting Solving Common Problems...
... improperly connected. Solution Connect the power cord. Press the SELECT button to access the On-Screen Display. Reference Guide A-1 Power switch is active. Screen blanking utility is off. Press the SELECT button to access the On-Screen Display. Select Auto Adjustment. Possible Cause Power cord is blank. Depress any key on power. adjustment. Select the Brightness and/or Contrast icons to adjust as needed. Image appears blurred, indistinct, or too dark. Problem Screen is disconnected. A Troubleshooting Solving Common Problems...

Reference Guide
Page 28
... your settings to a supported setting (see "Technical Specifications"). "Check Video Cable" is plugged into the back of your monitor supports. Connect the 15-pin monitor video cable to access the On-Screen Display. Change your computer and enter Safe Mode. Video resolution and/or refresh rate are set higher than what your computer. Speaker audio plug may need adjustment. "Input Signal Out of the computer. No sound from the back of Range" is disconnected. Monitor video cable is displayed on screen. Make sure your audio input jack (green connector) is displayed on...
... your settings to a supported setting (see "Technical Specifications"). "Check Video Cable" is plugged into the back of your monitor supports. Connect the 15-pin monitor video cable to access the On-Screen Display. Change your computer and enter Safe Mode. Video resolution and/or refresh rate are set higher than what your computer. Speaker audio plug may need adjustment. "Input Signal Out of the computer. No sound from the back of Range" is disconnected. Monitor video cable is displayed on screen. Make sure your audio input jack (green connector) is displayed on...

Reference Guide
Page 29
... at : http://www.compaq.com Reference Guide A-3 You can either browse the postings as a guest, or register as a user and submit your computer screen and increasing the volume level. Increase volume by using keyboard volume control or clicking on the Speaker icon on the speaker. Troubleshooting Problem Monitor is not enough air space to allow proper ventilation. Possible Cause Mute button may also be too...
... at : http://www.compaq.com Reference Guide A-3 You can either browse the postings as a guest, or register as a user and submit your computer screen and increasing the volume level. Increase volume by using keyboard volume control or clicking on the Speaker icon on the speaker. Troubleshooting Problem Monitor is not enough air space to allow proper ventilation. Possible Cause Mute button may also be too...

Reference Guide
Page 31
B Specifications Compaq 5017 Flat Panel Monitor Technical Specifications Display Type Viewable Image Size Face Treatment Maximum Weight (Unpacked) Dimensions Height Depth Width Maximum Graphics Resolution Text Mode Dot Pitch Horizontal Frequency Vertical Frequency 15 inches Flat panel, Active matrix-TFT LCD 15 inch diagonal 3H hardness coating with antiglare treatment 8.8 lb 38.1 cm 38.1 cm 4.0 kg 15.2 in 5.8 in 13.7 in 386 mm 147 mm 349 mm 1024 x 768 75 Hz refresh rate 720 x 400 0.297 mm 30 to 61 kHz 56 to 75 Hz Reference Guide B-1
B Specifications Compaq 5017 Flat Panel Monitor Technical Specifications Display Type Viewable Image Size Face Treatment Maximum Weight (Unpacked) Dimensions Height Depth Width Maximum Graphics Resolution Text Mode Dot Pitch Horizontal Frequency Vertical Frequency 15 inches Flat panel, Active matrix-TFT LCD 15 inch diagonal 3H hardness coating with antiglare treatment 8.8 lb 38.1 cm 38.1 cm 4.0 kg 15.2 in 5.8 in 13.7 in 386 mm 147 mm 349 mm 1024 x 768 75 Hz refresh rate 720 x 400 0.297 mm 30 to 61 kHz 56 to 75 Hz Reference Guide B-1

Reference Guide
Page 32
Factory Preset Display Modes Pre- Pixel set as factory defaults. This monitor automatically recognizes these preset modes and they will appear properly sized and centered on the screen. Vert Freq (Hz) 59.94 75.00 72.81 70.08 Vert Polarity + Pixel Clk (MHz) 25.175 31.500 31.500 28.322 Source VGA VESA VESA VGA B-2 Reference Guide Display Resolutions The display resolutions listed below are the most commonly used modes and are set Format...
Factory Preset Display Modes Pre- Pixel set as factory defaults. This monitor automatically recognizes these preset modes and they will appear properly sized and centered on the screen. Vert Freq (Hz) 59.94 75.00 72.81 70.08 Vert Polarity + Pixel Clk (MHz) 25.175 31.500 31.500 28.322 Source VGA VESA VESA VGA B-2 Reference Guide Display Resolutions The display resolutions listed below are the most commonly used modes and are set Format...
Reference Guide
Page 38
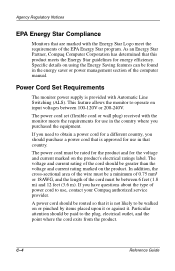
... rated for the product and for energy efficiency. Power Cord Set Requirements The monitor power supply is provided with the Energy Star Logo meet the requirements of power cord to obtain a power cord for a different country, you should be routed so that it . If you purchased the equipment. The power cord set (flexible cord or wall plug) received with the monitor meets the requirements for use , contact your Compaq authorized service...
... rated for the product and for energy efficiency. Power Cord Set Requirements The monitor power supply is provided with the Energy Star Logo meet the requirements of power cord to obtain a power cord for a different country, you should be routed so that it . If you purchased the equipment. The power cord set (flexible cord or wall plug) received with the monitor meets the requirements for use , contact your Compaq authorized service...


