Service Guide
Page 7
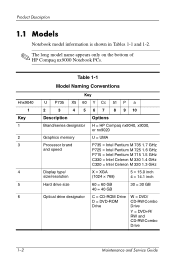
...Compaq nx9040, x9030, or nx9020 Graphics memory U = UMA Processor brand and speed P735 = Intel Pentium M 735 1.7 GHz P725 = Intel Pentium M 725 1.6 GHz P715 = Intel Pentium M 715 1.5 GHz C330 = Intel Celeron M 330 1.4 GHz C320 = Intel Celeron M 320 1.3 GHz Display type/ size/resolution X = XGA (1024 × 768) 5 = 15.0 inch 4 = 14.1 inch Hard drive... size 60 = 60 GB 40 = 40 GB 30 = 30 GB Optical drive designator C = CD-ROM Drive D = DVD-ROM Drive W = DVD/ CD-RW Combo Drive Y = DVD+R/ RW and CD-RW Combo...
...Compaq nx9040, x9030, or nx9020 Graphics memory U = UMA Processor brand and speed P735 = Intel Pentium M 735 1.7 GHz P725 = Intel Pentium M 725 1.6 GHz P715 = Intel Pentium M 715 1.5 GHz C330 = Intel Celeron M 330 1.4 GHz C320 = Intel Celeron M 320 1.3 GHz Display type/ size/resolution X = XGA (1024 × 768) 5 = 15.0 inch 4 = 14.1 inch Hard drive... size 60 = 60 GB 40 = 40 GB 30 = 30 GB Optical drive designator C = CD-ROM Drive D = DVD-ROM Drive W = DVD/ CD-RW Combo Drive Y = DVD+R/ RW and CD-RW Combo...
Service Guide
Page 15
... (1.6- or 14.1-inch XGA (1024 × 768) TFT display with over 16.7 million colors, varying by notebook model ■ 60-, 40-, or 30-GB high-capacity hard drive, varying by notebook model ■ Diskette drive (HP Compaq nx9040 notebook model only) ■ 256-MB DDR synchronous DRAM (SDRAM) at a lower temperature than other processors ❏ Intel...
... (1.6- or 14.1-inch XGA (1024 × 768) TFT display with over 16.7 million colors, varying by notebook model ■ 60-, 40-, or 30-GB high-capacity hard drive, varying by notebook model ■ Diskette drive (HP Compaq nx9040 notebook model only) ■ 256-MB DDR synchronous DRAM (SDRAM) at a lower temperature than other processors ❏ Intel...
Service Guide
Page 21
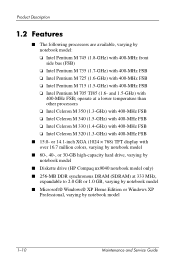
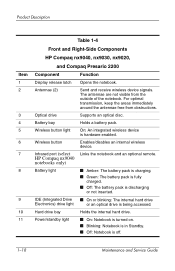
...16 Maintenance and Service Guide Power/standby light ■ On: Notebook is turned on. ■ Blinking: Notebook is in standby. ■ Off: Notebook is discharging or not inserted. Wireless button (select models only) Enables/disables an internal wireless device. The antennae are not visible from obstructions. IDE (Integrated Drive... ■ On or blinking: The internal hard drive Electronics) drive light or an optical drive is hardware enabled. Battery bay Holds a battery pack. Hard drive bay Holds the internal hard drive. For optimal ...
...16 Maintenance and Service Guide Power/standby light ■ On: Notebook is turned on. ■ Blinking: Notebook is in standby. ■ Off: Notebook is discharging or not inserted. Wireless button (select models only) Enables/disables an internal wireless device. The antennae are not visible from obstructions. IDE (Integrated Drive... ■ On or blinking: The internal hard drive Electronics) drive light or an optical drive is hardware enabled. Battery bay Holds a battery pack. Hard drive bay Holds the internal hard drive. For optimal ...
Service Guide
Page 23
...and Service Guide IDE (Integrated Drive ■ On or blinking: The internal hard drive Electronics) drive light or an optical drive is hardware enabled. The antennae are not visible from obstructions. Links the notebook and an optional remote. Hard drive bay Holds the internal hard drive. Wireless button light On: An... and receive wireless device signals. Product Description Item 1 2 3 4 5 6 7 8 9 10 11 Table 1-4 Front and Right-Side Components HP Compaq nx9040, nx9030, nx9020, and Compaq Presario 2200 Component Function Display release latch Opens the notebook.
...and Service Guide IDE (Integrated Drive ■ On or blinking: The internal hard drive Electronics) drive light or an optical drive is hardware enabled. The antennae are not visible from obstructions. Links the notebook and an optional remote. Hard drive bay Holds the internal hard drive. Wireless button light On: An... and receive wireless device signals. Product Description Item 1 2 3 4 5 6 7 8 9 10 11 Table 1-4 Front and Right-Side Components HP Compaq nx9040, nx9030, nx9020, and Compaq Presario 2200 Component Function Display release latch Opens the notebook.
Service Guide
Page 37
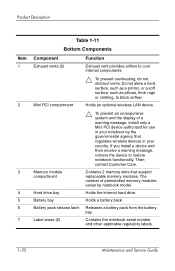
...1 2 3 4 5 6 7 Table 1-11 Bottom Components Component Exhaust vents (2) Mini PCI compartment Memory module compartment Hard drive bay Battery bay Battery pack release latch Label areas (2) Function Exhaust vent provides airflow to restore notebook functionality. Holds an... an unresponsive system and the display of preinstalled memory modules varies by the governmental agency that support replaceable memory modules. Holds the internal hard drive. Holds a battery pack. Contains 2 memory slots that regulates wireless devices in your country. If you install a device and then ...
...1 2 3 4 5 6 7 Table 1-11 Bottom Components Component Exhaust vents (2) Mini PCI compartment Memory module compartment Hard drive bay Battery bay Battery pack release latch Label areas (2) Function Exhaust vent provides airflow to restore notebook functionality. Holds an... an unresponsive system and the display of preinstalled memory modules varies by the governmental agency that support replaceable memory modules. Holds the internal hard drive. Holds a battery pack. Contains 2 memory slots that regulates wireless devices in your country. If you install a device and then ...
Service Guide
Page 38
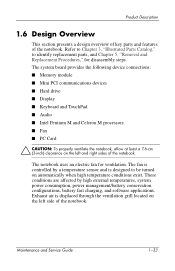
... conservation configurations, battery fast charging, and software applications. The system board provides the following device connections: ■ Memory module ■ Mini PCI communications devices ■ Hard drive ■ Display ■ Keyboard and TouchPad ■ Audio ■ Intel Pentium M and Celeron M processors ■ Fan ■ PC Card Ä CAUTION: To properly ventilate the...
... conservation configurations, battery fast charging, and software applications. The system board provides the following device connections: ■ Memory module ■ Mini PCI communications devices ■ Hard drive ■ Display ■ Keyboard and TouchPad ■ Audio ■ Intel Pentium M and Celeron M processors ■ Fan ■ PC Card Ä CAUTION: To properly ventilate the...

Service Guide
Page 43
... some startup tests. (If you suspect a memory failure and want to people with varying ranges of video memory available on hard drives in the system. Troubleshooting Selecting from the Tools Menu Select Hard Drive Self Test Table 2-4 Tools Menu To Do This Run a quick comprehensive self test on the notebook. Displays the amount of...
... some startup tests. (If you suspect a memory failure and want to people with varying ranges of video memory available on hard drives in the system. Troubleshooting Selecting from the Tools Menu Select Hard Drive Self Test Table 2-4 Tools Menu To Do This Run a quick comprehensive self test on the notebook. Displays the amount of...
Service Guide
Page 52
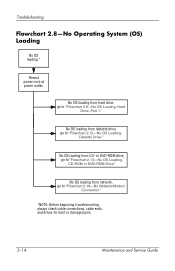
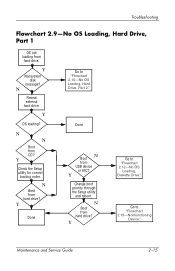
...*NOTE: Before beginning troubleshooting, always check cable connections, cable ends, and drives for bent or damaged pins. 2-14 Maintenance and Service Guide No OS loading from diskette drive, go to "Flowchart 2.9-No OS Loading, Hard Drive, Part 1." No OS loading from network, go to "Flowchart 2.13-No... OS Loading, CD-ROM or DVD-ROM Drive." No OS loading from hard drive, go to "Flowchart 2.12-No OS Loading...
...*NOTE: Before beginning troubleshooting, always check cable connections, cable ends, and drives for bent or damaged pins. 2-14 Maintenance and Service Guide No OS loading from diskette drive, go to "Flowchart 2.9-No OS Loading, Hard Drive, Part 1." No OS loading from network, go to "Flowchart 2.13-No... OS Loading, CD-ROM or DVD-ROM Drive." No OS loading from hard drive, go to "Flowchart 2.12-No OS Loading...
Service Guide
Page 53
... to "Flowchart 2.12-No OS Loading, Diskette Drive." Troubleshooting Flowchart 2.9-No OS Loading, Hard Drive, Part 1 OS not loading from hard drive? Y Go to "Flowchart 2.15-Nonfunctioning Device." Y Check the Setup utility for correct booting order. N Reseat external hard drive. N Boot from hard drive. Y Done Go to "Flowchart 2.10-No OS Loading, Hard Drive, Part 2." Y Change boot priority through the Setup...
... to "Flowchart 2.12-No OS Loading, Diskette Drive." Troubleshooting Flowchart 2.9-No OS Loading, Hard Drive, Part 1 OS not loading from hard drive? Y Go to "Flowchart 2.15-Nonfunctioning Device." Y Check the Setup utility for correct booting order. N Reseat external hard drive. N Boot from hard drive. Y Done Go to "Flowchart 2.10-No OS Loading, Hard Drive, Part 2." Y Change boot priority through the Setup...
Service Guide
Page 54
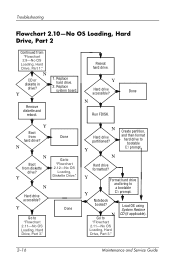
... hard drive. Hard drive formatted? N Go to "Flowchart 2.12-No OS Loading, Diskette Drive." Replace system board. Y Go to "Flowchart 2.11-No OS Loading, Hard Drive, Part 3." Y N Create partition, and then format hard drive to a bootable Y C:\ prompt. N Hard drive accessible? Load OS using System Restore CD (if applicable). 2-16 Maintenance and Service Guide Y Hard drive accessible? N Done N Boot from "Flowchart 2.9-No OS Loading, Hard Drive, Part 1." N Hard drive...
... hard drive. Hard drive formatted? N Go to "Flowchart 2.12-No OS Loading, Diskette Drive." Replace system board. Y Go to "Flowchart 2.11-No OS Loading, Hard Drive, Part 3." Y N Create partition, and then format hard drive to a bootable Y C:\ prompt. N Hard drive accessible? Load OS using System Restore CD (if applicable). 2-16 Maintenance and Service Guide Y Hard drive accessible? N Done N Boot from "Flowchart 2.9-No OS Loading, Hard Drive, Part 1." N Hard drive...

Service Guide
Page 55
N Run SCANDISK and check for bad sectors. Y OS loading from hard drive? N Replace hard drive. Boot from hard drive? Done Maintenance and Service Guide 2-17 Y Clean virus. N Y Diagnostics on hard drive? Run diagnostics and follow recommendations. N Fix bad sectors. Y Done Replace hard drive. Replace hard drive. Troubleshooting Flowchart 2.11-No OS Loading, Hard Drive, Part 3 Continued from "Flowchart 2.10-No OS Loading, Hard Drive, Part 2." Y Install OS and reboot. Y Virus on diskette? N Can bad sectors be fixed? N System files on hard drive?
N Run SCANDISK and check for bad sectors. Y OS loading from hard drive? N Replace hard drive. Boot from hard drive? Done Maintenance and Service Guide 2-17 Y Clean virus. N Y Diagnostics on hard drive? Run diagnostics and follow recommendations. N Fix bad sectors. Y Done Replace hard drive. Replace hard drive. Troubleshooting Flowchart 2.11-No OS Loading, Hard Drive, Part 3 Continued from "Flowchart 2.10-No OS Loading, Hard Drive, Part 2." Y Install OS and reboot. Y Virus on diskette? N Can bad sectors be fixed? N System files on hard drive?

Service Guide
Page 59
N Replace hard drive. Y Done Replace diskette drive. N Device boots properly? Close notebook, plug in power, and reboot. Fix or replace broken item. Reattach device. If integrated NIC, replace system board. N Device boots ...
N Replace hard drive. Y Done Replace diskette drive. N Device boots properly? Close notebook, plug in power, and reboot. Fix or replace broken item. Reattach device. If integrated NIC, replace system board. N Device boots ...

Service Guide
Page 69
... use only on notebook models with S-Video and 1394 digital connectors for use on HP Compaq nx9040 notebook models 371793-001 371794-001 371795-001 Hard drive guide (not illustrated) 371798-001 8a Diskette drive (for use on HP Compaq nx9040 notebook models only) 8b Diskette drive cover 371779-001 371805-001 Maintenance and Service Guide 3-7
... use only on notebook models with S-Video and 1394 digital connectors for use on HP Compaq nx9040 notebook models 371793-001 371794-001 371795-001 Hard drive guide (not illustrated) 371798-001 8a Diskette drive (for use on HP Compaq nx9040 notebook models only) 8b Diskette drive cover 371779-001 371805-001 Maintenance and Service Guide 3-7

Service Guide
Page 73
Illustrated Parts Catalog Table 3-1 Spare Parts: Notebook Major Components (Continued) Item Description Spare Part Number 12a Hard drives, 4200-rpm 60-GB 40-GB 30-GB 371778-001 371777-001 371776-001 12b Hard drive tray 371797-001 13 Mini PCI communications boards Mini PCI 802.11b wireless LAN, MOW Mini PCI 802... LAN, MOW Mini PCI 802.11b/g wireless LAN, BC 373023-001 373024-001 373025-001 373026-001 373027-001 14 Memory modules 512-MB DDR 256-MB DDR 128-MB DDR 371775-001 371774-001 371773-001 15a Memory module compartment cover and 15b Mini PCI compartment cover 371806-001...
Illustrated Parts Catalog Table 3-1 Spare Parts: Notebook Major Components (Continued) Item Description Spare Part Number 12a Hard drives, 4200-rpm 60-GB 40-GB 30-GB 371778-001 371777-001 371776-001 12b Hard drive tray 371797-001 13 Mini PCI communications boards Mini PCI 802.11b wireless LAN, MOW Mini PCI 802... LAN, MOW Mini PCI 802.11b/g wireless LAN, BC 373023-001 373024-001 373025-001 373026-001 373027-001 14 Memory modules 512-MB DDR 256-MB DDR 128-MB DDR 371775-001 371774-001 371773-001 15a Memory module compartment cover and 15b Mini PCI compartment cover 371806-001...

Service Guide
Page 75
Illustrated Parts Catalog Table 3-2 Mass Storage Devices Spare Part Number Information Item 1 2 3 Description Diskette drive Hard drives, 4200-rpm (includes hard drive bezel) 60-GB 40-GB 30-GB Optical drives 4X Max DVD+R/RW 2X Max DVD+R/RW 24X Max DVD/CD-RW Combo Drive 8X Max DVD-ROM Drive 24X Max CD-ROM Drive Spare Part Number 371779-001 371778-001 371777-001 371776-001 371784-001 371783-001 371782-001 371781-001 371780-001 Maintenance and Service Guide 3-13
Illustrated Parts Catalog Table 3-2 Mass Storage Devices Spare Part Number Information Item 1 2 3 Description Diskette drive Hard drives, 4200-rpm (includes hard drive bezel) 60-GB 40-GB 30-GB Optical drives 4X Max DVD+R/RW 2X Max DVD+R/RW 24X Max DVD/CD-RW Combo Drive 8X Max DVD-ROM Drive 24X Max CD-ROM Drive Spare Part Number 371779-001 371778-001 371777-001 371776-001 371784-001 371783-001 371782-001 371781-001 371780-001 Maintenance and Service Guide 3-13

Service Guide
Page 79
... with at least one inch of shock-proof foam. ■ Avoid dropping drives from any height onto any surface. ■ After removing a hard drive, CD-ROM drive, or a diskette drive, place it down through the operating system. ■ Before removing a diskette drive or optical drive, ensure that a diskette or disc is not in a bubble pack mailer or...
... with at least one inch of shock-proof foam. ■ Avoid dropping drives from any height onto any surface. ■ After removing a hard drive, CD-ROM drive, or a diskette drive, place it down through the operating system. ■ Before removing a diskette drive or optical drive, ensure that a diskette or disc is not in a bubble pack mailer or...

Service Guide
Page 85
... HP Pavilion ze4900 1 on HP Pavilion ze4900 Speakers 4 Optical drive 2 Display assembly 10 Top cover 20 Heat sink 3 5-2 Maintenance and Service Guide Section 5.3 5.4 5.5 5.6 5.7 5.8 5.9 5.10 5.11 5.12 5.13 5.14 Disassembly Sequence Chart Description # of Screws Removed Preparing the notebook for disassembly Battery pack Hard drive 0 2 to remove hard drive 2 to be referenced when removing notebook components.
... HP Pavilion ze4900 1 on HP Pavilion ze4900 Speakers 4 Optical drive 2 Display assembly 10 Top cover 20 Heat sink 3 5-2 Maintenance and Service Guide Section 5.3 5.4 5.5 5.6 5.7 5.8 5.9 5.10 5.11 5.12 5.13 5.14 Disassembly Sequence Chart Description # of Screws Removed Preparing the notebook for disassembly Battery pack Hard drive 0 2 to remove hard drive 2 to be referenced when removing notebook components.

Service Guide
Page 89
... screws. ✎ Spare part number 371808-001 should be used to slide the hard drive forward 3. Use the notch in the hard drive bezel to replace the hard drive rubber screw covers. b. d. Remove the hard drive. Removal and Replacement Procedures Spare Part Number Information Hard drives (all 4200 rpm) 60-GB 40-GB 30-GB 371778-001 371777-001 371776...
... screws. ✎ Spare part number 371808-001 should be used to slide the hard drive forward 3. Use the notch in the hard drive bezel to replace the hard drive rubber screw covers. b. d. Remove the hard drive. Removal and Replacement Procedures Spare Part Number Information Hard drives (all 4200 rpm) 60-GB 40-GB 30-GB 371778-001 371777-001 371776...

Service Guide
Page 90
Remove the hard drive bezel 2. Removing the Hard Drive Bezel Maintenance and Service Guide 5-7 f. Remove the 2 PM1.5×5.0 shoulder screws 1 that secure the hard drive bezel to the hard drive. Removal and Replacement Procedures e.
Remove the hard drive bezel 2. Removing the Hard Drive Bezel Maintenance and Service Guide 5-7 f. Remove the 2 PM1.5×5.0 shoulder screws 1 that secure the hard drive bezel to the hard drive. Removal and Replacement Procedures e.

Service Guide
Page 91
Remove the hard drive frame 2. i. Remove the 4 PM2.5×4.0 screws 1 that secure the hard drive frame to reassemble and install the hard drive. 5-8 Maintenance and Service Guide Disassembling the hard drive Reverse the above procedure to the hard drive. Removal and Replacement Procedures g. h. Remove the hard drive connector 3.
Remove the hard drive frame 2. i. Remove the 4 PM2.5×4.0 screws 1 that secure the hard drive frame to reassemble and install the hard drive. 5-8 Maintenance and Service Guide Disassembling the hard drive Reverse the above procedure to the hard drive. Removal and Replacement Procedures g. h. Remove the hard drive connector 3.


