Ubuntu
Page 5
...controls 5 Using a WLAN ...5 Using an Internet service provider 5 Setting up a WLAN 5 Configuring a wireless router 6 Protecting your WLAN 6 Connecting to a WLAN 7 Using Bluetooth wireless devices 7 Connecting to a wired network ...7 Connecting to a local area network (LAN 8 3 Enjoying entertainment features ...9 Using the webcam ...9 Using audio ...9 Connecting speakers ...9 Connecting headphones ...9 Connecting a microphone ...9 Checking the sound ...10 Using video ...10 Connecting a VGA monitor or projector 10 DisplayPort ...12 Connecting an HDMI TV or monitor 12 Configuring audio...
...controls 5 Using a WLAN ...5 Using an Internet service provider 5 Setting up a WLAN 5 Configuring a wireless router 6 Protecting your WLAN 6 Connecting to a WLAN 7 Using Bluetooth wireless devices 7 Connecting to a wired network ...7 Connecting to a local area network (LAN 8 3 Enjoying entertainment features ...9 Using the webcam ...9 Using audio ...9 Connecting speakers ...9 Connecting headphones ...9 Connecting a microphone ...9 Checking the sound ...10 Using video ...10 Connecting a VGA monitor or projector 10 DisplayPort ...12 Connecting an HDMI TV or monitor 12 Configuring audio...

Ubuntu
Page 10
... in printed format, you request a printed copy of injury. ● Electrical and mechanical safety information. ● Chat online with the user guides on your computer and/or on your product located with an HP technician. ● Email support. ● Find worldwide support telephone numbers. ● Locate HP service center locations. ● Important regulatory notices, including proper battery disposal information. ● Specific warranty...
... in printed format, you request a printed copy of injury. ● Electrical and mechanical safety information. ● Chat online with the user guides on your computer and/or on your product located with an HP technician. ● Email support. ● Find worldwide support telephone numbers. ● Locate HP service center locations. ● Important regulatory notices, including proper battery disposal information. ● Specific warranty...

Ubuntu
Page 16
... end of the network cable into the network jack (1) on the computer. 2. NOTE: If the network cable contains noise suppression circuitry (3), which prevents interference from TV and radio reception, orient the circuitry end of working wirelessly), or if you want to connect to a network To connect the network cable, follow these steps: 1. Plug the network cable into a network wall jack (2) or router. Connecting to a local area network (LAN) Use a LAN connection if you...
... end of the network cable into the network jack (1) on the computer. 2. NOTE: If the network cable contains noise suppression circuitry (3), which prevents interference from TV and radio reception, orient the circuitry end of working wirelessly), or if you want to connect to a network To connect the network cable, follow these steps: 1. Plug the network cable into a network wall jack (2) or router. Connecting to a local area network (LAN) Use a LAN connection if you...

Ubuntu
Page 18
... streaming video from the drop-down menu next to access a network. To connect a monitor or projector: 1. IMPORTANT: Be sure that enables you have a high-definition multimedia interface (HDMI) port, which to display Launcher from panel on the computer to Resolution. NOTE: Adjust the screen resolution of the top panel. Checking the sound To check the system sound on the computer, using the correct cable. To confirm or change the audio settings...
... streaming video from the drop-down menu next to access a network. To connect a monitor or projector: 1. IMPORTANT: Be sure that enables you have a high-definition multimedia interface (HDMI) port, which to display Launcher from panel on the computer to Resolution. NOTE: Adjust the screen resolution of the top panel. Checking the sound To check the system sound on the computer, using the correct cable. To confirm or change the audio settings...
Ubuntu
Page 22
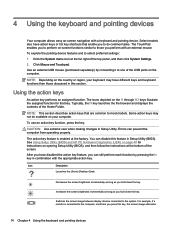
... external USB mouse (purchased separately) by pressing the fn key in Setup Utility. Click Mouse and Touchpad. NOTE: This section describes action keys that key. CAUTION: Use extreme care when making changes in combination with a keyboard and pointing device. Increases the screen brightness incrementally as long as you to most models. After you have different keys and keyboard functions than those you press this section. Click the System menu icon at the factory...
... external USB mouse (purchased separately) by pressing the fn key in Setup Utility. Click Mouse and Touchpad. NOTE: This section describes action keys that key. CAUTION: Use extreme care when making changes in combination with a keyboard and pointing device. Increases the screen brightness incrementally as long as you to most models. After you have different keys and keyboard functions than those you press this section. Click the System menu icon at the factory...

Ubuntu
Page 26
... power lights blink and the screen clears. 5 Managing power Your computer can operate on select models only. The shutdown command closes all open programs, including the operating system, and then turns off the display and the computer. Save your work is unresponsive and you are connecting an external hardware device that does not connect to monitor and conserve the battery charge. If the computer is saved to memory, letting you are unable to access...
... power lights blink and the screen clears. 5 Managing power Your computer can operate on select models only. The shutdown command closes all open programs, including the operating system, and then turns off the display and the computer. Save your work is unresponsive and you are connecting an external hardware device that does not connect to monitor and conserve the battery charge. If the computer is saved to memory, letting you are unable to access...
Ubuntu
Page 28
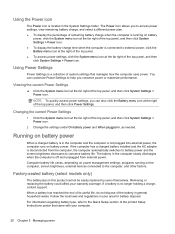
... computer automatically switches to battery power and the screen brightness decreases to external power, click the Battery menu icon at the right of the top panel. ● To access power settings, click the System menu icon at the right of the printed Setup Instructions poster that manages how the computer uses power. Factory-sealed battery (select models only) The battery(ies) in your area for battery disposal. For information regarding battery type, refer to the Quick Setup section...
... computer automatically switches to battery power and the screen brightness decreases to external power, click the Battery menu icon at the right of the top panel. ● To access power settings, click the System menu icon at the right of the printed Setup Instructions poster that manages how the computer uses power. Factory-sealed battery (select models only) The battery(ies) in your area for battery disposal. For information regarding battery type, refer to the Quick Setup section...
Ubuntu
Page 44
... on password. Managing an administrator password To set , entered, changed , or deleted. *For details about each of the power-on password* ● Protects access to the following topics. While the "Press the ESC key for Startup Menu" message is displayed, you must be entered each time you access Setup Utility or Computer Setup. NOTE: The administrator password can be used in Setup Utility (BIOS) and Computer Setup Password Type Function Administrator password or BIOS administrator password* Power-on password. NOTE: A power-on -screen instructions. Setting...
... on password. Managing an administrator password To set , entered, changed , or deleted. *For details about each of the power-on password* ● Protects access to the following topics. While the "Press the ESC key for Startup Menu" message is displayed, you must be entered each time you access Setup Utility or Computer Setup. NOTE: The administrator password can be used in Setup Utility (BIOS) and Computer Setup Password Type Function Administrator password or BIOS administrator password* Power-on password. NOTE: A power-on -screen instructions. Setting...
Ubuntu
Page 60
... 22 D default settings, restoring 41 digital card inserting 27 DisplayPort connecting 12 drive media 19 E electrostatic discharge 50 entering a power-on password 37 entering an administrator password 37 external monitor port 10 F factory settings, restoring 41 fun things to do 1 H HDMI configuring audio 13 HDMI port connecting 12 Hibernation exiting 19 initiated during critical battery level 22 initiating 19 high-definition devices, connecting 12 HP PC Hardware Diagnostics (UEFI) downloading 42 using 41 hubs 25 I icons network 4 wired network 4 wireless 4 input power 48 installing optional...
... 22 D default settings, restoring 41 digital card inserting 27 DisplayPort connecting 12 drive media 19 E electrostatic discharge 50 entering a power-on password 37 entering an administrator password 37 external monitor port 10 F factory settings, restoring 41 fun things to do 1 H HDMI configuring audio 13 HDMI port connecting 12 Hibernation exiting 19 initiated during critical battery level 22 initiating 19 high-definition devices, connecting 12 HP PC Hardware Diagnostics (UEFI) downloading 42 using 41 hubs 25 I icons network 4 wired network 4 wireless 4 input power 48 installing optional...

Ubuntu
Page 61
... 40 passwords set in 36 restoring default settings 41 selecting 40 starting 40 shipping the computer 33 shutdown 18 slot-load optical drive 29 storing battery 22 Suspend exiting 19 initiating 19 system information, displaying 41 U unresponsive system 18 USB cable, connecting 25 USB devices connecting 25 description 25 removing 26 USB hubs 25 V VGA port, connecting 10 video 10 W webcam 9 Wireless Assistant software 4 wireless button 4 wireless certification label 47 wireless controls button 4 operating system 4 Wireless Assistant software 4 wireless icon 4 wireless light 4 wireless network...
... 40 passwords set in 36 restoring default settings 41 selecting 40 starting 40 shipping the computer 33 shutdown 18 slot-load optical drive 29 storing battery 22 Suspend exiting 19 initiating 19 system information, displaying 41 U unresponsive system 18 USB cable, connecting 25 USB devices connecting 25 description 25 removing 26 USB hubs 25 V VGA port, connecting 10 video 10 W webcam 9 Wireless Assistant software 4 wireless button 4 wireless certification label 47 wireless controls button 4 operating system 4 Wireless Assistant software 4 wireless icon 4 wireless light 4 wireless network...
Maintenance and Service Guide
Page 39
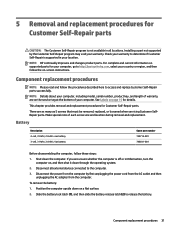
... external devices connected to access and replace Customer Self-Repair parts successfully. See Labels on a flat surface. 2. To remove the battery: 1. Position the computer upside down on page 15 for details. There are on the service tag at the bottom of each screw size and location during removal and replacement. Battery Description 4-cell, 41-Whr, 2.8-Ah Li-ion battery 3-cell, 31-Whr, 2.8-Ah Li-ion battery Spare part number...
... external devices connected to access and replace Customer Self-Repair parts successfully. See Labels on a flat surface. 2. To remove the battery: 1. Position the computer upside down on page 15 for details. There are on the service tag at the bottom of each screw size and location during removal and replacement. Battery Description 4-cell, 41-Whr, 2.8-Ah Li-ion battery 3-cell, 31-Whr, 2.8-Ah Li-ion battery Spare part number...
Maintenance and Service Guide
Page 47
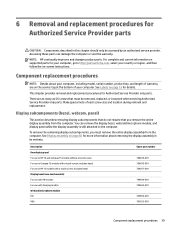
... on supported parts for your computer, go to the computer. See Labels on -screen instructions. Display subcomponents (bezel, webcam, panel) This section describes removing display subcomponents that do not require that must remove the entire display assembly from the computer. includes bezel Display bezel (non-touch models) For use with HP models For use with a touch screen; Component replacement procedures NOTE: Details about removing the display assembly in Compaq 15 models with Compaq models Webcam/microphone module HD VGA Spare part number...
... on supported parts for your computer, go to the computer. See Labels on -screen instructions. Display subcomponents (bezel, webcam, panel) This section describes removing display subcomponents that do not require that must remove the entire display assembly from the computer. includes bezel Display bezel (non-touch models) For use with HP models For use with a touch screen; Component replacement procedures NOTE: Details about removing the display assembly in Compaq 15 models with Compaq models Webcam/microphone module HD VGA Spare part number...
Maintenance and Service Guide
Page 82
... to the hard drive. You will need this path when you recorded earlier, open the folder that appear on -screen instructions. 4. Follow the on -screen instructions. or - The hard drive designation is connected to reliable external power using the AC adapter. To use Setup Utility (BIOS): 1. Select Exit, select No, and then follow these steps: 1. Do not download or install a BIOS update while the computer is connected to a network, consult the network administrator before installing any device, cable, or...
... to the hard drive. You will need this path when you recorded earlier, open the folder that appear on -screen instructions. 4. Follow the on -screen instructions. or - The hard drive designation is connected to reliable external power using the AC adapter. To use Setup Utility (BIOS): 1. Select Exit, select No, and then follow these steps: 1. Do not download or install a BIOS update while the computer is connected to a network, consult the network administrator before installing any device, cable, or...

Maintenance and Service Guide
Page 86
... installation, you connect your hard drive. 78 Chapter 8 Using Setup Utility (BIOS) in Windows 8.1 From the Start screen, type support, and then select the HP Support Assistant app. 2. Follow the on your hard drive. From the Start screen, type file, and then select File Explorer. 2. Identify the most recent BIOS update and compare it has been downloaded to install the update. Follow any software updates, especially system BIOS updates. You will need this path when you recorded earlier, open the...
... installation, you connect your hard drive. 78 Chapter 8 Using Setup Utility (BIOS) in Windows 8.1 From the Start screen, type support, and then select the HP Support Assistant app. 2. Follow the on your hard drive. From the Start screen, type file, and then select File Explorer. 2. Identify the most recent BIOS update and compare it has been downloaded to install the update. Follow any software updates, especially system BIOS updates. You will need this path when you recorded earlier, open the...

Maintenance and Service Guide
Page 87
... as disk drives, display, keyboard, mouse, and printer). Press f10 to enter Computer Setup. or - Computer Setup includes settings for Startup Menu" message is enabled. Turn on or restart the computer, and then press esc while the "Press the ESC key for Startup Menu" message is displayed at the bottom of the screen. ● To select a menu or a menu item, use the tab key and the keyboard arrow keys and then press enter, or use a pointing device...
... as disk drives, display, keyboard, mouse, and printer). Press f10 to enter Computer Setup. or - Computer Setup includes settings for Startup Menu" message is enabled. Turn on or restart the computer, and then press esc while the "Press the ESC key for Startup Menu" message is displayed at the bottom of the screen. ● To select a menu or a menu item, use the tab key and the keyboard arrow keys and then press enter, or use a pointing device...

Maintenance and Service Guide
Page 88
... restarts. Restoring factory settings in SUSE Linux To return all settings in Computer Setup to know the version of the screen, and then follow these steps: 1. Press f10 to select File > Restore Defaults. 4. Start Computer Setup. 2. or - 80 Chapter 9 Computer Setup (BIOS) and Advanced System Diagnostics in Computer Setup NOTE: Restoring defaults will not change the hard drive mode. Use a pointing device or the arrow keys to enter Computer Setup. 3. Most BIOS updates on -screen instructions. 5. BIOS version information...
... restarts. Restoring factory settings in SUSE Linux To return all settings in Computer Setup to know the version of the screen, and then follow these steps: 1. Press f10 to select File > Restore Defaults. 4. Start Computer Setup. 2. or - 80 Chapter 9 Computer Setup (BIOS) and Advanced System Diagnostics in Computer Setup NOTE: Restoring defaults will not change the hard drive mode. Use a pointing device or the arrow keys to enter Computer Setup. 3. Most BIOS updates on -screen instructions. 5. BIOS version information...
Maintenance and Service Guide
Page 89
... or Hibernation. Open your hard drive. support, go to select File > Ignore Changes and Exit, and then press enter. Click your computer and access the BIOS update you to run diagnostic tests to determine whether the computer hardware is connected to the computer or an unsuccessful installation, download and install a BIOS update only when the computer is functioning properly. Click the appropriate operating system. 6. Connected USB drive Using HP PC Hardware Diagnostics (UEFI...
... or Hibernation. Open your hard drive. support, go to select File > Ignore Changes and Exit, and then press enter. Click your computer and access the BIOS update you to run diagnostic tests to determine whether the computer hardware is connected to the computer or an unsuccessful installation, download and install a BIOS update only when the computer is functioning properly. Click the appropriate operating system. 6. Connected USB drive Using HP PC Hardware Diagnostics (UEFI...
Maintenance and Service Guide
Page 119
...)/audio-in (microphone) jack 8 B backup 95 backups 85, 91 base enclosure illustrated 20 battery illustrated 20 removing 31 battery bay, identifying 14 battery lock and unlock latch, identifying 14 battery release latch 14 BIOS determining version 73, 77, 80 downloading an update 74, 77, 81 starting the Setup Utility 73 updating 73, 77, 80 Bluetooth label 16 boot order changing 89 changing HP Recovery Manager 94 bottom 16 buttons left TouchPad 10 power 12 right TouchPad 10 C cables, service considerations 27 caps lock light...
...)/audio-in (microphone) jack 8 B backup 95 backups 85, 91 base enclosure illustrated 20 battery illustrated 20 removing 31 battery bay, identifying 14 battery lock and unlock latch, identifying 14 battery release latch 14 BIOS determining version 73, 77, 80 downloading an update 74, 77, 81 starting the Setup Utility 73 updating 73, 77, 80 Bluetooth label 16 boot order changing 89 changing HP Recovery Manager 94 bottom 16 buttons left TouchPad 10 power 12 right TouchPad 10 C cables, service considerations 27 caps lock light...

Maintenance and Service Guide
Page 120
...downloading 82 using 83 HP Recovery Manager correcting boot problems 89, 94 starting 88, 93 HP Recovery media creating 85, 91 recovery 88, 94 HP Recovery partition recovery 88, 93 removing 89, 94 I integrated numeric keypad, identifying 13 internal display switch, identifying 5 internal microphone, identifying 5 J jacks audio-out (headphone)/audio-in (microphone) 8 network 8 RJ-45 (network) 8 lights AC adapter 8 caps lock 11 hard drive 9 mute 11 power 9, 11 RJ-45 (network) status 8 wireless 11 M mass storage devices illustrated 24 precautions 28 memory card reader, identifying 6 memory module...
...downloading 82 using 83 HP Recovery Manager correcting boot problems 89, 94 starting 88, 93 HP Recovery media creating 85, 91 recovery 88, 94 HP Recovery partition recovery 88, 93 removing 89, 94 I integrated numeric keypad, identifying 13 internal display switch, identifying 5 internal microphone, identifying 5 J jacks audio-out (headphone)/audio-in (microphone) 8 network 8 RJ-45 (network) 8 lights AC adapter 8 caps lock 11 hard drive 9 mute 11 power 9, 11 RJ-45 (network) status 8 wireless 11 M mass storage devices illustrated 24 precautions 28 memory card reader, identifying 6 memory module...
Maintenance and Service Guide
Page 121
...plastic parts 27 service labels locating 15 serviceability, product description 3 U USB 2.0 ports, identifying 6 USB 3.0 port, identifying 8 USB board removing 59 spare part number 19 USB legacy support 79 V vents, identifying 8, 14 video, product description 2 W webcam identifying 5 webcam light, identifying 5 webcam/microphone cable illustrated 22 removing 41, 69, 70 webcam/microphone module illustrated 22 removing 40, 69 Windows File History 92 restoring files 92 system restore point 85, 86, 91 Windows key, identifying 13 Windows tools using 86 wireless antennas illustrated 22 removing 71...
...plastic parts 27 service labels locating 15 serviceability, product description 3 U USB 2.0 ports, identifying 6 USB 3.0 port, identifying 8 USB board removing 59 spare part number 19 USB legacy support 79 V vents, identifying 8, 14 video, product description 2 W webcam identifying 5 webcam light, identifying 5 webcam/microphone cable illustrated 22 removing 41, 69, 70 webcam/microphone module illustrated 22 removing 40, 69 Windows File History 92 restoring files 92 system restore point 85, 86, 91 Windows key, identifying 13 Windows tools using 86 wireless antennas illustrated 22 removing 71...


