User Guide
Page 10
... logging on to the Internet: http://www.compaq.com Be sure to the Internet: http://www.compaq.com Compaq Authorized Reseller For the name of your nearest Compaq Authorized Reseller: n In the United States, call Compaq: n Technical support registration number (if applicable) n Product serial number(s) n Product model name(s) and number(s) n Applicable error messages n Add-on boards or hardware n Third-party hardware or software n Operating system type and revision level n Detailed, specific...
... logging on to the Internet: http://www.compaq.com Be sure to the Internet: http://www.compaq.com Compaq Authorized Reseller For the name of your nearest Compaq Authorized Reseller: n In the United States, call Compaq: n Technical support registration number (if applicable) n Product serial number(s) n Product model name(s) and number(s) n Applicable error messages n Add-on boards or hardware n Third-party hardware or software n Operating system type and revision level n Detailed, specific...

User Guide
Page 11
... one user. A typical Compaq Server Console Switch, also know as your network system needs change. Tiering allows you . The 2-Port switch uses a simplified OSD. You can be identified by more than one location or by name or number, enabling you to view and select server names that make sense to you to control large computer networks using a single keyboard, monitor, and mouse. To switch between computers you simply type a command at...
... one user. A typical Compaq Server Console Switch, also know as your network system needs change. Tiering allows you . The 2-Port switch uses a simplified OSD. You can be identified by more than one location or by name or number, enabling you to view and select server names that make sense to you to control large computer networks using a single keyboard, monitor, and mouse. To switch between computers you simply type a command at...
User Guide
Page 12
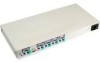
... direct downloading from 2 to include as well as power-up test data and configuration menus. This chapter provides an overview of the Server Console Switch include: s On-Screen Display (OSD) - Makes it easy to the 4- s Hardware Reset Switch - s Switch Firmware Update - s Support for a keyboard, monitor, mouse, and power cord. s Password Protection - Allows quick and easy update since the application code of the switch resides in 2-, 4-, and 8-Port versions and can use with the 2-Port switch.) See...
... direct downloading from 2 to include as well as power-up test data and configuration menus. This chapter provides an overview of the Server Console Switch include: s On-Screen Display (OSD) - Makes it easy to the 4- s Hardware Reset Switch - s Switch Firmware Update - s Support for a keyboard, monitor, mouse, and power cord. s Password Protection - Allows quick and easy update since the application code of the switch resides in 2-, 4-, and 8-Port versions and can use with the 2-Port switch.) See...

User Guide
Page 38
... the reboot is successful and that it is needed for additional information. The switch generates responses to turn on the computers because when the servers boot up the system as assigning unique names for the computers or displaying the computers by default, and displays the number "1" in the status flag displayed on the monitor. s Switches to port 1 by their drivers send device settings...
... the reboot is successful and that it is needed for additional information. The switch generates responses to turn on the computers because when the servers boot up the system as assigning unique names for the computers or displaying the computers by default, and displays the number "1" in the status flag displayed on the monitor. s Switches to port 1 by their drivers send device settings...

User Guide
Page 39
... steps. A system with eight servers connected to one 8-Port primary unit can accommodate eight secondary switch units. Tiering simply involves linking the secondary units' physical keyboard, mouse, and monitor connections to each of the currently selected computer. That is powered up. 3-8 Compaq Server Console Switch User Guide Resetting the Unit If the keyboard or mouse locks up, you can push the Reset button on the back panel...
... steps. A system with eight servers connected to one 8-Port primary unit can accommodate eight secondary switch units. Tiering simply involves linking the secondary units' physical keyboard, mouse, and monitor connections to each of the currently selected computer. That is powered up. 3-8 Compaq Server Console Switch User Guide Resetting the Unit If the keyboard or mouse locks up, you can push the Reset button on the back panel...

User Guide
Page 49
... Field/Button Select/Click to boot up the computers. Figure 4-3. Alternate Method Scan Enabled automatically switch video from the system, or change the mouse, keyboard, or monitor, they are lost when power to the switch is lost or turned off and each computer must be rebooted. If you do not save the hardware settings when you can initiate. 4-8 Compaq Server Console Switch User Guide Commands Screen The Commands screen lists actions you install a switch system, add or remove...
... Field/Button Select/Click to boot up the computers. Figure 4-3. Alternate Method Scan Enabled automatically switch video from the system, or change the mouse, keyboard, or monitor, they are lost when power to the switch is lost or turned off and each computer must be rebooted. If you do not save the hardware settings when you can initiate. 4-8 Compaq Server Console Switch User Guide Commands Screen The Commands screen lists actions you install a switch system, add or remove...
User Guide
Page 50
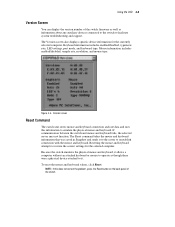
... keyboard values, click Reset. Keyboard information includes enabled/disabled, typematic rate, LED settings, port mode, and keyboard type. Mouse information includes enabled/disabled, sample rate, resolution, and mouse type. Resetting the mouse and keyboard attempts to facilitate system troubleshooting and support. Version screen Reset Command The switch unit stores mouse and keyboard connection and rate data and uses this does not correct the problem, press the Reset button on the back panel of the switch firmware as well as...
... keyboard values, click Reset. Keyboard information includes enabled/disabled, typematic rate, LED settings, port mode, and keyboard type. Mouse information includes enabled/disabled, sample rate, resolution, and mouse type. Resetting the mouse and keyboard attempts to facilitate system troubleshooting and support. Version screen Reset Command The switch unit stores mouse and keyboard connection and rate data and uses this does not correct the problem, press the Reset button on the back panel of the switch firmware as well as...

User Guide
Page 51
... monitor type to the port associated with that computer. In addition, if one or more of the computers in your system includes one or more secondary switches in a tiered configuration, you must make the primary switch aware of monitor, it then click Modify. 4-10 Compaq Server Console Switch User Guide Devices Screen If your switch system have a special type of the secondary switch by assigning a specific device type...
... monitor type to the port associated with that computer. In addition, if one or more of the computers in your system includes one or more secondary switches in a tiered configuration, you must make the primary switch aware of monitor, it then click Modify. 4-10 Compaq Server Console Switch User Guide Devices Screen If your switch system have a special type of the secondary switch by assigning a specific device type...

User Guide
Page 58
.... 2. To remove a computer from the Commands screen. Click OK. To start the scan mode, select Scan Enabled from the scan list: 1. Type the name or port number of the remaining computers to be selected before the scan switches to the next computer Defaults return to default settings OK save changes and return to include in the sequence. 3. Click OK. Press Delete or Press Shift + Delete to...
.... 2. To remove a computer from the Commands screen. Click OK. To start the scan mode, select Scan Enabled from the scan list: 1. Type the name or port number of the remaining computers to be selected before the scan switches to the next computer Defaults return to default settings OK save changes and return to include in the sequence. 3. Click OK. Press Delete or Press Shift + Delete to...

User Guide
Page 66
... to broadcast; To broadcast to tiered configurations: Setting Up Computers Attached to additional secondary switches. the Main screen for the secondary switch. 5. Using the OSD 4-25 Table 4-14 Broadcast Screen Functions Field/Button Select/Click to receive keystrokes and/or mouse movements. 2. Defaults return to default settings (all off broadcast mode, deselect Broadcast Active from the Commands screen to selected computers: 1. Select...
... to broadcast; To broadcast to tiered configurations: Setting Up Computers Attached to additional secondary switches. the Main screen for the secondary switch. 5. Using the OSD 4-25 Table 4-14 Broadcast Screen Functions Field/Button Select/Click to receive keystrokes and/or mouse movements. 2. Defaults return to default settings (all off broadcast mode, deselect Broadcast Active from the Commands screen to selected computers: 1. Select...

User Guide
Page 68
Access OSD menus at the secondary switch to: s Check version information of your firmware s Set up broadcasting s Add another level of the tiered port you switch between two computers, the Server Console Switch reconfigures the keyboard and mouse using the settings stored in a secondary switch because adjustments can cause conflicts between the secondary and primary switches. For example, if the current computer selected has Caps Lock turned on must...
Access OSD menus at the secondary switch to: s Check version information of your firmware s Set up broadcasting s Add another level of the tiered port you switch between two computers, the Server Console Switch reconfigures the keyboard and mouse using the settings stored in a secondary switch because adjustments can cause conflicts between the secondary and primary switches. For example, if the current computer selected has Caps Lock turned on must...
User Guide
Page 86
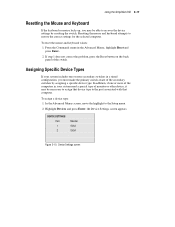
... secondary switches in the Advanced Menus, highlight Reset and press Enter. 2. From the Commands menu in a tiered configuration, you may be able to restore the correct settings for the selected computer. In the Advanced Menus screen, move the highlight to the port associated with that device type to the Setup menu. 2. Assigning Specific Device Types If your system need a special type of monitor...
... secondary switches in the Advanced Menus, highlight Reset and press Enter. 2. From the Commands menu in a tiered configuration, you may be able to restore the correct settings for the selected computer. In the Advanced Menus screen, move the highlight to the port associated with that device type to the Setup menu. 2. Assigning Specific Device Types If your system need a special type of monitor...
User Guide
Page 94
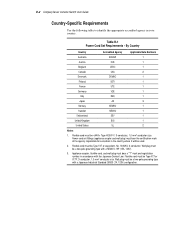
...-pole grounding type with a Japanese Industrial Standard C8303 (7A, 125V) configuration. B-2 Compaq Server Console Switch User Guide Country-Specific Requirements Use the following table to identify the appropriate accredited agency in accordance with the Japanese Dentori Law. Flexible cord must be Type VCT or VCTF, 3-conductor, 1.0 mm2 conductor size. Appliance coupler, flexible cord, and wall plug must bear a "T" mark and registration number in your...
...-pole grounding type with a Japanese Industrial Standard C8303 (7A, 125V) configuration. B-2 Compaq Server Console Switch User Guide Country-Specific Requirements Use the following table to identify the appropriate accredited agency in accordance with the Japanese Dentori Law. Flexible cord must be Type VCT or VCTF, 3-conductor, 1.0 mm2 conductor size. Appliance coupler, flexible cord, and wall plug must bear a "T" mark and registration number in your...
User Guide
Page 99
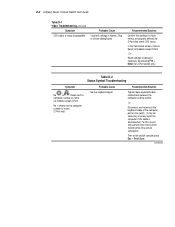
... check OSD menu). continued D-2 Compaq Server Console Switch User Guide Table D-1 Video Troubleshooting continued Symptom OSD colors or setup incompatible Probable Cause Incorrect settings in Names, Flag or Device dialog boxes Recommended Solution Confirm that settings in these tests when maintenance time can be scheduled.) Then at the computer port on Reset (all models except 2-Port) No + shows next to computer number or name (all models except 2-Port). In the Commands...
... check OSD menu). continued D-2 Compaq Server Console Switch User Guide Table D-1 Video Troubleshooting continued Symptom OSD colors or setup incompatible Probable Cause Incorrect settings in Names, Flag or Device dialog boxes Recommended Solution Confirm that settings in these tests when maintenance time can be scheduled.) Then at the computer port on Reset (all models except 2-Port) No + shows next to computer number or name (all models except 2-Port). In the Commands...

User Guide
Page 103
... Menus. D-6 Compaq Server Console Switch User Guide Symptom Mouse error on boot, all computers Mouse error on computer Computer left mouse in indeterminate state Mouse not initialized Recommended Solution Tighten loose mouse cable connections. Replace mouse cable. Reset mouse through OSD or reset switch. Check for cross-connections Replace mouse with PS/2 or mouse-port compatible mouse. Install PS/2-to exit broadcast mode. Use OSD to -serial protocol converter. Reset mouse through OSD or reset switch. Request other user console to...
... Menus. D-6 Compaq Server Console Switch User Guide Symptom Mouse error on boot, all computers Mouse error on computer Computer left mouse in indeterminate state Mouse not initialized Recommended Solution Tighten loose mouse cable connections. Replace mouse cable. Reset mouse through OSD or reset switch. Check for cross-connections Replace mouse with PS/2 or mouse-port compatible mouse. Install PS/2-to exit broadcast mode. Use OSD to -serial protocol converter. Reset mouse through OSD or reset switch. Request other user console to...
User Guide
Page 105
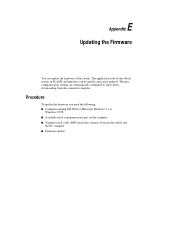
Procedure To update the firmware you need the following: s Computer running MS-DOS or Microsoft Windows 3.1 or Windows 95/98 s Available serial communications port on the computer s Standard serial cable (DB9-male) that connects between the switch and the PC computer s Firmware update E Appendix Updating the Firmware You can be quickly and easily updated. The application code of the switch resides in FLASH, and therefore can update the firmware of the switch. The port communication settings are automatically configured to allow direct downloading from the connected computer.
Procedure To update the firmware you need the following: s Computer running MS-DOS or Microsoft Windows 3.1 or Windows 95/98 s Available serial communications port on the computer s Standard serial cable (DB9-male) that connects between the switch and the PC computer s Firmware update E Appendix Updating the Firmware You can be quickly and easily updated. The application code of the switch resides in FLASH, and therefore can update the firmware of the switch. The port communication settings are automatically configured to allow direct downloading from the connected computer.

User Guide
Page 108
... 5-6 removing from scan list, 2-Port unit 5-12 scanning on 2-Port 5-10 selecting on 2-Port unit 5-4 simultaneously control more than one 4-8 startup behavior 3-7 switching between 4-28 switching on 2-Port 5-5 configurations alternate 3-8 dual console 3-10 master/slave 3-9 sample 1-3 tiered switch 3-8 tiered, figure 3-9 connecting tiers while the system is powered up 3-9 connections, making while under power 3-8 conventions for OSD Menus 4-2 cooperative mode setting 4-7 cover panel installation 2-16 D default settings 4-12 return to 4-8 Defaults button 4-11 delay time setting...
... 5-6 removing from scan list, 2-Port unit 5-12 scanning on 2-Port 5-10 selecting on 2-Port unit 5-4 simultaneously control more than one 4-8 startup behavior 3-7 switching between 4-28 switching on 2-Port 5-5 configurations alternate 3-8 dual console 3-10 master/slave 3-9 sample 1-3 tiered switch 3-8 tiered, figure 3-9 connecting tiers while the system is powered up 3-9 connections, making while under power 3-8 conventions for OSD Menus 4-2 cooperative mode setting 4-7 cover panel installation 2-16 D default settings 4-12 return to 4-8 Defaults button 4-11 delay time setting...
User Guide
Page 110
... hardware 2-1 rack-mount 2-15 side mount, securing 2-7 standard 1U 2-11 K keyboard conventions, OSD 4-3 enabled/disabled 4-9 LED settings, viewing 4-9 locking 4-22 locking on 2-Port unit 5-13 port mode, viewing 4-9 resetting 4-10 resetting on 2-Port unit 5-17 set for simultaneous control See broadcast settings, saving See Snapshot button troubleshooting D-3 type, viewing 4-9 typematic rate, viewing 4-9 kit Compaq 1U Keyboard Drawer Rack Option 2-8 Compaq Server Console Switch, contents 2-2 L language selection 4-1 left mouse button, function 4-2 M Main screen functions 4-6 making connections...
... hardware 2-1 rack-mount 2-15 side mount, securing 2-7 standard 1U 2-11 K keyboard conventions, OSD 4-3 enabled/disabled 4-9 LED settings, viewing 4-9 locking 4-22 locking on 2-Port unit 5-13 port mode, viewing 4-9 resetting 4-10 resetting on 2-Port unit 5-17 set for simultaneous control See broadcast settings, saving See Snapshot button troubleshooting D-3 type, viewing 4-9 typematic rate, viewing 4-9 kit Compaq 1U Keyboard Drawer Rack Option 2-8 Compaq Server Console Switch, contents 2-2 L language selection 4-1 left mouse button, function 4-2 M Main screen functions 4-6 making connections...

User Guide
Page 111
...11 settings, using default 4-11 status 4-5 Port button 4-6 ports 4-port assign secondary switch to 4-12 selection 4-12 8-port assign secondary switch to 4-12 selection 4-12 power cable, connecting to the switch box 2-8 rating label A-2 reboot, unattended 3-7 reset button hardware 3-8 button (OSD) 4-8 command 4-10 and 8-Port units C-2 switch 3-7 power-up sequence 3-7 preemptive mode setting 4-7 primary port 4-6 primary switch 4-11 programmable scanning 1-2 R rack-mount installation 2-15 rails securing 2-10 side-mount, attaching to 2-Port unit 2-3 sliding, attaching to Dual Console 8-Port unit...
...11 settings, using default 4-11 status 4-5 Port button 4-6 ports 4-port assign secondary switch to 4-12 selection 4-12 8-port assign secondary switch to 4-12 selection 4-12 power cable, connecting to the switch box 2-8 rating label A-2 reboot, unattended 3-7 reset button hardware 3-8 button (OSD) 4-8 command 4-10 and 8-Port units C-2 switch 3-7 power-up sequence 3-7 preemptive mode setting 4-7 primary port 4-6 primary switch 4-11 programmable scanning 1-2 R rack-mount installation 2-15 rails securing 2-10 side-mount, attaching to 2-Port unit 2-3 sliding, attaching to Dual Console 8-Port unit...
User Guide
Page 112
...accessing 5-2 accessing on the primary switch 5-2 server access, securing 5-12 settings default 4-12 return to default 4-8 Setup button 4-6 Setup screen displaying 4-6 figure 4-7 functions 4-7 Simplified OSD exiting 5-4 opening 5-1 slide rail brackets attaching 2-11 Snapshot button 4-8 specifications C-1 Standard selection 4-12 status flag 3-7 changing attributes on 2-Port unit 5-9 positioning 4-20 status port 4-5 symbols 4-5 symbols(Simplified OSD) 5-3 status symbols troubleshooting D-2 switch hardware reset 1-2 primary 4-11 secondary 4-11 troubleshooting D-6 switch box sliding into the rack...
...accessing 5-2 accessing on the primary switch 5-2 server access, securing 5-12 settings default 4-12 return to default 4-8 Setup button 4-6 Setup screen displaying 4-6 figure 4-7 functions 4-7 Simplified OSD exiting 5-4 opening 5-1 slide rail brackets attaching 2-11 Snapshot button 4-8 specifications C-1 Standard selection 4-12 status flag 3-7 changing attributes on 2-Port unit 5-9 positioning 4-20 status port 4-5 symbols 4-5 symbols(Simplified OSD) 5-3 status symbols troubleshooting D-2 switch hardware reset 1-2 primary 4-11 secondary 4-11 troubleshooting D-6 switch box sliding into the rack...