
User Manual
Page 2
... that contained in the literature accompanying the appliance. The exclamation point within the product's enclosure that is intended to alert the user to persons. TF-TV 1925/2225 Serial No. For Customer Use: Enter below the serial number that may be of sufficient magnitude to constitute a risk of electric to the...
... that contained in the literature accompanying the appliance. The exclamation point within the product's enclosure that is intended to alert the user to persons. TF-TV 1925/2225 Serial No. For Customer Use: Enter below the serial number that may be of sufficient magnitude to constitute a risk of electric to the...

User Manual
Page 3
... try to comply with Part 15 of the FCC rules. Reverse engineering or disassembly is connected. •• Consult the dealer or an experienced radio/TV technician for help Use of the equipment. Note: This equipment has been tested and found to correct the interference by Macrovision Corporation and other intellectual...
... try to comply with Part 15 of the FCC rules. Reverse engineering or disassembly is connected. •• Consult the dealer or an experienced radio/TV technician for help Use of the equipment. Note: This equipment has been tested and found to correct the interference by Macrovision Corporation and other intellectual...

User Manual
Page 7
... size of a normal screen (4:3) and a wide screen (16:9) LCD (Liquid Crystal Display) Designed with color TFT liquid crystal display clearly shows the data. Multiple Mode TV AV S-VIDEO COMPONENT HDMI VGA High Quality Property High Resolution Adopt an MPEG2 decoding format to experience some light or dark spots appearing on the...
... size of a normal screen (4:3) and a wide screen (16:9) LCD (Liquid Crystal Display) Designed with color TFT liquid crystal display clearly shows the data. Multiple Mode TV AV S-VIDEO COMPONENT HDMI VGA High Quality Property High Resolution Adopt an MPEG2 decoding format to experience some light or dark spots appearing on the...

User Manual
Page 8
b. a. If any item is missing, contact your LCD TV/monitor. Package Contents Please make sure the following items are included with your dealer. c. a, Main Unit b, Power Cord & RCA Cable c, Remote Control Unit 2
b. a. If any item is missing, contact your LCD TV/monitor. Package Contents Please make sure the following items are included with your dealer. c. a, Main Unit b, Power Cord & RCA Cable c, Remote Control Unit 2

User Manual
Page 9
... of mounts are available in the standby/power-on the wall. MENU Display the system setup menu. 11 7. VOL+/- Attach the TV case to the wall •• Separate the TV case and the stand-base by removing screws before installation. •• Use the VESA standard mountings to enter. 8. Take care...
... of mounts are available in the standby/power-on the wall. MENU Display the system setup menu. 11 7. VOL+/- Attach the TV case to the wall •• Separate the TV case and the stand-base by removing screws before installation. •• Use the VESA standard mountings to enter. 8. Take care...

User Manual
Page 10
... menu, press OK to show the system menu. 17. "-" Button Used with number buttons to set the screen format. 7. SOUND 10 22 Press to access TV programs. 3 13 4. P.Mode Select the picture mode. 19. EXIT Press to enter. 15. EPG 19 7 20 8 Access the Electronic Program Guide. 9 21 10. SOURCE Press...
... menu, press OK to show the system menu. 17. "-" Button Used with number buttons to set the screen format. 7. SOUND 10 22 Press to access TV programs. 3 13 4. P.Mode Select the picture mode. 19. EXIT Press to enter. 15. EPG 19 7 20 8 Access the Electronic Program Guide. 9 21 10. SOURCE Press...

User Manual
Page 12
... units and then connect the VGA jack and the PC Audio In jack with this product. 6 VGA Input - PC Connection The VGA port of the TV is capable of time, disconnect the power. When used for a long period of accepting high-definition signals from computers with a VGA output jack. Cable Connections... of the supplied power cord to the player's power jack and the other end to the antenna port. Cable connections Antenna/Power Connection 111 Connect TV RF sources to the 110-240V AC wall outlet. The mentioned cables are not included with a 15-Pin D-Sub cable and a 3.5mm stereo audio ...
... units and then connect the VGA jack and the PC Audio In jack with this product. 6 VGA Input - PC Connection The VGA port of the TV is capable of time, disconnect the power. When used for a long period of accepting high-definition signals from computers with a VGA output jack. Cable Connections... of the supplied power cord to the player's power jack and the other end to the antenna port. Cable connections Antenna/Power Connection 111 Connect TV RF sources to the 110-240V AC wall outlet. The mentioned cables are not included with a 15-Pin D-Sub cable and a 3.5mm stereo audio ...

User Manual
Page 16
.... See the "Channel Menu" section for details). 222 Press the POWER button to turn on the player. 333 Press the MODE button to select the TV signal mode. 444 Press the CH+/- TV Function Preparations 111 Connect cables.(Refer to the "Cable Connections" section for details.
.... See the "Channel Menu" section for details). 222 Press the POWER button to turn on the player. 333 Press the MODE button to select the TV signal mode. 444 Press the CH+/- TV Function Preparations 111 Connect cables.(Refer to the "Cable Connections" section for details.

User Manual
Page 17
... the SLEEP button on the Sleep Time. To cancel the sleep timer, set the timer to Off. The count down automatically on the remote once. TV Function Audio Menu ITEM Sound Mode Bass Treble Balance Surround AVC MTS Audio Language DESCRIPTION Set the sound mode. (Standard, Music, Movie, Sports,Personal). Set...
... the SLEEP button on the Sleep Time. To cancel the sleep timer, set the timer to Off. The count down automatically on the remote once. TV Function Audio Menu ITEM Sound Mode Bass Treble Balance Surround AVC MTS Audio Language DESCRIPTION Set the sound mode. (Standard, Music, Movie, Sports,Personal). Set...
User Manual
Page 18
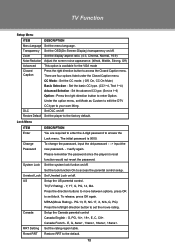
...Text 1~4) Advanced Selection - Please remember the password since the players's reset function would not revert the password. Y, Y7, G, PG, 14, MA. TV Function Setup Menu ITEM DESCRIPTION Menu Language Set the menu language. DLC Set DLC on /off Restore Default Set the player to your own liking.... (4:3, Cinema, Normal, 16:9) Noise Reduction Adjust the screen noise appearance. (Weak, Middle, Strong, Off) Advanced This option is 0000. TV(TV Rating) - Canada French - To change the password, input the old password - - > input the new password- - >verify again.
...Text 1~4) Advanced Selection - Please remember the password since the players's reset function would not revert the password. Y, Y7, G, PG, 14, MA. TV Function Setup Menu ITEM DESCRIPTION Menu Language Set the menu language. DLC Set DLC on /off Restore Default Set the player to your own liking.... (4:3, Cinema, Normal, 16:9) Noise Reduction Adjust the screen noise appearance. (Weak, Middle, Strong, Off) Advanced This option is 0000. TV(TV Rating) - Canada French - To change the password, input the old password - - > input the new password- - >verify again.

User Manual
Page 19
TV Function Channel Menu ITEM DESCRIPTION Air/Cable Setup the antenna type as the favorite channel. To disable the setting, press OK again. Show/Hide Hide ...
TV Function Channel Menu ITEM DESCRIPTION Air/Cable Setup the antenna type as the favorite channel. To disable the setting, press OK again. Show/Hide Hide ...

User Manual
Page 20
Warm NOTE: Please see the TV section for details 222 Press the MODE button to select the relevant AV mode (AV, S-Video, Component, HDMI). Refer to enter. While working with the ...
Warm NOTE: Please see the TV section for details 222 Press the MODE button to select the relevant AV mode (AV, S-Video, Component, HDMI). Refer to enter. While working with the ...

User Manual
Page 21
... select VGA System Setup Menu Various features can use the unit's TFT LCD as "Phase" accordingly under the SETUP menu. 15 NOTE: Please see the TV section for a proper functioning. Adjust the PC Screen Upon switching to the PC mode, the moniter will be preset through the system menu, please read...
... select VGA System Setup Menu Various features can use the unit's TFT LCD as "Phase" accordingly under the SETUP menu. 15 NOTE: Please see the TV section for a proper functioning. Adjust the PC Screen Upon switching to the PC mode, the moniter will be preset through the system menu, please read...

User Manual
Page 22
... power cord has been properly connected to the power outlet. •• Check if the main power has been switched on. •• Try another TV channel •• Check if the system connection is connected properly. •• Check if the system has been properly connected. •• If using...
... power cord has been properly connected to the power outlet. •• Check if the main power has been switched on. •• Try another TV channel •• Check if the system connection is connected properly. •• Check if the system has been properly connected. •• If using...


