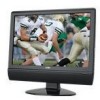
Instruction Manual
Page 2
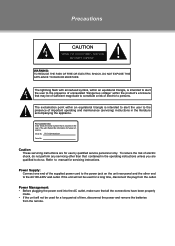
... APPLIANCE TO RAIN OR MOISTURE. For Customer Use: Enter below the serial number that may be used for a long time, disconnect the plug from the remote. Caution: These servicing instructions are qualified to the presence of the unit. To reduce the risk of the supplied power cord to the AC100-240V...
... APPLIANCE TO RAIN OR MOISTURE. For Customer Use: Enter below the serial number that may be used for a long time, disconnect the plug from the remote. Caution: These servicing instructions are qualified to the presence of the unit. To reduce the risk of the supplied power cord to the AC100-240V...
Instruction Manual
Page 8
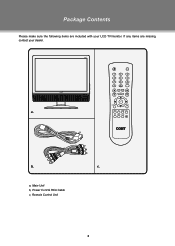
b. a, Main Unit b, Power Cord & RCA Cable c, Remote Control Unit 2 Package Contents Please make sure the following items are missing, contact your LCD TV/monitor. If any items are included with your dealer. a. c.
b. a, Main Unit b, Power Cord & RCA Cable c, Remote Control Unit 2 Package Contents Please make sure the following items are missing, contact your LCD TV/monitor. If any items are included with your dealer. a. c.

Instruction Manual
Page 9
...TFTV1923 Rear Cabinet) 16. HDMI 19. VOLUME-/+ 5. MENU 7. PHONE JACK 100mm 11. TV ANTENNA 13. Take care when mounting, it may cause damage or serious injury should it from its fixture. VIDEO IN 15. COMPONENT IN 17. CH-/+ 6. PC AUDIO IN 12. TFT SCREEN 2. VGA IN 18. Unit View 4 15 6 7 28 9 3 1. REMOTE... SENSOR 3. SPEAKER 10. AUDIO IN((R/L) 14. S-VIDEO IN < > > VESA Standard mounting thread x 4 < 100mm > Plastic part x 2 Unit Stand (e.g. POWER JACK 10 11 12 13 14 15 16 17 18 19 Wall Mounting •• Pinch ...
...TFTV1923 Rear Cabinet) 16. HDMI 19. VOLUME-/+ 5. MENU 7. PHONE JACK 100mm 11. TV ANTENNA 13. Take care when mounting, it may cause damage or serious injury should it from its fixture. VIDEO IN 15. COMPONENT IN 17. CH-/+ 6. PC AUDIO IN 12. TFT SCREEN 2. VGA IN 18. Unit View 4 15 6 7 28 9 3 1. REMOTE... SENSOR 3. SPEAKER 10. AUDIO IN((R/L) 14. S-VIDEO IN < > > VESA Standard mounting thread x 4 < 100mm > Plastic part x 2 Unit Stand (e.g. POWER JACK 10 11 12 13 14 15 16 17 18 19 Wall Mounting •• Pinch ...
Instruction Manual
Page 10
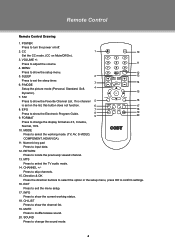
...exit the menu setup. 17. Direction & OK Press the direction buttons to select the option in the setup menu, press OK to select the TV audio mode. 14. POWER Press to set on the list, this button does not function. 6 P-MODE 17 8. CC 1 10 Set ... Remote Control Drawing 1. Press to locate the previously viewed channel. 13. MENU Press to select the working status. 18. FAV Press to change the sound mode. 4 FORMAT 9 19 20 Press to show the channel list. 19. RETURN Press to adjust the volume. 11 4. CHANNEL +/- CH-LIST...
...exit the menu setup. 17. Direction & OK Press the direction buttons to select the option in the setup menu, press OK to select the TV audio mode. 14. POWER Press to set on the list, this button does not function. 6 P-MODE 17 8. CC 1 10 Set ... Remote Control Drawing 1. Press to locate the previously viewed channel. 13. MENU Press to select the working status. 18. FAV Press to change the sound mode. 4 FORMAT 9 19 20 Press to show the channel list. 19. RETURN Press to adjust the volume. 11 4. CHANNEL +/- CH-LIST...
Instruction Manual
Page 11
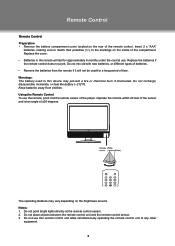
...; Remove the batteries from children. Operate the remote within 20 feet of the sensor and at the remote control sensor. 222 Do not place objects between the remote control unit and the remote control sensor. 333 Do not use the remote, point it will last for a long period...normal use. Do not recharge, disassemble, incinerate, or heat the battery (~212ºF). Using the Remote Control To use this device may vary depending on the brightness around. Remote Control Remote Control Preparation •• Remove the battery compartment cover located on the inside of the compartment....
...; Remove the batteries from children. Operate the remote within 20 feet of the sensor and at the remote control sensor. 222 Do not place objects between the remote control unit and the remote control sensor. 333 Do not use the remote, point it will last for a long period...normal use. Do not recharge, disassemble, incinerate, or heat the battery (~212ºF). Using the Remote Control To use this device may vary depending on the brightness around. Remote Control Remote Control Preparation •• Remove the battery compartment cover located on the inside of the compartment....
Instruction Manual
Page 15
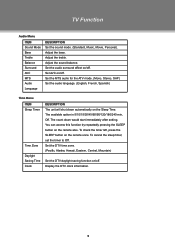
.... Set the DTV time zone. (Pacific, Alaska, Hawaii, Eastern, Central, Mountain) Set the DTV daylight saving function on the remote also. TV Function Audio Menu ITEM Sound Mode Bass Treble Balance Surround AVC MTS Audio Language DESCRIPTION Set the sound mode. (Standard, Music, Movie, Personal). Adjust the ...
.... Set the DTV time zone. (Pacific, Alaska, Hawaii, Eastern, Central, Mountain) Set the DTV daylight saving function on the remote also. TV Function Audio Menu ITEM Sound Mode Bass Treble Balance Surround AVC MTS Audio Language DESCRIPTION Set the sound mode. (Standard, Music, Movie, Personal). Adjust the ...
Instruction Manual
Page 20
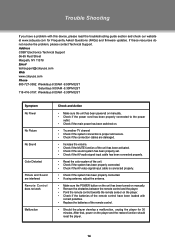
Address COBY Electronics Technical Support 56-65 Rust Street Maspeth, NY 11378 Email [email protected] the power outlet. •• Check if the main power has been switched on. •• Try another TV channel •• Check if the system connection is proper and secure. •• Check if the connection cables ...Asked Questions (FAQs) and firmware updates. After that, power on the player. •• Check if the batteries of the remote control have a problem with correct polarities. •• Replace the batteries of the unit. •• Check if the...
Address COBY Electronics Technical Support 56-65 Rust Street Maspeth, NY 11378 Email [email protected] the power outlet. •• Check if the main power has been switched on. •• Try another TV channel •• Check if the system connection is proper and secure. •• Check if the connection cables ...Asked Questions (FAQs) and firmware updates. After that, power on the player. •• Check if the batteries of the remote control have a problem with correct polarities. •• Replace the batteries of the unit. •• Check if the...


