

User Manual
Page 1
TFT LCD Widescreen Television Instruction Manual TFTV1525 Please read this manual carefully before connection and use
TFT LCD Widescreen Television Instruction Manual TFTV1525 Please read this manual carefully before connection and use
User Manual
Page 2
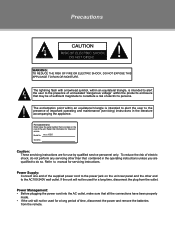
... that may be used for use by qualified service personnel only. TF-TV 1525 Serial No. Refer to persons. Caution: These servicing instructions are qualified to the presence of the supplied power cord to the power jack on the rear of time, disconnect the power and remove the batteries from the outlet. Model No. Power Supply: Connect one end of important operating and maintenance (servicing) instructions in the operating instructions unless you are...
... that may be used for use by qualified service personnel only. TF-TV 1525 Serial No. Refer to persons. Caution: These servicing instructions are qualified to the presence of the supplied power cord to the power jack on the rear of time, disconnect the power and remove the batteries from the outlet. Model No. Power Supply: Connect one end of important operating and maintenance (servicing) instructions in the operating instructions unless you are...
User Manual
Page 3
...; LCD Information The LCD panel used in accordance with Class B limits in the manual. Reverse engineering or disassembly is required to comply with the instructions, may cause undesired operation. patents and other rights owners. If this copyright protection technology must accept any changes or...or more of disks are designed to radio or television reception, which the receiver is connected. •• Consult the dealer or an experienced radio/TV technician for help Use of shielded cable is prohibited. This product incorporates copyright protection technology ...
...; LCD Information The LCD panel used in accordance with Class B limits in the manual. Reverse engineering or disassembly is required to comply with the instructions, may cause undesired operation. patents and other rights owners. If this copyright protection technology must accept any changes or...or more of disks are designed to radio or television reception, which the receiver is connected. •• Consult the dealer or an experienced radio/TV technician for help Use of shielded cable is prohibited. This product incorporates copyright protection technology ...
User Manual
Page 4
... the wall outlet and disconnect the antenna or cable system during a lightning storm or when it from the type of power supply to qualified service personnel. If you to . 1111 Power Sources: This product should be hazardous. 777 Water and Moisture: Do not use liquid cleaners or aerosol cleaners. For products intended to . 444 Follow Instructions: All operating and usage instructions...
... the wall outlet and disconnect the antenna or cable system during a lightning storm or when it from the type of power supply to qualified service personnel. If you to . 1111 Power Sources: This product should be hazardous. 777 Water and Moisture: Do not use liquid cleaners or aerosol cleaners. For products intended to . 444 Follow Instructions: All operating and usage instructions...
User Manual
Page 5
... and refer servicing to qualified service personnel under the following the operating instructions. d) if the product does not operate normally by the manufacturer. 2222 Heat: The product should be mounted to a wall or ceiling only as recommended by following conditions: a) when the power-supply or plug is in wire to an antenna-discharge unit, size of grounding conductors, location of other...
... and refer servicing to qualified service personnel under the following the operating instructions. d) if the product does not operate normally by the manufacturer. 2222 Heat: The product should be mounted to a wall or ceiling only as recommended by following conditions: a) when the power-supply or plug is in wire to an antenna-discharge unit, size of grounding conductors, location of other...
User Manual
Page 7
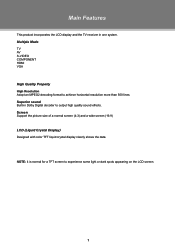
... for a TFT screen to achieve horizontal resolution more than 500 lines. Multiple Mode TV AV S-VIDEO COMPONENT HDMI VGA High Quality Property High Resolution Adopt an MPEG2 decoding format to experience some light or dark spots appearing on the LCD screen. 1 Superior sound Built-in one system. Screen Support the picture size of a normal screen (4:3) and a wide screen (16:9) LCD (Liquid Crystal Display) Designed with color TFT liquid crystal display clearly shows...
... for a TFT screen to achieve horizontal resolution more than 500 lines. Multiple Mode TV AV S-VIDEO COMPONENT HDMI VGA High Quality Property High Resolution Adopt an MPEG2 decoding format to experience some light or dark spots appearing on the LCD screen. 1 Superior sound Built-in one system. Screen Support the picture size of a normal screen (4:3) and a wide screen (16:9) LCD (Liquid Crystal Display) Designed with color TFT liquid crystal display clearly shows...
User Manual
Page 8
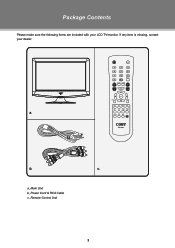
a, Main Unit b, Power Cord & RCA Cable c, Remote Control Unit 2 c. FAV+ FAV- 023 b. a. Package Contents Please make sure the following items are included with your dealer. If any item is missing, contact your LCD TV/monitor.
a, Main Unit b, Power Cord & RCA Cable c, Remote Control Unit 2 c. FAV+ FAV- 023 b. a. Package Contents Please make sure the following items are included with your dealer. If any item is missing, contact your LCD TV/monitor.
User Manual
Page 9
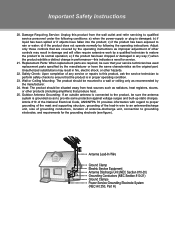
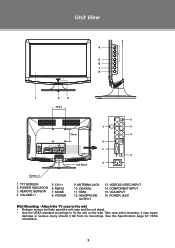
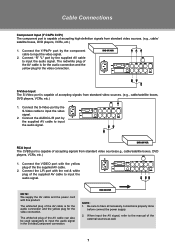
TFT SCREEN 2. ANTENNA JACK 10. VIDEO/S-VIDEO INPUT 14. Attach the TV case to the wall •• Release screws and take apart the unit case and the unit stand. •• Use the VESA standard mountings to fix the unit on the wall. Unit View 4 5 6 7 8 1 2 3 75mm < > > < 12 9 13 75mm 14 10 > 11 15 16 Unit Stand Screw x 2 1. VOLUME-/+ 5. CH-/+ 6. MENU 7. POWER 9. HDMI 12. REMOTE SENSOR 4. HEADPHONE OUTPUT 13. Take care when mounting, it may...
TFT SCREEN 2. ANTENNA JACK 10. VIDEO/S-VIDEO INPUT 14. Attach the TV case to the wall •• Release screws and take apart the unit case and the unit stand. •• Use the VESA standard mountings to fix the unit on the wall. Unit View 4 5 6 7 8 1 2 3 75mm < > > < 12 9 13 75mm 14 10 > 11 15 16 Unit Stand Screw x 2 1. VOLUME-/+ 5. CH-/+ 6. MENU 7. POWER 9. HDMI 12. REMOTE SENSOR 4. HEADPHONE OUTPUT 13. Take care when mounting, it may...
User Manual
Page 10
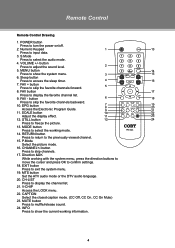
... the previously viewed channel. 15. RETURN button Press to return to select the working mode. 023 14. Numeric Keypad 1 13 Press to select the audio mode. 4. S.Mode Press to input data. 3. button Press to access the sleep timer. 4 16 7. Sleep button Press to adjust the sound level. 2 5. FAV button 17 Press to exit the system menu. 19. EPG button Access the Electronic Program Guide. 11. EXIT button Press to display the favorite channel list. 9. CAPTION Select the closed caption mode. (CC...
... the previously viewed channel. 15. RETURN button Press to return to select the working mode. 023 14. Numeric Keypad 1 13 Press to select the audio mode. 4. S.Mode Press to input data. 3. button Press to access the sleep timer. 4 16 7. Sleep button Press to adjust the sound level. 2 5. FAV button 17 Press to exit the system menu. 19. EPG button Access the Electronic Program Guide. 11. EXIT button Press to display the favorite channel list. 9. CAPTION Select the closed caption mode. (CC...
User Manual
Page 11
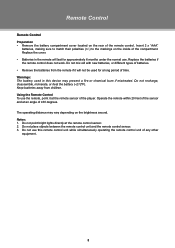
... battery used in the remote will not be used for approximately 6 months under the normal use. Using the Remote Control To use this device may vary depending on the inside of time. Remote Control Remote Control Preparation •• Remove the battery compartment cover located on the rear of any other equipment. 5 Replace the cover. •• Batteries in this remote control unit while simultaneously operating the remote control unit of the remote control.
... battery used in the remote will not be used for approximately 6 months under the normal use. Using the Remote Control To use this device may vary depending on the inside of time. Remote Control Remote Control Preparation •• Remove the battery compartment cover located on the rear of any other equipment. 5 Replace the cover. •• Batteries in this remote control unit while simultaneously operating the remote control unit of the remote control.
User Manual
Page 12
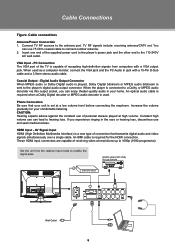
... Digital audio is played, Dolby Digital bitstream or MPEG audio bitstream is connected to the antenna port. TV RF signals include: receiving antenna/CATV net. When used . An optical audio cable is required when a Dolby Digital decoder or MPEG audio decoder is required for your unit is a new type of the supplied power cord to the player's power jack and the other end to hearing loss. Constant high volume use can use of receiving video at high volume. Coaxial Output - Cable Connections...
... Digital audio is played, Dolby Digital bitstream or MPEG audio bitstream is connected to the antenna port. TV RF signals include: receiving antenna/CATV net. When used . An optical audio cable is required when a Dolby Digital decoder or MPEG audio decoder is required for your unit is a new type of the supplied power cord to the player's power jack and the other end to hearing loss. Constant high volume use can use of receiving video at high volume. Coaxial Output - Cable Connections...
User Manual
Page 13
... boxes, DVD players, VCRs, etc.) 111 Connect the VIDEO port with the yellow plug of the supplied AV cable to input the audio signal in the S-video/Component connection. NOTE: 111 Be sure to have all necessary connections properly done before connect the power supply. 222 When input the AV signal, refer to the manual of the AV cable can also be used separately to input the audio signal. NOTE: We supply the AV cable and the power cord with the red & white plug...
... boxes, DVD players, VCRs, etc.) 111 Connect the VIDEO port with the yellow plug of the supplied AV cable to input the audio signal in the S-video/Component connection. NOTE: 111 Be sure to have all necessary connections properly done before connect the power supply. 222 When input the AV signal, refer to the manual of the AV cable can also be used separately to input the audio signal. NOTE: We supply the AV cable and the power cord with the red & white plug...
User Manual
Page 14
... POWER button to turn on the player. 333 Press the MODE button to select the TV signal mode. 444 Press the CH+/- Warm Picture Menu ITEM Picture Mode Contrast Brightness Color Tint Sharpness Color Mode DESCRIPTION Setup the picture mode (Personal, Standard, Dynamic, Soft). TV Setup Menu Various features can press the number buttons to input channels directly. Or you need to scan channels under the Channel Menu. While working with the menu, 111 Press the up menu. Adjust the display contrast Adjust the display brightness Adjust...
... POWER button to turn on the player. 333 Press the MODE button to select the TV signal mode. 444 Press the CH+/- Warm Picture Menu ITEM Picture Mode Contrast Brightness Color Tint Sharpness Color Mode DESCRIPTION Setup the picture mode (Personal, Standard, Dynamic, Soft). TV Setup Menu Various features can press the number buttons to input channels directly. Or you need to scan channels under the Channel Menu. While working with the menu, 111 Press the up menu. Adjust the display contrast Adjust the display brightness Adjust...
User Manual
Page 15
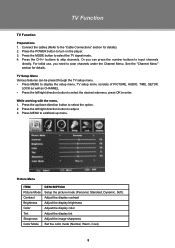
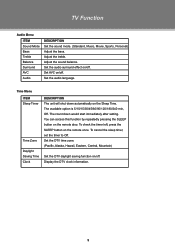
... check the timer left, press the SLEEP button on the remote also. TV Function Audio Menu ITEM Sound Mode Bass Treble Balance Surround AVC Audio DESCRIPTION Set the sound mode. (Standard, Music, Movie, Sports, Personal). Adjust the bass. The count down automatically on /off . You can access this function by repeatedly pressing the SLEEP button on the remote once. Adjust the treble. To cancel the sleep timer, set the timer to Off...
... check the timer left, press the SLEEP button on the remote also. TV Function Audio Menu ITEM Sound Mode Bass Treble Balance Surround AVC Audio DESCRIPTION Set the sound mode. (Standard, Music, Movie, Sports, Personal). Adjust the bass. The count down automatically on /off . You can access this function by repeatedly pressing the SLEEP button on the remote once. Adjust the treble. To cancel the sleep timer, set the timer to Off...
User Manual
Page 16
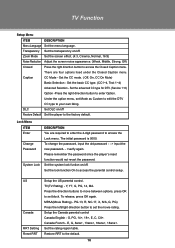
... factory default. Set the rating region table. Zoom Mode Set the screen effect. (4:3, Cinema, Normal, 16:9) Noise Reduction Adjust the screen noise appearance. (Weak, Middle, Strong, Off) Closed Press the right direction button to access the parental control setup. Set the CC mode. ( Off, On, CC On Mute) Basic Selection - Set the advanced CC type for DTV. (Service 1~6) Option -Press the right direction button to the default. 10 To change the password, input the old password - - > input...
... factory default. Set the rating region table. Zoom Mode Set the screen effect. (4:3, Cinema, Normal, 16:9) Noise Reduction Adjust the screen noise appearance. (Weak, Middle, Strong, Off) Closed Press the right direction button to access the parental control setup. Set the CC mode. ( Off, On, CC On Mute) Basic Selection - Set the advanced CC type for DTV. (Service 1~6) Option -Press the right direction button to the default. 10 To change the password, input the old password - - > input...
User Manual
Page 17
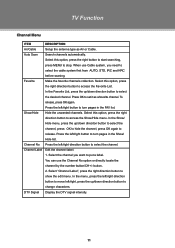
... button to select the channel, press OK to hide the channel, press OK again to show the edit menu. You can use Cable system, you want to turn pages in the FAV list. TV Function Channel Menu ITEM DESCRIPTION Air/Cable Setup the antenna type as a favorite channel. Auto Scan Search channels automatically. When use the Channel No option or directly locate the channel by the number button/CH+/- Show/Hide Hide the unwanted channels. Channel...
... button to select the channel, press OK to hide the channel, press OK again to show the edit menu. You can use Cable system, you want to turn pages in the FAV list. TV Function Channel Menu ITEM DESCRIPTION Air/Cable Setup the antenna type as a favorite channel. Auto Scan Search channels automatically. When use the Channel No option or directly locate the channel by the number button/CH+/- Show/Hide Hide the unwanted channels. Channel...
User Manual
Page 18
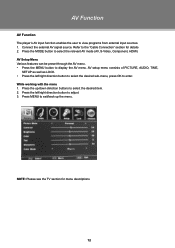
... user to display the AV menu. Warm NOTE: Please see the TV section for details 222 Press the MODE button to select the relevant AV mode (AV, S-Video, Component, HDMI) AV Setup Menu Various features can be preset through the AV menu. •• Press the MENU button to view programs from external input sources. 111 Connect the external AV signal source. While working with the menu 111 Press the up the menu. AV setup menu consists of PICTURE, AUDIO, TIME, SETUP...
... user to display the AV menu. Warm NOTE: Please see the TV section for details 222 Press the MODE button to select the relevant AV mode (AV, S-Video, Component, HDMI) AV Setup Menu Various features can be preset through the AV menu. •• Press the MENU button to view programs from external input sources. 111 Connect the external AV signal source. While working with the menu 111 Press the up the menu. AV setup menu consists of PICTURE, AUDIO, TIME, SETUP...
User Manual
Page 19
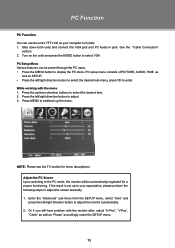
... the MENU button to display the PC menu. NOTE: Please see the TV section for a proper functioning. See the "Cable Connection" section. 222 Turn on the units and press the MODE button to enter. PC setup menu consists of PICTURE, AUDIO, TIME as well as SETUP. •• Press the left /right direction button to adjust the monitor automatically. 222 Or if you still have problem with the menu 111...
... the MENU button to display the PC menu. NOTE: Please see the TV section for a proper functioning. See the "Cable Connection" section. 222 Turn on the units and press the MODE button to enter. PC setup menu consists of PICTURE, AUDIO, TIME as well as SETUP. •• Press the left /right direction button to adjust the monitor automatically. 222 Or if you still have problem with the menu 111...
User Manual
Page 20
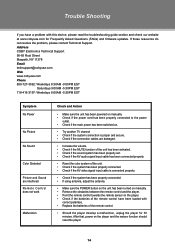
... AV video signal input cable is connected properly. •• Check if the system has been properly connected. •• If using antenna, adjust the antenna. •• Make sure the POWER button on the unit has been turned on manually. •• Remove the obstacles between the remote control and the player. •• Point the remote control towards the remote sensor on the player and the restore function should reset the player. 14...
... AV video signal input cable is connected properly. •• Check if the system has been properly connected. •• If using antenna, adjust the antenna. •• Make sure the POWER button on the unit has been turned on manually. •• Remove the obstacles between the remote control and the player. •• Point the remote control towards the remote sensor on the player and the restore function should reset the player. 14...
User Manual
Page 21
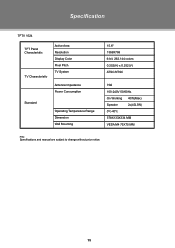
Specification TFTV 1524 TFT Panel Characteristic TV Charactoristic Active Area Resolution Display Color Pixel Pitch TV System Antenna Impedance Power Consumption Standard Operating Temperature Range Dimension Wall Mounting 15.6" 1366X768 6-bit, 262.144 colors 0.252(H) x 0.252(V) ATSC/NTSC 75Ω 100-240V 50/60Hz On Working 40W(Max) Speaker 2x(4Ω,3W) 0ºc-40ºc 378X133X334 MM VESA M4 75X75 MM P/N: Specifications and manual are subject to change without prior notice. 15
Specification TFTV 1524 TFT Panel Characteristic TV Charactoristic Active Area Resolution Display Color Pixel Pitch TV System Antenna Impedance Power Consumption Standard Operating Temperature Range Dimension Wall Mounting 15.6" 1366X768 6-bit, 262.144 colors 0.252(H) x 0.252(V) ATSC/NTSC 75Ω 100-240V 50/60Hz On Working 40W(Max) Speaker 2x(4Ω,3W) 0ºc-40ºc 378X133X334 MM VESA M4 75X75 MM P/N: Specifications and manual are subject to change without prior notice. 15


