Instruction Manual
Page 1
... voltage" within an equilateral triangle, is intended to alert the user to the presence of time, disconnect the power and remove the batteries form the remote. POWER SUPPLY: Connect one end of electric shock, do not perform any servicing other end to the DC12V jack on the unit side panel and...
... voltage" within an equilateral triangle, is intended to alert the user to the presence of time, disconnect the power and remove the batteries form the remote. POWER SUPPLY: Connect one end of electric shock, do not perform any servicing other end to the DC12V jack on the unit side panel and...
Instruction Manual
Page 2
... service personnel. Do not defeat the safety purpose of Contents Table Of Contents Important Safety Instruction Unpacking 1 Unit View 2 Remote Control 3-4 Cable Connections 5 TV Function 6-9 AV Function 10 PC Function 11 Troubleshooting 12 Specifications 13 A polarized plug has two blades with the apparatus. Table of the polarized or grounding-type plug. Heed all...
... service personnel. Do not defeat the safety purpose of Contents Table Of Contents Important Safety Instruction Unpacking 1 Unit View 2 Remote Control 3-4 Cable Connections 5 TV Function 6-9 AV Function 10 PC Function 11 Troubleshooting 12 Specifications 13 A polarized plug has two blades with the apparatus. Table of the polarized or grounding-type plug. Heed all...
Instruction Manual
Page 4
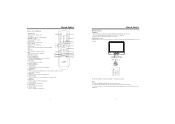
...select the TV audio mode. 13 P-MODE 17 9. Numeric key pad Press to muffle/release sound. 20. MUTE button Press to input data. 13. Using Remote control Point the remote to set on the cover. button 12 Press to change the sound mode. 3 Remote Control Remote Control Preparation... button Press to show the Electronic Program Guide. 16. RETURN Press to exit the menu setup. 12. Under normal use this remote control unit while simultaneously operating the remote control unit of the front unit. 7 s MODE RETURN The operating distance may vary depending on Mute...
...select the TV audio mode. 13 P-MODE 17 9. Numeric key pad Press to muffle/release sound. 20. MUTE button Press to input data. 13. Using Remote control Point the remote to set on the cover. button 12 Press to change the sound mode. 3 Remote Control Remote Control Preparation... button Press to show the Electronic Program Guide. 16. RETURN Press to exit the menu setup. 12. Under normal use this remote control unit while simultaneously operating the remote control unit of the front unit. 7 s MODE RETURN The operating distance may vary depending on Mute...
Instruction Manual
Page 5
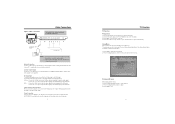
.... buttons to skip channels or press numeric buttons to output sound. Audio Output Connect the " Line Out" port to the external speaker or the digital decoding amplifier to input channel directly. AV Signal Input To input the AV signal, you can be used as well. Connect the antenna to the... antenna jack on the remote to enter the menu. Press MODE on the unit side panel. 2. Line out cable is not supplied. TV RF signals include: receiving antenna/CATV net. They are Picture Menu, Audio Menu, Time Menu, ...
.... buttons to skip channels or press numeric buttons to output sound. Audio Output Connect the " Line Out" port to the external speaker or the digital decoding amplifier to input channel directly. AV Signal Input To input the AV signal, you can be used as well. Connect the antenna to the... antenna jack on the remote to enter the menu. Press MODE on the unit side panel. 2. Line out cable is not supplied. TV RF signals include: receiving antenna/CATV net. They are Picture Menu, Audio Menu, Time Menu, ...
Instruction Manual
Page 8
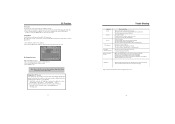
...if the connection cables are subject to change without prior notice. 12 Make sure the POWER button on the unit has been turned...unit to exit. Setup Menu Various features can use the unit's TFT LCD as your expectation, please perform the following steps to adjust 3. Press ... Press the left /right direciton button to select the menu, press OK to the TV section for 30 minutes. If the result is in the standby mode, press POWER ... function of four menus. Check if the batteries of the remote control have problem with the monitor after, adjust "H-Position", V-Position", "Clock " as well...
...if the connection cables are subject to change without prior notice. 12 Make sure the POWER button on the unit has been turned...unit to exit. Setup Menu Various features can use the unit's TFT LCD as your expectation, please perform the following steps to adjust 3. Press ... Press the left /right direciton button to select the menu, press OK to the TV section for 30 minutes. If the result is in the standby mode, press POWER ... function of four menus. Check if the batteries of the remote control have problem with the monitor after, adjust "H-Position", V-Position", "Clock " as well...


