User Manual
Page 1
TFDVD7052 7″ Widescreen TFT Portable Tablet DVD/CD/MP3 Player Instruction Manual Please read this manual carefully before operation.
TFDVD7052 7″ Widescreen TFT Portable Tablet DVD/CD/MP3 Player Instruction Manual Please read this manual carefully before operation.
User Manual
Page 2
.... CAUTION: This Digital Video Disc player employs a laser system. When open and the interlocks are designed to wide slot of outlet and fully insert. Reverse engineering or disassembly is intended to alert the user to the presence of important operation and servicing instructions in the literature accompanying the appliance. Increase the separation between the equipment and receiver.- TFDVD7052 The lightning flash...
.... CAUTION: This Digital Video Disc player employs a laser system. When open and the interlocks are designed to wide slot of outlet and fully insert. Reverse engineering or disassembly is intended to alert the user to the presence of important operation and servicing instructions in the literature accompanying the appliance. Increase the separation between the equipment and receiver.- TFDVD7052 The lightning flash...

User Manual
Page 4
... directions to . 4. Any mounting of the plug. Quick stops, excessive force, and uneven surfaces may be walked on a bed, sofa, rug, or other attach- If you are not likely to be equipped with the product. See the operating instructions for cleaning. 6. ments may be sure the service technician has used a replacement plug that they exit from the type...
... directions to . 4. Any mounting of the plug. Quick stops, excessive force, and uneven surfaces may be walked on a bed, sofa, rug, or other attach- If you are not likely to be equipped with the product. See the operating instructions for cleaning. 6. ments may be sure the service technician has used a replacement plug that they exit from the type...
User Manual
Page 5
... extensive work by following conditions: a) when the power-supply or plug is connected to the product, be located in wire to an antenna-discharge unit, size of grounding conductors, location of time. Overloading: Do not overload wall outlets, extension cords, or integral convenience receptacles as opening or removing covers may result in a fire or electric shock. Servicing: Do...
... extensive work by following conditions: a) when the power-supply or plug is connected to the product, be located in wire to an antenna-discharge unit, size of grounding conductors, location of time. Overloading: Do not overload wall outlets, extension cords, or integral convenience receptacles as opening or removing covers may result in a fire or electric shock. Servicing: Do...
User Manual
Page 7
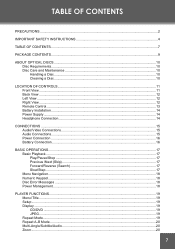
... Right View...12 Remote Control...13 Battery Installation...14 Power Supply...14 Headphone Connection...14 CONNECTIONS...15 Audio/Video Connections...15 Audio Connections...15 Power Connection...16 Battery Connection...16 BASIC OPERATIONS...17 Basic Playback...17 Play/Pause/Stop...17 Previous /Next (Skip)...17 Forward/Reverse (Search 17 Slow/Step...17 Menu Navigation...18 Numeric Keypad...18 Disc Error Messages...18 Power Management...18 PLAYER FUNCTIONS...19 Menu/Title...19 Setup...19 Display...19 CD/DVD...19 JPEG...19 Repeat Mode...19 Repeat A-B Mode...20 Multi-Angle/Subtitle/Audio...
... Right View...12 Remote Control...13 Battery Installation...14 Power Supply...14 Headphone Connection...14 CONNECTIONS...15 Audio/Video Connections...15 Audio Connections...15 Power Connection...16 Battery Connection...16 BASIC OPERATIONS...17 Basic Playback...17 Play/Pause/Stop...17 Previous /Next (Skip)...17 Forward/Reverse (Search 17 Slow/Step...17 Menu Navigation...18 Numeric Keypad...18 Disc Error Messages...18 Power Management...18 PLAYER FUNCTIONS...19 Menu/Title...19 Setup...19 Display...19 CD/DVD...19 JPEG...19 Repeat Mode...19 Repeat A-B Mode...20 Multi-Angle/Subtitle/Audio...
User Manual
Page 8
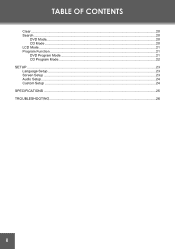
TABLE OF CONTENTS Clear...20 Search...20 DVD Mode...20 CD Mode...20 LCD Mode...21 Program Function...21 DVD Program Mode...21 CD Program Mode...22 SETUP...23 Language Setup...23 Screen Setup...23 Audio Setup...24 Custom Setup...24 SPECIFICATIONS...25 TROUBLESHOOTING...26 8
TABLE OF CONTENTS Clear...20 Search...20 DVD Mode...20 CD Mode...20 LCD Mode...21 Program Function...21 DVD Program Mode...21 CD Program Mode...22 SETUP...23 Language Setup...23 Screen Setup...23 Audio Setup...24 Custom Setup...24 SPECIFICATIONS...25 TROUBLESHOOTING...26 8
User Manual
Page 10
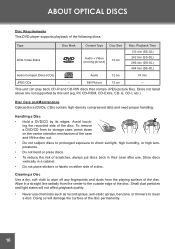
... its edges. Doing so will not affect playback quality. • Never use . ABOUT OPTICAL DISCS Disc Requirements This DVD player supports playback of the disc. Still Picture 12 cm -- To remove a DVD/CD from the playing surface of the disc. Type DVD-Video Discs Disc Mark Content Type Disc Size Audio + Video (moving picture) 12 cm Max. This unit can play back CD-R and CD-RW discs that contain JPEG picture files. Wipe in a cabinet. • Do not...
... its edges. Doing so will not affect playback quality. • Never use . ABOUT OPTICAL DISCS Disc Requirements This DVD player supports playback of the disc. Still Picture 12 cm -- To remove a DVD/CD from the playing surface of the disc. Type DVD-Video Discs Disc Mark Content Type Disc Size Audio + Video (moving picture) 12 cm Max. This unit can play back CD-R and CD-RW discs that contain JPEG picture files. Wipe in a cabinet. • Do not...

User Manual
Page 11
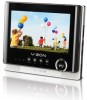
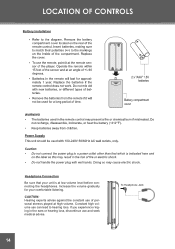
Place a disc with the label side facing up in the CD compartment. 2. To play next / previous track, press the NEXT/PREV button. 5. To start playback, press the PLAY/PAUSE button. (Some discs will start playback automatically). 3. To fast forward/reverse, repeatedly press and hold the NEXT/PREV button. 11 To stop playback, press the STOP button. 4. LOCATION OF CONTROLS Front View Power on Indicator Charging Indicator Previous / Fast Reverse For your reference: 1.
Place a disc with the label side facing up in the CD compartment. 2. To play next / previous track, press the NEXT/PREV button. 5. To start playback, press the PLAY/PAUSE button. (Some discs will start playback automatically). 3. To fast forward/reverse, repeatedly press and hold the NEXT/PREV button. 11 To stop playback, press the STOP button. 4. LOCATION OF CONTROLS Front View Power on Indicator Charging Indicator Previous / Fast Reverse For your reference: 1.
User Manual
Page 12
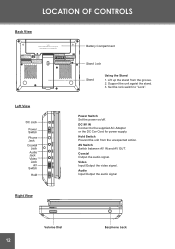
Hold Switch Prevent the unit from the groove. 2. Support the unit agaist the stand. 3. Power Switch Set the power on/off. Lift up the stand from the unexpected action. DC 9V IN Connect to "Lock". LOCATION OF CONTROLS Back View Battery Compartment Left View Right View Using the Stand 1. Coaxial Output the audio signal. Audio Input/Output the audio signal Volume Dial 12 Earphone Jack Set the lock switch to the supplied AC Adapter or the DC Car Cord for power supply. Video Input/Output the video signal. AV Switch Switch between AV IN and AV OUT.
Hold Switch Prevent the unit from the groove. 2. Support the unit agaist the stand. 3. Power Switch Set the power on/off. Lift up the stand from the unexpected action. DC 9V IN Connect to "Lock". LOCATION OF CONTROLS Back View Battery Compartment Left View Right View Using the Stand 1. Coaxial Output the audio signal. Audio Input/Output the audio signal Volume Dial 12 Earphone Jack Set the lock switch to the supplied AC Adapter or the DC Car Cord for power supply. Video Input/Output the video signal. AV Switch Switch between AV IN and AV OUT.

User Manual
Page 13
LOCATION OF CONTROLS Remote Control Title Power LCD Mode Menu Enter Direction buttons Mute Mute Numeric buttons Clear Repeat A-B Repeat Audio Subtitle Clear Step PBC Dispaly LCD Mode Setup Play/Pause Stop Zoom Prev./Nex/Skip Fast Forward/Reverse Step Slow PBC Program Angle 13
LOCATION OF CONTROLS Remote Control Title Power LCD Mode Menu Enter Direction buttons Mute Mute Numeric buttons Clear Repeat A-B Repeat Audio Subtitle Clear Step PBC Dispaly LCD Mode Setup Play/Pause Stop Zoom Prev./Nex/Skip Fast Forward/Reverse Step Slow PBC Program Angle 13
User Manual
Page 14
Constant high volume use and seek medical advise. To Headphone Jack 14 If you experience ringing in the ears or hearing loss, discontinue use can lead to hearing loss. LOCATION OF CONTROLS Battery Installation Headphone Connection Be sure that your comfortable listening. CAUTION: Hearing experts advise against the constant use of personal stereos played at low volume level before connecting the headphones. Increase the volume gradually for your unit is at high volume.
Constant high volume use and seek medical advise. To Headphone Jack 14 If you experience ringing in the ears or hearing loss, discontinue use can lead to hearing loss. LOCATION OF CONTROLS Battery Installation Headphone Connection Be sure that your comfortable listening. CAUTION: Hearing experts advise against the constant use of personal stereos played at low volume level before connecting the headphones. Increase the volume gradually for your unit is at high volume.
User Manual
Page 15
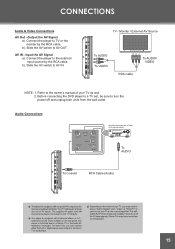
... AUDIO To VIDEO To AUDIO/ VIDEO RCA cable NOTE: 1. Connect the player to AV IN. Slide the AV switch to the owner's manual of your TV as well. 2. Refer to AV OUT. Input the AV Signal a). b). Audio Connections Amplifier equipped with a Dolby Pro Logic Surround To AUDIO To Coaxial RCA Cable (Audio) 15 CONNECTIONS Audio & Video Connections AV Out - Connect the player to turn the power off and unplug both units from the wall outlet. Before connecting the DVD player...
... AUDIO To VIDEO To AUDIO/ VIDEO RCA cable NOTE: 1. Connect the player to AV IN. Slide the AV switch to the owner's manual of your TV as well. 2. Refer to AV OUT. Input the AV Signal a). b). Audio Connections Amplifier equipped with a Dolby Pro Logic Surround To AUDIO To Coaxial RCA Cable (Audio) 15 CONNECTIONS Audio & Video Connections AV Out - Connect the player to turn the power off and unplug both units from the wall outlet. Before connecting the DVD player...
User Manual
Page 16
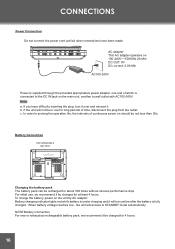
... not be in use , we recommend it be charged for about 300 times without obvious performance drop. Battery charging indicator lights red while battery is supplied through the provided appropriative power adapter, one end of time, disconnect the plug from the outlet. CONNECTIONS Power Connection Do not connect the power cord until all other connections have difficulty inserting the plug, turn yellow after the battery is connected to the DC...
... not be in use , we recommend it be charged for about 300 times without obvious performance drop. Battery charging indicator lights red while battery is supplied through the provided appropriative power adapter, one end of time, disconnect the plug from the outlet. CONNECTIONS Power Connection Do not connect the power cord until all other connections have difficulty inserting the plug, turn yellow after the battery is connected to the DC...
User Manual
Page 17
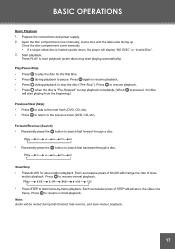
If a single-sided disc is loaded upside-down, the player will display "NO DISC" or "Invalid Disc". Close the disc compartment cover manually. Slow/Step 17 BASIC OPERATIONS Open the disc compartment cover manually, load a disc with the label-side facing up.
If a single-sided disc is loaded upside-down, the player will display "NO DISC" or "Invalid Disc". Close the disc compartment cover manually. Slow/Step 17 BASIC OPERATIONS Open the disc compartment cover manually, load a disc with the label-side facing up.
User Manual
Page 21
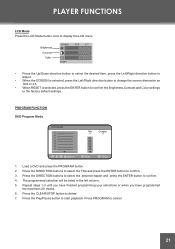
... factory default settings. Load a DVD and press the PROGRAM button. 2. PLAYER FUNCTIONS Press the LCD Mode button once to display the LCD menu. • Press the Up/Down direction button to select the desired item, press the Left/Right direction button to adjust. • When the SCREEN is selected, press the Left/Right direction button to change the screen dimension as 16:9 or 4:3. • When RESET is selected, press the ENTER button to confirm the Brightness,Contrast and Color settings...
... factory default settings. Load a DVD and press the PROGRAM button. 2. PLAYER FUNCTIONS Press the LCD Mode button once to display the LCD menu. • Press the Up/Down direction button to select the desired item, press the Left/Right direction button to adjust. • When the SCREEN is selected, press the Left/Right direction button to change the screen dimension as 16:9 or 4:3. • When RESET is selected, press the ENTER button to confirm the Brightness,Contrast and Color settings...
User Manual
Page 22
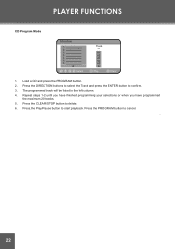
PLAYER FUNCTIONS CD Program Mode Track 1. Press the DIRECTION buttons to select the Track and press the ENTER button to start playback. Press the Play/Pause button to confirm. 3. Press the PROGRAM button to delete. 6. Repeat steps 1-2 until you have finished programming your selections or when you have programmed the maximum 20 tracks. 5. Press the CLEAR/STOP button to cancel. 22 The programmed track will be listed in the left column. 4. Load a CD and press the PROGRAM button. 2.
PLAYER FUNCTIONS CD Program Mode Track 1. Press the DIRECTION buttons to select the Track and press the ENTER button to start playback. Press the Play/Pause button to confirm. 3. Press the PROGRAM button to delete. 6. Repeat steps 1-2 until you have finished programming your selections or when you have programmed the maximum 20 tracks. 5. Press the CLEAR/STOP button to cancel. 22 The programmed track will be listed in the left column. 4. Load a CD and press the PROGRAM button. 2.
User Manual
Page 23
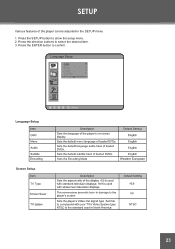
Press the SETUP button to confirm. Press the ENTER button to show the setup menu. 2. Language Setup ACB OSDA CB Menu Audio Subtitle Language Setup Encoding Screen Setup Sets the Encoding Mode Western European 23 Press the direction buttons to select the desired item. 3. SETUP Various features of the player can be adjusted in the SETUP menu 1.
Press the SETUP button to confirm. Press the ENTER button to show the setup menu. 2. Language Setup ACB OSDA CB Menu Audio Subtitle Language Setup Encoding Screen Setup Sets the Encoding Mode Western European 23 Press the direction buttons to select the desired item. 3. SETUP Various features of the player can be adjusted in the SETUP menu 1.
User Manual
Page 24
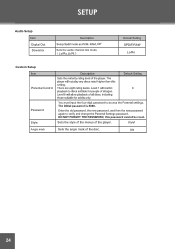
Sets the angle mark of the player. SETUP Digital Out Off SPDIF/RAW Downmix Lo/Ro,Lt/Rt Lo/Ro Custom Setup Parental Control Password Style Angle mark Sets the style of the menus of the disc. Style1 ON 24
Sets the angle mark of the player. SETUP Digital Out Off SPDIF/RAW Downmix Lo/Ro,Lt/Rt Lo/Ro Custom Setup Parental Control Password Style Angle mark Sets the style of the menus of the disc. Style1 ON 24

User Manual
Page 26
...-screen. • Change the aspect ratio setting of your TV's color system. • Ensure that the disc is not damaged or too dirty. • Clean the disc or try again. There is securely connected to the player and the proper wall outlet. cobyusa.com for 1-2 hours and then try another one. • Reset your player from the Setup menu. • Select a different aspect ratio option from the DVD disc menu...
...-screen. • Change the aspect ratio setting of your TV's color system. • Ensure that the disc is not damaged or too dirty. • Clean the disc or try again. There is securely connected to the player and the proper wall outlet. cobyusa.com for 1-2 hours and then try another one. • Reset your player from the Setup menu. • Select a different aspect ratio option from the DVD disc menu...

User Manual
Page 27
... a different Audio track of the DVD by pressing AUDIO. • Ensure that the batteries in and power on the player -- The player has malfunctioned. • Unplug the player. the restore function should reset the player. 27 After 30 minutes, plug in the remote retain a charge and have been installed correctly. • Try replacing the remote's batteries. TROUBLESHOOTING • Ensure that the TV and amplifier connections are no...
... a different Audio track of the DVD by pressing AUDIO. • Ensure that the batteries in and power on the player -- The player has malfunctioned. • Unplug the player. the restore function should reset the player. 27 After 30 minutes, plug in the remote retain a charge and have been installed correctly. • Try replacing the remote's batteries. TROUBLESHOOTING • Ensure that the TV and amplifier connections are no...


