
User Manual
Page 2
...receiving antenna. •• Increase the separation between the equipment and receiver. •• Connect the equipment into an outlet on again. In this circumstance, please follow the procedures below for Class B digital devices, pursuant to comply with the instructions, may be required to rain or moisture. Operation... to radio or television reception, which the receiver is connected. •• Consult the dealer or an experienced radio/TV technician for help Use of shielded cable is present inside the enclosure. If such changes or modifications should be...
...receiving antenna. •• Increase the separation between the equipment and receiver. •• Connect the equipment into an outlet on again. In this circumstance, please follow the procedures below for Class B digital devices, pursuant to comply with the instructions, may be required to rain or moisture. Operation... to radio or television reception, which the receiver is connected. •• Consult the dealer or an experienced radio/TV technician for help Use of shielded cable is present inside the enclosure. If such changes or modifications should be...
User Manual
Page 3
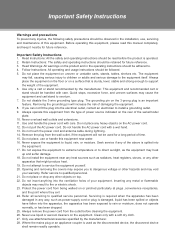
... the equipment and cart/stand to support the weight of the serial/model plate. 1111 Never overload wall outlets and extensions. 1111 Use and handle the power cord with a soft dry cloth. 2222 Only use liquid or aerosol cleaners on the 3-prong plug is sturdy, level, stable and strong enough to overturn. 777 Do not disable the 3-wire grounding type plug. The grounding pin...
... the equipment and cart/stand to support the weight of the serial/model plate. 1111 Never overload wall outlets and extensions. 1111 Use and handle the power cord with a soft dry cloth. 2222 Only use liquid or aerosol cleaners on the 3-prong plug is sturdy, level, stable and strong enough to overturn. 777 Do not disable the 3-wire grounding type plug. The grounding pin...
User Manual
Page 4
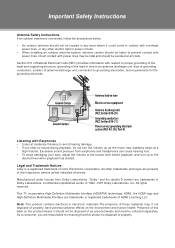
... damage. •• If you are property of antenna discharge unit, connection to the desired level when playback has started. All other electric light or power circuits. •• When installing an outdoor antenna system, extreme caution should be taken to the lowest level before playback, and turn the Volume up to grounding electrodes, and requirements for ensuring...
... damage. •• If you are property of antenna discharge unit, connection to the desired level when playback has started. All other electric light or power circuits. •• When installing an outdoor antenna system, extreme caution should be taken to the lowest level before playback, and turn the Volume up to grounding electrodes, and requirements for ensuring...
User Manual
Page 6
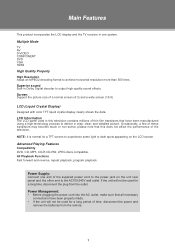
Screen Support the picture size of these transistors may become stuck or non-active; If the unit will not be used for a long time, disconnect the plug from the remote. 1 Superior sound Built-in one end of the supplied power cord to the power jack on the LCD screen. Advanced Playing Features Compatibility DVD, CD, MP3, CD-R,CD-RW, JPEG discs compatible. LCD Information The LCD panel used for a TFT screen to experience some light or...
Screen Support the picture size of these transistors may become stuck or non-active; If the unit will not be used for a long time, disconnect the plug from the remote. 1 Superior sound Built-in one end of the supplied power cord to the power jack on the LCD screen. Advanced Playing Features Compatibility DVD, CD, MP3, CD-R,CD-RW, JPEG discs compatible. LCD Information The LCD panel used for a TFT screen to experience some light or...
User Manual
Page 8
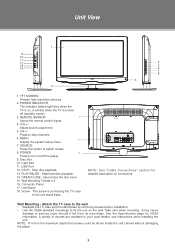
...+/- MENU 10 Display the system setup menu. 7. Card Slot 11. Unit Stand 18. Wall Mounting - Wall Mounting Thread X 4 16. POWER INDICATOR The indicator lights bright blue when the TV is connecting the TV case to turn on connectors. Press to switch modes. 8. USB Port 12. Connector Panel 17. See the Specification page for detailed description on /off (standby mode). 3. VOL+/- SOURCE Press this button to skip channels. 6. Start/hold disc playback. 14. Screw - NOTE: See "Cable Connections...
...+/- MENU 10 Display the system setup menu. 7. Card Slot 11. Unit Stand 18. Wall Mounting - Wall Mounting Thread X 4 16. POWER INDICATOR The indicator lights bright blue when the TV is connecting the TV case to turn on connectors. Press to switch modes. 8. USB Port 12. Connector Panel 17. See the Specification page for detailed description on /off (standby mode). 3. VOL+/- SOURCE Press this button to skip channels. 6. Start/hold disc playback. 14. Screw - NOTE: See "Cable Connections...
User Manual
Page 9
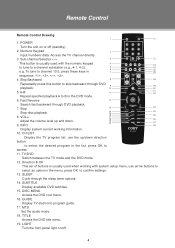
... 9. TITLE Access the DVD title menu. 19. Direction & OK This set of buttons is usually used when working information. 10. SLEEP Cycle through DVD playback. 7. CH/LIST Display the TV program list, use arrow buttons to select an option in the list, press OK to channel 13-2, press these keys in the DVD mode. 6. LIGHT Turn the front panel light on or off . 4 Remote Control Remote Control Drawing 1 21 1. POWER Turn the unit on /off (standby). 2. Access the TV channel directly. 3. To...
... 9. TITLE Access the DVD title menu. 19. Direction & OK This set of buttons is usually used when working information. 10. SLEEP Cycle through DVD playback. 7. CH/LIST Display the TV program list, use arrow buttons to select an option in the list, press OK to channel 13-2, press these keys in the DVD mode. 6. LIGHT Turn the front panel light on or off . 4 Remote Control Remote Control Drawing 1 21 1. POWER Turn the unit on /off (standby). 2. Access the TV channel directly. 3. To...
User Manual
Page 10
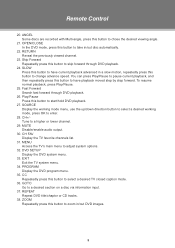
... TV closed caption mode. 36. To resume normal playback, press Play/Pause. 25. Play/Pause Press this button to have playback moved step by step forward. MUTE Disable/enable audio output. 30. CC Repeatedly press this button to skip forward through DVD playback. 26. GOTO Go to a higher or lower channel. 29. CH+/Tune to a desired section on a disc via information input. 37. MENU Access...
... TV closed caption mode. 36. To resume normal playback, press Play/Pause. 25. Play/Pause Press this button to have playback moved step by step forward. MUTE Disable/enable audio output. 30. CC Repeatedly press this button to skip forward through DVD playback. 26. GOTO Go to a higher or lower channel. 29. CH+/Tune to a desired section on a disc via information input. 37. MENU Access...
User Manual
Page 12
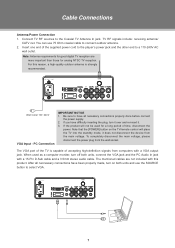
... the supplied power cord to the player's power jack and the other end to connect outdoor antenna. 222 Insert one end of accepting high-definition signals from the wall socket. When used for a long period of time, disconnect the power. Note: Antenna requirements for analog NTSC TV reception. Wall Outlet 100~240V VGA Input - For this product. The mentioned cables are more important than those for good digital...
... the supplied power cord to the player's power jack and the other end to connect outdoor antenna. 222 Insert one end of accepting high-definition signals from the wall socket. When used for a long period of time, disconnect the power. Note: Antenna requirements for analog NTSC TV reception. Wall Outlet 100~240V VGA Input - For this product. The mentioned cables are more important than those for good digital...
User Manual
Page 13
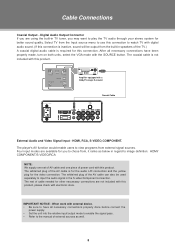
... mode with electronic store. The white/red plug of external sources as below in regard to play the TV audio through your stereo system for other neccessary connections are using the built-in the S-video/Component connection. Cable Connections Coaxial Output - The player's AV function would enable users to input the audio signal in TV tuner, you are not included with this connection to the manual of the AV cable can also be output from the Input source menu...
... mode with electronic store. The white/red plug of external sources as below in regard to play the TV audio through your stereo system for other neccessary connections are using the built-in the S-video/Component connection. Cable Connections Coaxial Output - The player's AV function would enable users to input the audio signal in TV tuner, you are not included with this connection to the manual of the AV cable can also be output from the Input source menu...
User Manual
Page 14
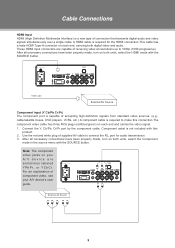
... boxes, DVD players, VCRs, etc.) A component cable is required for audio transmission. 333 After all necessary connections have been properly made , turn on both units, select the Component mode in the source menu with the SOURCE button. External AV Source 9 Component cabel is a new type of connection that transmits digital audio and video signals simultaneously over a single cable. Cable Connections HDMI Input HDMI (High Definition Multimedia Interface) is not included with this connection.The component video cable has three RCA plugs (red/blue/green...
... boxes, DVD players, VCRs, etc.) A component cable is required for audio transmission. 333 After all necessary connections have been properly made , turn on both units, select the Component mode in the source menu with the SOURCE button. External AV Source 9 Component cabel is a new type of connection that transmits digital audio and video signals simultaneously over a single cable. Cable Connections HDMI Input HDMI (High Definition Multimedia Interface) is not included with this connection.The component video cable has three RCA plugs (red/blue/green...

User Manual
Page 15
.../white/red) on both units, select the S-Video mode with the SOURCE button. Cable Connections S-Video Input The S-Video port is required to make this product 222 Connect the L, R port by the S-Video cable to input the video signal. External AV Source RCA Input The CVBS port is capable of accepting signals from standard video sources(e.g., cable/satellite boxes, DVD players, VCRs, etc.) A composite A/V is capable of accepting signals from standard video sources. (e.g., cable/satellite boxes, DVD players, VCRs, etc.) 111 Connect the S-Video port by the white/red plug of the supplied...
.../white/red) on both units, select the S-Video mode with the SOURCE button. Cable Connections S-Video Input The S-Video port is required to make this product 222 Connect the L, R port by the S-Video cable to input the video signal. External AV Source RCA Input The CVBS port is capable of accepting signals from standard video sources(e.g., cable/satellite boxes, DVD players, VCRs, etc.) A composite A/V is capable of accepting signals from standard video sources. (e.g., cable/satellite boxes, DVD players, VCRs, etc.) 111 Connect the S-Video port by the white/red plug of the supplied...
User Manual
Page 16
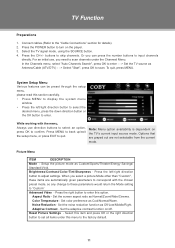
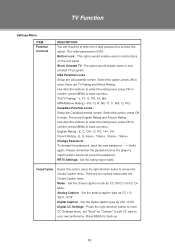
... signal mode, using the SOURCE button. 444 Press the CH+/- In the Channels menu, select "Auto Channels Search", press OK to enter - - > Set the TV source as Antenna/Cable (ATV/DTV) - - > Select "Start", press OK to scan channels under this menu to adjust settings. buttons to enter. System Setup Menu Various features can press the number buttons to quit. Color Temperature - Adaptive Contrast - Set the adaptive contrast function on the TV's current input source mode. Noise Reduction - When you need to scan...
... signal mode, using the SOURCE button. 444 Press the CH+/- In the Channels menu, select "Auto Channels Search", press OK to enter - - > Set the TV source as Antenna/Cable (ATV/DTV) - - > Select "Start", press OK to scan channels under this menu to adjust settings. buttons to enter. System Setup Menu Various features can press the number buttons to quit. Color Temperature - Adaptive Contrast - Set the adaptive contrast function on the TV's current input source mode. Noise Reduction - When you need to scan...
User Manual
Page 17
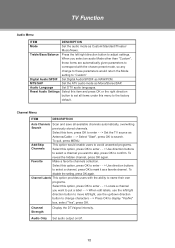
... users to avoid unwanted programs. Ch ann els Select this menu to mark it as Custom/Standard/Theater/ Music/News. Channel Strength Display the DTVsignal intensity. Treble/Bass/Balance Press the left /right, use the left/right direction button to move left /right direction button to confirm. Audio Only Set audio output on/off. 12 MTS/SAP Set the ATV audio mode as RAW/PCM. Reset Audio Settings...
... users to avoid unwanted programs. Ch ann els Select this menu to mark it as Custom/Standard/Theater/ Music/News. Channel Strength Display the DTVsignal intensity. Treble/Bass/Balance Press the left /right, use the left/right direction button to move left /right direction button to confirm. Audio Only Set audio output on/off. 12 MTS/SAP Set the ATV audio mode as RAW/PCM. Reset Audio Settings...
User Manual
Page 18
... player's reset function would enable users to your own preference. Closed Caption Select this option, press the right direction button to back up menu. Analog Caption - Digital CC Settings - Button Lock - Select this option, press OK to enter, there are required to enter the 4-digit password to access this option, press OK to back up . 13 PG-13, R, NC-17, X, N/A, G, PG) Canadian Parental Locks Setup the Canada parental control. Change Password To change the password, input...
... player's reset function would enable users to your own preference. Closed Caption Select this option, press the right direction button to back up menu. Analog Caption - Digital CC Settings - Button Lock - Select this option, press OK to enter, there are required to enter the 4-digit password to access this option, press OK to back up . 13 PG-13, R, NC-17, X, N/A, G, PG) Canadian Parental Locks Setup the Canada parental control. Change Password To change the password, input...
User Manual
Page 19
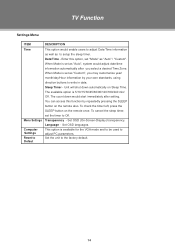
... would adjust date/time information automatically after setting. This option is 5/10/15/30/45/60/90/120/180/240 min/ Off. To cancel the sleep timer, set "Mode" as to setup the sleep timer. Transparency - Set OSD languages. Set the unit to the factory default. 14 TV Function Settings Menu ITEM DESCRIPTION Time Menu Settings Computer Se ttin gs Reset to Defaut This option would enable users to adjust Date/Time information...
... would adjust date/time information automatically after setting. This option is 5/10/15/30/45/60/90/120/180/240 min/ Off. To cancel the sleep timer, set "Mode" as to setup the sleep timer. Transparency - Set OSD languages. Set the unit to the factory default. 14 TV Function Settings Menu ITEM DESCRIPTION Time Menu Settings Computer Se ttin gs Reset to Defaut This option would enable users to adjust Date/Time information...
User Manual
Page 20
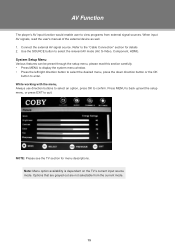
... signal source. Note: Menu option availability is dependent on the TV's current input source mode. Refer to the "Cable Connection" section for menu descriptions. Press MENU to back up/exit the setup menu, or press EXIT to select the relevant AV mode (AV, S-Video, Component, HDMI). NOTE: Please see the TV section for details 222 Use the SOURCE button to quit. AV Function The player's AV input function would enable user to view programs...
... signal source. Note: Menu option availability is dependent on the TV's current input source mode. Refer to the "Cable Connection" section for menu descriptions. Press MENU to back up/exit the setup menu, or press EXIT to select the relevant AV mode (AV, S-Video, Component, HDMI). NOTE: Please see the TV section for details 222 Use the SOURCE button to quit. AV Function The player's AV input function would enable user to view programs...

User Manual
Page 21
... LCD as your expectation, please adjust the moniter manually via the "Computer Settings" menu which is not up /exit the setup menu, or press EXIT to quit. Press MENU to back up to your computer's monitor. 111 Shut down direction button or the OK button to enter. Adjust the PC Screen Upon switching to confirm. See the "Cable Connection" section. 222 Turn on units and use the SOURCE button to...
... LCD as your expectation, please adjust the moniter manually via the "Computer Settings" menu which is not up /exit the setup menu, or press EXIT to quit. Press MENU to back up to your computer's monitor. 111 Shut down direction button or the OK button to enter. Adjust the PC Screen Upon switching to confirm. See the "Cable Connection" section. 222 Turn on units and use the SOURCE button to...
User Manual
Page 23
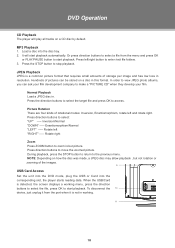
... STOP button to move the zoomed picture. JPEG Playback JPEG is detected, the screen displays a working . 11 18 Rotate right Zoom Press ZOOM button to the previous menu. When the USB/Card is a common picture format that requires small amounts of storage per image and has low loss in resolution. Hundreds of the images. 9 USB/Card Access Set the unit into the DVD mode, plug the USB or...
... STOP button to move the zoomed picture. JPEG Playback JPEG is detected, the screen displays a working . 11 18 Rotate right Zoom Press ZOOM button to the previous menu. When the USB/Card is a common picture format that requires small amounts of storage per image and has low loss in resolution. Hundreds of the images. 9 USB/Card Access Set the unit into the DVD mode, plug the USB or...
User Manual
Page 26
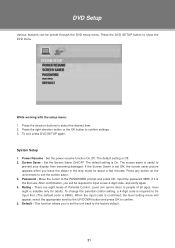
... to input a new 4-digit code, and verify again. 444 Rating - The default setting is the first use. Set the Screen Saver ON/OFF. Level one opens discs to the factory default. 21 If the Screen Saver is set the unit back to people of Parental Control. To change the parental control setting, a 4-digit code is required to prevent your display from becoming damaged. The screen saver is On. While working with the setup menu: 111...
... to input a new 4-digit code, and verify again. 444 Rating - The default setting is the first use. Set the Screen Saver ON/OFF. Level one opens discs to the factory default. 21 If the Screen Saver is set the unit back to people of Parental Control. To change the parental control setting, a 4-digit code is required to prevent your display from becoming damaged. The screen saver is On. While working with the setup menu: 111...
User Manual
Page 28
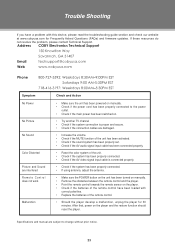
... sound system has been properly set. •• Check if the AV audio signal input cable has been connected properly. •• Reset the color system of the remote control. •• Should the player develop a malfunction, unplug the player for Frequently Asked Questions (FAQs) and firmware updates. Specifications and manual are subject to the power outlet. •• Check if the main power has been switched...
... sound system has been properly set. •• Check if the AV audio signal input cable has been connected properly. •• Reset the color system of the remote control. •• Should the player develop a malfunction, unplug the player for Frequently Asked Questions (FAQs) and firmware updates. Specifications and manual are subject to the power outlet. •• Check if the main power has been switched...


